
Basically there can be 2 types of relay which will be used in an organization for relaying applications.
1) Internal Relay: Which might be an application which submits emails to exchange and in turn it delivers emails to users mailbox as a daily report, faxes etc.,
2) External Relay: An application might send out fax like invoice, quotation etc., to an external vendor for daily operation purpose.In turn the vendor can also send out some automated emails like daily sales report to user’s mailbox.
In order for both the functionality to work we need to have relay configured on the exchange side
The submission of the relay can happen in 2 ways
1) Anonymous
This relay happens through anonymous connection which means any account within that subnet assigned in the relay connector is authorized to submit emails to the organization.
2) Authenticated
This relay happens only through specific authenticated account by which the emails are submitted to the exchange side from the application, fax etc.,
For the authenticated relay to happen first we need to Create/configure a service account for the applications/copier to use
In this article we will be seeing on how to configure relay permission on Exchange 2013
First open EAC and then click on Mail Flow
Select the required server and then click on + Sign

Type the name of the connector and then select Custom

Click next and now we need to assign the correct subnets and the ip address
Note:This is very important point since giving permission to unknown subnets will make the server to behave as an open relay which is ready to accept spam messages. Ensure that you are giving only to the known subnets which requires relay.
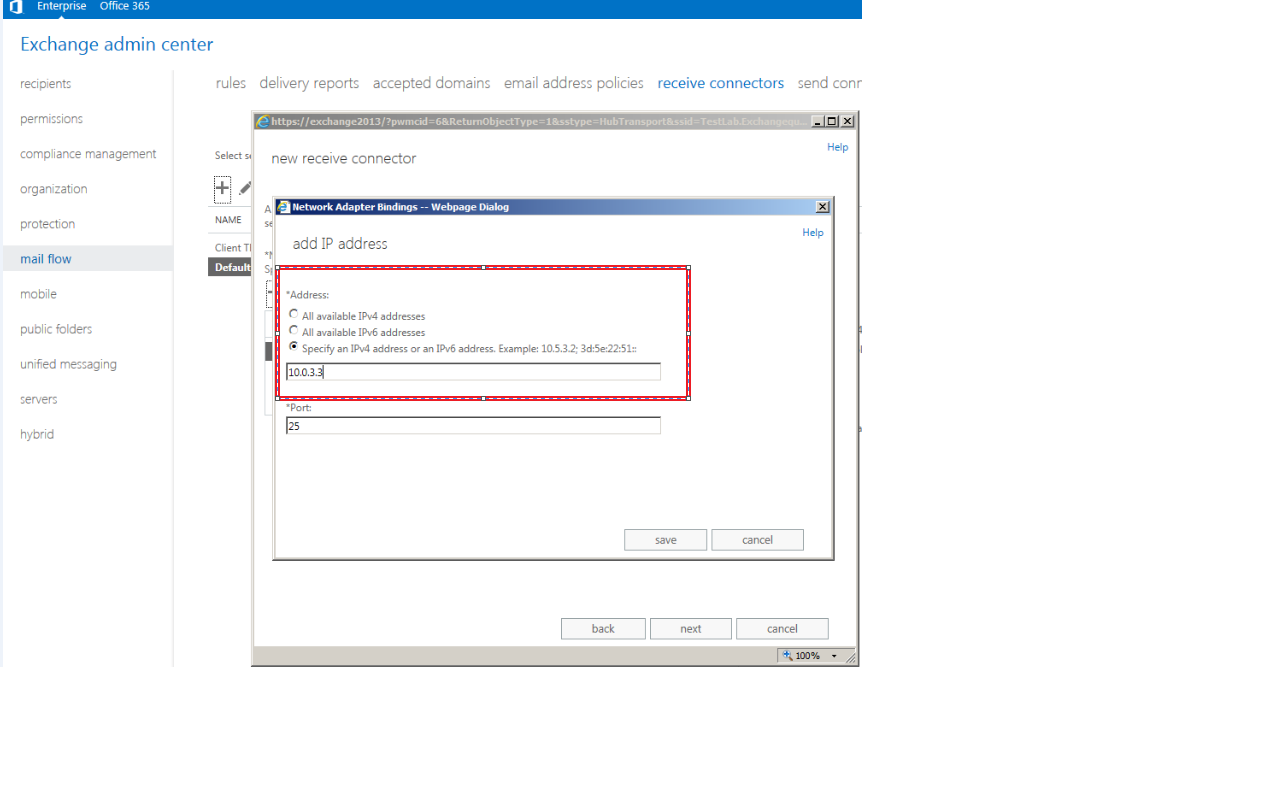
Now add the subnets

Click finish. And now we need to give permission accordingly to the type of relay that we are going to assign to this connector
1) Anonymous
2) Authenticated
First we will look on how to give anonymous permission
Double click or click on edit on the relay connector

Select anonymous users which is under security and click save

Now we need to give required authentication to this anonymous users account for this connector. This can be done in 2 ways
Through Exchange Management Shell
Through ADSI Edit
We will see on how to grant permission through ADSI edit.
Open adsiedit and navigate to below location

Click security and select anonymous logon and click submit messages to any recipient
Note: This permission should be granted only on relay connectors and it should never be granted on default receive connector.

Follow the same steps for authenticated relay except for giving permission to anonymous user account give submit messages to any recipient permission to the associated service account.
Also you can run the below command to grant permission on anonymous account for relay connector alone.
Get-ReceiveConnector “Anonymous Relay” | Add-ADPermission -User “NT AUTHORITY\ANONYMOUS LOGON” -ExtendedRights “Ms-Exch-SMTP-Accept-Any-Recipient”
Sathish Veerapandian


In pre-2013 releases creating this type of relay was about 5 clicks. I’m still astounded by how ‘admin UNfriendly’ the new version has become.
LikeLike
It will be much easier if we get some hands on tricks with powershell 🙂
LikeLike
Hi, i tried this on a 2013 Exchange, in a 2010 / 2013 coexistence environment, but if i Telnet to the 2013 server, and specify a Exchange 2010 account emailadress in mail from, the mail never gets delivered, no errors or anything, is this by design?, it Works if i specify a 2013 account emailaddress.
LikeLike
I think you are facing an altogether different issue with mail flow coexistence with Exchange 2010 and 2013 and it is not related to app relay .
Can you please elaborate the issue little bit so that we can help you out further.
LikeLike
Hi Sathish, thank you for replying.
I’ll try to elaborate.
We have a 2010 Exchange server, and a 2013 Exchange server in coexistence.
I have 2 test accounts, test2010 off course located on the 2010 server and test2013 located on the 2013 server.
I have created a receive connector on the Exchange 2013, with permission to external relay,
and lets say that 10.0.0.10 is the only server that can use this connector.
If i from 10.0.0.10, telnet to the Exchange 2013 server, and specify mail from:test2010@xxx.x where xxx.x is the internal SMTP domain, and in rcpt to specify an external mail address, the mail gets queued, but never delivered.
BUT, if i specify mail from:test2013@xxx.x and in rcpt to, specify an external account, the mail gets queued, and delivered fine.
Is that by design?, that it does not work, trying to telnet to a 2013 server connector with an 2010 address
LikeLike
ARRHHH sorry sorry, i found out, i have forgot the tick the “Legacy Exchange servers” i security on the 2013 external receive connector, that somehow did the trick.
LikeLike
Glad to hear that it got resolved 🙂
LikeLike
Hi, great article!
Does that also apply if an exchange user wants to relay from external?
Exchange User sends emails from external network to the internal exchange – recipients are external mail addresses.
I have modified the connector like you mentioned, but I still get “Unable to relay”!
Only if I configure it for anonymous logon it works! any suggestions?
LikeLike
Hi Mike you should never allow relay from an external IP to your server unless that external IP has registered hostname and SPF record. Also you have to make sure that the subject , attachments of the emails that you are going to send through this type of relay is legitimate according to your region ISP standards
LikeLike
why do you need anonymous also if there is authenticated?
LikeLike
Hi Rino
I wrote this blog to explain how to configure 2 different types of relay and not both of them together. Maybe my heading is not exactly matching the content. Thanks for notifying me and i will change the heading now 🙂
LikeLike
Hi Satish,
I am getting spam mail issue after configured external relay that around 10000 mails are use my external relay to send mail and all are stuck in my queue so suggest if any.
LikeLike
What is the range of subnet and the ip’s you have added on the relay connector ?
Better to remove the relay connector first and see if you are still getting the spam mails and then you can reconfigure the relay connector correctly according to your needs.
LikeLike
Am I missing something here? Why is it that 99% of the time someone instructs to change something in ADSI edit they fail to mention which naming context! I could have had this done by now, but 15 minutes later I’m still trying to find what god-damn section of ADSI edit your in. Your screenshot leaves very little to go on.
LikeLike
It is the same location as per the screenshot
LikeLike