
Sometimes we might run into a situation where we need to perform admin tasks from a client PC where we do not have management tools installed in office location.
In those scenarios we can always connect to the Exchange Management shell and import all the modules from exchange through windows PowerShell.
By using this we can grant access to the help desk team with only view only admin rights or recipient management rights on their PC without having the Exchange management tools installed so that they can view user mailbox settings and perform basic troubleshooting from their power shell.
Prerequisites
The client PC must be a member of the domain Windows 7 or Windows 8 or minimum windows server 2008.
The client PC must have minimum Windows PowerShell 2.0 and no exchange management tools is required
The user for whom we are going to grant this access should be having local admin rights on his PC as well as Admin rights on the Exchange Servers( You can give the user administrative roles , end user roles ,organizational management or recipient management according to your criteria)
Applies for Exchange 2010 and 2013
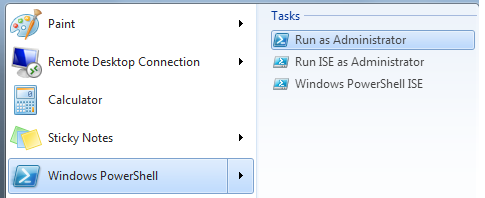
Go to start – Right click on windows power shell and click run as administrator.
Now we need to check if the PowerShell profile is created for the user who has logged into the PC by running $profile in powershell
Though it will display the below default path we need to check if the file actually resides.

Run the below command to check if the file exists in the location.
Test-Path $profile
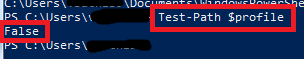
By default the ps1 profile will not be created and that’s the reason it shows as false.
We need to create it by running the below command
New-Item -path $profile –Type File -Force

Now we can see the file is created.
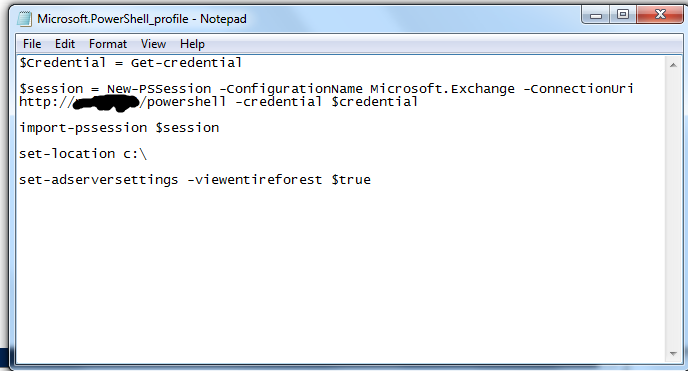
Now open the file through PowerShell
Notepad.exe $profile

Now we need to establish a remote session to connect to Exchange server to import the commands. In order to do those add the following command
The first line of below command will help us to authenticate with the exchange server.
The second line to create a new session with specified exchange server
The third line to import all the pss session from that particular server.
The last fourth and fifth are optional since I have set directory location in this client PC and command to view all value from all the Exchange Servers in entire forest.
Below is the command. Just copy ,paste the value in the powershell file and save .
************************************************************************
$Credential = Get-credential
$session = New-PSSession -ConfigurationName Microsoft.Exchange -ConnectionUri http://casservername/powershell -credential $credential
import-pssession $session
set-location c:\
set-adserversettings -viewentireforest $true
***********************************************************************
Now open the PowerShell with run as admin and will prompt you for credentials.

Once you have authenticated you will see the below screen which says you have successfully connected remotely with Exchange server.

We can create PowerShell ISE profile for this user as well which will be very useful and provide additional informational while typing any commands since the help desk team might not be aware of Exchange commands.
Do the same procedure for creating PowerShell ISE profile
Go to start and run windows PowerShell ISE.

Opens the below window.

Type the same command to create profile for ise and click on Run Script Icon or press F5 button to execute.
New-Item -path $profile –Type File -Force

Now copy ,paste the same command as we did for PowerShell file in the below location.

Now open Windows PowerShell.ISE and it will prompt for credentials and get connected to Exchange modules.
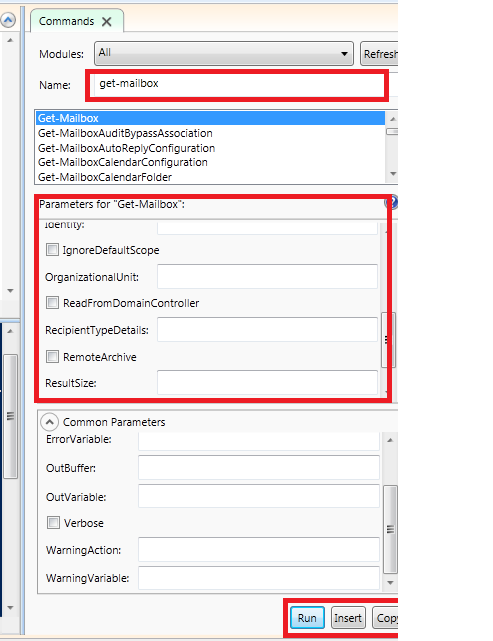
Below is an example of executing from PowerShell ISE which gives us suggestions while executing the commands in the command pane.
We have an option to choose our command and either Run, Insert or Copy the file in the script pane.
Note : The below option is available only from Windows PowerShell 3.0

We are done with connecting to Exchange through Client PC windows power shell.
Cheers
Sathish Veerapandian


Write more, thats all I have to say. Literally, it seems as though you relied on the video to
make your point. You definitely know what youre talking about,
why throw away your intelligence on just posting videos to your blog when you could be giving us something enlightening to read?
LikeLike
Thanks for your inputs . Will surely try to post videos in near future 🙂
LikeLike
Ηello to all, hoѡ is all, I think every one is getting more from this web site, and your views are good designed for
new people.
LikeLike
Thanks and you are welcome 🙂
LikeLike
Hello
Thanks for your site a mine of gold!!
I have installed a dedicated server tools to administrate via Exchange Power Shell.
I have configured nothing but it still connect me to the same server.
Do you know where the information of server is writen?
Thx a lot,
SB
LikeLike