Category Archives: Exchange 2016

Inbox folder renamed to Archive

One of the user reported that the inbox folder was renamed to archive

There is one possibility of when the user has clicked on archive folder by accidentally by highlighted inbox – clicking on archive and then use create archive folder or choose existing folder.


while troubleshooting found this is a known issue and there is an article released from Microsoft

https://support.microsoft.com/en-us/help/2826855/folder-names-are-incorrect-or-displayed-in-an-incorrect-language-in-ou 

As per Microsoft this  can also occur if   a mobile device with different application like MDM  or a third-party server application synchronizes the Exchange Server mailbox.It could have been caused by a malfunctioning add-in.

If the default Inbox folder is changed unexpectedly to Archive we need to directly skip to step 4 and not look into step 1,2&3.

Use the step4  with MFCMapi tool to fix this problem.

Once the step4 is completed we need to run resetfolder as below

outlook.exe /resetfoldernames

After performing the step 4 we can run the below command and make sure the inbox folder in the root folder path is renamed correctly and not present as archive.

Get-MailboxFolderstatistics mbxname | select name,folderpath,foldersize,itemsinfolder

Thanks & Regards 

Sathish Veerapandian

Cross Forest Migration – Delegated Mailbox Automapping is missing for migrated users

We might notice the mailbox auto-mapping will be missing after the cross forest migration is completed.

But while looking into the mailbox permissions (sendas,send on behalf and full access) from the exchange admin center we would be able to see the permission entry. But the users would have lost the mailbox automapping.

If we take one affected delegated user, remove and readd the permission from EAC we can see the  automapping will be fixed in few minutes. So where is the real problem 🙂

So started digging into the ADMT logs and found the below errors which was present in first ADMT migration job.

Untitled

So what is this msexchdelegatelistlink ?

For the Automapping to work for delegated users the  msexchdelegatelistlink needs to be populated for the delegated user with the DN of the shared mailbox.

We can see this attribute for the affected user via Active Directory Users and Computer via attribute editor and it will be empty

WhatsApp Image 2017-07-30 at 16.31.41

If we look for this same user account in the source forest the value will be populated with the DN of the shared mailbox.

Solution:

Export the msexchdelegatelistlink from the source Forest.

To export the msexchdelegatelistlink from the source forest we can use any of the below commands:

Get-ADUser -Filter {(mail -notlike ‘null’)} -Properties * | select name,mail,DistinguishedName,@{n=’DelegatedMailboxes’;e={$_.msExchDelegateListLink}} | export-csv -path c:\export\userDelegation_details.csv –NoTypeInformation –noclobber

Get-ADUser -Properties msExchDelegateListBL,msExchDelegateListLink -LDAPFilter “(msExchDelegateListBL=*)” | Select name,mail,@{n=’Distinguishedname’;e={$_.distinguishedname}},@{n= ‘alternate’;e={$_.msExchDelegateListLink}} | Export-csv userlist.csv –notypeinformation –noclobber

To filter this only for specific OU we can use the below :

Get-ADOrganizationalUnit -Identity ‘OU=AsiaPacific,OU=Sales,OU=UserAccounts,DC=FABRIKAM,DC=COM’ | Get-ADUser -Properties msExchDelegateListBL,msExchDelegateListLink -LDAPFilter “(msExchDelegateListBL=*)” | Select name,mail,@{n=’Distinguishedname’;e={$_.distinguishedname}},@{n= ‘alternate’;e={$_.msExchDelegateListLink}} | Export-csv userlist.csv –notypeinformation –noclobber

Later once after we export the user msexchdelegatelistlink we can import them from CSV to the target affected users with the below command.

import-csv “C:\test\delegate.csv” | % {get-aduser -identity $_.distinguishedname | set-aduser -add @{msExchDelegateListlink=$_.distinguishedname}}

After updating the AD attribute with the DN of the shared mailbox on the target accounts this will force auto mapping during the autodiscover next refresh interval.

Thanks & Regards
Sathish Veerapandian

Cross forest Migration error – The archive GUID on source and target do not match

We might get this error for few mailboxes during cross forest migration and the mailbox migration will not get completed for these mailboxes.

The archive GUIDs on source ‘Sathish Veerapandian’ and target ‘Sathish Veerapandian’ recipients don’t match. Source archive GUID: 00000000-0000-0000-0000-000000000000, target archive GUID:
71e7097b-5dc3-23a-c601-t84576k0ntlf.
+ CategoryInfo          : InvalidArgument: (SATHISH@exchangequery.com:MailboxOrMailUserIdParameter) [New-MoveRequest],
RecipientTaskException
+ FullyQualifiedErrorId : [Server=MSEXCH1,RequestId=c1b6f3aa-6138-420b-8deb-6149f349fc43,TimeStamp=8/2/2017 4:54:
28 PM] [FailureCategory=Cmdlet-RecipientTaskException] 5802C9B0,Microsoft.Exchange.Management.Migration.MailboxRep
lication.MoveRequest.NewMoveRequest
+ PSComputerName        : MSEXCH1.exchangequery.com

Reason:

Initially the mailbox in the source forest had an exchange archive enabled. When the migration started the all the emails have been moved to the primary mailbox and the archive was disabled for the users.

The ADMT was used initially to  migrate the user accounts in bulk for user properties , mail attributes ,prepare move request was run and while running new move request got the above message for few users.

If we see the ADMT logs the users mailbox msexchArchiveguid properties were migrated when the ADMT was run in the bulk job migration initially.

Untitled1

Later since these mailboxes on the source the archive mailbox was  removed , the MRSproxy while initiating the mailbox moves from the source identifies this archive guid value on source to be null and target having a older value which was copied by ADMT and gives the error.

We can verify the mailbox archive GUID from source and target by

Get-Mailbox MBXName | fl *archive*

Solution:

Take  all the mailboxes which was failed with this value, prepare a csv file and rerun the ADMT only for them , prepare move request and then run the New move request

This will successfully migrate these mailboxes.

If we have only less number of users handful of them we can simply go to the target user account and clear the old value msexcharchiveguid from the Attribute editor from Active Directory users and Computers.

Untitled

After this ADMT rerun job is done rerunning the newmoverequest will move all the failed mailboxes.

Thanks & Regards
Sathish Veerapandian

CRM Email Router Configuration in Exchange 2016 environment

This article  scopes on the CRM email router configuration in an on premise CRM and Exchange Environment.

The CRM email router provides us to configure interface between CRM deployment and Exchange server through POP3 for incoming email configuration.

The Microsoft Dynamics CRM 2016 Email Router is an interface between Microsoft Dynamics CRM 2016 and an email system.

By doing this the CRM users will be receiving the emails and sending after this configuration is complete.

Basically this CRM 2016 Email Router requires 2 configurations in an email system (Exchange on premise server in our case):

1) POP3 servers for incoming email – We need to use the Exchange POP3 configuration

Untitled

Untitled1

In our example we are using other specified.

Other specified: By using this option we are configuring the email router in CRM to send emails on behalf of every CRM user through a specific CRM service account that has access to all the CRM users mailboxes which will be the preferred setting. Other advanced settings can be configured in the advanced section.

Untitled3

2) SMTP or Exchange servers (EWS)  for outgoing email:

The outgoing email configurations for CRM is used for users or queues to send Microsoft Dynamics CRM email messages.

For Exchange online we need to use the below configuration.

We can use the same configuration for on premise and use the EWS URL , if the EWS URL is resolving from the CRM email router configuration host.

Untitled4

For SMTP configuration:

In the below case we can use and SMTP server (can be IIS SMTP  or SMTP G/W)and the CRM email router host needs to have connection to the SMTP host. The email router component can be installed on the SMTP server itself and configured.

Untitled5

Exchange Permission for CRM account:

First we need to create a new Application Impersonation role assignment in the RBAC and assign to the CRM service account

In order to do that please run the below command:

New-ManagementRoleAssignment –Name:impersonationAssignmentName – Role:ApplicationImpersonation –User:[ServiceUser]

Run the below command on the CRM users Container:

Get-Mailbox -OrganizationalUnit CRMUsersCOntainerOU | ForEach-Object {Add-ADPermission -Identity $_.DistinguishedName -User User1 -ExtendedRights ms-Exch-EPI-May-Impersonate}

Get-Mailbox -OrganizationalUnit CRMUsersCOntainerOU | ForEach-Object {Add-ADPermission -Identity $_.DistinguishedName -User User1 -ExtendedRights ms-Exch-EPI-Impersonation}

This service user will have a forwarding mailbox in the CRM. All email sent to that address will have  a forwarder and send to the actual recipient.

After the above configuration is completed the CRM can send outgoing emails ,receive incoming emails and process for all users.

Thanks & Regards
Sathish Veerapandian

Save Cisco Jabber Conversation history in Outlook Folder in Exchange On-premise Environment

In this article we will have a look at option to integrate the Cisco Jabber with outlook to save the conversation history in outlook folder.

We can enable the Jabber client to automatically save chat histories in Outlook like same how we have conversation history folder option in Skype for Business.
Here after the integration we can see a folder called Cisco Jabber Chats.

Below are the steps:

1)  Set the EnableSaveChatHistoryToExchange parameter to true in the jabber-config.xml file.

The default value after the installation is set to false in the config file. Having this value to false will not save the conversation history in Outlook.

Steps to update the conversation history in the Jabber-config.xml file:
a) Login to the CUCM TFTP server and access the below URL

http://:6970/jabber-config.xml

After accessing this URL jabber-config.xml  will be downloaded.
b) Update the xml file with EnableSaveChatHistoryToExchange true as below

Jabber3

Once this is completed we need to upload the updated file with the same name on each of the TFTP server present in the Cluster.
Post this operation restart the TFTP service on each TFTP server for the update to reflect immediately.

2) There is option to specify the authentication settings.

Authenticate Using Single Sign On for the Operating System:
When we set this the jabber client will use the account details of the logged in user to authenticate with exchange server.It users NTLM authentication method. This method will be easier.

Update the jabber-config.xml file with ExchangeAuthenticateWithSystemAccount parameter to true.

Jabber5

Authenticate by Syncing Credentials:
We can sync the Exchange credentials with another set of credentials for users which will be the jabber client credentials. With this method, the client will be using the credentials to authenticate to the Exchange server.

Below parameter needs to be updated to sync credentials in Jabber.xml config file

Jabber6
In this example Cisco UCS is defined as the service which provides the Exchange server with credentials for authentication.

If we don’t specify an authentication method, then users can authenticate directly from the Outlook tab in the Options menu of their clients. But this will be manual process where the server name needs to be entered and not automatic server discovery.

3) Specify Server Addresses

After we set the EnableSaveChatHistoryToExchange value to true and decide on the authentication method we need to select an option for the jabber client to reach the exchange server address.
Jabber client uses the Exchange autodiscover for this integration.

So for this configuration to make it happen automatic we can configure the autodiscover domain parameter in the jabber-config.xml file.

Access the jabber-config.xml file same as step 1 through TFTP server, configure the ExchangeAutodiscoverDomain parameter.
Define the Autodiscover domain URL’s.

Jabber2
The Jabber client will use defined autodiscover URL in the config file to search for the Exchange server at one of the following Web addresses:
https:///autodiscover/autodiscover.svc
https://autodiscover.domain.com /autodiscover/autodiscover.svc

This option can be checked in File – Options – Outlook in Cisco Jabber Client
Server settings and user settings can be checked from here.

There is an option to  change the chat history preference from the user side as below

Jabber

The local jabber-config.xml file will be stored in the below location of end users PC
C:\Users\%user-profile name%\AppData\Roaming\Cisco\Unified Communications\Jabber\CSF\Config

Also we can see the server configuration through the client having the cached TFTP file in the below location

userprofile\appdata\roaming\cisco\unifiedcomms\jabber\CSF\config\cache

Jabber1

Once all the above configuration are completed we can see a folder called Cisco Jabber Chats created in the Outlook and the Cisco Jabber Conversation histories.

Thanks & Regards
Sathish Veerapandian

Quick Tip – Monitor Cross Forest Mailbox Moves Transfer rate per second in Exchange native migration

Assume below scenario:

Performing the mailbox move Pull  migration request from the target. The MRS proxy is enabled on the source forest.

The MRS proxy  core component of the move requests is responsible for migration.

After initiating the bulk move pull request from target we can check the below things on Exchange 2016  on the target Mailbox Server

Open Resource Monitor – Select Network – and Select MSExchangeMailboxReplication
If we notice we can see the send B/Sec and ReceiveB/Sec for the MRS service.exe will be increasing

MRS1.png

Monitoring this for a while after initiating bulk moves will give us an average idea of how much transfer rates we are getting on our target Exchange servers.We can also run the below command  for one large move request mailbox to analyze he transfer rate

Get-MoverequestStatistics  -Identity  “currentlymovingmbxname” | fl mrsservername,remotehostname,requestqueue,bytestransferredperminute,starttimestamp,lastupdatetimestamp

After getting the MRS server name we can go to that server and monitor the transfer rate for msexchangemailboxreplication.exe for few minutes.This will gives us an idea of how much transfer bytes per second we are getting for the move requests.

Also we can see the remote connections – To which IP it is connecting to for pulling the mailboxes from the source

We can see them on the TCP connections under network – Remote Address and in the local address we can see our Exchange server

MRS2.png

We can see the remote TCP connections by using the below cmd from command prompt from the target Exchange 2016 Mailbox Server

netstat -ano | findstr remoteCASIP

Note :

It’s very important to note that when we see the remote connections we should see the local IP of the CAS (remotehostname) and not its public routable IP.
If it’s not resolving in local IP better to put source cas servers local IP as host entry in target  Exchange Servers.
This will work because there will be IP communication on port 443 set in place already for the cross forest to work.
If the connections are going through local IP’S then the move requests will be faster.

We can run the below command to see if the MRSServer in the target is distributed among all of them which will speed up the migration process.

Get-Moverequest  | Get-MoverequestStatistics  | fl mrsservername,remotehostname,requestqueue,bytestransferredperminute,starttimestamp,lastupdatetimestamp 

We can get the network utilization report from the firewall which is allocated for this migration. We can get this from the time when the migration was started and time it got completed.

It’s always better to have a dedicated bandwidth for cross forest migration (separate VPN tunnel) temporarily till the migration is completed.

There is one amazing complete move requests status  script provided by Microsoft product team.

https://blogs.technet.microsoft.com/exchange/2014/03/24/mailbox-migration-performance-analysis/

This works well for Cross forest on premise Exchange migration environments also.But make sure the Step 1 is exactly run as below with including the 1 dot with  space before running the script only  then it works.

. .\AnalyzeMoveRequestStats.ps1

Thanks & Regards
Sathish Veerapandian Continue reading

SCOM Error – The Microsoft Exchange Mailbox Replication Service isn’t scanning mailbox database queues for jobs

Recently in one of the Exchange Server was frequently giving this alert on the SCOM alerts.

Ran the below command to check the health of the affected Exchange Server

Get-ServerHealth -Server ServerName

Could see the MailboxMigration HealthSet Unhealthy and the other healthsets were healthy.

The SCOM alert too reported the same DUMP directory:

<b>Dump Directory:</b>
C:\Program Files\Microsoft\Exchange Server\V15\Diagnostics\MigrationResponderDumps
at Microsoft.Exchange.Monitoring.ActiveMonitoring.Migration.Probes.MRSQueueScanProbe.DoWork(CancellationToken cancellationToken)
at System.Threading.Tasks.Task.Execute()
— End of stack trace from previous location where exception was thrown —

Also at the end provided the same information for troubleshooting

Note: Data may be stale. To get current data, run: Get-ServerHealth


As a part of normal troubleshoot restarted the Mailbox replication service and the issue still persists.

Now started looking into the event logs and got the below event


MRS.png


It was trying to process jobs in a recovery database which was created by an admin and forgot to remove them after a restore job.

So dismounted this recovery database and removed them which solved this issue and after that this error never reappeared again.

Thanks & Regards

Sathish Veerapandian

Extend the Symantec Enterprise Vault to DR site for HA

In this article we will have a look at extending the Enterprise Vault to DR site. This configuration will be helpful when the main site is completely down.

Usually below will be the Enterprise vault configuration in most of the cases :
1) Active/Passive Configuration on Primary Site.
2) HA Failover option will be present in primary site.
3) EV will be available 100 percent in primary site.

In most cases 99 percent the enterprise vault will be configured in Microsoft Cluster because of Good  stability of Windows cluster.

Normal Active/Passive setup with HA option in Main site :

EV1.png

Implications without EV DR :

  1. Archived items will not be  available when the main site is not available.
  2. EV items stored in EV storage will be not available.

So in a normal scenario where the main site is operational and available the DR server will not be functioning and will remain as Standby.

A typical DR solution requires primary and secondary sites, and clusters within those sites for the EV to function.

There are 2 options available for EV DR setup :

1)  Go with update service location option with Symantec software. (Requires more manual operation like below)

a) SQL native tools to DR failover.
b) Mount  the volumes of EV stores appropriately.
c) Need to use the EV native  Update service Location (USL).

on top of the above we are not sure that the replicated storage of EV data and SQL  to DR is healthy or not.

2) Go with an EV aware DR application software.(Recommended)

There are few EV aware software’s available in market. They can fully automate the failover and failback between the sites. Its better to go with this option.

Below are the EV aware software’s which is available :

  1. Enterprise Vault with InfoScale Enterprise.
  2. EV Near Sync.

Below is one example  of high level design of EV DR setup:

EV2png.png

Below is the summary:

1) Have EV Seperate Cluster on secondary site.
2) Perform the SQL and EV storage replication to the DR site regularly.
3) Have an EV aware software which performs the automatic failover and failback in case of disaster.Because these software after the intitial configuration does rest of the work such as updating entries in SQL database and activating the DR replicated Vault storage groups.
4) Need to change the DNS alias pointing from production to DR in case of DR activation.

Storage Requirements:

1) The EV storage groups needs to be replicated to the DR site ,can be done through SAN replication and most of the storage vendors are having the SAN replication.
2) Replication needs to be synchronous from the main site to the DR site.
3) Replication needs to be scheduled from the storage everyday for incremental updates.
4) Replication should be performed after the daily archiving schedule, during the vault stores in backup mode.
5) Indexes, databases, and files from the primary NAS to DR should be synced on a daily schedule.

SQL Replication Requirements:

1) Symantec recommends as a best practice to configure SQL Server for disaster recovery before configuring Enterprise Vault for disaster recovery.
2) A SQL server instance must be present on the DR site for SQL replication.
3) SQL server log shipping must be done to replication of DR.
4) SQL server DB replication must be done for replication to DR.
5) SQL data needs to be replicated in daily schedule to the DR site.

EV server requirements:

1) A new site DR to be defined in the EV topology in the vault admin console.
2) 2 new EV nodes with different names to be introduced in this Site.
3) Volume replication needs to be scheduled after storage is ready on the DR.
4) SQL replication needs to be scheduled after the DR instance is setup.
5) Better to have an well known EV aware replicating software like InfoScale or EVNEARSYNC which is having a good presence in the market because these applications provides RTO & RPO in minutes compared to the native EV failover scenario.

Network Requirements:

1) SQL replication needs to be done from the main site to the DR site. Required ports needs to be open.
2) Since SAN replication is already in place better to verify for these Datastores for the replication and required bandwidth for the daily incremental data replication in the current nw bandwidth in the DR site.
3) One standby IP for EV url in the DR site and needs to be pointed to this IP during the DR scenario.

High Level – How DR Works :

1) EV DR servers will be always Turned off in normal scenario.
2) During DR scenario EV DR servers needs to be turned on.
3) Present the replicated healthy storage (indexing & partition) to the DR server (Achieved through EV cmdlets)
4) Present the replicated healthy SQL db to the DR server (Achieved through EV cmdlets)
5) Perform failover by changing production alias to DR Server (Achieved through EV cmdlets)
6) Change DNS alias of Archive URL pointing from production to DR EV server and then run USL (Update service location).

All these above steps can be reduced and performed automatically by an EV aware application like EVNEARSYNC or InfoScale Enterprise.

Note:

1) The storage SAN replication needs to be planned accordingly with the current storage vendor and their recommendations.
2) Need to make sure the Exchange  DR setup is already in place, databases replicated in DR site and should be able to perform Exchange DR activation also to achieve best SLA for Email.

Thanks & Regards
Sathish Veerapandian

Integrate Cisco TelePresence Management Suite Extension for Exchange with Exchange 2016

This article explains on integrating Cisco Telepresence Suite with Exchange Server 2016. Before that lets have a brief on these components.

Cisco Telepresence Management Suite (Core Component of Video Collaboration):

This component in the Cisco IPT infrastructure provides the on-premises video collaboration.By this component we would be able to configure, Deploy, manage ,schedule , analyze and track the telepresence utilization  within an organization.

Cisco TMS helps in the following:

1) Helps Admins in the daily operations, configuration and maintainence of the telepresence network.
2) Helps consumers to use these telepresence network according to their customization.Like telepresence deployment as a service Example : Setting up meeting rooms of multi-monitors, multi-microphones and multi-channel speaker systems which gives stunning real like audio,video experience.
3) Helps in monitoring the Telepresence utilization and analyzing them.

What is Cisco TelePresence Management Suite Extension for Microsoft Exchange ?

Cisco TelePresence Management Suite Extension for Microsoft Exchange (Cisco TMSXE) is an extension for Cisco TelePresence Management Suite that enables videoconference scheduling via Microsoft Outlook, and replicates Cisco TMS conferences to Outlook room calendars.

Cisco TelePresence Management Suite Extension for Microsoft Exchange (Cisco TMSXE) is one of their extension for Cisco TelePresence Management Suite.

How it helps us in Scheduling the Meeting :

1)By having this it enables the option to Video Conferencing Scheduling via Microsoft Outlook.
2)Replicates Cisco TMS conferences settings to Outlook Room Calendars.
3)Makes end users to book Audio/Video conferences based on the Meeting room Availability from Outlook.

Cisco TMSXE Installation:

This Cisco TMSXE server runs on Windows server Cisco TMSXE component will be installed on this server along with booking service option chosen.
It similarly uses the IIS as web server. Enable https on the Default Website after the installation.

All the other configurations in Cisco components required for this integration like integrating with CUCM , CMS must be configured on the Cisco TMSXE and Cisco TMS server. There are more configurations on the TMS and TMSXE componenets which needs to be performed before integrating with Exchange Server.

In a small deployment the Cisco TMS and its extensions can be co-located on the same server.
In large scale deployments Cisco TMSXE extensions is seperate and remote SQL instance is required. And seperate Cisco TMS and Cisco TMSPE are always co-resident.

DNS Requirements:

The Cisco TMSXE server must be present on the same server VLAN where we have AD,Exchange servers.
The communication will be authenticated using the Cisco TMSXE Exchange service user account.

EWS and Autodiscover must be reachable from the TMS and TMSXE server for them to function.

Licensing:

Each telepresence endpoints to be booked through Cisco TMSXE must be licensed for general Cisco TMS usage.

In our case from Exchange perspective only the Meeting rooms where we need telepresence to be enabled must have the license.

Supported Exchange Server Versions:

  1. Office 365 ( Active Directory Federation Services and the Windows Azure Active Directory Sync tool are required)
  2. Exchange Server 2016 CU1  (latest CU’s preferred)
  3. Exchange Server 2013 SP1  (latest CU’s preferred)
  4. Exchange Server 2010 Sp3  (Latest Roll-ups preferred)
  5. Exchange Server 2007   (Latest Roll-ups preferred)

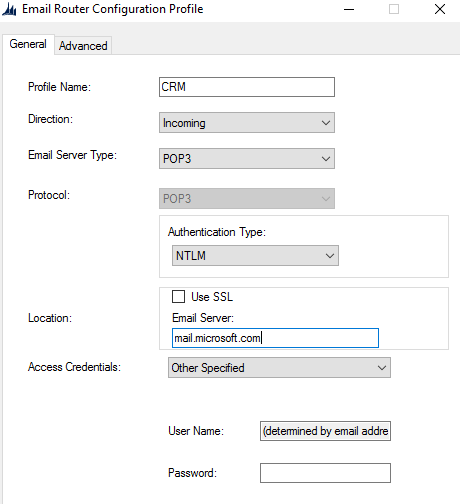
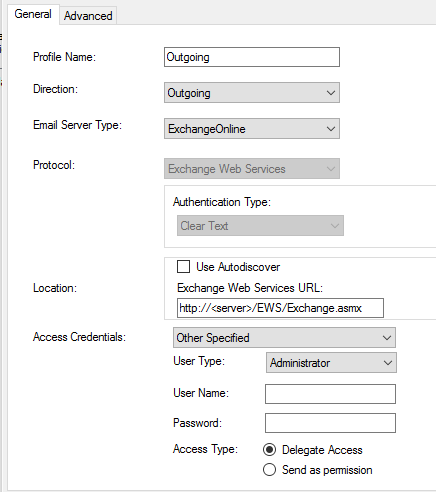
Exchange Requirements:

  1. TMSXE purely depends upon Exchange  AutoDiscover and EWS components to show the configured resource mailboxes availability
  2. Room Mailboxes added to Cisco TMSXE must have below configurations
  3. a)Delete the subject
    b)Add the organizer’s name to the subject
    c)Remove the private flag on an accepted meeting

    3.Cisco TMSXE Service Account with Mailbox is required.This service account will be used in Cisco TMS to connect to Exchange, Cisco TMSXE and Cisco TMS.

Enable impersonation for the service user in Exchange to prevent throttling issues.

To enable impersonation run the below command:
New-ManagementRoleAssignment –Name:impersonationAssignmentName – Role:ApplicationImpersonation –User:[ServiceUser]

Certificate Requirements:

Https is the default communication protocol for communicating with Cisco TMS and with Exchange Web Services.

Certificate can be issued from a Trusted CA , since this is only server to server communcation between the Exchange CAS services (EWS/AutoDiscover) and TMSXE services no public SSL is required.

So the TMSXE server certificate issued from Trusted CA should have the below:

  1. Should have the host name of the TMSXE server.
  2. Should have the host name of the Exchange servers for the EWS and Autodiscover services in secure communication.

To verify that we have certificates that are valid and working:
1. Launch Internet Explorer on the Cisco TMSXE server.
2. Enter the URL for the Exchange CAS and verify that the URL field turns green.
3. Enter the URL for the Cisco TMS server and verify that the URL field turns green.

Below will be the Work Flow :

Cisco TMS

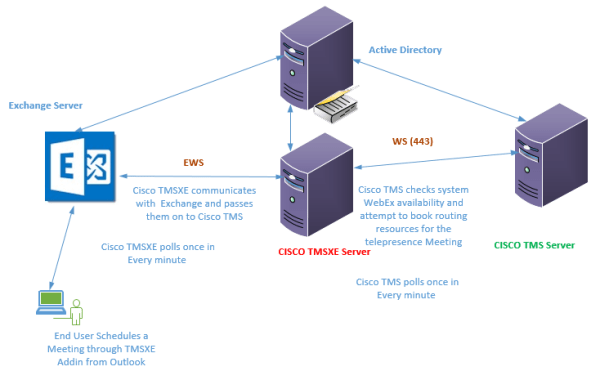
  1. End User Books a meeting through Outlook addin.TP.png
  2. Exchange Checks the resource Mailboxes availability and books the meeting and sends initial confirmation.
  3. Cisco TMSXE communicates with Exchange and passes them on to Cisco TMS.
  4. Cisco TMS checks system and WebEx availability and attempt to book routing resources for the telepresence.

Additional Tips:

  1. The Cisco TMS is dependent only on resource calendars which are configured for this Telepresence feature.
  2. Cisco TMSXE does not have permissions to modify the calendars of personal mailboxes.
  3. All the other configurations  required for this integration must be configured on the Cisco TMSXE and Cisco TMS server.

Thanks & Regards
Sathish Veerapandian

Exchange 2016 CU rollup readiness check fails – MSCORSVW(3404) has open files

During an Exchange CU update we were getting the below message

NGEN

Prior to this all the  Exchange servers were fully patched including  the latest .net assemblies since it was CU5 upgrade.

If we look into the task manager we can see this process running and consuming large CPU resources. This is a .net related process that does the compilation job based on the priorities it is having high priority assemblies  and low priority assemblies.

What is MSCORSVW.exe?

The .Net framework has technology  called Native Image Generator Technology (NGEN) which will speed up the process for .net apps which will run only on a periodic basis purely to improve the performance of that machine

This process MSCORSVW.exe is used by NGEN  to improve the startup performance of .NET apps. So probably after an windows update especially .net patch if we have we can see this process running only at that time and consuming more CPU.

Solution for this problem:

  1. Solution 1: We can wait for a while for this .net compilation job to complete probably 5 or 10 minutes time. Once completed if we rerun the setup  things will  go fine.
  2. Solution 2: By default, NGEN only uses one CPU core for this operation . There is an option to make this work done quickly by making it to use up to 6 cores when we require them. By doing this it will complete its compilation job quickly.

Open CMD in elevated mode and run this command from this path

c:\Windows\Microsoft.NET\Framework\v4.0.30319\ngen.exe executeQueuedItems

Untitlesd

Running the above will  Execute queued compilation jobs with extra CPU cores and make it faster.Now wait for the process to precompile all the assemblies, after a couple of minutes it will be completed.

There will be ngen log as well generated in the same location where we executed this command which we can have a look at after the job completes.

References:

https://msdn.microsoft.com/en-us/library/6t9t5wcf(v=vs.110).aspx
https://blogs.msdn.microsoft.com/dotnet/2013/08/06/wondering-why-mscorsvw-exe-has-high-cpu-usage-you-can-speed-it-up/

Thanks & Regards
Sathish Veerapandian

%d bloggers like this: