
In this article we will have a look at option to integrate the Cisco Jabber with outlook to save the conversation history in outlook folder.
We can enable the Jabber client to automatically save chat histories in Outlook like same how we have conversation history folder option in Skype for Business.
Here after the integration we can see a folder called Cisco Jabber Chats.
Below are the steps:
1) Set the EnableSaveChatHistoryToExchange parameter to true in the jabber-config.xml file.
The default value after the installation is set to false in the config file. Having this value to false will not save the conversation history in Outlook.
Steps to update the conversation history in the Jabber-config.xml file:
a) Login to the CUCM TFTP server and access the below URL
http://:6970/jabber-config.xml
After accessing this URL jabber-config.xml will be downloaded.
b) Update the xml file with EnableSaveChatHistoryToExchange true as below

Once this is completed we need to upload the updated file with the same name on each of the TFTP server present in the Cluster.
Post this operation restart the TFTP service on each TFTP server for the update to reflect immediately.
2) There is option to specify the authentication settings.
Authenticate Using Single Sign On for the Operating System:
When we set this the jabber client will use the account details of the logged in user to authenticate with exchange server.It users NTLM authentication method. This method will be easier.
Update the jabber-config.xml file with ExchangeAuthenticateWithSystemAccount parameter to true.

Authenticate by Syncing Credentials:
We can sync the Exchange credentials with another set of credentials for users which will be the jabber client credentials. With this method, the client will be using the credentials to authenticate to the Exchange server.
Below parameter needs to be updated to sync credentials in Jabber.xml config file

In this example Cisco UCS is defined as the service which provides the Exchange server with credentials for authentication.
If we don’t specify an authentication method, then users can authenticate directly from the Outlook tab in the Options menu of their clients. But this will be manual process where the server name needs to be entered and not automatic server discovery.
3) Specify Server Addresses
After we set the EnableSaveChatHistoryToExchange value to true and decide on the authentication method we need to select an option for the jabber client to reach the exchange server address.
Jabber client uses the Exchange autodiscover for this integration.
So for this configuration to make it happen automatic we can configure the autodiscover domain parameter in the jabber-config.xml file.
Access the jabber-config.xml file same as step 1 through TFTP server, configure the ExchangeAutodiscoverDomain parameter.
Define the Autodiscover domain URL’s.

The Jabber client will use defined autodiscover URL in the config file to search for the Exchange server at one of the following Web addresses:
https:///autodiscover/autodiscover.svc
https://autodiscover.domain.com /autodiscover/autodiscover.svc
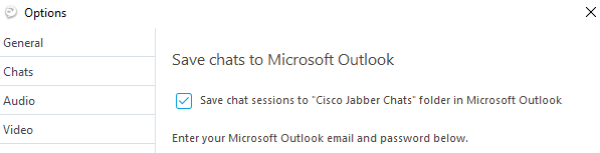
This option can be checked in File – Options – Outlook in Cisco Jabber Client
Server settings and user settings can be checked from here.
There is an option to change the chat history preference from the user side as below
The local jabber-config.xml file will be stored in the below location of end users PC
C:\Users\%user-profile name%\AppData\Roaming\Cisco\Unified Communications\Jabber\CSF\Config
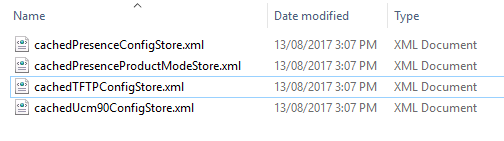
Also we can see the server configuration through the client having the cached TFTP file in the below location
userprofile\appdata\roaming\cisco\unifiedcomms\jabber\CSF\config\cache
Once all the above configuration are completed we can see a folder called Cisco Jabber Chats created in the Outlook and the Cisco Jabber Conversation histories.
Thanks & Regards
Sathish Veerapandian


What versions of CUCM, Jabber and exchange are you using.
LikeLike
Hi we deployed CUCM 11.5 for one customer last year
LikeLike
Has anyone attempted this with O365?
LikeLike
Haven’t tried this option with office 365 URL’s. You can try updating the jabber xml file with o365 url’s and see the results.
LikeLike