Author: Sathish Veerapandian

  • Performing Veritas Enterprise Vault Upgrade for Exchange Environment

    Upgrade on Veritas Enterprise vault will very according to the setup.

    If its on a single node the upgrade will be easier.
    If it is on Veritas Cluster the before the upgrade few factors needs to be taken  care.
    If it is on Windows cluster the before the upgrade few factors needs to be taken  care.

    In this article we will have a look at performing Enterprise Vault Upgrade on Windows server failover Cluster.
    Also if we are upgrading from 11.x.x lot of things needs to be taken care because:

    12  = Major release
    12.X = Minor release
    12.x.y = Maintenance release

    Readiness before upgrading to EV version 12.0 from 11:
    1) EV 12.x and above requires Windows Server 2012, hence if you are running older OS  version on the current EV version, you will have to migrate to a new server
    2) EV 12 version supports Outlook 2016 on the server with the below conditions
    If its Outlook 2016 exchange connection must be MAPI/HTTP and not RPC/HTTP
    4) It Supports only SQL2012 and above. If we have SQL 2008 then we need to migrate to atleast SQL 2012

    Note:
    Enterprise Vault does not provide the high availability upgrades meaning we cannot perform the upgrade when the system is active and accessible via the passive node.The upgrades must be completed on all the nodes in the cluster before we start the Enterprise vault services after the upgrade. The system will be down and not accessible during the upgrade. So better to plan and perform this upgrade on a weekend.

    Below things needs to be done prior to the upgrade:

    1. Stop all the task controller services. No Archive must be initiated or running. Stop all the jobs and make sure no jobs are running for any mailbox servers.
    2. Backup your Enterprise vault Server , data and the SQL stores.
    3. Clean the queues and the queues must be empty. There is a procedure to clean up the queues if the EV is running on Failover Cluster
    4. Unload the Antivirus on the EV nodes.
    5. Ensure no Backup , SQL, Nodes are happening during this time.
    6. Supported Outlook client on the EV server –

    The Following Versions of Outlook Running on the Server are not supported:
    Outlook 2013 SP1 64 bit version
    Outlook 2013 Original Release
    Outlook 2016 (64-bit version)

    Only the below Versions of Outlook on the EV server are supported:

    Outlook 2013 SP1 (32 bit version)
    Outlook 2016 (32 bit windows installer, available with volume license)

    If we need to upgrade the outlook on the EV nodes perform the following:

    Stop the EV admin cluster resource service from the failover cluster.
    Install the supported version of Outlook.
    Restart all the EV Services.

    Upgrade EV on a Windows Server Failover Cluster on EV Nodes:

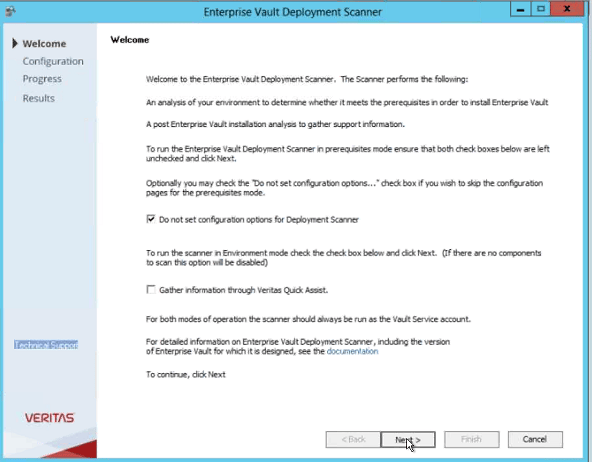
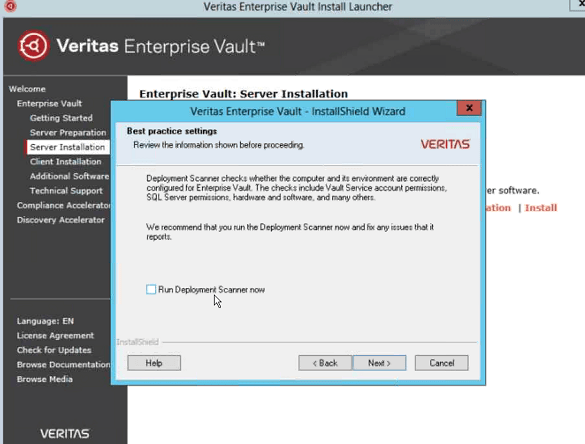
    Before we run the upgrade we need to run the deployment scanner to check required software and settings.
    Inorder to perform that
    Load the Media – run setup.exe – click enterprise vault – click server preparation

    0Untitled

    Untitled1

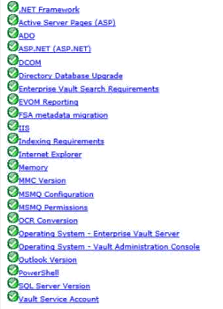
    Once the deployment scanner is completed, if  the prerequisites are successful we can see the results like below.

    01Untitled

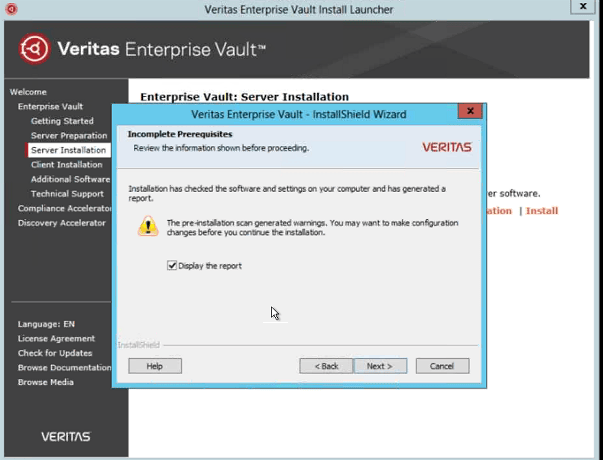
    If they are not successful we might get like below and need to correct steps as  mentioned in the report.

    Untitled3

    Logon to the Active Node with the vault service account and bring the admin service resource offline. If there are multiple sites make sure they are also stopped.

    Load the media and run the setup. Make sure no MMC are open in the server.

    Click – server installation and select upgrade existing server.

    Select only EV services,Admin console, search access components, operations manager and reporting only if we have exchange integrated with EV.

    Click install.

    Untitle21

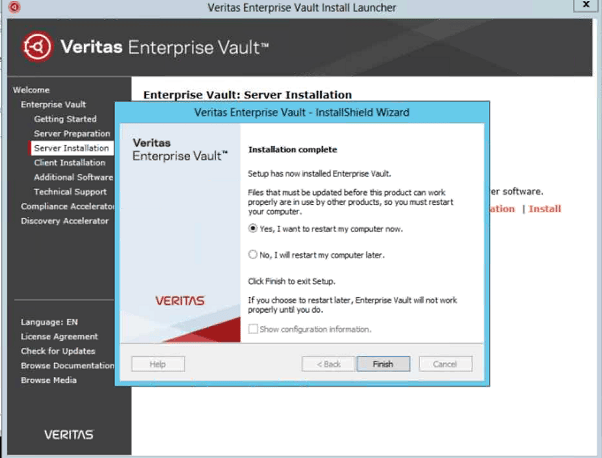
    Once the setup is complete on the active node we will get screen like below . Better to restart after the upgrade  completes on all other nodes, SQL and indexes.

    Untitled9

    Steps to upgrade the DB (Directory, Monitoring & Audit):

    Logon to the active node with vault service account.
    Open the Enterprise Vault Managment Shell.
    Run the command Start-EvDatabaseUpgrade -Verbose.
    Once the upgrade is complete we can see dbupgrade subfolder where we can see the logs of the db upgrade and mandatorily they must be verified.

    Once the DB is upgraded and the upgrade is completed on all the nodes, we can go to the failover cluster and bring EV Admin Server Resource online.

    Additional Requirements based on setup:

    1. Upgrade the EV reporting component.
    2. Upgrade the MOM & SCOM management pack and delete the previous management packs.
    3. By Default EV deploys the Exchange server forms to users computer automatically.If the forms from organizational library is used then thhe Exchange server forms needs to be upgraded.

    Thanks & Regards
    Sathish Veerapandian

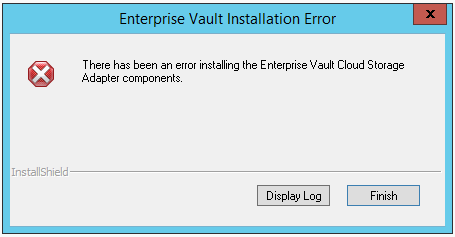
  • There has been an error installing the Enterprise Vault Cloud Storage Adapter Components

    During the upgrade of the Enterprise Vault  which is in Windows cluster was getting the below error.

    EVError

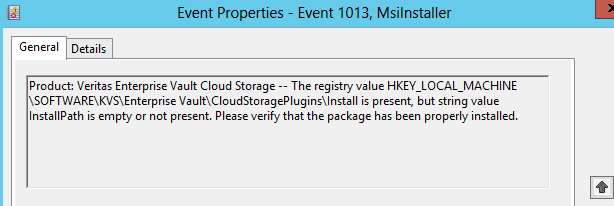
    While looking into the event view in the application log on the affected node can see the below error message.

    EVError

    We can also see the below error message in the EV installation logs

    Machine policy value ‘DisableUserInstalls’ is 0

    Installation Log Folder can be seen in Ev installation directory with the format EVInstall.date.time.log

    Solution:

    Creating the registry below registry value will fix the issue :

    HKEY_LOCAL_MACHINE\SOFTWARE\KVS\Enterprise Vault\CloudStoragePlugins\Install

    What is this Cloud Storage Plugins ?

    We can Use the Enterprise Vault Administration Console to enable and configure most of the cloud Storage Service as secondary storage for our store partitions.

    To enable this – Open Vault Admin Console – Navigate to Store partition – properties

    Select the store which we need to have secondary storage .

    First we need to click on collections – select enterprise vault.

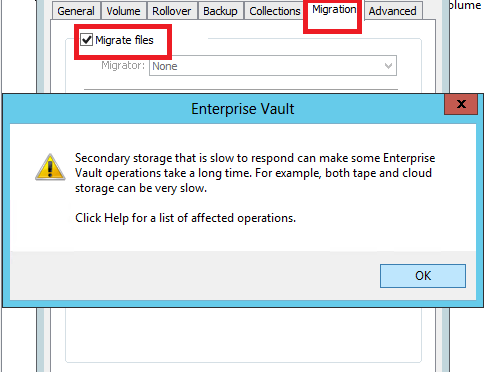
    Then we need to click on migration – select migrate files

    Caution: If you use secondary storage that is slow to respond, some Enterprise Vault operations that access this storage will take a long time. For example, both tape and cloud storage can be very slow. We get this warning as well during enabling this service.

    CLS1

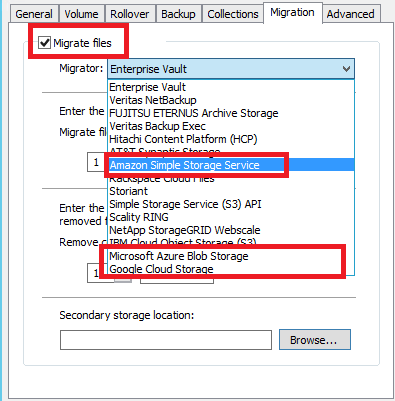
    Then in Migrate files we can select on the cloud storage subscription we are having   and apply. Also there is an option to remove the collection files from primary storage after they have been migrated.

    CLS2

    Later in cloud storage service properties we can provide the service name, class, secure access ID and other options.

    Thanks & Regards
    Sathish Veerapandian

  • Inbox folder renamed to Archive

    One of the user reported that the inbox folder was renamed to archive

    There is one possibility of when the user has clicked on archive folder by accidentally by highlighted inbox – clicking on archive and then use create archive folder or choose existing folder.


    while troubleshooting found this is a known issue and there is an article released from Microsoft

    https://support.microsoft.com/en-us/help/2826855/folder-names-are-incorrect-or-displayed-in-an-incorrect-language-in-ou 

    As per Microsoft this  can also occur if   a mobile device with different application like MDM  or a third-party server application synchronizes the Exchange Server mailbox.It could have been caused by a malfunctioning add-in.

    If the default Inbox folder is changed unexpectedly to Archive we need to directly skip to step 4 and not look into step 1,2&3.

    Use the step4  with MFCMapi tool to fix this problem.

    Once the step4 is completed we need to run resetfolder as below

    outlook.exe /resetfoldernames

    After performing the step 4 we can run the below command and make sure the inbox folder in the root folder path is renamed correctly and not present as archive.

    Get-MailboxFolderstatistics mbxname | select name,folderpath,foldersize,itemsinfolder

    Thanks & Regards 

    Sathish Veerapandian

  • Update NTP server in Linux Application

    We use the NTP protocol to sync the time of servers,network devices, client PC’s with our local time zone to keep the correct time over the network. This can be accomplished through a NTP server configured locally in our network which will have the capability to receive and update the local time from the satellites in space.

    The time which they get updated will be set as a bench mark over the entire machines over its network if this machine is configured as NTP server for them. This article focusses on updating the local NTP server on linux application.

    To See Current Date –

    Putty ssh to the server and run –    date

    To check the ntp service status run –   service ntpd status

    NTP1

    To set your as NTP server  to get up to date time from them  run below  –

    ntpdate ntpserverfqdn

    Example – ntpdate ntp.exchangequery.local

    Once after we updated we will get the below message

    ntpdate Step time server offset sec
    ntpdate adjust time server offset sec

    To sync hardware clock –

    hwclock –systohc

    Reason to run above command: There are 2 types of clocks in Linux Operating systems.

    1) Hardware clock – is the battery powered “Real Time Clock” (also known as the “RTC”, “CMOS clock”) which keeps track of time when the system is turned off but is not used when the system is running.

    2) System clock-  (sometimes called the “kernel clock” or “software clock”) which is a software counter based on the timer interrupt.

    This  above command will Set the Hardware Clock to the current System Time which will update from the local ntp server in our environment.

    Note: We have an option to set the Hardware Clock from the System Time, or set the System Time from the hardware Clock.

    Finally we need to Add the NTP server in the ini.config

    Navigate via VI to ntp.conf location –  vi /etc/ntp.conf

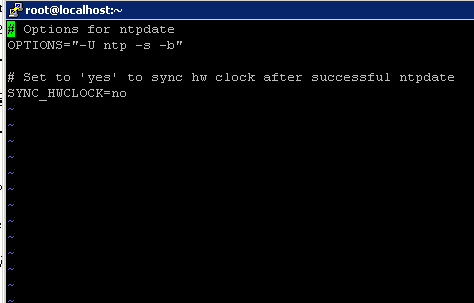
    vi /etc/sysconfig/ntpdate

    NTP

    Finally restart the ntp service –

    service ntpd  restart

    There is another option to update the servers from the website ntp.pool.org

    We can go to this official ntp pool site and choose our continent area servers.

    In order to update them VI to the ntp location :

    vi /etc/ntp.conf

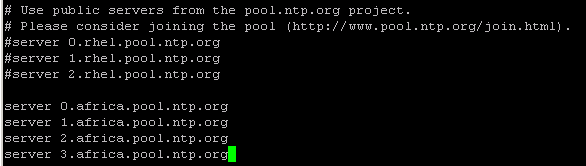
    We can see the default ntp servers like below. We can comment them and need to update with the correct servers for the respective country where the server is hosted.

    NTP2

    In my example updating with my local time zone as below and commenting the default ones.

    NTP3

    After the above is completed the servers will be updated.

    We can check the ntp peers synchronization with the below command

    ntpq -p

    Based on our requirement we can set the ntp server to be our local ntp server or one from the local time zone and after this the linux server will be updated with the latest current local time zone.

    Thanks & Regards
    Sathish Veerapandian

  • Renew SSL certificate for ADFS URL

    This document outlines the steps to renew the SSL certificate for ADFS claims providers federation metadata URL

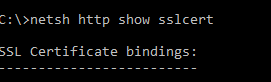
    1) To take the application ID and the certificate hash run the below command.

    netsh http show sslcert

    ADFS1

    copy only application id value. This we require for the certificate renewal. Better to take a copy of this results.

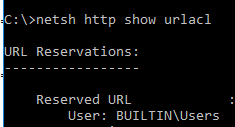
    2) Run this command to see the ADFS listners

    netsh http show urlacl 

    ADFS2

    This is just to take a copy of the ACL url’s before the certificate renewal. This part is so sensitive because ADFS will have some URL reservations in the HTTP.SYS. This will help us just in case if we face any issues after the certificate renewal.

    3) Delete the old certificates –

    $Command = “http delete sslcert hostnameport=adfs.exchangequery.com:443”
    $Command | netsh

    $Command = “http delete sslcert hostnameport=adfs.exchangequery.com:49443”
    $Command | netsh

    $Command = “http delete sslcert hostnameport=localhost:443”
    $Command | netsh

    $Command = “http delete sslcert hostnameport=EnterpriseRegistration.exchangequery.com:443”
    $Command | netsh

    4) Delete the old hostIP and port entries:

    $Command = “http delete sslcert hostnameport=0.0.0.0:443”
    $Command | netsh

    5) Now we can add the new certificates:

    Prerequisite:

    Take the APP id which was noted down in the step 1

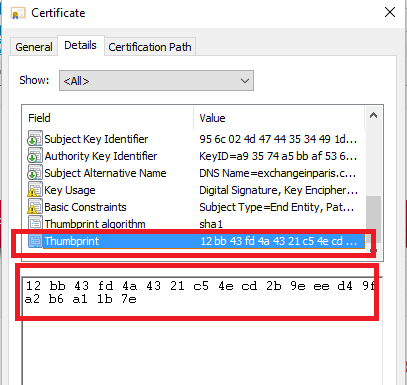
    Take the certificate Hash – This can be taken from the new certificate thumbprint

    example below –  remove all the spaces and copy the new certificate hash value.

    ADFS3

    # APP ID
    $guid = “paste the appid here”

    # Cert Hash
    $certhash = “paste the certificatethumbprint”

    To renew actual metadata URL:

    $hostnameport = “adfs.exchangequery.com:443”
    $Command = “http add sslcert hostnameport=$hostnameport certhash=$certhash appid={$guid} certstorename=MY sslctlstorename=AdfsTrustedDevices clientcertnegotiation=disable”
    $Command | netsh

    To renew localhost:

    $hostnameport = “localhost:443”
    $Command = “http add sslcert hostnameport=$hostnameport certhash=$certhash appid={$guid} certstorename=MY sslctlstorename=AdfsTrustedDevices clientcertnegotiation=disable”
    $Command | netsh

    To renew Device Registrations:

    $hostnameport = “adfs.exchangequery.com:49443”
    $Command = “http add sslcert hostnameport=$hostnameport certhash=$certhash appid={$guid} certstorename=MY clientcertnegotiation=enable”
    $Command | netsh

    The above is required because Changes were made in ADFS on Windows Server 2012 R2 to support Device registration and happens on port 49443.

    $hostnameport = “EnterpriseRegistration.exchangequery.com:443”
    $Command = “http add sslcert hostnameport=$hostnameport certhash=$certhash appid={$guid} certstorename=MY sslctlstorename=AdfsTrustedDevices clientcertnegotiation=disable”
    $Command | netsh

    The above is also  required for device registration service.

    Hope this helps.

  • Quick Tip – Reduce the amount of Mailbox Audit log information generated by a service account

    Usually we enable Mailbox auditing to monitor actions taken by mailbox owners, delegates and administrators. But we do not require mailbox audit to be enabled for service accounts which are actually doing genuine operations.

    We can configure mailbox audit logging bypass for service accounts which are configured in applications and access mailboxes frequently. This will Reduce the amount of audit log information generated by a service account.

    Below steps can be performed to bypass audit for the service accounts:

    To check the mailbox audit bypass we can run the below command

    Get-MailboxAuditBypassAssociation -identity serviceaccount

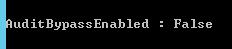
    The main parameter we need to look is AuditByPassEnabled.

    The default value will be false for mailboxaudit enabled and disabled account.

    AP

    The AuditBypassEnabled parameter controls if the audit logging is enabled or disabled for this account.
    When the value is set to $True this account will have the maiboxaudit disabled.
    When the value is set to $false this account will have the maiboxaudit enabled.

    We can run the below command to bypass the mailbox audit logging for service account.

    Set-MailboxAuditBypassAssociation -Identity “service.crm” -AuditBypassEnabled $true

    IMP Note:

    By default the mailboxaudit logging is not enabled for newly created mailboxes and existing mailboxes.

    We can check the mailboxaudit if its enabled or not with the below command.

    Get-Mailbox usermbxx | fl *Audit*

    The default value will be false like below and the default audit log age limit is 90 days.

    AD
    Below script can be used to enable bulk maibox audit based on OU level

    The Script can be downloaded here – EnableMailboxAudit

    ##############################################################
    # Description:
    # This script enables the Mailbox Audit for new mailboxes in your Organization on OU level.
    # You need to make them run on a task scheduler on a weekly basis for new mailboxes audit to be enabled.
    # You need to mention the OrganizationalUnit in the script where the mailboxes are present.
    # You need to mention the CSV location in Export-Csv.
    # You need to mention To address From address and SMTPserver(exchangeserver) for sending this report in email.
    ################################################################

    add-pssnapin Microsoft.Exchange.Management.Powershell.E2010 -ea SilentlyContinue
    add-pssnapin Microsoft.Exchange.Management.Powershell.Support -ea SilentlyContinue
    $mbxs = Get-Mailbox -OrganizationalUnit “mention OU Name” | where { $_.auditenabled -eq $false } | Select Name, DisplayName, UserPrincipalName,SamAccountName,PrimarySMTPAddress
    $mbxs | Export-Csv C:\temp\auditlogs\Audit.csv -Encoding UTF8
    $mbxs | % { Set-Mailbox $_.SamAccountName -AuditEnabled:$true -AuditAdmin Copy, Create, FolderBind, HardDelete, MessageBind, Move, MoveToDeletedItems, SendAs, SendOnBehalf, SoftDelete, Update }
    $mbxs | % { Set-Mailbox $_.SamAccountName -AuditEnabled:$true -AuditDelegate Create, FolderBind, HardDelete, Move, MoveToDeletedItems, SendAs, SendOnBehalf, SoftDelete, Update }

    Send-MailMessage -To emailadmin@domain.com -From reports@domain.com -Subject “Audit Enabled for the attached users” -Attachments C:\temp\auditlogs\Audit.csv -SmtpServer specifysmtpserver -Port 25025 -BodyAsHtml -Body “Audit Enabled”

    ***************************************************

    Thanks 
    Sathish Veerapandian

  • Unable to open PST file . Error Details: Header File length is zero. If this file is from a previously failed PST export, please delete the file and resume the export

    We might come across the below error in the PST import/export

    Error code: -2146233088

    Unable to open PST file ‘\\fileshare\Archive\testuser.pst’. Error details: Header file length is zero. If this file is from a previously failed pst export, please delete the file and resume the export. –> Header file length is zero. If this file is from a previously failed pst export, please delete the file and resume the export.

    There can be so many issues causing this factor and below tips can be helpful:

    1) The mailbox import/export uses the Microsoft Exchange Mailbox Replication service on the CAS server. When a  import/export request is triggered a remote powershell connections will be established from the source CAS to the appropriate destinations to the shared folder to initiate this process. So better to have the shared location network drive in the same VLAN where the exchange is hosted and this will speed up the import/export option.

    2) Restart Microsoft Exchange Mailbox Replication service – Since the MRS service is handling this job and if the MRS is stuck processing the huge jobs a restart of this service will definitely help  to speed up the migration process.

    3) Remove the Failed import/export requests with the below commands

    Get-MailboxExportRequest -Status Failed | Remove-MailboxExportRequest

    Get-MailboximportRequest -Status Failed | Remove-MailboximportRequest

    4)  We can run this command import/export to exclude and skip few errors

    For Import –
    New-MailboxImportRequest  -Mailbox  -filepath ‘\\fileshare\Archive\testuser.pst’ -Baditemlimit unlimited -AcceptLargeDataLoss -Priority High -AssociatedMessagesCopyOption Copy  -Confirm:$false  -ConflictResolutionOption KeepLatestItem  -ExcludeDumpster
    For Export-
    New-MailboxExportRequest  -Mailbox  -filepath ‘\\fileshare\Archive\testuser.pst’ -Baditemlimit unlimited -AcceptLargeDataLoss -Priority High -AssociatedMessagesCopyOption Copy  -Confirm:$false  -ConflictResolutionOption KeepLatestItem  -ExcludeDumpster

    5) Also better to check the free space available on the shared network drives where the PST export is happening.  Also better to see the free space available on the disk where the database resides from where the PST export/import is happening.

    6) If we are experiencing a mailbox import/export for a specific user a mailbox repair might also help. We can perform the mailboxrepair with the below command.

    New-MailboxrepairRequest –Mailbox “usernanme” –CorruptionType ProvisionedFolder,SearchFolder,AggregateCounts,FolderView

  • Product Review – LepideMigrator for Exchange

    Product Review – LepideMigrator for Exchange

    I was evaluating  the Lepide Software’s Exchange migration solution as it boasted numerous unique features and made some bold claims. For these features alone I felt that it was a solution worth trying. Here’s what I found:

    Product Information

    LepideMigrator for Exchange is an Exchange/Office 365 migration solution that allows us to migrates mailboxes and public folders between the following (irrespective of their versions and the complexity of the migration scenario): Between on-premises Exchange Servers, between Office 365 accounts, and between Exchange and Office 365. It is designed to simplify migration management and minimize resource usage to make any migration more comfortable.

    Some Notable Features

    LepideMigrator for Exchange comes with some features that are rarely seen in other migration solutions. Some of them are:

    • Pre-migration analysis
    • Load sharing with migration agents
    • Migration rollback

    Pre-migration analysis

    The pre-migration analysis feature calculates the approximate migration time from a combination of the network speed, the number of migration agents used and the size of data (public folders and mailboxes) to be migrated. Though the process is simple it is very important as it helps when scheduling the migration and allocating resources. A sample of LepideMigrator’s pre-migration analysis is shown below:
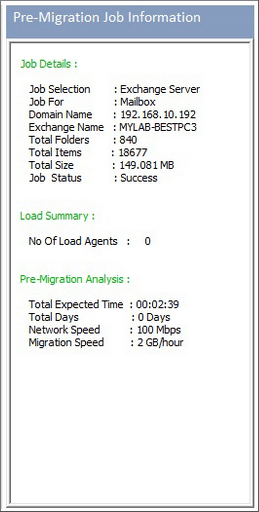
    L1

    Migration agents

    It can sometimes be difficult to keep to an initial migration schedule, especially when the migration load is heavy or the server resources are low. Lepide cleverly allows you to share the migration load across the network computers. Here’s an example of how to deploy migration agents:
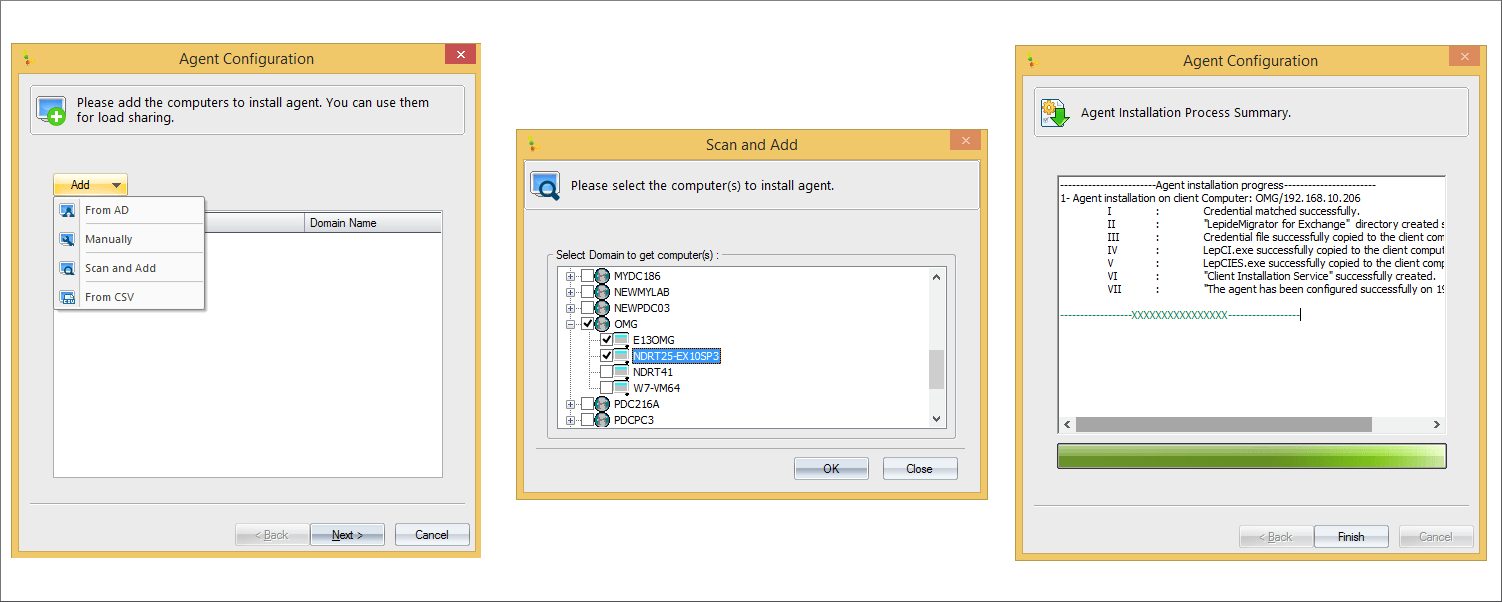
    L2

    Migration rollback

    Migration rollback comes in handy if something has gone wrong during an attempted migration. It simply allows you to undo the migration and related jobs and start again from scratch. It also includes a ‘Footprint Cleaner’ feature to help erase any signs of migration from the target environment. An example is shown below:
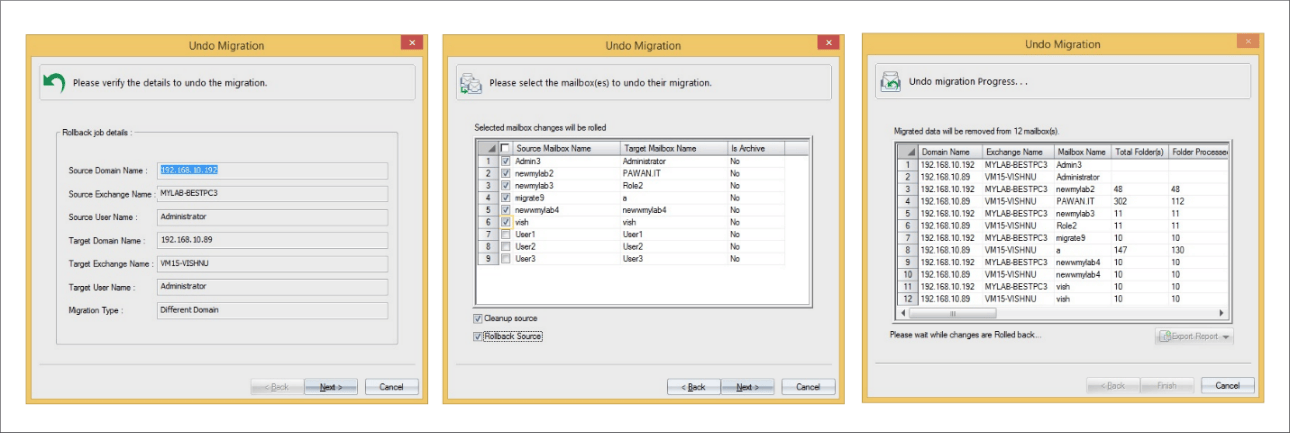
     L3


    Before starting the migration…

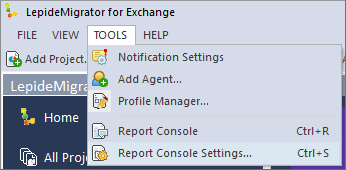
    Before starting the migration you’ll need to configure Notifications Settings and Report Console Settings (both from the Tools menu). These are pretty self-explanatory so I won’t bother going through them here.
     

     L4

    Migration using Lepide Exchange Migrator

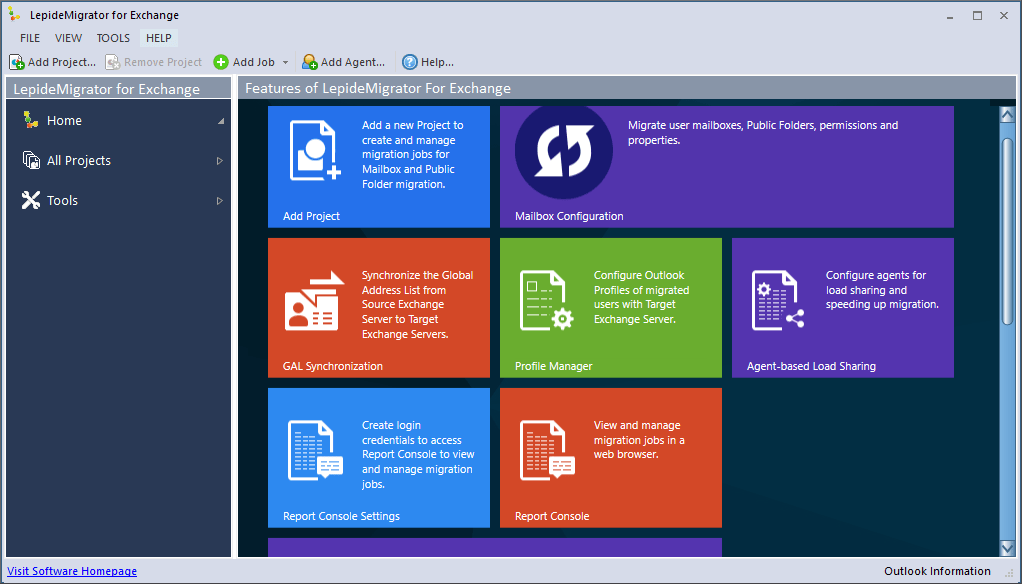
    So now onto the actual migration itself. I attempted to migrate a few mailboxes from Exchange Server 2007 to a different domain in Exchange Server 2013. After successfully installing Lepide Exchange Migrator (available as a trial version), you will be shown the below homepage:

    What I liked straight away about this solution was that it didn’t require me to prepare the source or destination domains as you would have to with the native methods. I was free to start the migration directly from the solution itself (although, of course, you need administrative rights over the source and destination domains).
     L5.png

    The procedure

    Migrating using LepideMigrator for Exchange involves four steps:

    1. Create a migration project
    2. Add a mailbox migration job to the project
    • Add a public folder migration job to the project
    1. Manage migration jobs from the Reports Console

    Note: After the migrating mailboxes and public folders, you can migrate their limits and permissions too. To avoid any end user impact, you can migrate Outlook rules & folder permissions, update Outlook profiles and synchronize Global Address Lists simultaneously.

    Creating a migration project

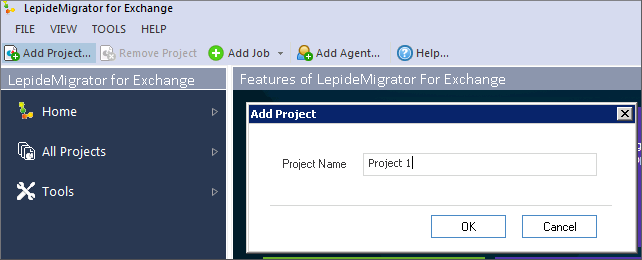
    A migration project is where all the jobs related to a particular migration reside e.g. mailbox migration and public folder migration. To add a project, just click the Add Project button, enter a name for the project, and click OK. The new project then gets listed under All Projects.
    L6.png

    Creating a mailbox migration job

    A ‘mailbox migration job’ migrates mailboxes from source to target (even between Exchange 2003 to Exchange 2016). The series of steps given below will show you how to perform a cross-forest migration between two different versions of Exchange.

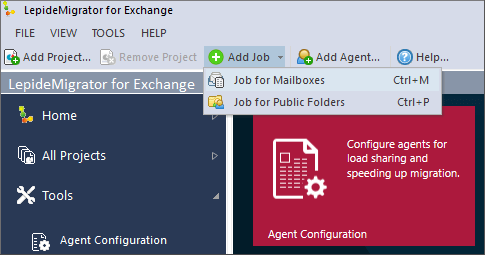
    Step 1: On the Homepage expand the Add Job button and select Job for Mailboxes.
    L7.png

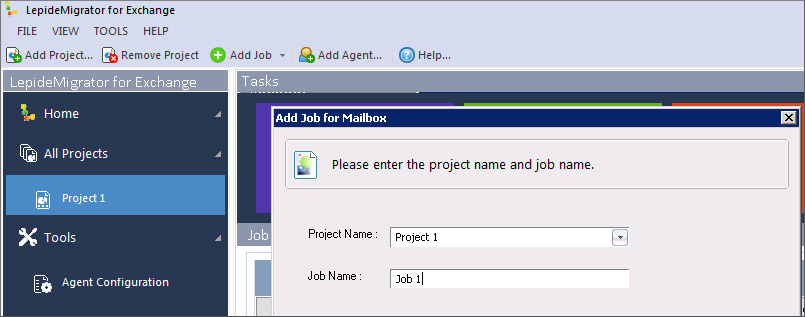
    Step 2: In Add Job for Mailbox, select a project name and enter a job name; click Next.
    L8

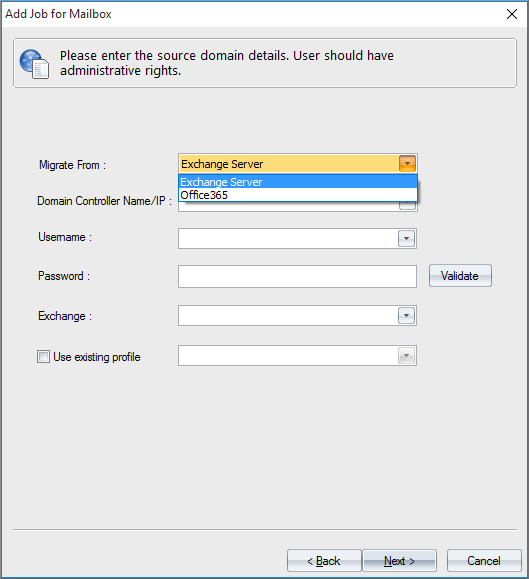
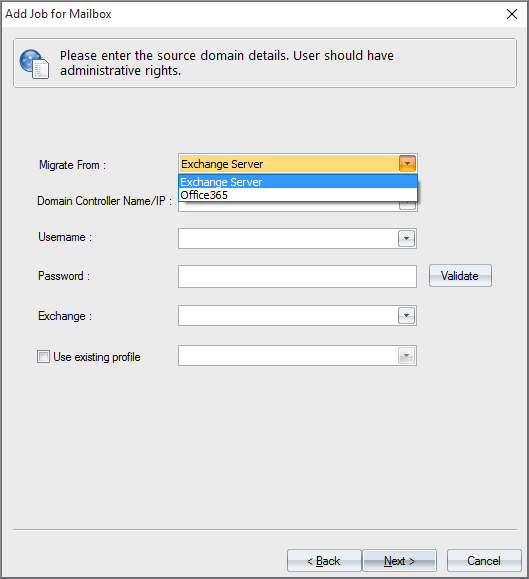
    Step 3: Choose ‘Exchange Server’ in the Migrate From box and then provide Domain Controller name/IP and username; click Validate. After validation, select the relevant Exchange Server and select ‘Use an existing profile’ if there is an online profile for the user already in the system. Otherwise, the application will create a temporary profile (which will be deleted when the migration is over). Click Next.
    L9

    Comments:

    • As seen in the Migrate From box, Lepide Migrator for Exchange supports migration from Exchange and Office 365.
    • The option to use an existing profile, saves the time that would be wasted creating a new temporary profile.

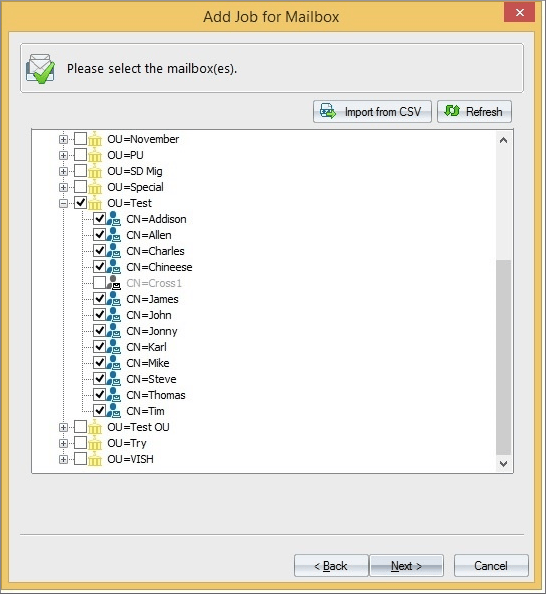
    Step 4: Select the mailboxes that you wish to migrate from the list of mailboxes in the source domain (for the selected Exchange). Click Next.
    L0

    • Comments: The selection of mailboxes is easy as all the mailboxes get listed as shown. Alternately, you can import the list of mailboxes as a CSV file. This option is useful when there are a large number of mailboxes.

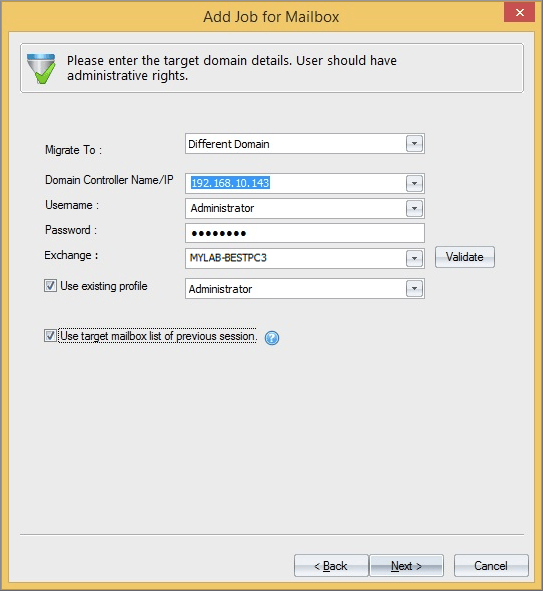
    Step 5: Select ‘Different Domain’ in the Migrate To field (as we are doing a cross-forest migration). Provide destination domain credentials and click Validate. After validation, choose an existing Outlook profile. Click Next. When the mailboxes of the destination server are displayed, select the required ones or create new ones. Click Next.
    L1

    • Comments: Expand the Migrate To box to see the options available in LepideMigrator.
    To migrate: Select (in the Migrate To box):
    to the same Exchange Server Same Domain (Single Exchange)
    to new mailboxes or existing ones in a different Exchange Server Same Domain (Multiple Exchange)
    to new or existing mailboxes of different domain’s Exchange Server Different Domain
    to Office 365 mailboxes Office 365


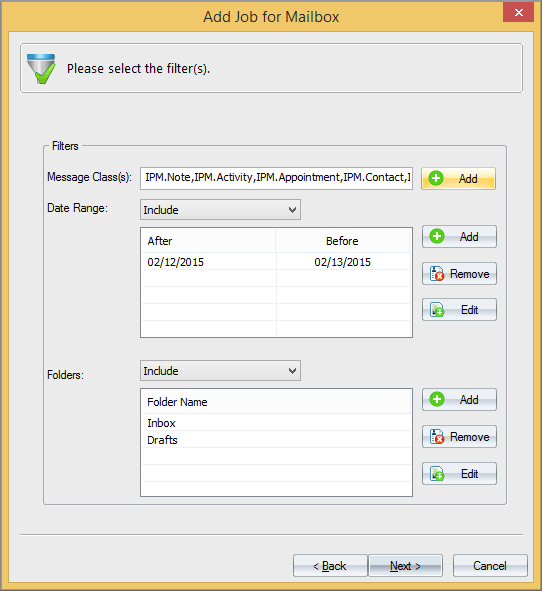
    Step 6: Filter for the required messages (by message classes, date range, and folders). Click Next.
    L2.png

    • Comments: LepideMigrator for Exchange effectively controls the selection of data to be migrated. It allowed you to select the required mailboxes from the source Exchange earlier (Step 4). Now, it allows you to filter the mailboxes according to criteria like message classes, date range, and folders. The filtered data can be included or excluded from the migration.

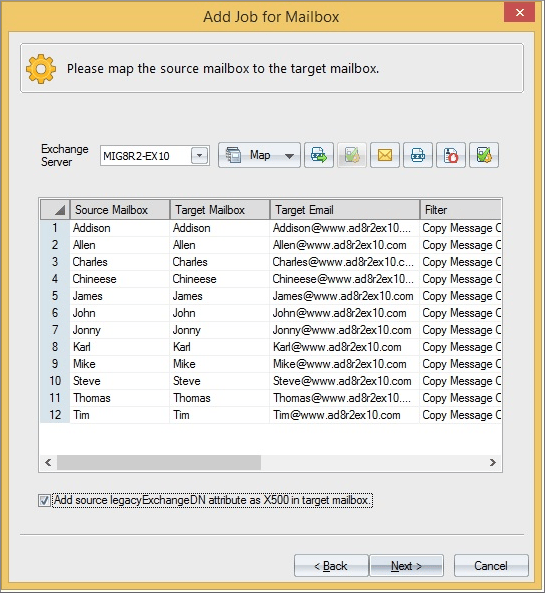
    Step 7: Map the mailboxes from the source Exchange to existing or to new mailboxes on the target Exchange. Click Next.
    L3.png


    • Comments: Mapping has been simplified enormously by LepideMigrator through its Map Automatically, Map using CSV and Map Selected Mailboxes options (these options can be seen by expanding the Map button).

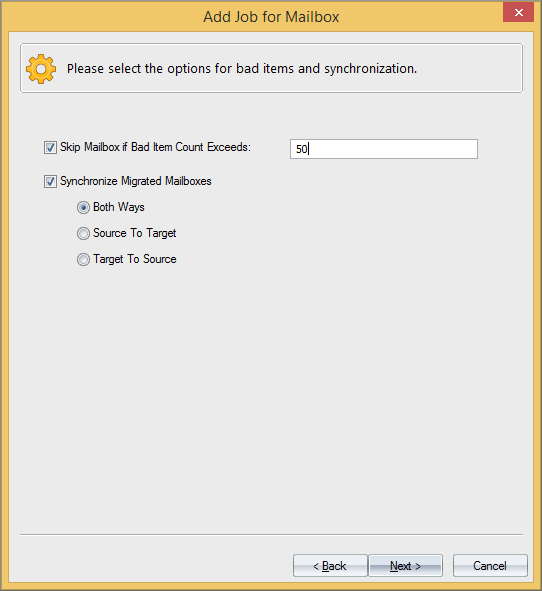
    Step 8: Select the synchronization options. Click Next.
    L4.png

    • Comments: Synchronization of mailboxes minimizes accessibility issues in the post-migration phase. Lepide Migrator can synchronize the mailboxes in source to target, target to source or both. Also, there is an option to exclude mailboxes having large number of bad items.

    Step 9: Provide the details for email notifications. Click Next.
    L9.png

    • Comments: With LepideMigratior there is no need to continuously supervise the migration. Its notifications will reach the inbox at every stage of the migration, making it an ideal tool for busy Exchange administrators.

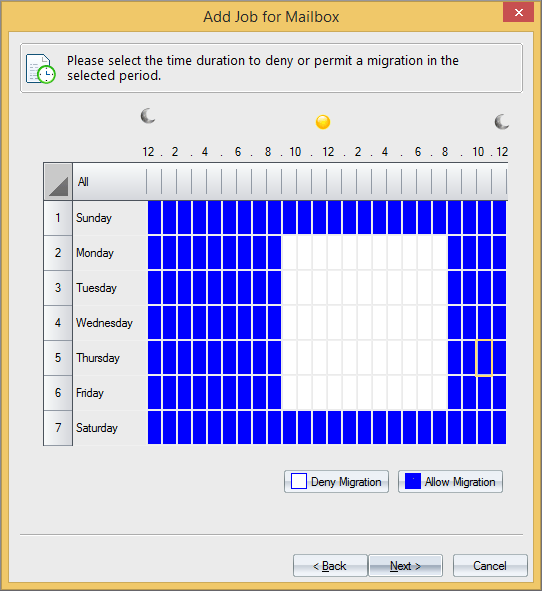
    Step 10: Specify blackout hours when you want the migration to be temporarily paused. Click Next.
    L8.png

    • Comments: This feature is helpful when the migration has to be stopped during office working hours.

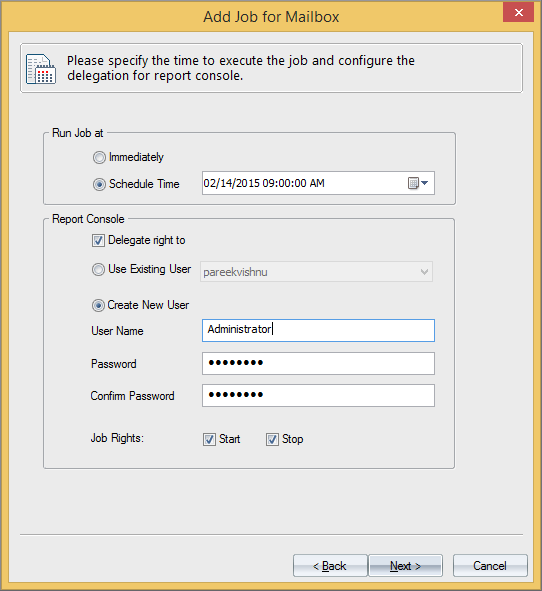
    Step 11:  The migration can be run immediately or at any specified time. Provide the user details (new users can be created) to delegate the rights to access the Report Console. Click Next.
    L9.png

    Comments: Lepide Migrator runs the migration job at specified time without any manual intervention.

    • Step 12: Finally, review the job summary and click Finish.


    Creating a public folder migration job

    Creating a public folder migration job is a similar process to creating a mailbox migration job.


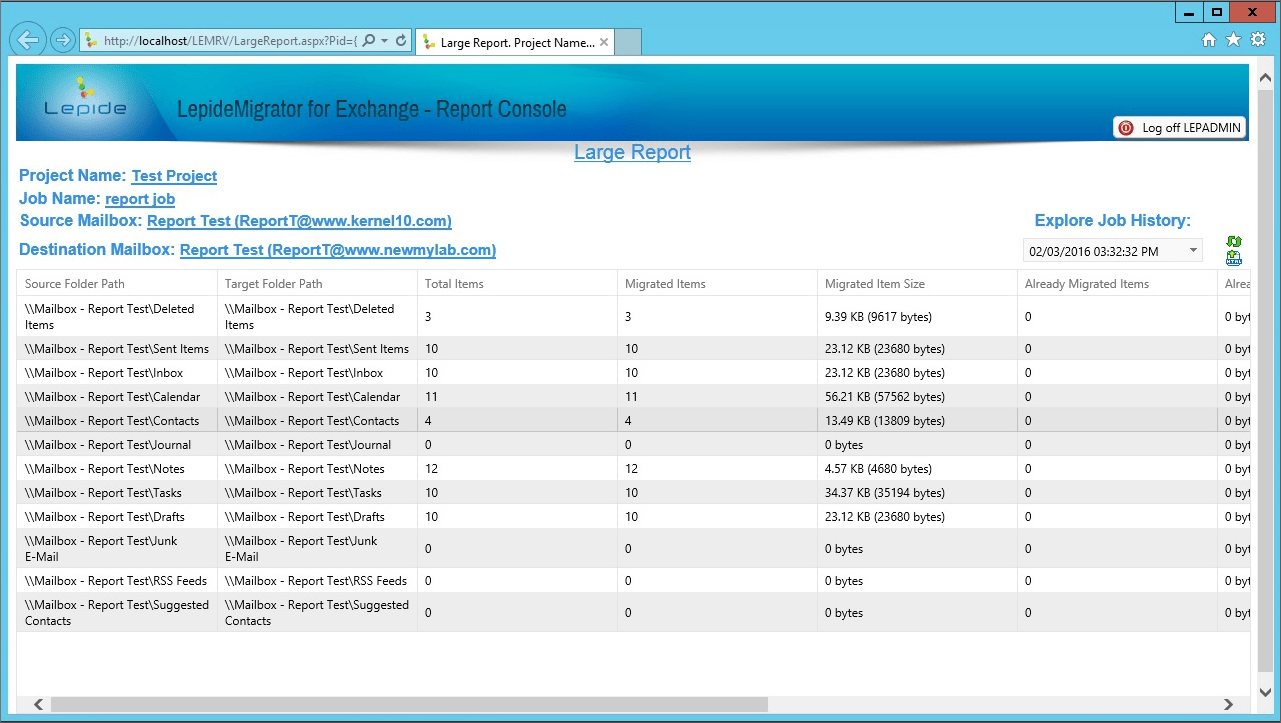
    Managing migration jobs from the Report Console

    Report console is a web interface that displays migration details and manage options. It lists project details and job details. Migration or related jobs can be started and stopped from here (image courtesy: Lepide).
     MRS.png

    How LepideMigrator helps condition the post-migration environment

    Adapting to the post-migration Exchange environment can be a challenge for many organizations, especially when end users are not technology savvy. Unlike many other migration tools I have tried, Lepide Exchange Migrator takes care of some of the post-migration requirements for you, including:

    • Migration of limits and permissions
    • GAL Synchronization
    • Migration of Outlook rules & folders permissions
    • Updating Outlook profiles

    Migration of limits and permissions (of mailboxes and public folders)

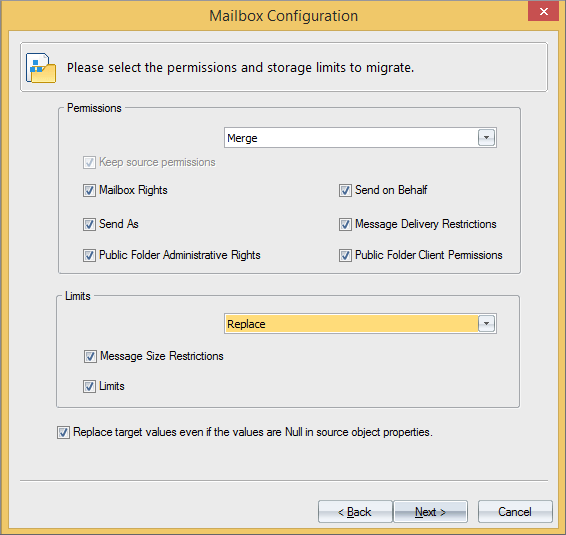
    As a natural continuation of mailbox and public folder migrations, LepideMigrator migrates permissions and storage limits to the new Exchange. The steps to do this are similar to those in mailbox and public folder migration with the difference being that this job migrates limits and permissions instead of data.
    MRS.png


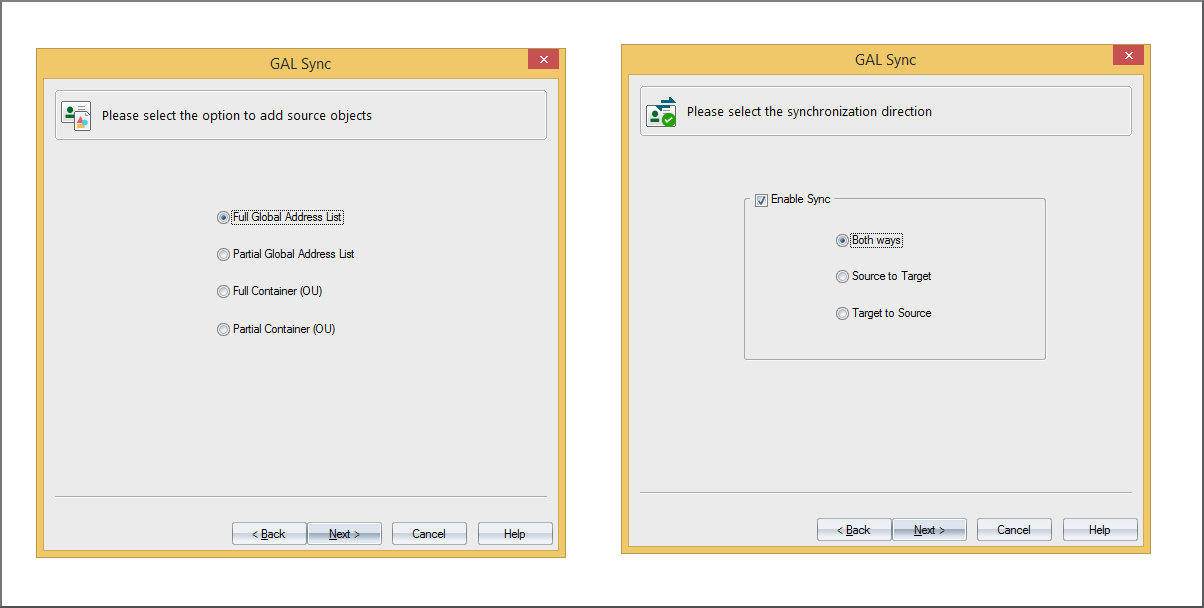
    GAL Synchronization

    Lepide Migrator allows to synchronize the Global Address Lists of the source and the target to make all the addresses or selected addresses available on the other end.
    MRS.png


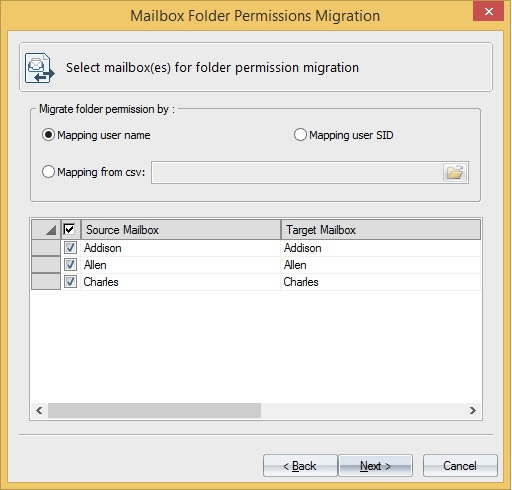
    Migration of Outlook rules & folders permissions

    I feel this option is very good especially during cross forest migration
     MRS.png

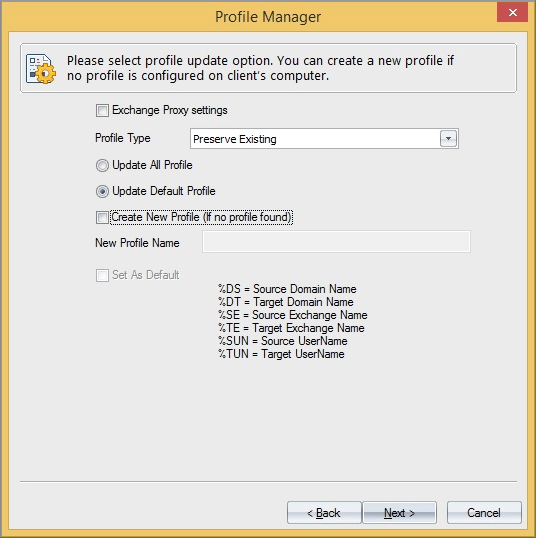
    Updating Outlook profiles

    The Outlook profile manager updates Outlook profiles in the target environment without any manual intervention. Though there are many pre-conditions to be met for updating the profiles, this facility is undoubtedly useful.
    MRS12.png

    Final Verdict

    LepideMigrator for Exchange didn’t disappoint. It did everything I wanted it to do and lived up to the promises it made. The most surprising this is how easy it was to use. I could complete the entire migration without any support. It was also very easy to manage the migration and get the all the required details.

    Another important thing for me is that it supports all versions of Exchange—from 2003 to Exchange 2016— and Office 365. I didn’t have any issues with the speed of the migration either, although this will depend on your infrastructure. With a network speeds, server resources and agents in place this solution will perform very well.

    Overall, I would say that LepideMigrator for Exchange deserves a solid 7/10 and worth for the money.

    Product page – http://www.lepide.com/exchangemigrator/

    Product download – http://www.lepide.com/exchangemigrator/download.html
  • Skype for Business unplanned DR failover and Fail back

    This article outlines the unplanned failover and fail back for Skype for business. However the DR setup must be provisioned in order for the DR activation to happen.

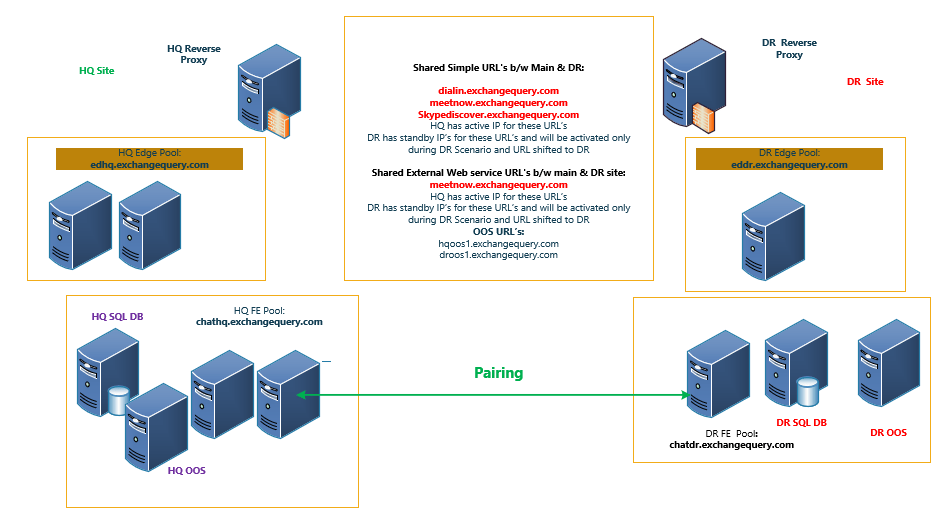
    The deployment must have the below setup :

    1)Skype for Business HQ Front end, HQ SQL ,HQ OOS will be part of the HQ active directory site.

    2) HQ site will have its dedicated Edge server.

    3) Skype for Business DR Front end, DR SQL and DR OOS will be part of the DR active directory site.

    4) DR site will have its dedicated Edge server.

    5) DR front end, edge servers will be in the same Skype for Business Site since the site is a standby site.

    6) Synchronous data Replication will be enabled between the HQ FE pool and the DR FE pool .

    7) DR sql store information must be published in the topology builder.

    8) Associated backup pool must be specified as DR Skype for business FE pool in the topology builder.DR file stores must be published in the topology builder.

    9) HQ and DR site edge servers DNS name spaces can be load balanced. DR site must be made unavailable during normal scenario and connections  to DR edge must be allowed only during DR scenario.

    10) Required communication from HQ to DR FE,SQL should be present for the Pool replication to happen.

    Example of DR setup with main site:


    SFB112

    Procedure to activate unplanned DR failover:

    In case of unplanned failover its a total disaster where the main site will be completely unavailable.

    So the  CMS (Central Management Store) ,HQ fe pool and HQ edge services will not be accessible during this scenario.

    Below steps can be used:

    1) Configure in the DNS load balancer and make sure the edge server DNS name spaces are ready to accept connections in the DR site edge server. There are multiple ways to achieve this based on the network setup. As a last resort also we can add simply 2 entries (hq & dr) on the DNS name spaces and stop the DR edge services. We can activate the DR edge services only during the DR scenarios.

    2) Activate the CMS

    We can try to run the below command to see the CMS status

    Invoke-CsManagementServerFailover -Whatif

    This command will throw an error because this CMS is not available since it was present in the main site and main site is totally in accessible.

    SFBDR7

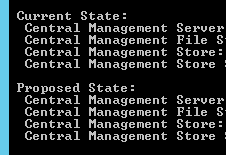
    In a normal state when the main site is available in a planned failover the result of the command will be the below

    SFBDR8

    It will let us know the current state of the CMS and the proposed state of the CMS after the failover.

    SFBDR9

    3) In this scenario the CMS needs to be activated forcefully by the below command

    Invoke-CsManagementServerFailover -BackupSqlServerFqdn “DRSQLFQDN” –BackupSqlInstaceName “BACKUPDRSQLINSTANCE” –Force:$true

    Untitled11

    SFBDR1

    4) Wait for the replication status to be completed:

    We can check the replication status by below command

    Get-CsManagementStoreReplicationStatus | ft

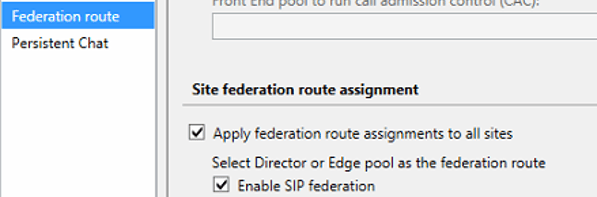
    5) Reconfigure Edge Federation Route  via DR edge and publish topology and run the setup on all edge servers.

    Enable the federation on DR edge and modify the federation route via DR edge.

    Untitled21

    Untitled12

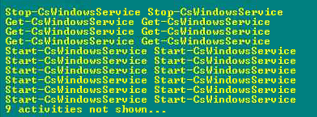
    6) Failover the Pool using disaster mode switch.

    Invoke-CsPoolFailOver -PoolFqdn “poolfqdn” -Force -DisasterMode

    Untitled14

    Failback to HQ site:

    Once after the main site is back  make sure the  DNS name spaces are available in the main site

    1)  Failover the CMS

    Invoke-CsManagementServerFailover

    Wait for the CMS replication to complete in the main site.

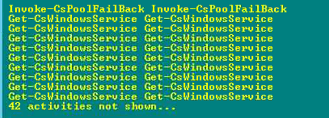
    2) Failback the FE pool to the main site.

    Invoke-CsPoolFailBack -PoolFqdn “poolfqdn”

    SFBDR2

    3) Reconfigure Edge Federation Route and publish topology and run the setup on all edge servers.

    Note: The DNS routing and the VOIP component SIP/PSTN integration will vary in each and every deployment .The DR setup and failover needs to be taken into consideration  according to these configuration.

    Thanks & Regards
    Sathish Veerapandian

  • Enterprise Vault – There has been no mailbox synchronization with Exchange since 3 days

    Recently one of the mailbox server was not syncing with  enterprise vault server and was getting the message on the status  monitor screen as unable to synchronize with one exchange server for last 4 days.

    Checked the below things:

    1. Did a Force a synchronization and checked if the A7 queue is populated – No luck.
    2. Checked for the archiving service mailbox status of that server(verified if this service mailbox is hidden) – No issues.
    3. Checked the throttling policy – all are set to unlimited and no issues.
    4. Tried to manually synchronize a mailbox  from the affected archiving Task – No Luck.
    5. Brought Offline/Online Enterprise Vault Task Controller Service – No Luck
    6. Restarted the affected Exchange Server and also the EV nodes – Still the same
    7. Checked the moved items update summary of the affected server – no of failed updates was 0 and there was no affected mailboxes present.
    8. Checked if Enterprise Vault related MSMQ queues are clear by running the below command and they were clear

    Get-MsmqQueue | where {$_QueueName -like “*private*<affected” exchange server name>*”} | ft QueueName,MessageCount -autosize

    But the interesting thing was that the affected server did not have any new files generated moved items summary  files right after the issue reported date.

    Started looking into the event logs to see if there are any additional information to be gathered right after the issue was reported

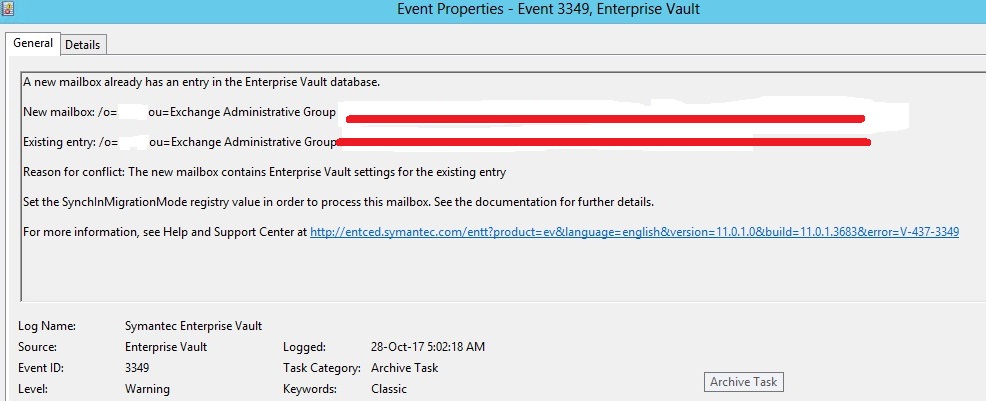
    Found this event ID 3349 right after the mailbox synchronization started happening for the affected server.

    looked for this mailbox and found it was present in the affected mailbox server.

    b7a7db31-7190-43a7-8fc5-03b7fa068c56

    Looked into the existing entry of the legacy DN of the affected mailbox in the EV directory database by running the below

    EV1

    looked into the legacy exchangeDN of the affected mailbox from the Active Directory Users and computer through Attribute Editor. Both the values were different.

    In this case the admin has removed the user and the mailbox but  archive remained. After some time the same user has rejoined and was created with the same UPN ,SAMID .

    So when the mailbox synchronization started after the new mailbox creation EV during its synchronization of this server found this mismatch entry and stuck in the synchronization. After this it was not able to proceed with the synchronization.

    Solution:

    Delete the old stale legacy mailbox DN entry from the Enterprise Vault  Directory Database.

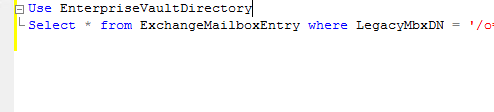
    Use EnterpriseVaultDirectory
    Select * from ExchangeMailboxEntry where LegacyMbxDN = ‘mention the old dn showing from the Event viewer’

    Once this is done we can manually run the Synchronize Mailboxes from this affected Archiving Task  and the synchronization of all mailboxes from this affected  mailbox server will be successful.

    Thanks
    Sathish Veerapandian