Small history on DKIM:
Cisco’s Identified Internet Mail (IIM) and Yahoo’s DomainKeys were merged and formed the DomainKeys Identified Mail (DKIM) in the year 2004, an IETF standard described in RFC 6376.
IIM and Domain keys is no longer supported by any RFC standards and they are depreceated.
These both systems were combined together as DKIM which is widely being used currently.
By using SPF we are actually letting everyone know that these are the authorized IP’s for sending emails.
But but few suggest they aren’t as secure and there are chances these authorized servers on SPF list can be compromised and spoofed messages can be sent.
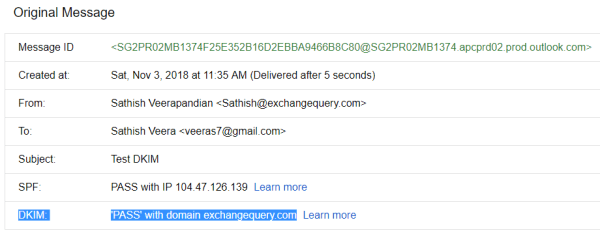
DKIM is a process through which the recipient domain can validate and ensure that the messages are originated from the actual domain sender and was not spoofed message.
How DKIM Works ?
DKIM involves 2 processes signing and verifying. Signing from the sender who has this feature enabled and can be from a module Mail Transfer Agent.
By default Exchange server does not have this option to sign for emails with DKIM.
We need to have a MTA agent to perform this job on the Exchange server or the best way is to enable this feature for signing out all emails through an SMTP gateway for an on premise setup.
Almost every SMTP gateway in the market is having this option to enable DKIM and DMARC.
When performing this operation on sender organization who has this feature enabled for outgoing emails it inserts hash tag of the DKIM signature content header fields , body fields for the author organization.
The verifying is done by the receiving part domain if the DKIM is configured in that recipient domain. If at all there is no DKIM configured no DKIM verification will be performed on the receiver and the mails will be routed normally to the recipient.
The receiving SMTP server uses the domain name and the selector to perform a DNS lookup
We can rotate the keys randomly from the smtp gateway or from the application which is doing the job if at all we have a doubt if the private key is compromised.
In this case we need to change the selector name accordingly in the DNS for DKIM to reflect the new selector having the new private key.
The above scenario is very very rare and if it happens anyone will be able to get a copy of your private keys, they will be able to sign messages on your behalf.
The private key will be present on the MTA agent with the domain owner itself which performs this job and the public key will be published as a DNS text records.
By using this DNS published text records it allows anyone to verify that the signature(hash tag) present in the received email is valid and no contents in the email have been tampered.
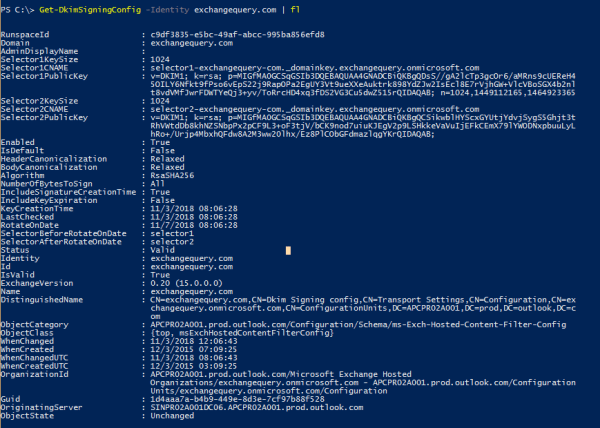
Below are the core components with which the DKIM will be functional :
Selector (S) – Its usually the SMTP server which has the key pair certificate (private key usually SMTP server)
We can have multiple selectors if we have multiple SMTP servers
Or we can use the same key pair on all the SMTP servers which is best because we don’t need to publish multiple DNS records for multiple selectors.
_domainkey – Static fixed part of the protocol itself and can’t be altered.
d(Signing Domain) – This part needs to be verified so it should be our domain name.
p(Public-key data) – This portion contains the public key of our generated cert request in base encoding.It should be definitely base64 encoding format.
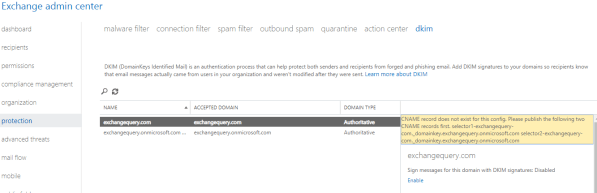
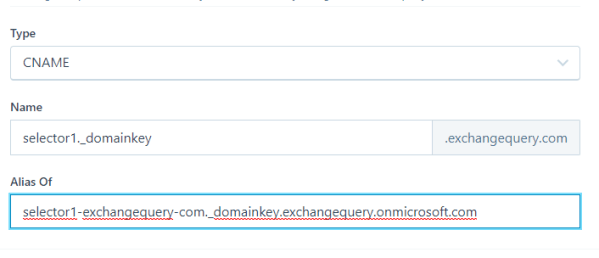
Once the DKIM domain records is created we need to append the TXT record in the DNS records for the newly created subdomain with the public key generated from the DKIM responsible server(selector).
Below are the additional components which can be added if required:
v – is the version.
a – is the signing algorithm.
c – is the canonicalization algorithm(s) for header and body.
q – is the default query method.
l – is the length of the canonicalized part of the body that has been signed.
t – is the signature timestamp.
x – is its expire time.
h – is the list of signed header fields, repeated for fields that occur multiple times.
Below is the overall steps:
1) Create your signing key in the agent or server responsible for this job in your environment.
2) Publish your DKIM DNS record for your domain.
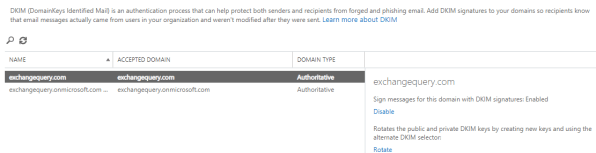
3) Enable the DKIM signing and encrypting option for all outbound emails.
Below is the standard DKIM configuration through SMTP server MTA Agent:

Benefits of DKIM:
1) DKIM will add positive points to the antispam in terms of SCL rating for our internet emails.
2) There is no possibility of Spoofed emails going on behalf of our domain if we have SPF and DKIM together.
If we have multiple SMTP Gateways do we need to have multiple selectors ?
In this case we can use the same key and profile on all SMTP Gateways.So we create a domain profile on the first Gateway as well as the signing key and publish the TXT record. Its better to have only one TXT record for a domain. The same keys generated on one SMTP GW can be used on all of the Gw’s we have. Just we can import them on all gateways. By doing this we don’t need to create multiple txt entries for the respective selectors.
After this Export Public Key and add the TXT entries in the public DNS server.
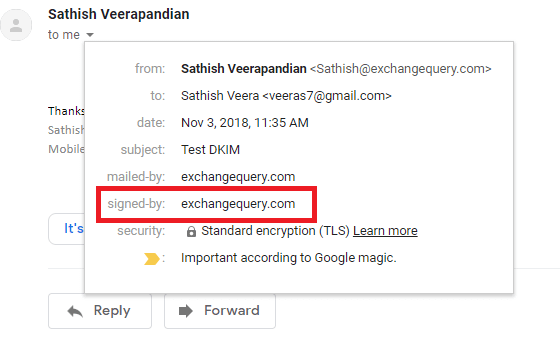
So basically a DKIM enabled org will have all the sent emails stamped with a hash tag with the private key from the DKIM MTA agent or the SMTP Gateway.
The recipient domain will perform the DKIM validator if it does by querying the DKIM text records.
The recepient domain will consider this domain valid only when the sender email has the hash tag.Basically this is a key pair.
DMARC : Domain-based Messaging, Authentication, Reporting and Conformance (DMARC) standard
DMARC is a mechanism for domains to get reports on DKIM and SPF results for our domain if we have them configured.They let us know what to do if the SPF or DKIM fails for our domain.
A DMARC policy applies clear instructions for the message receiver to follow if an email does not pass SPF or DKIM authentication—for instance, reject or junk it which we can configure according to our requirement.
DMARC sends a report back to the sender about messages that PASS and/or FAIL DMARC evaluation.
Through DMARC, we can receive all the forensic reports sent on behalf of our domain daily.
We need to Designate the email account(s) where we want to receive these reports and all the reports will be sent to this email address.
This DMARC again requires a DMARC tag that will be inserted on all outgoing emails which are with SPF and DKIM. So we are letting the receiver to verify this DMARC tag.
DMARC tags are the language of the DMARC standard.
Below are the important required tags for DMARC:
v: Version – This tag is used to identify the TXT record as a DMARC record and is static value as is.
p: Requested Mail Receiver Policy.
Again this P can be any of these 3 values
p=none: No specific action will be taken on emails that fails in DMARC validation.
p=quarantine: By doing this we are requesting the receiver end to place the email in the spam/junk folder and mark them as suspicious.
p=reject: By doing this the domain owner says strictly reject all emails that fails DMARC validation on the receiver end.
This is the best recommended way and it provides a highest level of protection.
rua: Indicates where aggregate DMARC reports should be sent to.
Senders designate the destination address in the following format: rua=mailto:domain@example.com.
fo: Dictates what type of authentication and/or alignment vulnerabilities are reported back to the Domain Owner.
pct:We are specifying this value to the percentage of messages to which the DMARC needs to be applied for all the outgoing messages.
This can be optional and can be used to test the impact of the DMARC policy at the initial stage and later can be removed or kept 100.
Below is an example of the DMARC record of how it should be created with the above required tags:
v=DMARC1; p=reject; fo=1; rua=mailto:domain@example.com; rf=afrf; pct=100
The above method of creating a txt record is the DMARC standard.
Also we need to specify the email address where the reports should be sent.
We also need to inform ISP’s to send all the messages to the specified email address and not to block as a spam or reject them for any reason.
Important points to be considered while enabling DKIM:
1) DKIM verification is automatically verified for all messages sent over IPv6 communications if the recipient domain has DKIM verifier enabled.
2) This DMARC is again configurable in on-premise only if your SMTP Gateway is having this feature.
3) DKIM performs Cryptographic checksums on every outbound messsages sent externally.This increases the protocol load overhead on the outgoing emails and more memory system resources will be consumed to perform this operation.
4)DKIM is an IETF Draft Standard, and it is free of cost no need to pay anything for your ISP because all we need is the DKIM public key text entries.
5) If the receiver domain does not have this DKIM verifier configured all the emails sent with DKIM enabled will be received normally and there will not be any issues.
Thanks & Regards
Sathish Veerapandian
MVP – Office Servers & Services