Category Archives: Antispam

Configure DKIM in office 365 Environment

In this article we will go through the steps to enable DKIM in pure  office 365 cloud environment.

For understanding DKIM concepts and  Enabling DKIM in on premise environment you can follow my previous blog 

The main difference between enabling DKIM in on premise environment and office 365 is:

  1.  In on premise we keep the private keys in our outgoing Anti spam gateway or DKIM agent which will be responsible for signing every outbound emails with DKIM stamp. Later we publish the public key in the DNS record.
  2.  But office 365 requests the customers to publish the CNAME and point them to a public key in DNS which will delegate the corresponding name space to office 365.

With this office 365 CNAME option we can rotate the keys whenever required. Because in this case the private key is owned by Microsoft and the public key is maintained in their office365 DNS records. We just need to create CNAME in our DNS console only for the first time. Later we need to create CNAMES only for the new domains we are adding in office 365.

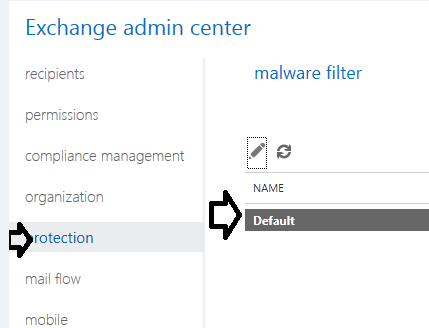
First we need to enable DKIM from the Exchange admin center from the office 365 portal – navigate to protection – click on DKIM tab

We can enable for the routable domains registered with office 365. But when we enable them without publishing the DNS records for DKIM then we will get the below error.

Untitled

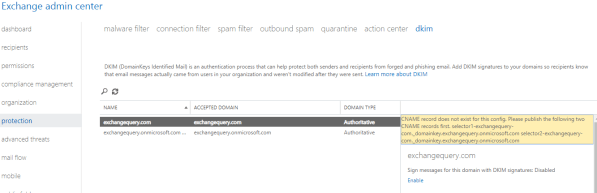
We have to publish DKIM DNS records as below:

Create 2 CNAME records for 2 selector’s to sign the outgoing emails with DKIM.

In our case we need to create below records from the DNS hosting provider console.

Host name: selector1._domainkey.exchangequery.com
Points to address or value: selector1-exchangequery-com._domainkey.exchangequery.onmicrosoft.com
TTL: 3600

Host name: selector2._domainkey.exchangequery.com
Points to address or value: selector2-exchangequery-com._domainkey.exchangequery.onmicrosoft.com
TTL: 3600

Untitled1

Untitled2

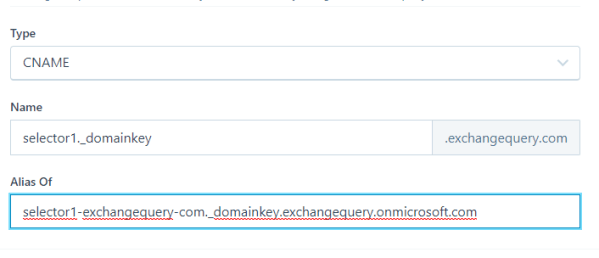
Once we create these 2 CNAME records office 365  will take care of signing all the outgoing emails with DKIM with their signing agents.

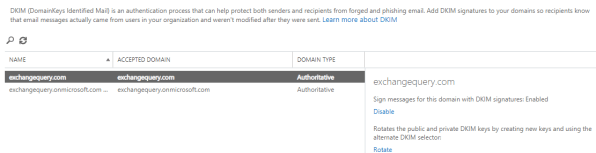
Now if we go to office 365 portal and enable the DKIM it will get enabled. If we have a closer look we have an option to  rotate DKIM keys just in one radio button which is amazing option. Ideally its  not required to do this option from our side  since office 365 will do the rotation  of their keys once in a while as a part of their security checks.

Untitled3

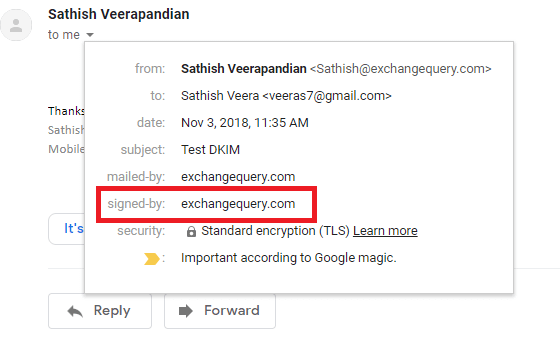
To verify if the mail is signed by DKIM we can send one test email to gmail and if it says signed by your domain name then its DKIM enabled outbound email.

Untitled4

In the message headers we can see the DKIM status as passed.

Untitled8

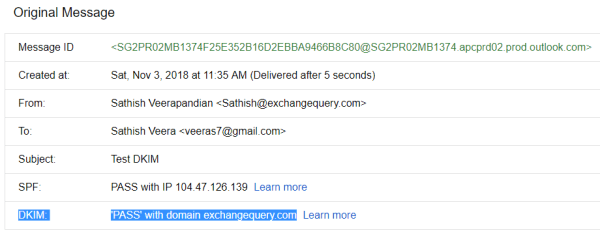
Further if we look into the message headers we can see

Authenticated Received Chain (ARC)- New email security mechanism standard Which is currently used by office 365.
DomainKeys Identified Mail (DKIM)-  If the DKIM is enabled we see the DKIM value as pass.
Sender Policy FrameWork(SPF)-  SPF verification results.

Untitled6

Also in the DKIM signature we can see the selector and the domain name like below

Untitled5

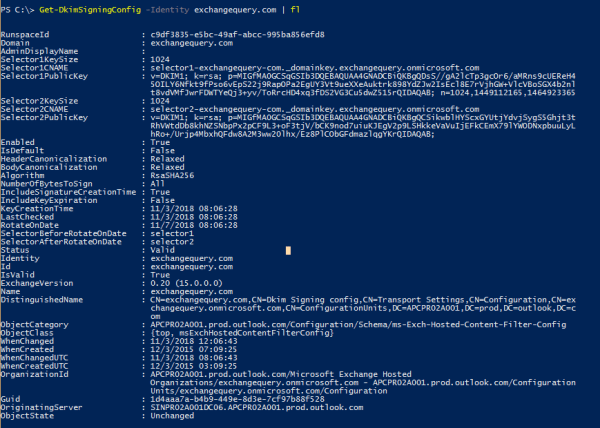
Further we can look into the DKIM public keys by running the below command.

Get-DkimSigningConfig -Identity exchangequery.com | fl

Untitled9

Additional General Info:

Below can be the possible results as a part of DKIM test in the message header.

  • DKIM=Pass – Message was Signed.
  • DKIM=Fail – The message was signed and the signature or signatures were acceptable, but they failed the verification test(s).
  • DKIM=None – The messages were not signed.
  • DKIM=Policy – The messages were signed but the signatures were not acceptable.
  • DKIM=neutral = The message was signed, but it was not formed correctly. This is possibly a configuration error on the sending domain side.
  • DKIM=temperror – This is a temproary error where unable to verify the public key for the DKIM verification.
  • DKIM=permerror = The message could not be verified due to some error that is unrecoverable.

Continue reading

New Boomerang feature to prevent Backscatter (Reverse NDR Attack)

Reverse NDR attack is one of the most common method of spamming a mail server by the hackers. Even though if they are unable to compromise any user accounts by this method in an organization they can increase the load on the messaging system and our network bandwidth  by bouncing the NDR’s back and forth. This makes the end users more annoying to think why they got NDR’s for the message which they never sent.


What is Reverse NDR Attack?

1) Spammer creates and email address with the spam victim’s address in the sender field since sender can always be anonymous and in the recipient he addresses them with random common names at your domain.

Ex: from:Sathish@contoso.com , To:Jack@exchangequery.com,Jim@exchangequery.com

2) He attaches an spam email and sends to the random addressed recipients of the victims domain.
3) Your mail server cannot deliver the message and sends an NDR email back to what appears to be the sender of the original message, the spam victim.
4)The return email carries the non-delivery report and possibly the original spam message. Thinking it is email they sent, the spam victim reads the NDR and the included spam.


Microsoft has brought some basic filtering setup for this Backscatter detection in EOP(Exchange Online Protection) which is more beneficiary. It uses a method called BATV( Bounce Address Tag Validation)


What is BATV ?

BATV( Bounce Address Tag Validation) is a standard internet draft of validating a reverse NDR email to see whether it is legitimate with a tag value or not.

How does this works ?

It uses a cryptographic hash. This cryptographic hash contains a valid return path of an email address, time stamp in the encoded format.So any NDR that is returned to a system without this cryptographic has tag value will be halted/rejected and hence no bounce backs.

BATV replaces an envelope sender like sathish@hotmail.com with prvs=tag-value=sathish@hotmail.com, where prvs, called “Simple Private Signature” . This PRVS is one of the possible method of tagging the values though there are few more in the standards followed.

This cryptographic token cannot be forged at any cost until they come to know the PRVS tag value.

For on-premise setup If you have this reverse NDR filtering setup in your anti-spam filtering agent you need not worry about this setup since your spam filtering will take care of this part.

If you are an on-premise customer and if you have your email filtering with EOP then Microsoft recommends to turn on this feature .

If your Mailboxes are hosted with Office 365 you no need to worry about turning on this feature. However Microsoft recommends to turn this feature ON if your outbound email goes through Office365(Not sure why)


Below are the steps to turn on this feature in through EAC

Open EAC – Click on protection – Navigate to your Policy – Click Advanced

Capture


Turn on the NDR back scatter option

Capture1

Enabling this option will definitely add additionally layer of security especially for reverse NDR attacks. Hope this helps.

Thanks 
Sathish Veerapandian

MVP – Exchange Server

Steps to Delete circulated Suspicious emails with Search-Mailbox

In this article we will have a look at steps to identify the spam emails circulated in an environment. When a user suspects any spam email and informs the IT Team  first and the foremost thing that would come to an Admin is that whether the emails have been circulated to everyone or not.

There are multiple scenarios where the spam messages can be circulated in an environment.

  • From single spam source  email address to single recipient.
  • From Single spam email address to multiple recipients.
  • From multiple spam email address to multiple recipients with different subject line.

Its always better to make a search in the whole organization to make sure the emails are not circulated to all the users.

The easiest way to identify the spam emails is to run a search command with the subject line so that all the affected mailbox can be identified.

Now we will have a look at the steps to perform this action with search-mailbox command.

First we need to add the user who is going to perform this task to Discovery Management group
This should be done in order to use the search-mailbox command. If we do not add this then the user won’t be able to run search command.

Create a new role group as below. We need this in order to export/Import the contents from the source mailbox and copy it to the target mailbox.
Run the below commands to create the role group if we don’t have already . If we have the import/export rolegroup already then just add the user who is going to perform this action into that rolegroup.
To Create –  New-RoleGroup “Mailbox Import-Export Management” -Roles “Mailbox Import Export”
To Add user – Add-RoleGroupMember “Mailbox Import-Export Management” -Member Administrator

newsearch5

Even if single user suspects a virus message it is better to search in the whole organization to make sure the emails are not circulated to others.Now run the below command to search the virus email throughout the organization. In our example we are going to identify an infected email with the subject “Virus Infected”

get-mailbox -ResultSize unlimited -IgnoreDefaultScope | search-mailbox -SearchQuery ‘Subject:”virus infected”’ -LogOnly -TargetMailbox administrator -TargetFolder filter -LogLevel Full

NewSearch1

Once we run the command we could see the searching would be started as shown in the above screenshot. The search results may take some time depending upon the environment and number of mailboxes we have.

Upon a successful completion of search we can see the logs and the emails in the zip file attached as shown in the screenshot.

newsearch2

Now we need to run the below command to search the infected emails and delete all of them in the whole organization

get-mailbox -ResultSize unlimited -IgnoreDefaultScope | search-mailbox -SearchQuery ‘Subject:”virus infected”’ -TargetMailbox administrator -TargetFolder filter -deletecontent -LogLevel Full

newsearch4

Once it identifies the affected emails it would ask us for confirmation as shown above before deleting the suspected emails as shown in the screenshot above.

Apart from the above as an additional part of security check we can also run a message tracking with the subject in the whole organization to see to whom all the infected emails have been circulated and ensure all the emails have been deleted.

Run the below command to perform a Message Tracking with subject in the whole organization. In our case we are using the subject “Virus Infected” .

Get-ExchangeServer | where {$_.isHubTransportServer -eq $true -or $_.isMailboxServer -eq $true} | Get-MessageTrackingLog -Messagesubject “Virus Infected” | Select-Object Timestamp,ServerHostname,ClientHostname,Source,EventId,Recipients | Sort-Object -Property Timestamp

newsearch6

Imp Note Note:

Hi Please add your account to Discovery Management role group for the search-mailbox command to work.

Add-RoleGroupMember -Identity “Discovery Management” -Member Administrator

Above method can be used to identify and delete any circulated spam email in our organization.

Thanks

Sathish Veerapandian

MVP – Exchange Server

Product Review: SPAMfighter Exchange Module

Protecting the the IT infrastructure from Spam mails,Malicious codes ,Malwares is one of the important and challenging task and needs to be monitored always. There are different types of spam attack through which an user can try to crack the perimeter network of any organization and intrude to inject any kind of malicious codes or phishing emails. While the most widely used type of method for circulating SPAM is Email through which unwanted emails, more number of spam emails, reverse NDR attacks etc.,  are circulated by which the productivity of an organization will be adversely affected.

Its always better to have 2 step anti-spam filtering feature or even more in any organization to ensure that the spam never reaches our network especially the Messaging system.

Microsoft has built in Anti spam features which can be enabled from Exchange 2003 versions and they work perfectly fine and more accurate in filtering the spam emails. Its always recommended to have this feature enabled as a part of additional security along with additional spam configurations and settings  in an environment.

But we need to always ensure that we are aware of all the settings configured in the spam filtering in all levels in our organization as it can interrupt the end users in sending and receiving emails if this configuration is not correct.

I just happened to walk through one of the most recent version of additional  spam security feature from product SPAMfighter and was much impressed with all the Configurations, Options and user friendliness of the product r.

In this article lets walk through the installation and few functionalities of the product SPAMfighter Exchange Module.

What is SPAMfighter ?

It is an add-on to Exchange Server that fully integrates and offers anti spam protection.  It works with Exchange versions Exchange 200,2003,2007,2010 and 2013.

How Does it works ?

Spam Fighter administration is managed through web interface which is much user friendly and has more options to explore.

It works integrated fully with Microsoft Exchange Server. It creates its own security groups and user account in AD which integrates with Exchange servers. This will be easier for us to manage easier way in terms of policy management and having separate control over Spam Fighter. Also by using this we can designate an individual to take care of these tasks who has control only on this software.

Prerequisites 

There is no prerequisites required to install this software as i ran it from a member server ( Windows server 2008) . The only thing i noticed was it required install the Microsoft Visual C++ Run-time which it prompted for it and it found the software by its own and installed them which made my job simple.

Installation

The product can be downloaded from here

http://www.spamfighter.com/SPAMfighter/Product_SEM.asp

Its a 30 day trial version and should be downloaded on to Windows Servers.

The installation was pretty much standard as all the software does and it prompted me for the latest virus definition updates so i would not walk through the entire setup.

One interesting thing i found during the installation was it asked for user name and password for Spam Fighter administration and it automatically created respective AD account to integrate with the exchange modules.


s1


Once the installation is done you can open up the web console through add or remove programs and select spam fighter and opens web console as below

Give the user name and password given during installation.

S2


Was astonished to see more options

S3


In addition to the administration part from the server end spam fighter has outlook add in as well which users can install and further customize filtering on their own.

s4


It has good policies which can be filtered in various levels as shown below.

I can see policy defined for inbound,outbound and internal emails.

Also i could notice policy filter settings for user level too which is very good.

s5


All the users can be modified individually as well.

s6


Finally a statistics report can also be pulled over which shows up the graphical value of filtered emails as below.

s7


Cost Factor

Like most of the  apps which integrate with exchange makes licensing cost per user the spam fighter also have licensing structure  cost per user  basis for one year. However the cost factor reduces very well for organizations more than 2500 users.

You can view the pricing list here

http://www.spamfighter.com/SPAMfighter/Payment_Choose_Product_SEM.asp

Conclusion 

Overall SPAMfighter product is much user friendly and latest version  has much effective cool new features which can be integrated with Exchange Servers  for better spam filtering.

Thanks 

Sathish Veerapandian 

MVP – Exchange Server

Comparing the differences between Antispam agents from Exchange 2010 to Exchange 2013

Microsoft has built in Anti spam feature which can be enabled from Exchange 2003 versions. We can enable this feature as a part of additional security along with additional spam configurations and settings that have been configured before it reaches our network.

But we need to always ensure that we are aware of all the settings configured in the spam filtering in our organization in all the levels as it can interrupt the end users in sending and receiving emails if this configuration is not correct.

In this article we will be looking at how about Anti spam features in Exchange 2013 and its features

Now we will look at how to enable the Anti spam feature in Exchange 2013

By default the Anti spam agents are installed in Exchange 2013 if enable Anti spam option  during the time of installation. Else we need to install them after the installation.


In Exchange 2010 the Anti-spam will be enabled on the HUB & Edge servers.

In Exchange 2013 we need to enable Anti-spam agents in the Mailbox servers since the transport categorization takes place on mailbox server.

 From Exchange 2013 SP1 we have edge servers in which we can enable the Anti-spam agents as well.

The installation of the Exchange Anti-spam agents is the same step as we do it for Exchange 2010.

We just need to navigate to the exchange installation path directory and navigate to below location and install the Exchange Anti-spam.


Image


Image


Once the Anti-spam is installed  we need to restart the Microsoft Exchange Transport Service for the changes to take effect.

After we restart the transport service we can run Get-Transport agent and see if Exchange Anti-spam agents are installed.

We can further have a look at this by pipe-lining the output 

Image


Now comparing the differences between anti-spam agents in Exchange 2010 and 2013.

This is the output of the Exchange Anti-spam installed on Exchange 2010.

Image


This is the output of the Exchange Anti-spam installed on Exchange 2013.

Image


When we compare the Exchange Anti-spam agents between Exchange 2010 and 2013 we can see in Exchange 2013 there is a new transport agent  component called Malware agent which is been introduced. This is a built in Antimalware protection for on premise which can be enabled for additional security.

Also we can notice that the connection filtering agent is not present in Exchange 2013 mailbox servers and they are present in the Edge transport servers since the connection can be decided and filtered at the perimeter level itself.

Once after we enable this Anti-spam agents there will be a default Anti-spam created as we can modify them through EAC as well as shown below.

Image


In addition to the default malware policy we can always create custom policies as per our requirement and assign to our organization. There are more parameters which can be altered. Below is an example.


Image


This Exchange Anti-spam feature is a global level feature which cannot be altered server level and group level.

It’s always better to download antimalware engine and definition updates from Microsoft Download Engine and Definition Updates to keep the Anti-Spam Features up to date.

Configure Malware in Exchange 2013

Microsoft Exchange 2013 has the basic antimalware settings which can be enabled during the installation

By default we have a default malware policy which can be modified according to our needs.But it cannot be deleted.

We can create our our malware policy according to the company needs.

Below are the steps to configure malware in Exchange 2013

Open EAC – Click on protection and you will get the malware filter tab

Click Edit to edit the default malware policy

Image

Click on settings and you can give any desired description on our own for this policy

Image


We have malware detection options as shown below and can use any of them .

Also we have options to send messages to the internal/External senders about the NDR

Image

Also we can notify administrator about the spam messages. We can specify customized notification text message as well.

Image


Image


%d bloggers like this: