Category Archives: Exchange2013

Back Pressure in Exchange in 2013

Back-pressure is used to monitor resources like hard disk space , availability of memory and version buckets to give an advance notification to the administrator before the email server is totally down.This feature was introduced from Exchange 2007. The concept of back-pressure in Exchange 2013 is the same as it was in Exchange 2010.
Basically high level of hard drive space utilization is calculated by using the following formula in Exchange 2013:
100 * (hard disk size – fixed constant) / hard drive size
The value of fixed constant is 500 megabytes (MB)

A list of changes that are made to the message queue database is kept in memory until those changes can be committed to a transaction log. Then the list is committed to the message queue database itself. These outstanding message queue database transactions that are kept in memory are known as version buckets.

If normal level isn’t reached for the entire version bucket history depth, then edgetransport.exe config file is coded to take the following actions:

1) Reject incoming messages from other Exchange servers ( could be internal exchange servers as well as external exchange servers)- initially

2) Reject message submissions from mailbox databases by the Mailbox Transport Submission service on Mailbox servers – End users sent email received from their respective databases to transport submission service will be rejected. Which means that these messages will not reach till the categorizer level and all the messages will be rejected at the precategorizer level itself.
3) Reject incoming messages from non-Exchange servers – Could be notes,zimbra etc.,
4) Reject message submissions from Pickup and Replay directories – Messages from applications dropped in the pickup directory

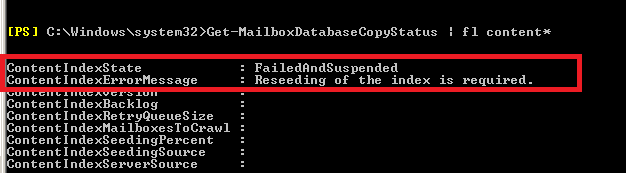
Similarly following event logs will be logged in the affected server:

Event log entry for an increase in any resource utilization level
Event Type: Error
Event Source: MSExchangeTransport
Event Category: Resource Manager
Event ID: 15004
Description: Resource pressure increased from Previous Utilization Level to Current Utilization Level.

Event log entry for a decrease in any resource utilization level

Event Type: Information

Event Source: MSExchangeTransport

Event Category: Resource Manager
Event ID: 15005
Description: Resource pressure decreased from Previous Utilization Level to Current Utilization Level.
Event log entry for critically low available disk space
Event Type: Error
Event Source: MSExchangeTransport
Event Category: Resource Manager
Event ID: 15006
Description: The Microsoft Exchange Transport service is rejecting messages because available disk space is below the configured threshold. Administrative action may be required to free disk space for the service to continue operations.
Event log entry for critically low available memory
Event Type: Error
Event Source: MSExchangeTransport
Event Category: Resource Manager
Event ID: 15007
Description: The Microsoft Exchange Transport service is rejecting message submissions because the service continues to consume more memory than the configured threshold. This may require that this service be restarted to continue normal operation.

So the above event logs will help you to identifying the back-pressure on the affected server

Solution:

Use the Command Prompt to move the existing queue database and transaction logs to a new location.
In a Command prompt window, open the EdgeTransport.exe.config file in Notepad by running the following command:

Notepad %ExchangeInstallPath%Bin\EdgeTransport.exe.config

Change the drive letter in which you wish to have the new location by changing in the below add key values

<add key=”QueueDatabasePath” value=”D:\Queue\QueueDB” />
<add key=”QueueDatabaseLoggingPath” value=”D:\Queue\QueueLogs” />

Thanks 

Sathish Veerapandian

MVP – Exchange Server

Quick Bites – Deploy Edge server in Exchange 2010/2013 coexistence scenarios

If you deploy Exchange 2013 servers in your Exchange 2010 organization and you have external mailflow configured to pass emails through exchange 2013 Edge Transport servers, you should configure subscription for Exchange 2013 edge servers to your existing Exchange 2010 hub servers.

You can subscribe an edge server in a site to multiple HUB servers if it is(Exchange 2007/2010) and CAS & Mailbox Combined together if it is Exchange 2013 servers.

You can subscribe a 2007/2010 edge to 2013 Exchange CAS & HUB combined servers. This can be done vice versa as well.

You can import the Edge Subscription file and run EdgeSync on a standalone Exchange 2013 Mailbox server, or on a server where the Mailbox server and the Client Access server are installed on the same computer.

Note :

You can’t import the Edge Subscription file or run EdgeSync only on a standalone Exchange 2013 Client Access server.
You cannot subscribe an edge servers to multiple site since edge servers are bounded to site specific and can be subscribed to multiple mailbox & CAS servers in a single site

Make sure you open the below ports on the firewall

Inbound traffic:
SMTP – TCP port 25 (from Internet)
SMTP – TCP port 25 (from Edge server to Hub server on internal network)
Outbound traffic:
SMTP – TCP/UDP port 25 (from Edge to Internet)
SMTP – TCP/UDP port 25 (from Hub to Edge server)

Very IMP : Do not open the below mentioned ports on perimeter firewall. These ports should be open only on intranet firewall.

LDAP for Edge Sync – TCP port 50389 (from Mailbox to Edge server) Secure LDAP for Edge Sync – TCP port 50636 (from Mailbox to Edge server).

Thanks
Sathish Veerapandian

MVP – Exchange Server

Microsoft Exchange Search Host Controller service terminated unexpectedly

We might notice that Microsoft Exchange Search Host Controller service is crashing intermittently after a database failover and trying to start by its own but never succeeds.

When we look in to the application log we will get the following event logs

The Microsoft Exchange Search Host Controller service terminated unexpectedly.  It has done this 1 time(s).  The following corrective action will be taken in 60000 milliseconds: Restart the service

  1. Faulting application name: hostcontrollerservice.exe, version: 15.0.4454.1006, time stamp: 0x50d08ef5
    Faulting module name: KERNELBASE.dll, version: 6.2.9200.16384, time stamp: 0x5010ab2d
    Exception code: 0xe0434352
    Fault offset: 0x00000000000189cc
    Faulting process id: 0x73f0
    Faulting application start time: 0x01d0348c64230ae1
    Faulting application path: C:\Program Files\Microsoft\Exchange Server\V15\Bin\Search\Ceres\HostController\hostcontrollerservice.exe
    Faulting module path: C:\Windows\system32\KERNELBASE.dll
    Report Id: a5eb039b-a07f-11e4-9438-00155d0aca05
    Faulting package full name:
    Faulting package-relative application ID:


What is the main functionality of this Microsoft Exchange Search Host Controller service?

It connects with exchange mailbox databases and creates content indexes for each databases.

This content indexes helps in the eDiscovery search.This eDiscovery search uses the content indexes for search query that are done in the entire organization.


What things will be affected if the Microsoft Exchange Search Host Controller service is stopped?

1) We will not be able to perform  eDiscovery search in the entire organization.


2) And also mailbox database in a DAG will not automatically failover if the content index is not healthy and it shows as failed and suspended.

However we would be able to perform a manual failover through EMS with the switch -SkipClientExperienceChecks with a bad content index state as a work around.

Things to check:

I would recommend to have to have latest updates installed on all Exchange servers.

Disable all the AV and third party agents running on the affected server, try starting the host controller service and see the results.

Run the below command to check the content index status of the database

content

If you get the above error rebuilding the content index will help to start the host controller service

However  if you identify the content index state to be failed and suspended for only one database then you can use the below command to reseed the content index catalog only for that database .


Update-MailboxDatabaseCopy -Identity DBname\MBXservername  -CatalogOnly

To rebuild the whole content index of affected mailbox server perform the below task

Log on to the affected server and navigate to the below location where you have host controller files


<C:\Program Files\Microsoft\Exchange Server\V15\Bin\Search\Ceres\HostController

hostcontroller.old

Set the host controller service and Microsoft exchange search to disabled and stopped state

Rename the folder hostcontroller to hostcontroller.old    and start the host controller service this time it should most probably start the service without any issues

Once the service starts it will build new content indexes for the mailbox databases on the affected server.

Also Refer : http://social.technet.microsoft.com/wiki/contents/articles/29640.microsoft-exchange-search-host-controller-service-terminated-unexpectedly.aspx

Thanks

Sathish Veerapandian

MVP – Exchange Server

Modify Connectors to Send/Receive Internet Mails on different port through your spam filtering/ISP provider

We can Modify Connectors for Receiving Internet Mail on different port apart from port 25 through your spam filtering/ISP provider.

This step applies to Exchange 2007/2010/2013. It is always a best practice to have this kind of setup so the spammers will not be able to intrude in our network and perform a directory harvest attack,reverse NDR attack etc.., and we can prevent spam emails circulating  in our environment.

Perform the  following thing to achieve this task.

1) Create a dedicated receive connector for your ISP/Spam filtering provider domain.

2) Add only to your (ISP/Spam filtering provider)   subnet and IP ranges. Note : You need to remove the default subnet range. Specify the ip ranges of only your Spam filtering provider or ISP provider

3) Change the port to your desired number on which you need to receive emails from them.

Hub1

4) Disable the default receive connector since it’s not required anymore.

So the mail-flow for inbound will be in the following type

Inbound

From Internet – Mails comes to your ISP/smart host – ISP delivers emails to your firewall on different port – then it comes to exchange server

For sending emails to the internet it would be very easy

Just create a send connector and smart host it to your (ISP/spam-filtering provider) IP address so that all the internet emails would be delivered to desired port to your (ISP/spam-filtering provider).

Outbound  From Exchange – Email goes to your (ISP/Spam filtering provider) on a different port – Mail gets delivered to the internet user on standard port 25

Make sure that all the port numbers that you have configured to send/receive emails through your Spam filtering provider have been opened both inbound and outbound on your corporate and perimeter firewall.

Also refer – http://social.technet.microsoft.com/wiki/contents/articles/29577.modifying-connectors-for-sendingreceiving-internet-mails-on-different-port-apart-from-port-25-through-your-spam-filteringisp-provider.aspx

Thanks 
Sathish Veerapandian

Error – “Something went wrong” in both OWA and ECP

After applying updates on Exchange 2013 environment we might come across the below symptom  from end users while accessing OWA

User can use outlook to send/receive emails normally, but when the user try to login OWA, a “something went wrong” screen with the following information appears:


owa

An unexpected error occurred and your request couldn’t be handled.

X-OWA-Error: System.NullReferenceException

X-OWA-Version: 15.0.775.32

X-FEServer: {2013 CAS server}

X-BEServer: {2013 Mailbox server}

Date: **

1) Rebuilding OWA/ECP virtual directories will not help

2) Playing with owa authentication settings will not help

3) Re-installing exchange server also will not help at times


While looking into the event logs you can find the below log with the description


ev

Description        :
Event code: 3005
Event message: An unhandled exception has occurred.
Event time: 8/30/2013 11:02:13 AM
Event time (UTC): 8/30/2013 4:02:13 PM
Event ID: f959d55d927a45f8b3b69051bbd62038
Event sequence: 2
Event occurrence: 1
Event detail code: 0

Application information:
Application domain: /LM/W3SVC/2/ROOT/owa-1-130223042171473642
Trust level: Full
Application Virtual Path: /owa
Application Path: C:\Program Files\Microsoft\Exchange Server\V15\ClientAccess\owa\
Machine name: EXC2013CAS

Process information:
Process ID: 13764
Process name: w3wp.exe
Account name: NT AUTHORITY\SYSTEM

Exception information:
Exception type: NullReferenceException
Exception message: Object reference not set to an instance of an object.
at Microsoft.Exchange.Clients.Common.Canary15.Init(Byte[] userContextIdBinary, Byte[] timeStampBinary, String logonUniqueKey, Byte[] hashBinary, String logData)
at Microsoft.Exchange.Clients.Common.Canary15..ctor(String logonUniqueKey)
at Microsoft.Exchange.Clients.Common.Canary15Cookie.TryCreateFromHttpCookie(HttpCookie cookie, String logonUniqueKey, Canary15Profile profile)
at Microsoft.Exchange.Clients.Common.Canary15Cookie.TryCreateFromHttpContext(HttpContext httpContext, String logOnUniqueKey, Canary15Profile profile)
at Microsoft.Exchange.Clients.Owa2.Server.Core.OwaRequestHandler.InternalOnPostAuthorizeRequest(Object sender)
at Microsoft.Exchange.Clients.Owa2.Server.Core.OwaRequestHandler.OnPostAuthorizeRequest(Object sender, EventArgs e)
at System.Web.HttpApplication.SyncEventExecutionStep.System.Web.HttpApplication.IExecutionStep.Execute()
at System.Web.HttpApplication.ExecuteStep(IExecutionStep step, Boolean& completedSynchronously)

Request information:
Request URL: https://localhost:444/owa/logoff.owa
Request path: /owa/logoff.owa
User host address: 127.0.0.1
User: CORJESU\SM_cab26786a5604c759
Is authenticated: True
Authentication Type: Kerberos
Thread account name: NT AUTHORITY\SYSTEM

Thread information:
Thread ID: 12
Thread account name: NT AUTHORITY\SYSTEM
Is impersonating: False
Stack trace:    at Microsoft.Exchange.Clients.Common.Canary15.Init(Byte[] userContextIdBinary, Byte[] timeStampBinary, String logonUniqueKey, Byte[] hashBinary, String logData)
at Microsoft.Exchange.Clients.Common.Canary15..ctor(String logonUniqueKey)
at Microsoft.Exchange.Clients.Common.Canary15Cookie.TryCreateFromHttpCookie(HttpCookie cookie, String logonUniqueKey, Canary15Profile profile)
at Microsoft.Exchange.Clients.Common.Canary15Cookie.TryCreateFromHttpContext(HttpContext httpContext, String logOnUniqueKey, Canary15Profile profile)
at Microsoft.Exchange.Clients.Owa2.Server.Core.OwaRequestHandler.InternalOnPostAuthorizeRequest(Object sender)
at Microsoft.Exchange.Clients.Owa2.Server.Core.OwaRequestHandler.OnPostAuthorizeRequest(Object sender, EventArgs e)
at System.Web.HttpApplication.SyncEventExecutionStep.System.Web.HttpApplication.IExecutionStep.Execute()
at System.Web.HttpApplication.ExecuteStep(IExecutionStep step, Boolean& completedSynchronously)


By looking into the event viewer we can see this is related to Active Directory Cache error related with CAS server for a value called Canary Data

What is this Canary Data ?
Basically Canary Data is an attribute that is created during the first exchange 2013 schema preparation.

It creates 4 attributes while schema preparation or it may be even just one attriubute

msExchCanaryData0
msExchCanaryData1
msExchCanaryData2
msExchCanaryData3

Why do we need this Canary Data ?

It is a secret token that exchanges between the clients and the server for services OWA,ECP and other exchange web services.

So these values gets stored in the cookie collection of the clients browser.

So for any owa,ECP,EWS requests from clients the browser sends the GUID value that is stored in the cache and compares it with the GUID that is in the URL (server).
If they dont match then the request from the client is considered as malicious and blocked
Also an event regarding the same is logged with the originating IP address.

Below is the solution to fix this type of issue :


1) Open ADSI Edit

ADS

2) Right click 【CN=Client Access】and click properties, scroll down to look for values

【msExchCanaryData0】

【msExchCanaryData1】

【msExchCanaryData2】

【msExchCanaryData3】

parameter, as below:

ADS2


3) Take a backup to be safe and clear all these values to not set as shown below

ADS3

4.Open IIS Manager on your CAS server, go to 【Application Pools】, right click 【MSExchangeOWAAppPool】 and click Recycling


ADS4


After doing the above its better to restart Mailbox and CAS server and this issue will be resolved.

Also Refer –

http://social.technet.microsoft.com/wiki/contents/articles/29433.error-something-went-wrong-in-both-owa-and-ecp.aspx

Thanks

Sathish Veerapandian

MVP – Exchange Server

Trace emails sent with BCC option by end users

At times we might run into a situation where we need to track the emails for users sent in BCC field.

I have created few troubleshooting steps that can be helpful during these scenarios

Below is the steps to create a transport rule for tracing emails with BCC option sent from users

Create a new Transport Rule with Name and comment

BCC

Choose the below option as shown below

bcc1

Specify header as

If the message:’X-MS-Exchange-Organization-BCC’ header matches the following patterns

bcc2

Take the following actions: Forward the message  to the sender’s manager for moderation

bcc4

Click on finish

bcc5

Also we can use the message tracking logs to track the emails sent by end users with BCC option

Below is an example for tracing the emails with BCC in Message Tracking logs

I have sent a test email with BCC with the below users as shown below

BCC6

Navigate to the below location to get the message tracking logs.

bcc7

Copy the logs from the below location.  Possibly the logs during the time period when you want to trace the emails sent with BCC.

Now copy and paste them in a excel sheet as shown below

bcc8

Now we need to look into recipient address and recipient status value as shown below

bcc9

Now having a closer look into the 2 parameters recipient address and recipient status will give us the information of the user TO, BCC and CC information in the correct  order as shown below

bcc10

First user Administrator@exchangequery.com is in TO field which is mapped to To field in recipient status as shown above

Second user Sathish@exchangequery.com is in BB field which is mapped to BCC field in recipient status

Similarly it shows the corresponding users in the BCC field.

In addition to above 2 suggestions as well

You can collect information about BCC recipients if you implement message journaling in the environment

Look below technet article for Configuring Envelope Journaling in Exchange

http://technet.microsoft.com/en-us/library/gg191797.aspx

Also Refer –

http://social.technet.microsoft.com/wiki/contents/articles/29270.trace-emails-sent-with-bcc-option-by-end-users.aspx

Thanks 

Sathish Veerapandian

MVP – Exchange Server 

AutodiscoverServiceInternalURI in Exchange 2013

In Exchange 2013 when we run the below can see AutoDiscoverServiceInternalUri

Get-ClientAccessServer | fl AutoDiscoverServiceInternalUri

Normally this should be something like below:

AutoDiscoverServiceInternalUrihttps://autodiscover.domain.com/Autodiscover/Autodiscover.xmlJump

Don’t touch the Autodiscover virtual directory for changing external and internal URI leave it as such.

Their values will be empty and can be checked by running the below command
Get-AutoDiscoverVirtualDirectory -Server servername | fl *url*

Actually there is no ExternalUri we need to specify.
Internally (so when the clients are on the domain and can see the domain) they will query the domain for that value and resolve to it.

Externally the clients go through a pre-set number of URLs:

https://example.com/Autodiscover/Autodiscover.xml Jump

https://Autodiscover.example.com/Autodiscover/Autodiscover.xml Jump

Then DNS SRV records and finally a redirect.

Therefore for Autodiscover to work correctly externally you need to have one of those URLs resolve and be on the SSL certificate – the most common method is to use Autodiscover.example.com as an additional URL on the UC certificate

Steps to perform SSl Certificate renewal in Exchange 2010/2013

In this article let’s have a look at things to consider during SSL certificate renewal in Exchange 2010 and 2013 environment.

First we need to confirm what type certificate we are using, i.e., the third-party certificate or self-signed certificate. And then we need to check the existing 3rd party certificate is associated with what all exchange services, number of SAN entries we have  and note down them.

Let’s see the procedure of renewing the certificates for third party and self-signed.

For Third party Certificate Renewal

For renewing the third-party certificate, we need to apply a new certificate request from the third-party CA, then import the certificate to the Exchange servers and enable the related service (IIS, IMAP, POP, and SMTP) on the Exchange servers.

Follow the below steps:

Step 1: Obtain an SSL certificate. Purchase an SSL certificate from a well-known certification authority (CA).

Step 2: Generate and submit the certificate request: create a new certificate request for Secure Sockets Layer (SSL) services.

  1. Open Exchange Management Shell
  2. Run the following command, replace domain name and friendly name with your domain name and display name, and then run below command:

New-ExchangeCertificate -GenerateRequest -SubjectName “C=US, S = Contoso, L = Toybox, O = Test, OU = IT, CN = mail.contoso.com” -domainname mail.contoso.com, Mail.ad.contoso.com, Webmail.contoso.com  -FriendlyName mail.contoso.com -privatekeyexportable:$true -path c:\cert.txt

IMP Note:

“DomainName” is used to populate one or more domain names (FQDNs) or server names in the resulting certificate request. We can replace ‘domainname’ according to our own environment.

“FriendlyName” is used to specify a display name for the resulting certificate. The display name must be lesser  than 64 characters.

In SubjectName property, we can use the proper subject name by our own environment: c for country/region name, o for organization name and cn for common name.

  1. Submit the request to the certification authority and have the CA generate the certificate

Step 3: Enable the certificate on the Default Web site after your certificate has been generated, you must import it and then enable the certificate on the Default Web site.

  1. From the computer where step 2 was run, import the certificate. To import the certificate, open EMS and run the below cmdlet:

Import-ExchangeCertificate -path c:\cert.cer

Note: “c:\cert.cer” is the location and name of our certificate in my example.

  1. Copy the thumbprint of the certificate, which is the digest of the certificate data.
  2. Enable the certificate on the Default Web site, run the cmdlet in EMS and paste the copied thumbprint to the following cmdlet:

Enable-ExchangeCertificate -thumbprint <copied thumbprint value> -services “IIS,IMAP,POP,SMTP”

Note: Using the “enable-ExchangeCertificate” cmdlet will update the certificate mapping and replace the existing certificate that is configured in IIS, IMAP4, POP3, SMTP.

Step 4: Require the Client Access server virtual directories to use SSL

Step 5: Perform an IIS reset. Try browsing OWA and see if you get any errors

For Self Signed Certificate Renewal

For renewing the self-signed certificate, we need to get the old Thumbprint property of the expiring self-signed certificate, and then use New-ExchangeCertificate to renew the certificate and then enable the related service to the new certificate.

To get the existing thumbprint value

Run

Get-Exchangecertificate | fl

5

Important thing to note down the self-signed certificate should have a value True in the column IsSelfSigned

Then use the command remove-Exchangecertificate to remove the old expired certificate

Example

Remove-ExchangeCertificate -Thumbprint 5113ae0233a72fccb75b1d0198628675333d010e

You can use the command New-ExchangeCertificate to create a new certificate

Run the below command to perform the action

New-ExchangeCertificate -FriendlyName “SelfSigned Certificate” -KeySize 2048 -SubjectName “c=IN, s=, l=, o=CONTOSO, ou=IT, cn=CONTOSO.COM” -DomainName MAIL.CONTOSO.COM, AUTODISCOVER.CONTOSO.COM -PrivateKeyExportable $True


Below are the important things to keep in mind:

  • You can assign only one certificate to the Default Web site at a time. I would recommend deleting the old certificate as it is useless and will create confusions because it will not be used by any services once we assign the new certificate.
  • Ideally it should break or bring own any services while installing the new certificate. However, we may need to do an IISreset (not always but we may need it). So for few seconds till your IIS comes back we will experience a disconnection for few seconds
  • Certificates cannot be changed after they are signed, otherwise they would provide no security. Once issued, a certificate holds all SANs. This means that a certificate would have to be revoked and a new one has to be issued to add a new SAN.
  • You should first find out which names you want to register, because revoking and reissuing will most likely cost extra money. And also adding SAN entries will cost you extra money. If you have edge servers then the new certificate created must be imported on them and new edge subscription must be created.
  • When you order a Unified Communications Certificate from a third party you can secure all the SAN names you need with one easily manageable certificate. After your Multiple Domain (UCC) SSL certificate is issued, you can add or remove Subject Alternative Names (SANs) at any time. SANs are the additional, non-primary domain names secured by your UCC SSL certificate. However, keep in mind: Changing your SANs generates a new certificate, which you must install on your server. Your old certificate only remains valid only for 72 hours and has to be replaced with new entries.
  • Public trusted CA’s shall not issue a certificate with an Expiry Date later than 1 November 2015 with a SAN or Subject Common Name field containing a Reserved IP Address or Internal Server Name. As from 1 October 2016, CAs shall revoke all unexpired Certificates.
  • If you are a server admin using internal names, you need to either reconfigure those servers to use a public name, or switch to a certificate issued by an internal CA before the 2015 cutoff date. All internal connections that require a publicly-trusted certificate must be done through names that are public and verifiable (it does not matter if those services are publicly accessible).
    What things comes under internal name ?

    Any server name with a non-public domain name suffix. For example, http://www.contoso.local or server1.contoso.internal.
    NetBIOS names or short hostnames, anything without a public domain. For example, Web1, ExchCAS1, or Frodo.
    Any IPv4 address in the RFC 1918 range.
    Any IPv6 address in the RFC 4193 range.

Also Refer – http://social.technet.microsoft.com/wiki/contents/articles/28809.steps-to-perform-ssl-certificate-renewal-in-exchange-20102013.aspx

Thanks

Sathish Veerapandian

MVP – Exchange Server

Steps to run Experfwiz remotely on all Exchange Servers

I have created a simple script to run experfwiz remotely on all the exchange servers. Below steps can be done to accomplish this task.

First get all the servers  and store them in a text file. Ensure that are no spaces between them.

Note: We need to download the experfwiz and have them  on the remote machine from where we are executing this script.

Lets say if we are running this script on all the exchange servers remotely  from one machine we  will be prompted to answer yes or no after it enables the counters on each servers. So each and every time it would ask us an input before it starts collecting the data for all the counters.

In-order to avoid this input each and every-time for all the servers probably we can bypass this confirm switch  parameter to yes so that no manual confirmation of (YES or NO)  is not  required from the admin side. We need to do small modification in the experfwiz script to avoid this input.

Follow the below steps to avoid this manual confirmation.

First download the experfwiz from the below technet link

https://experfwiz.codeplex.com/releases/view/135743

Open the ps1 file in notepad

Look for the value $answer = confirmAnswer

experfwiz

Change the above value from

$answer = confirmAnswer

to

$answer = “yes” as shown below

experfwiz2

save the PS1 file in the computer where we are going to run experfwiz

Now copy the below script in notepad  , save them in a ps1 file on the computer where we are going to run the experfwiz

*********************************************************************************

$server = Get-Content c:\servers.txt

foreach ($s in $server)

{.\experfwiz.ps1 -Server $s -duration 08:00:00 -interval 5 -filepath \\$s\c$\Logs}

**********************************************************************************

In my example i’m storing it as experfwiz.ps1

Then navigate to the drive and run this command and it will start to run experfwiz  on all exchange servers

experf222

The above script will query all the servers we have in text file and will run experfwiz . After that it will store these perfmon logs in  respective servers in the path c$ in a folder called logs.

To directly download the file as PS1 go to  – https://gallery.technet.microsoft.com/Steps-to-run-Experfwiz-73f3d662

Thanks 

Sathish Veerapandian

MVP – Exchange Server

Determining the users connected in Outlook Online/Cached mode

At times we might run into checking the users how they are connected through online mode or cached mode during troubleshooting performance issues. If we have more number of users connected in online mode then we might need to look into the number of users connected through online mode as this could cause performance issues if we have more online users.

First we need to analyze and identify always users who can be used to connect online mode and the rest of the users can be connected through cached mode . Since cached mode stores the local copy of the user’s email and the OAB in the form of OST file.User no longer needs to  depend upon the network connectivity and the users latest information is available offline.

Probably for most of the users it is better to have the outlook in cached mode since end user will have better experience of reading the latest emails offline and would be able to update them periodically whenever they get connected. Users would be able to read important email even when the laptop is not connected in the LAN or WIFI.

Online mode can be used only in few exemptions where if we have a generic mailbox which has a secure sensitive data which should not be stored locally on any  common PC’s and should be available only for few users. Or if size of the mailbox is very large let’s say greater than 20 GB then it takes more time to update the information.  In those scenarios we can use online mode.

I have just collected few troubleshooting steps which we might think of doing if we are in a situation to determine the users connected in online and cached mode

To see users connected in Cached mode or online mode –

The first easiest way to identify this is through RPC Client Access Logs.

To achieve this goal, we can use Excel to open the RPC Client Access logs. RPC logs can be located in Client Access Server in the below Location.

(<Install Path>:\Program Files\Microsoft\Exchange Server\V14\Logging\RPC Client Access)

These logs would be in Text File. Copy them and open these logs in excel file do some formatting and filter. After filtering them the logs would look like the below screenshot.

RPC logs

We have 2 options classic and cached.Classic is for Online Mode and Cached is for cache mode.

Another way to achieve this is to use EXMON tool to identify the list of online/cached mode users


Download the exmon tool from the Microsoft site  http://www.microsoft.com/download/en/details.aspx?displaylang=en&id=11461

Just proceed with the installation
Once the installation is done we need to go the installed directory and look for the file ExMon.reg,Double click on this file to add the required registry entries.

We might get warnings as below and just proceed with the adding the registry entries

exmon1


We should get the below screen upon successful registration of the Reg keys

exmon2

We have an option to check the users connected in cached mode as shown below in by clientmon Tab

cached mode


Also we have an option to see the client version and the client ip address in by user tab.


exmon4


Apart from the above we can use the below script which will give only the Outlook Client Version and the computer name and not the ip address and the type of connection users are connected. It can be used only to find the type of Outlook version users are connected and the computer name from which they are connected.

Get-LogonStatistics -server ServerName| where {$_.ClientMode -ne “Cached”} | select-object FullMailboxDirectoryName,UserName,Windows2000Account,ClientMode,ClientName,ClientVersion,Identity | sort-object UserName -Unique| Export-Csv -Path C:\scripts\UserCount.csv -NoTypeInformation


Above steps can be used to troubleshoot the Exchange Performance issues and to identify the users connected in online mode in an Exchange Environment.

Also Refer –

http://social.technet.microsoft.com/wiki/contents/articles/28446.determining-the-list-of-users-connected-in-outlook-onlinecached-mode.aspx

http://go.microsoft.com/fwlink/?LinkId=142433.

Thanks 

Sathish Veerapandian

MVP – Exchange Server

%d bloggers like this: