Category Archives: Connectors

Exclaimer signature manager for on-premise

Maintaining the signature format uniformly for all the users is really a difficult task.Also the signature format will be changing on department, user and job role basis.

At times there might be a requirement to modify the signatures for departments based on events as well.

As an admin it  will be very difficult if you are not having any centralized signature system for the messaging systems.

Out of the available signature applications in the market i always prefer Exclaimer based on their support and options available in their product. In this article we will have a look at configuring the Exclaimer Signature and run through some of the options available in their product.

The installation and configurations are very simple since it is just a transport agent which will be triggered in the categorizer  part and signature will be applied. So this application has to be installed on a server where the transport categorization takes place.

In Exchange 2010 this application needs to be installed on the Hub Transport server

In exchange 2013 & 2016 it has to be installed on Mailbox servers.

One thing we need to make sure is that it has to be installed on all the HUB servers if its exchange 2010 and all the mailbox servers if its exchange 2013 & 2016. This is because the Mail-routing can happen in any of the available transport services and this application needs to be there to trigger in the categorization part.

The installation is pretty simple and straight forward which is very easy .Just need to download the application and install them.

The application can be downloaded from below url

https://www.exclaimer.ae/signature-manager-exchange-edition/download

Ex1

We have the option to keep a backup of the previous configurations which will be easier to revert.

There is option called remote deployment where we need to configure a shared folder for the exclaimer images, configuration files to be stored in a common location so that all the transport servers can be updated without any delay.

EX01.png

Below are the options available for the sent items configuration which are pretty much easier to understand.

It has a temporary file folder where it processes all the signature as a cache before applying them. You can specify a drive on your own.

Ex03

After a successful installation we  will get a screen as below

We can have multiple signature policies based on department, Organizational Unit and apply to respective ones.

Ex09

So this signature pulls all the information like Name, Company, Phone Number ..etc from the information present in the mailbox.

So all we need to do is to create a new policy choose and apply the desired values as below from the new created template

Ex04

We have an option to change the element behavior , layouts as well.

ex05

Note: We need to make sure that all the user information like Name, Phone Number, Company are updated. Only then it will update the information from the User object and reflecting in the signature. If the field is not updated then the information will show empty.

The signature can be customized further as well by adding an image, hyperlink to the attached image to them. All kinds of alignments, layouts can be done for the same.

Ex11

Moreover we have an option to edit the source code of the HTML which is a great amazing feature. By having this option we can customize the signature templates of our own according to the requirement.

Ex12.png

There are multiple options available to apply signature based on the requirement.

An example below.

EX8

Also we can set exceptions for few users who does not like to have this automated signature policy.We have an option to apply the signature only on a specific date and after that it will be disabled automatically.

There are more features and options available to explore on this product.

Overall we will get a very good support, latest updates, very simple installation configuration  and more features available to customize with this  exclaimer application. And so far with all versions of exchange this product has been always a bread and butter and haven’t caused any issues in terms of considering them as a third party Transport Agent.

Thanks & Regards
Sathish Veerapandian

MVP – Office Servers & Services

Foreign Connectors VS Delivery Agent connectors

Over the period of time these foreign connectors have been playing a major role in handling the non SMTP messages from the applications and FAX machines.

These foreign connectors manage a file transfer system process to route inbound/outbound messages from a NON-SMTP systems.

For outbound systems it uses the drop directory where applications must create and submit their own messages to this drop directory .
These foreign connectors checks if the messages are properly formatted (MIME)
and then move them to the drop directory. From here Exchange has done its job and its the responsibility of the NON-SMTP system to pick these messages and deliver them.

For the inbound flow the message should be submitted to to the replay directory from the non-smtp system. We need to make sure that the submitted messages are properly formatted in MIME or TIFF(Usually used format) so that  exchange picks them up, processes these messages and delivers them to the directory.

Usually these directories are not scoped to these connectors and we need to run the below command  an example below

Set-ForeignConnector -identity Test -DropDirectory \\exchange2010\share

Running the above command will create a shared directory for the outbound so that after exchange drops the email the non-smtp system will pick these messages for delivery.

From Exchange 2013 these foreign connectors have been depreciated.Since it uses  file transfer systems to route the messages through drop(outbound) and replay (inbound) the sender will not be aware if the message has been delivered to the recipients.

But still this foreign connectors can be configured in Exchange 2013

From Exchange 2013 Microsoft recommends to have the delivery agent connectors which is having a simpler configuration compared to the foreign connectors.

Below are the advantages of having the delivery agent connectors:

  1. There is no need to manage file transfer to a Drop directory and check the drop directory quota, permissions etc.
  2. We can use the queue management for messages that are routed to non-smtp systems through this method.
  3. We can verify and acknowledge the message delivery to which is a major benefit when compared to foreign connectors.


Each delivery agent is associated with a Delivery Agent connector, which queues messages routed to the delivery agent for processing and delivery to the non-SMTP device or system

A delivery agent is a component installed in the Transport service of a Mailbox server.
Example there is a Citrix Virtual Delivery Agent which is used for one of the citrix application to route the non smtp messages.
If there is a agent required for your non-smtp system then we need to install that agent on Mailbox servers of exchange 2013 & 2016

By Default there is a text messaging Delivery Agent connector.
This is an agent which is installed by default in the Mailbox Servers of Exchange 2013 & 2016.
This delivery agent connectors are available from exchange 2010 where they are present in hub roles.

By default it will have only the default mobile delivery agent connector. You can see the delivery protocol is mentioned as MOBILE.

So for other delivery agent connectors we need to specify the protocol types.

D1.png

Example if we need a delivery protocol as x400 which most of the fax applications and non-smtp application uses we need to run the below command.
New-DeliveryAgentConnector -Name “Contoso X.400 Connector” -AddressSpaces “X400:c=US;a=Fabrikam;p=Contoso;1” -DeliveryP
rotocol “X.400” -SourceTransportServers Mailboxserver

D2.png

After performing the above the  message is routed to a Delivery Agent connector, the associated delivery agent performs the content conversion and message delivery.

Thanks

Sathish Veerapandian

General troubleshooting steps for inbound/outbound mail flow issues

Mail flow can be stopped for various reasons in a organization. Also it depends entirely on the environment design as there are various factors involved in affecting the mail flow like network, ports , firewall , antivirus , anti-spam , transport agents , directory services , connectors misconfiguration , exchange server services not running up and the list goes on.

Its always better to design the mail flow architecture  in a easy understandable way and also we need to ensure that the SMTP security inbound\outbound is tightened in the perimeter level to make sure no spam emails are circulated.

In this article i have mentioned few basic troubleshooting steps that can be followed during mail flow issues in a environment

This applies for both inbound/outbound mail flow issues

Following things can be done

1) First run EXBPA to check if we get any misconfig errors ( applies only for exchange 2007/2010). You can skip this step if you are running Exchange 2013 and upcoming versions.

2) Go through your event logs on hub transport if its 2010 , Mailbox Server if its 2013 to see if we get any clue (at times it may be a back pressure as well so its better to check logs). Its better to check all the exchange services at this time  and ensure if they are running.

3) Do a telnet from internal to external network and see if everything is fine and also perform telnet test from external domain to your domain.This test will usually help you to identify if there is any SMTP traffic block in your firewall.

Below is the example of performing a telnet test

Type Telnet domainname orIP 25


Telnet2

Above is an example of successful delivery to the target domain.

4)  Check whether the MX record is valid for the affected domain.

Below is an example of performing mx validation for google.com domain.

Nslookup
5) Enable protocol logging both send and receive connectors and see if you are able to track anything.

6) Check if  the connecting IP is in  blacklist

We need to obtain the following tool to do the check:

If there is a blacklisting, please contact the providers of Blacklist. They will take a look into the reason behind blacklisting and remove the domain from the blacklist for you.
7) Check for NDR message.Enable message tracking for those  nondelivery mails and see if you get where the message gets dropped.This will help you a lot to identify the problem.
8) Analyze  Message header of the NDR to see in which hop the email was dropped.
9) Check the send connector and receive connector config and make sure the settings are correct according to your environment setup.
10) Check your firewall config and make sure port 25 inbound/outbound are open. Also check if there is any  SMTP filtering in your firewall which will be the culprit in most of the cases.
Hope this article is helpful in troubleshooting mail flow issues.
Thanks & Regards 
Sathish Veerapandian
MVP – Exchange Server 

Modify Connectors to Send/Receive Internet Mails on different port through your spam filtering/ISP provider

We can Modify Connectors for Receiving Internet Mail on different port apart from port 25 through your spam filtering/ISP provider.

This step applies to Exchange 2007/2010/2013. It is always a best practice to have this kind of setup so the spammers will not be able to intrude in our network and perform a directory harvest attack,reverse NDR attack etc.., and we can prevent spam emails circulating  in our environment.

Perform the  following thing to achieve this task.

1) Create a dedicated receive connector for your ISP/Spam filtering provider domain.

2) Add only to your (ISP/Spam filtering provider)   subnet and IP ranges. Note : You need to remove the default subnet range. Specify the ip ranges of only your Spam filtering provider or ISP provider

3) Change the port to your desired number on which you need to receive emails from them.

Hub1

4) Disable the default receive connector since it’s not required anymore.

So the mail-flow for inbound will be in the following type

Inbound

From Internet – Mails comes to your ISP/smart host – ISP delivers emails to your firewall on different port – then it comes to exchange server

For sending emails to the internet it would be very easy

Just create a send connector and smart host it to your (ISP/spam-filtering provider) IP address so that all the internet emails would be delivered to desired port to your (ISP/spam-filtering provider).

Outbound  From Exchange – Email goes to your (ISP/Spam filtering provider) on a different port – Mail gets delivered to the internet user on standard port 25

Make sure that all the port numbers that you have configured to send/receive emails through your Spam filtering provider have been opened both inbound and outbound on your corporate and perimeter firewall.

Also refer – http://social.technet.microsoft.com/wiki/contents/articles/29577.modifying-connectors-for-sendingreceiving-internet-mails-on-different-port-apart-from-port-25-through-your-spam-filteringisp-provider.aspx

Thanks 
Sathish Veerapandian

Modifying System Generated Mailbox in Exchange 2013

In this article we will have a look at the system generated mailbox and steps to modify system generated mailbox in Exchange 2013.

By default the system generated mailbox comes from sender “Microsoft Outlook”. Sometimes we might need to change the display name of the system generated mailbox because some of the users might use Non-Microsoft clients like MAC, Linux etc., and cannot understand if system generated emails are why sent from “Microsoft Outlook”  sender and this could create confusion for end users if they have configured outlook on multiple PC’s thinking  that could cause trouble in sending email to few users.

In these kinds of scenarios we can specify identical display for Microsoft Exchange Recipient, so that it would be easily understandable by all client users in domain that the message is sent from the server and not from outlook. Also there could be scenarios where users would reply for an ndr message received  if he/she is not aware of these system generated emails. It could be better if we have a mailbox setup which is monitored by admins so that users can reply for these ndr’s and can be addressed.


Now let’s have a look into few of these parameters involved first.

Basically there are 2 types for system generated Mailbox in a  organization that exchange server can send. It can send NDR’s for internal users for mailbox limit quota warning, non-deliverable reports for internal senders. MicrosoftExchangeRecipientPrimarySmtpAddress attribute is involved in sending ndr’s to the internal users. Also it can send external NDR for external recipients as well who is not part of accepted domain in our organization. Externalpostmasteraddress attribute is involved in sending ndr notification to users who are not part of our domain. Both these attributes are in organizational level and can’t be altered from server level.

We can use the below command to check the value of the MicrosoftExchangeRecipientPrimarySmtpAddress

Get-OrganizationConfig | FL MicrosoftExchangeRecipientPrimarySmtpAddress

When we run this command it shows a default value with alphanumeric@domain.com as shown below


T2

We can use the below command to check value of Externalpostmasteraddress

Get-TransportService | FL Identity, ExternalPostMasterAddress

By default the Externalpostmaster address value is not set to any value. Which means by running this command usually the result will be null as shown below.

T1


In my case it is just showing the list of hub transport server , transport service(exchange 2013) and edge server without any values  since  I have not set any specific mailbox.

So what happens if there is no value set for ExternalPostMasterAddress.

The NDR for external users will be sent in postmaster@domain.com format from our domain if we have only mailbox and cas servers. It will use edge server to send out these external ndr’s if we have edge configured and the value will be postmaster@edgeserverfqdn.


So if you need to change this value run the below command

Set-TransportConfig -ExternalPostMasterAddress postmaster@contoso.com

To change the value of MicrosoftExchangeRecipientPrimarySmtpAddress  is little bit tricky. We can change this value to a different mailbox however if we make any organizational changes by running set-organization command then it reverts back this value to default value Microsoft Outlook.


First we need to change the value by running the below command

MicrosoftExchangeRecipientEmailAddressPolicyEnabled $False

And then we need to set an appropriate email address from which it can send out NDR’s to the internal users.

Set-TransportConfig MicrosoftExchangeRecipientPrimarySmtpAddress localit@exchangequery.com

T5


Note:

MicrosoftExchangeRecipientEmailAddressPolicyEnabled –   If this parameter is set to $false, you must manually add new e-mail addresses to the Microsoft Exchange recipient when e-mail address policies are added or modified.

There is an alternative way by which we can achieve this setting. We can change the display name alone through ADSI edit

To make this change in the adsiedit follow the below instruction

  • Open ADSIEdit.msc
  • Configuration – Services – Microsoft Exchange
  • Open the properties of “CN=MicrosoftExchange329e71ec88ae4615bbc36ab6ce41109e” in right hand side pan.
  • Locate the display name attribute and Make sure that it is displaying “Microsoft Exchange” if not then change it to Desired Display name that users want to see when they receive an NDR.
  • Close ADSIEdit.

If you need the internal ndr’s to be copied to a mailbox and if a user reply back to an ndr and if that email needs to be delivered to a mailbox and monitored then we need to set value for the attribute MicrosoftExchangeRecipientReplyRecipient.Run the below command

Set-OrganizationConfig -MicrosoftExchangeRecipientReplyRecipient localit

After you run the above command you can see the value as below when you run

Get-OrganizationalConfig |FL

T6

If we want the external ndr’s to be sent to the above email address  we can run the below command

Set-TransportConfig -GenerateCopyOfDSNFor 5.1.0, 5.1.1

dsn

Above is an example for getting a copy of DSN only for 2 ndr codes. We can add multiple ndr codes as well.

Steps to enable intraorgprotocollogginglevel in Exchange 2013

Intraorgconnectors are the connectors used for the communication for the internal Hub servers from Legacy servers as well as from the same version of hub servers for communications between different Sites,shadow redundancy and safety net.

We can enable this protocol logs at the time of troubleshooting in scenarios where there is mail flow issues happening between Exchange 2010 and Exchange 2013 and mailflow between sites .

In Exchange 2013 since the hub role is removed and split into 3 transport services it can be enabled only on the transport service running on mailbox server.
Now we will see how to enable this option

Run below command to see if the intraorgprotocollogginglevel is enabled or disabled

Get-Transportservice  “mbx2013servername” |fl*intra*.

Correction1

Run the below command to enable verbose logging in intraorg connector

Set-Transportservice  CAS2013servername  –intraorgprotocollogginglevel verbose

Below path is the location where we can see the logs recorded.

<installationdrive\Program Files\Microsoft\Exchange Server\V15\TransportRoles\Logs\Mailbox\Connectivity

Correction2

Now let’s send an email from Exchange 2010 server and see the output of the results

Test email sent from Exchange 2010 user to Exchange 2013 user 


Image

As soon as the email is sent from Exchange 2010 to 2013 you can see a separate queue created with Hub version 15 as shown below.

Image


This is again a good place for us to note in case of scenarios where mailflow not happening between Exchange 2007/2010 and 2013 and mailflow issues between hub transport servers and sites. It can give us few more information in the last error state.

Below is the email received by Exchange 2013 user . 

Image


Now when you open the logs and below is the result of a successful transaction

Image


This will be helpful in troubleshooting mailflow between Exchange 2007/2010 and 2013  servers.

Delivery Reports in Exchange 2013

In this article we will be looking into how to perform Message tracking in Exchange 2013.

Unlike the previous version the message tracking has been replaced with the name Delivery reports. But both have the same functionality.

Open Exchange admin center – navigate to – mail flow and click on Delivery reports.

Image

Now click on browse and enter the mailbox which we need to search.

Image

We have an option to search messages received from as well. Also we can search messages with the subject line same options like we had in Exchange 2010

But this time the search results shows in a better GUI

Image

It displays only the subject and no contents same like previous versions and message tracking results will be unsuccessful for the users sending emails through POP and IMAP clients.


Analyzing the protocol logs and Message tracking logs in Exchange 2013

During the time of troubleshooting in mail delay and issues when users reporting emails being not received its little bit tougher part to isolate and identify the problem.

Message tracking and protocol logs analysis is one of the best way to identify whether the problem exists in exchange end or else to prove that exchange has successfully done its mail transaction on its end.

In this article we will be looking at how to enable protocol logging and Message tracking in Exchange 2013 and analyzing the protocol and message tracking logs as well in a little bit different way through Excel.Earlier in Exchange 2007 & 2010 we used to turn on Message tracking in Hub transport servers.

Since in Exchange 2013 the hub transport servers have been removed the Message tracking logs are stored in the mailbox servers.

Steps to turn on Message tracking in Exchange 2013

Use EAC to configure Message tracking

1. In the EAC, navigate to Servers > Servers.

2. Select the Mailbox server you want to configure, and then click Edit .

3. On the server properties page, click Transport Logs.

4. In the Message tracking log section, select the following:

◦Enable message tracking

5. Click Save.

Steps to turn on Protocol Logs in Exchange 2013

Open EAC

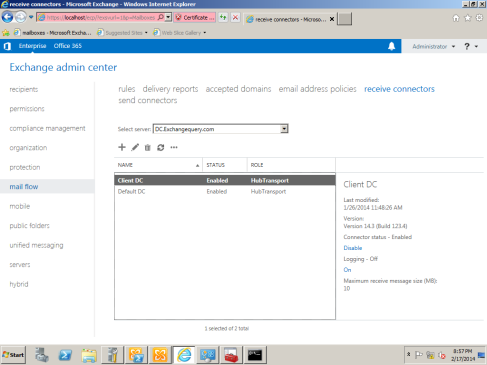
Click on mail flow

Image

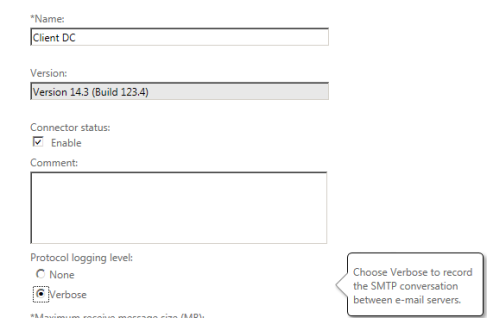
Double click on receive connector tab and select the protocol logging level to verbose

Image

Now we are going to send few test emails so that the logs get generated which would be ideal for us to analyze the logs

So we are sending test email with subject “Test Email for Message Tracking”

For analyzing the verbose logs it’s always better we can use the log parser tool.

If still we need to analyze the data without log parser for single transaction it’s possible with sender and recipient to check if the mail transaction has been successful.

Below is an example

For analyzing the logs in message tracking you can follow the below steps

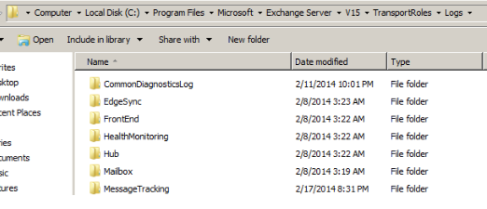
Copy the message tracking logs from the below location from the mailbox server

Image

Note: There will be 4 types of message tracking logs in Exchange 2013 unlike in Exchange 2010 we have only 2.

•MSGTRK   These logs are associated with the Transport service.

•MSGTRKMA   These logs are associated with the approvals and rejections used by moderated transport. For more information, see Moderated Transport.

•MSGTRKMD   These logs are associated with messages delivered to mailboxes by the Mailbox Transport Delivery service.

•MSGTRKMS   These logs are associated with messages sent from mailboxes by the Mailbox Transport Submission service

MSGTRKMS  is sufficient for us to calculate the message tracking in most of the situations.

We can use other logs in deep dive analysis of cases where we suspect the  mails being not delivered to mailbox server and in few cases where we are unable to find any transaction in MSGTRKMS logs to see if the mail is been delivered to the mailbox server from the CAS server.

But MSGTRKMS will give us the information 99 percent of the time.After copying the MSGTRKMS logs in the excel just filter the category column as shown below.

Image

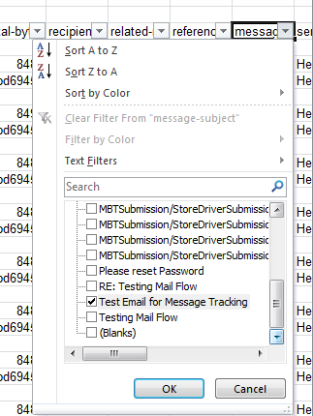
Now we have number of options to filter message transactions. In below example we are going to filter a particular transaction with Message subject and below is the output for successful transaction.

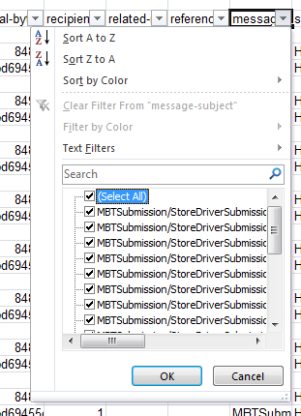
Just select the Message subject column drop down and uncheck select all as shown below.

Image

Just select Test Email for Message Tracking as shown below

Image

Below output is the successful transaction of the message transaction after the filter is applied for our example scenario.

Image

The below screenshot is the important parameter which should be checked and for a successful transaction i.e column (source and event-id) as shown below

Image

For a failure transaction we will not be having the receive status as shown above

We have multiple options like date time, Client ip, server ip , recipients through which we will be able to isolate a particular transaction very easily . Getting used to this will take some time but once after if you start analyzing the message tracking through this then you will feel comfortable with this type of message tracking Cook for situations like where you need to filter out multiple parameters.

Now we will look into how to analyze the receive connector protocol logs with help of Excel as we did for Message tracking.

 First Copy the Logs from the below location

Image

Note:

It is very clear we  will be getting confused to see where to find the receive connector protocol logs since the transport level architecture have been bifurcated in exchange 2013 and we have multiple folders like front end, hub , protocol log unlike Exchange 2010 we have only this location

“D:\Program Files\Microsoft\Exchange Server\V14\TransportRoles\Logs\ProtocolLog\SmtpReceive”

We just need to navigate to the below location alone in Exchange 2013 and copy the receive connector logs which will be identical to analyze the protocol logs via excel.

“C:\program files\Microsoft\Exchange Server\V15\TransportRoles\Logs\Hub\ProtocolLog\SmtpReceive”

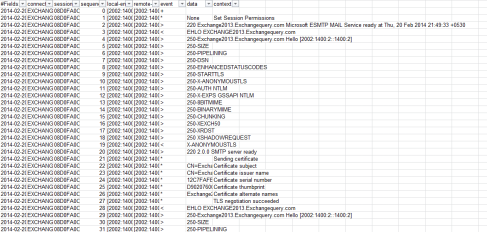
 Open them in Excel

Unlike in Message tracking we do not have many items for us to filter here as shown below. But we can always filter them via sender or recipient address who reported to be a problem with mail flow.

Image

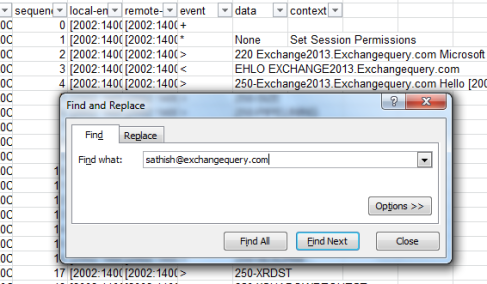
Now we are going to identify a successful transaction for user id Sathish@exchangequery.com through receive connector protocol logs .For that we just need to open the receive connector logs in Excel and search for the above email id in the excel sheet.

Image

Below is the successful transaction for the above search result

Image

In the above screen it clearly mentions the mail from and the rcpt to . The final transaction result we can see is Transferred 3 resolved and 0 unresolved and 250 chunk received OK . This should be the output for a successful transaction.

 Note:  All we need to look is only at the data and context part  in receive and send connector protocol logs which gives us info about the successful \failure transaction.

You can also use log parser to analyze the protocol logs. The above steps is  just an additional part of troubleshooting steps through deep dive into message tracking and protocol logs to narrow down  mail flow issues to identify the root cause.