
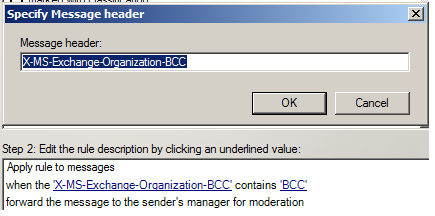
Nowadays many business professionals want to track that who is accessing their mailbox in an organization to have details, who is performing certain actions on their mailbox items. To perform such monitoring of data, Exchange Server 2010 (SP1 or later) offers a feature known as Mailbox Audit Logging. This feature provides the monitoring mailbox audit logging in Exchange Server 2010. However, this functionality is not turned on by default. These are enable by the Exchange administrator for those mailboxes that are measured sensitive or can be accessed anywhere. In the following section, we will discuss the way to of enabling Mailbox Audit.
Category Archives: Exchange2010
Configure New Store, storage , provisioning groups in Enterprise Vault in Exchange Environment
In this article we will have a look at the steps to provision the Enterprise Vault in the Storage, Policy and Group level.
If we talk about Enterprise Vault its again a big topic considering all the functionalities ,configuration , features , HA etc..,
So here we will focus only on how to provision archive only for end users in a new deployment
We will need to look at the steps to consider in creating a storage, Backup , creating policy based on the retention that end users are expecting.
So below things needs to be planned properly before the configuration:
a) Archive policy based on mailbox quota and number of months. eg: If the quota exceeds 80 percent and emails greater than 5 months should be archived.
b) Archive retention period for end users. How long the archived emails will stay eg: like 5 years, 7 years etc
c) Retention of the shortcuts archived items in the mailbox after the archive.
Once planning on the above is done we need to configure Provisioning group, Archive policy and create a store group and a store for the archive process to happen.
Below things needs to be created :
a) Create a provisioning group to target the users who require the archive feature to be enabled.
b) Create a dedicated policy for this group based on the requirement.
c) Create a dedicated store-group and store to place all the archive .
d) Configure the backup for these stores.
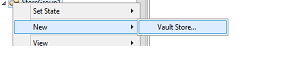
We will look into the steps to create provisioning group first
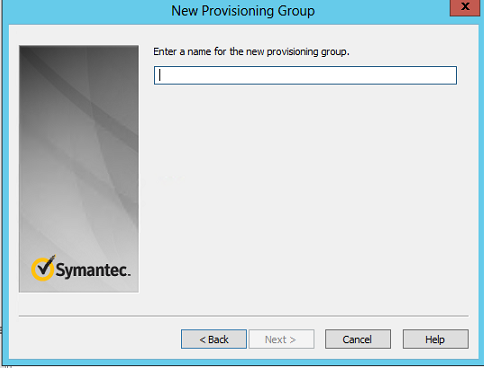
Log in to the Vault Administration console and navigate to provisioning groups and select new provisioning group
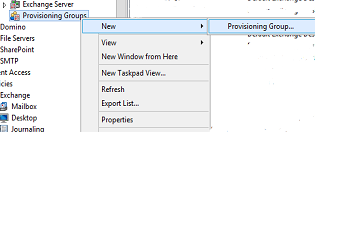
Give a name
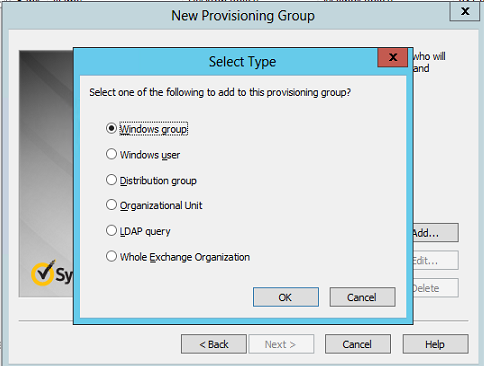
Associate the targets for this group
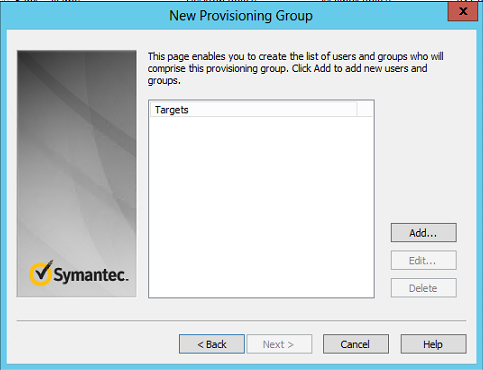
Targets can be OU’s, Whole domain, Distribution Group. The best practice is to always target a Distribution group and add users who require EV since the OU’s will contain service accounts, vendor mailboxes which will unnecessarily consume licenses.
Then later you need to select the policy that you would need to apply for this group of users based on your requirement.
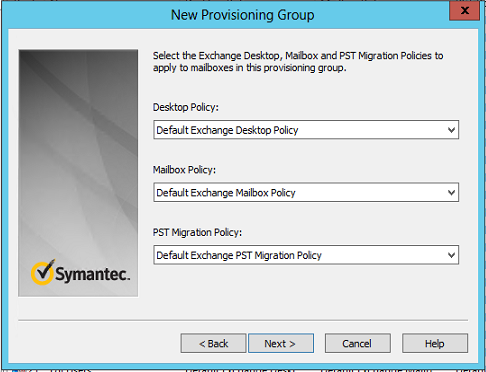
Set the retention category

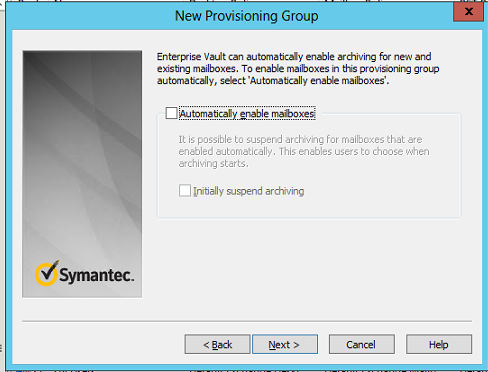
Select the associated store and enable the option automatically provision the mailboxes for people who comes under this group
Now we will look in creating the Policy
It is better to have multiple policies since its always better to segregate users based on their quota, nature of job and the amount of emails they receive on daily basis.
To create a New Policy Open Vault Admin Console – Navigate to policies and create a new mailbox policy.
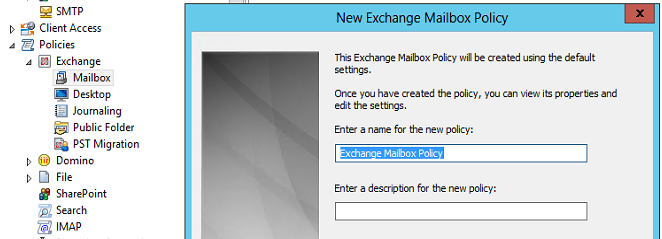
These are the default values once its created. Based on your requirement you can modify these values.
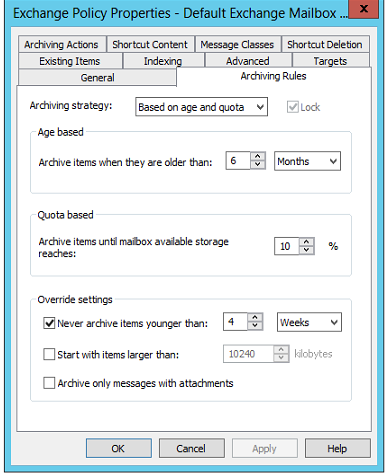
There is nothing much complexity involved in creating the policy but yes if the users retention is not understood properly then later you would be in trouble. So its better to set the clear expectations to the end users before setting the policy.
Now we should look in creating a store for the archived mailboxes.
Its better to create a store group first

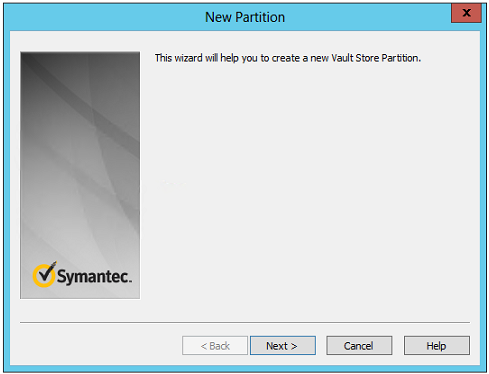
Then create a Store under the Store group
You will get the below window
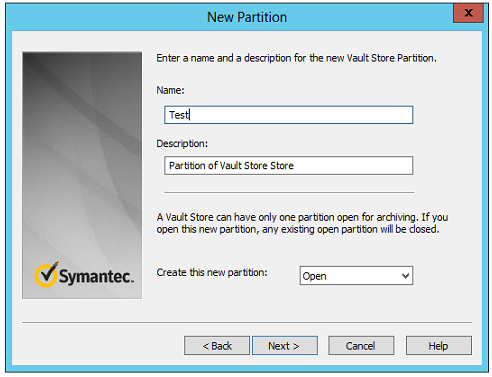
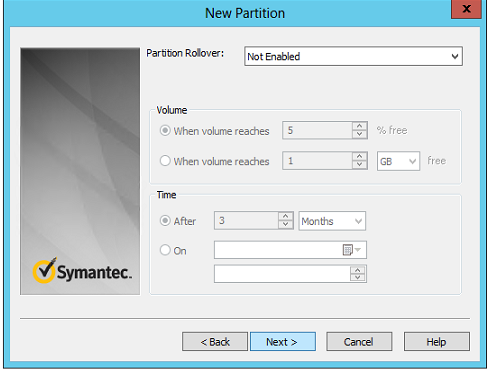
Give it a name and select the option whether open or closed. If you keep this partition open then partition rollover can happen if any of the other partition are full. If you keep it closed then rollover to this partition will not happen.
Select the storage type by default it is NTFS

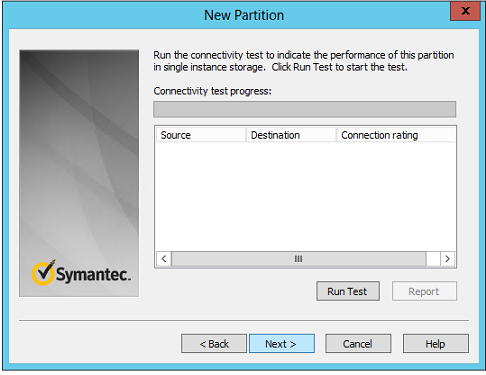
Then you need to specify the drives and drive path and finally you have to perform the run test which will indicate a success or failure of your config
This is the partition rollover which i was taking in earlier screenshots which is an amazing feature
You have an option to set the volume and time
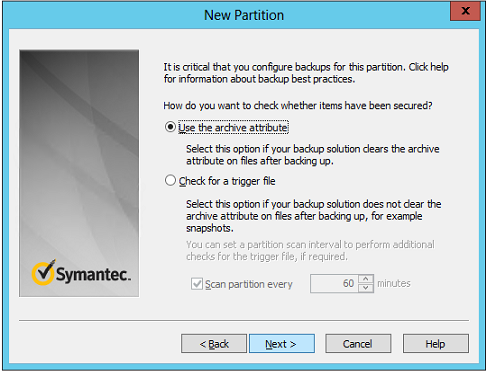
Here you go for setting the backup for this partition. The beauty of the archive is when you create the store by specifying the SQL instance location the DB’s are automatically created.
So now these values needs to be chosen according to the type of backup you are using.
If you have a snap shot EV unaware backup then you need to select the option check for a trigger file.
If you have a EV aware backup most likely backup exec from Symantec then you can use the first option.
Note: Its very important that you need to keep in mind that these backups will never help you in restoring brick level for end users. These are meant only for system recovery scenarios.
So when a user permanently deletes an archive from EV its gone forever.
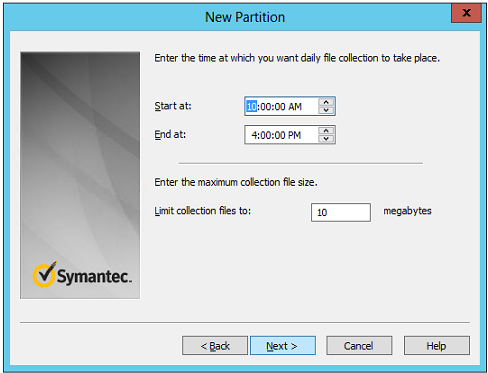
Then you need to use the file collection software if you are using the second option

And enter the time at which you need to place this file collection software.
After this once you click on finish the archive is configured to take place.So based on your Archiving Mailbox server Task schedule the archiving job would start happening.
There are few more backup configurations that needs to be done if you choose the 2nd option. We will look that seperately in another write up since adding those information will definitely confuse and increase the length of reading this blog.
Thanks
Sathish Veerapandian
MVP – Exchange Server
Best practices to be followed to configure Backup in Exchange 2010/2013
Backing up the exchange server is very important thing to protect the data loss . If you aren’t running the Exchange Server Backups then your Transaction logs will eventually fill up their storage volume
In this article we will look at few steps that we need to look in configuring the backup in Exchange 2010/2013.
Backups are very much necessary during the case of a whole disaster, retention of datas for a period of time , performing a granular restore for the end users as well.
Choosing the Backup Media
Disk or Tape ?
Over the period of years Tape backup has been doing a great job. Cost wise also they are little bit lesser compared to the SATA storage and disk arrays which needs to be extended as users and our applications increases.
So, tape still has an advantage, particularly for larger backup volumes.
But when comparing the performance factor the disks backups wins the game.
Also Disk-based solutions will usually be better for faster recovery.
More realistically, a disk-based solution will involve copying data between two storage systems over a WAN from one site to another. If you are ready to pay for this expensive WAN links and replication then it should be fine with the disk backup.
Its always better to keep the daily and weekly backups in the disks (virtual tape library) which will help in disaster and daily restore scenarios and larger backups monthly,quarterly and annual in Tapes. Because there is no point to keep all these large data in expensive storage on data-centers for the purpose of retention since the tapes will do the same job.
Plan for the Retention period
Planning for the retention of the data is very important. This plays a vital role in restoring the data as well as for any old data that is required for any legal cases.
Its very mandate retention needs to be followed for the following backups
Daily Backups
This decides on the single point of restoration for the end users on a specific day. Its better to have daily backup retention at-least to a period of 3 months so that granular restore for a specific date can be done.
Weekly Backups
This decides on the single point of restoration for the end users on a specific week. Its better to have this monthly backups to a retention of at-least 6 months which will help to recover emails if the first case fails.
Monthly Backups
This decides on the single point of restoration for the end users on a specific month. Its better to keep this retention atleast for a period of 1 year.
Quarterly Backups
Quarterly backups are very much important in restoring the data in case of dealing any cases , restoring emails from resigned staffs. So its better to keep this retention for 3 years.
Annual Backups
Annual Backups also does the same job of retention data for dealing with any cases . Its better to have the Annual Backups for a period of 5 Years.
Quarterly and Annual Backups can be taken in a Tape Drive and kept since they will not be used mostly and also will not involve in the disaster cases.
Setting end user Recovery Standards
Setting the scope of possible restores from the backup to the end users is very much important since they need to be aware of the possible restores.
So you need to carefully go through your backup retention periods and inform the users about the possible monthly restores. At any point of time if the users are missing out data within a month then its always advisable from the help-desk to restore them from the dumpster.
So its better you can prepare and create end user Recovery Standard scope document and hand it over to the help desk team so that they are aware of the possible restores.
Check Mailbox server performance during the backup
This point is very much important and we need to check the performance of the mailbox servers during the backup period. Though the backup will be running on off-production hours but there are cases where your CEO might be accessing an important email after working hours.
ESEUTIL will be running during backup process to verify integrity of the databases which increases disk I\O intensive.Usually if the storage configuration is not proper then the normal disk read/write operations will increase. There are chances if the storage is having bottleneck issues then the normal RPC read/write operations will get delayed due to which all the end users will severely experience connectivity issues.
When the backup is triggered you can go to the event viewer on the mailbox servers and look for any RPC , ESE , VSS writers, storage errors etc..,
Create a test account on any of the backup databases login to outlook,owa and activesync and measure the performance.
If you have DAG configured in your setup and have Active/Passive combined distributed type check your active copies as well .Check if the I/O operations are increasing on the active copies during the backup.Also you can check the event logs to see if you get anything related to them.
If you don’t see anything on them then the backup should be fine.
Note: The above steps are applicable only when you configure the backup solution for the first time on your mailbox servers.
Later you can prepare a daily check list on your backup status on all the mailbox servers to ensure the backups are completed.Daily checking of the backups is very important since the backup will truncate your old logs which will maintain space on your storage. There are many scripts written by experts on the Technet Gallery which you can schedule them and make them run through task scheduler.
Test the Backup
Testing the backup is very mandatory. As the backups has been configured its not that we are in safe side. Testing the backup is very much necessary.
There are several scenarios we can test and i have listed few of them
Check if the backup is supporting any other languages restore. For Example if i have an end user who has French Mailbox with all emails in French and backup has been taken for him. When a restore is done for this mailbox it should be successful with all the emails both body and subject visible in French.
Take 2 users with the same UPN different SAM and see if the backup for them is restoring their contents,
Restore the Weekly backup and see the results.
Restore the monthly backup as well and see the results.
Thanks
Sathish Veerapandian
MVP – Exchange Server
RBAC role to Manage end user contacts through (Exchange Control Panel)
There might be a requirement to delegate the management of contacts for all the staffs especially for the HR team.Since the staffs position title change, phone numbers, city, extension , address change will happen randomly for all the staffs.
Its better to delegate this task alone to the HR team member so that the help desk calls for changing these information will be reduced. Also there is no need to wait for a period of time to make these changes from the help desk team.
Basically we can create a custom RBAC role and assign this to a HR staff who would be able to manage this task through ECP .
Create a new management role :
New-ManagementRole -Parent “Mail Recipients” -Name “Contact Management”

Now we need to create a new role group
Create a new role group :
New-RoleGroup –Name “Contact Editor” –Roles “Contact Management”

Remove all of the unwanted cmdlets from our newly created role, since we need to give the bare minimum permission of modifying only the contacts.
Get-managementRoleEntry “Contact Management\*” | where { $_.Name –ne “Set-User”} | Remove-ManagementRoleEntry
Add only the required entries for the new role
Set-ManagementRoleEntry “Contact Management\Set-User” -Parameters “Phone,city,phone,fax,mobilephone,department,title,street address”
![]()
New-ManagementRoleAssignment -Role Contact Management -User TestITHRAdmin 
Run the below command to check and ensure that only set-user editor rights are assigned Get-managementRoleEntry “Contact Management\*” ![]()
When this RBAC role person can login through ECP and he would be able to manage only the AD contacts
Thanks
Sathish Veerapandian
MVP – Exchange Server
Exchange 2013 Unable to access ECP Encounter “500 Unexpected Error”
Today i faced an issue in accessing ecp through an admin delegated account and got the below error. I thought of writing up a blog with few general checklists that can be performed if we come across this kind of issues.

Below are the troubleshooting steps that can be performed in this order if we come across issues with accessing the ECP virtual directory.
1) Check if there is any issue with the XAML file type
Find the file located in
C:\Program Files\Microsoft\Exchange Server\V15\ClientAccess\ecp\DDI\RemoteDomains.XAML

If you have any staging servers with the same version where it is working just copy this XML file or if you could find this file from the setup just replace with the existing one do an iis reset and see the results
2) Check on the Application Pools to view whether OWA and ECP Application Pool is running on .NET Framework v4.0. It maybe the incompletely or corrupted installation of Framework that causes this error.

You might come across the above if you recently made any recent upgrade or its a new fresh installation.
If that’s the case try to run the following command as Administrator:
%windir%\Microsoft.NET\Framework\v4.0.30319\aspnet_regiis.exe -i
Change the MSExchangeECPAppPool from .NET Framework from v4.0 to v2.0. Then restart IIS and check the results.

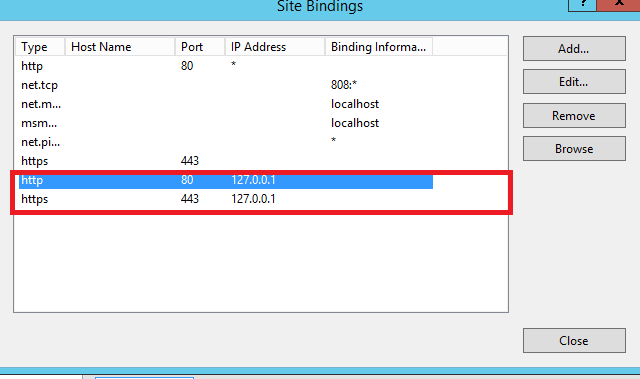
3) Check the bindings of the default website to confirm to Microsoft recommended settings:
({http port 80 *}{http port 80 127.0.0.1}
{https port 443 *}{https port 443 127.0.0.1})
4) If none of the above steps works try recreating the ecpvirtualdirectory and see the results
In EMS, please run the following command:
Remove-Ecpvirtualdirectory –Identity “CAS\Autodiscover (xxxxx)”
New-Ecpvirtualdirectory –Identity “CAS\Autodiscover (xxxxx)”
There are more cases where even recreating the ECP virtual directory or any virtual directory will still cause this same error 500 unexpected error
This is because of the stale entries present in the ecp objects as well as in the IIS metabase.
If recreating corresponding affected VD doesn’t help you then try the below steps
Remove the newly created ECP virtual directory
Remove-Ecpvirtualdirectory –Identity “CAS\ECP(xxxxx)”
5) Remove the ecp objects in AD container
a. Open ADSIEDIT.msc, locate:
Configuration–>CN=Services–>CN=Microsoft Exchange–>CN=Organization–>CN=Administrative Groups–>CN=Exchange Administrative Groups–>CN=Servers–>CN=Exchange–>CN=Protocols–>CN=HTTP
b. In the right pane, please check whether the CN=ECP(xxx) is present. If its present you can remove it.

6. Delete the autodsicover in metabase
a. Download the IIS 6.0 Resource Kit Tools from the following link:
b. Install it on the CAS server. Open the “Metabase Explorer” (Open it in elevated mode)
c. Locate: Exchange -> LM -> W3SVC -> 1 -> ROOT.
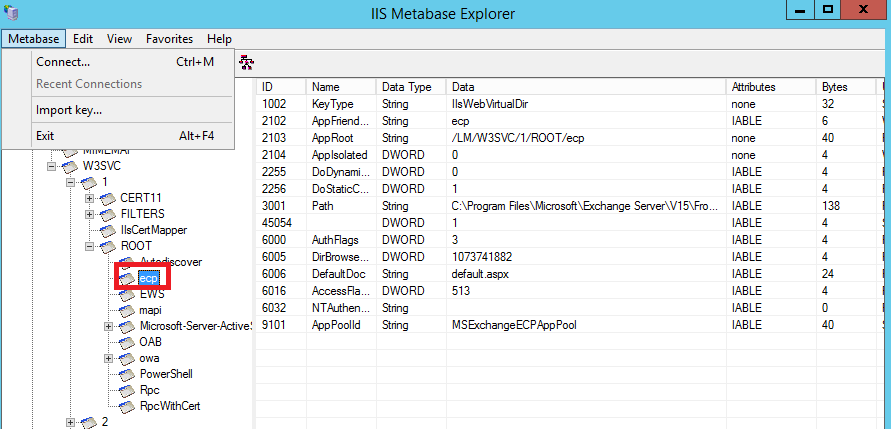
d. Check if you are able to find ECP virtual directory is present, if so, remove it.
7. After that, try recreating the ECP virtual directory and see the results
New-Ecpvirtualdirectory –Identity “CAS\Autodiscover (xxxxx)”
Most likely after following the above troubleshooting steps the affected ECP VD should start working. You can also follow the same troubleshooting steps if in case you are getting the same error in accessing the OWA,EAC ,Autodiscover and PowerShell Virtual Directories.
Hope this article is helpful
Thanks
Sathish Veerapandian
MVP – Exchange Server
Exchange 2010-failed to execute Troubleshoot-DatabaseSpace.ps1 Error formatting a string
We will get a SCOM alert for Exchange 2010 Management Pack unable to run the Troubleshootdatabase,ps1 after we install windows management framework 3.0 or higher versions on the exchange servers.
What is this TroubleshootDatabase.ps1 ?
The Troubleshoot-Database.Ps1 is located by default on the C:\Program Files\Microsoft\Exchange Server\V14\Scripts.
![]()
This script is triggered from the SCOM Management Pack to the SCOM agent on the exchange servers every 15 minutes to detect and correct any excess log growth or exchange database log growth.
What is the impact if SCOM MP is unable to trigger this script every 15 minutes ?
The Exchange log file growth and database growth becomes unmonitored for people who have SCOM monitoring system for exchange daily monitoring due to which it can cause the database down time.
What is the root cause if we find this issue in our environment ?
It happens when you have Windows Management Framework 3.0(Powershell 3.0) installed on the mailbox server recently and thus you’re running Powershell v3.0. You might be upgrading this for any recent backup software upgrade for the mailbox servers there are few backup software for which the recent upgrade requires WMF 3.0. Hence you will never be able to identify why scom stopped monitoring your databases and log files.
How do you find this ?
When you open Exchange Management shell it will run PS v2.0 and the command will execute just fine, but if you just click on the Powershell button next to start menu and add PSsnapins for Exchange 2010 it will run PS v3.0 and the command will fail to execute. You can verify the version of Powershell run by calling $Host.Version in your PS/EMS window. The reason for this is, that whenever the script is ran by SCOM it will call PS from “NT AUTHORITY\SYSTEM” context which will run the latest version of PS available while Exchange Management Shell is always calling version 2.0
By default this script (Troubleshoot-DatabaseSpace.ps1) is triggered to run by the Exchange 2010 Monitoring Management Pack.
Exchange 2010 Management Pack versions 14.03.0038.004 and earlier required only PowerShell 2.0 to be installed on the Exchange server for it to work. When PowerShell 3.0 or higher is installed on Exchange 2010 servers that were working with only PowerShell 2.0 installed, Exchange Management Pack on the SCOM stops monitoring the exchange databases.
If you login to the SCOM server and check the exchange management pack for SCOM it should be lesser than version 14.03.0038.004 and earlier as shown below.
Inorder to check
Login to the SCOM server – Open operations manager console – Click on Administration and – select management packs
Over the right check the version of the management pack installed for exchange server and it should be lesser than 14.03.0038.004

Solution:
We need to upgrade our management pack for exchange to the latest version to start monitoring our databases by SCOM. Version 14.3.210.2 of the Exchange 2010 Management Pack released last December helps when PS 3.0 and PS 2.0 are installed together on the same server. There is no need to uninstall PS 3.0 where the monitoring fails.
SCOM Management pack 14.3.210.2 can be downloaded from this location – http://www.microsoft.com/en-za/download/details.aspx?id=692
The new MSI (Exchange2010PowershellFix.MSI) script that has been included in this release enables Exchange 2010 MP to work on servers that have PowerShell 2.0 installed side by side with PowerShell 3.0+. This new MSI should be used only if existing Exchange 2010 MP isn’t able to monitor the Exchange 2010 servers that has PowerShell 2.0 and PowerShell 3.0+ installed side by side. This will NOT work if the server has only PowerShell 3.0 or higher installed.
In-order to upgrade to the latest version of the SCOM login to the SCOM server.
Open operations manager console – click on management pack – select import management packs and import the latest downloaded Exchange 2010 management pack 14.3.210.2 which will solve this problem.

Hope this helps.
Thanks
Sathish Veerapandian
MVP – Exchange Server
Steps to create/identify the list of public Ip’s used by exchange services
In this article we will look at the steps to create and identify the list of public Ip’s used by exchange
In this article we will have a look at the steps to set all Outgoing SMTP from 1 IP address and to see all the ip address from the Exchange server.
First you have to run Get-SendConnector SourceIPAddress x.x.x.x from the EMS in order to see the source IP address of the exchange server

Note:
By default this value will be set only to 0.0.0.0 and exchange hub will take its default assigned ip to send emails to the smart host (firewall/spam filter/Spam cloud). However you can check this if there is any value set to be on the safer side.
Now how the mail flow will go from your Exchange server
From your Exchange – to your firewall – then its gets NAT’ed from local ip to public ip and to internet
We need to NAT our local IP to one public IP.
Inorder to do that Follow the below steps:
Now you need to accomplish this with a router/firewall with a feature called Policy Based Routing.
1) Create a firewall/NAT rule to NAT outbound traffic from exchange ip address to your preferred public ip address.
2) With this you could make a rule like: When traffic is coming from my mail server AND the destination port is 25, send the traffic through your ISP from one of your public IP.
To be more precise you will have to do many to one NAT in your firewall as below:
For Example below is your server
Server name Private IP (Server) (Public IP on firewall) Port
Server1: 192.168.0.1 –> 65.55.33.118 Port 25
Server2: 192.168.0.2 –> 65.55.33.118 Port 25
If your servers configured as above your source public will be 65.55.33.118 from both the servers.
Also you should have PTR created for your external IP. If not please inform your ISP to create PTR for your external IP’s.
How to identify which Public IP your exchange services are using
There are multiple ways to identify the public ip address used by exchange server
The easiest way to identify them is through MX lookup
You can query all the Exchange url’s through nslookup to see the results
Things you need to query through nslookup:
1) Query external autodiscover url
2) Query webmail external url
3) Query outlook anywhere external url
Below is an example of mxlookup for Microsoft records

This steps can be useful during the migration scenarios of exchange servers as well as firewall.
Thanks
Sathish Veerapandian
Modify Connectors to Send/Receive Internet Mails on different port through your spam filtering/ISP provider
We can Modify Connectors for Receiving Internet Mail on different port apart from port 25 through your spam filtering/ISP provider.
This step applies to Exchange 2007/2010/2013. It is always a best practice to have this kind of setup so the spammers will not be able to intrude in our network and perform a directory harvest attack,reverse NDR attack etc.., and we can prevent spam emails circulating in our environment.
Perform the following thing to achieve this task.
1) Create a dedicated receive connector for your ISP/Spam filtering provider domain. 
2) Add only to your (ISP/Spam filtering provider) subnet and IP ranges. Note : You need to remove the default subnet range. Specify the ip ranges of only your Spam filtering provider or ISP provider 

3) Change the port to your desired number on which you need to receive emails from them.
4) Disable the default receive connector since it’s not required anymore.
So the mail-flow for inbound will be in the following type
Inbound
From Internet – Mails comes to your ISP/smart host – ISP delivers emails to your firewall on different port – then it comes to exchange server
For sending emails to the internet it would be very easy
Just create a send connector and smart host it to your (ISP/spam-filtering provider) IP address so that all the internet emails would be delivered to desired port to your (ISP/spam-filtering provider).
Outbound From Exchange – Email goes to your (ISP/Spam filtering provider) on a different port – Mail gets delivered to the internet user on standard port 25
Make sure that all the port numbers that you have configured to send/receive emails through your Spam filtering provider have been opened both inbound and outbound on your corporate and perimeter firewall.
Thanks
Sathish Veerapandian
Steps to perform SSl Certificate renewal in Exchange 2010/2013
In this article let’s have a look at things to consider during SSL certificate renewal in Exchange 2010 and 2013 environment.
First we need to confirm what type certificate we are using, i.e., the third-party certificate or self-signed certificate. And then we need to check the existing 3rd party certificate is associated with what all exchange services, number of SAN entries we have and note down them.
Let’s see the procedure of renewing the certificates for third party and self-signed.
For Third party Certificate Renewal
For renewing the third-party certificate, we need to apply a new certificate request from the third-party CA, then import the certificate to the Exchange servers and enable the related service (IIS, IMAP, POP, and SMTP) on the Exchange servers.
Follow the below steps:
Step 1: Obtain an SSL certificate. Purchase an SSL certificate from a well-known certification authority (CA).
Step 2: Generate and submit the certificate request: create a new certificate request for Secure Sockets Layer (SSL) services.
- Open Exchange Management Shell
- Run the following command, replace domain name and friendly name with your domain name and display name, and then run below command:
New-ExchangeCertificate -GenerateRequest -SubjectName “C=US, S = Contoso, L = Toybox, O = Test, OU = IT, CN = mail.contoso.com” -domainname mail.contoso.com, Mail.ad.contoso.com, Webmail.contoso.com -FriendlyName mail.contoso.com -privatekeyexportable:$true -path c:\cert.txt
IMP Note:
“DomainName” is used to populate one or more domain names (FQDNs) or server names in the resulting certificate request. We can replace ‘domainname’ according to our own environment.
“FriendlyName” is used to specify a display name for the resulting certificate. The display name must be lesser than 64 characters.
In SubjectName property, we can use the proper subject name by our own environment: c for country/region name, o for organization name and cn for common name.
- Submit the request to the certification authority and have the CA generate the certificate
Step 3: Enable the certificate on the Default Web site after your certificate has been generated, you must import it and then enable the certificate on the Default Web site.
- From the computer where step 2 was run, import the certificate. To import the certificate, open EMS and run the below cmdlet:
Import-ExchangeCertificate -path c:\cert.cer
Note: “c:\cert.cer” is the location and name of our certificate in my example.
- Copy the thumbprint of the certificate, which is the digest of the certificate data.
- Enable the certificate on the Default Web site, run the cmdlet in EMS and paste the copied thumbprint to the following cmdlet:
Enable-ExchangeCertificate -thumbprint <copied thumbprint value> -services “IIS,IMAP,POP,SMTP”
Note: Using the “enable-ExchangeCertificate” cmdlet will update the certificate mapping and replace the existing certificate that is configured in IIS, IMAP4, POP3, SMTP.
Step 4: Require the Client Access server virtual directories to use SSL
Step 5: Perform an IIS reset. Try browsing OWA and see if you get any errors
For Self Signed Certificate Renewal
For renewing the self-signed certificate, we need to get the old Thumbprint property of the expiring self-signed certificate, and then use New-ExchangeCertificate to renew the certificate and then enable the related service to the new certificate.
To get the existing thumbprint value
Run
Get-Exchangecertificate | fl
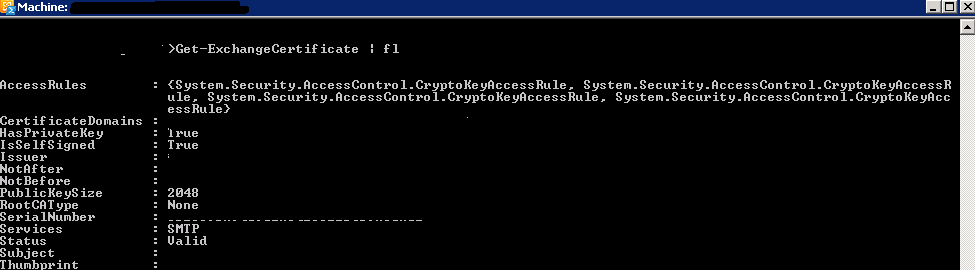
Important thing to note down the self-signed certificate should have a value True in the column IsSelfSigned
Then use the command remove-Exchangecertificate to remove the old expired certificate
Example
Remove-ExchangeCertificate -Thumbprint 5113ae0233a72fccb75b1d0198628675333d010e
You can use the command New-ExchangeCertificate to create a new certificate
Run the below command to perform the action
New-ExchangeCertificate -FriendlyName “SelfSigned Certificate” -KeySize 2048 -SubjectName “c=IN, s=, l=, o=CONTOSO, ou=IT, cn=CONTOSO.COM” -DomainName MAIL.CONTOSO.COM, AUTODISCOVER.CONTOSO.COM -PrivateKeyExportable $True
Below are the important things to keep in mind:
- You can assign only one certificate to the Default Web site at a time. I would recommend deleting the old certificate as it is useless and will create confusions because it will not be used by any services once we assign the new certificate.
- Ideally it should break or bring own any services while installing the new certificate. However, we may need to do an IISreset (not always but we may need it). So for few seconds till your IIS comes back we will experience a disconnection for few seconds
- Certificates cannot be changed after they are signed, otherwise they would provide no security. Once issued, a certificate holds all SANs. This means that a certificate would have to be revoked and a new one has to be issued to add a new SAN.
- You should first find out which names you want to register, because revoking and reissuing will most likely cost extra money. And also adding SAN entries will cost you extra money. If you have edge servers then the new certificate created must be imported on them and new edge subscription must be created.
- When you order a Unified Communications Certificate from a third party you can secure all the SAN names you need with one easily manageable certificate. After your Multiple Domain (UCC) SSL certificate is issued, you can add or remove Subject Alternative Names (SANs) at any time. SANs are the additional, non-primary domain names secured by your UCC SSL certificate. However, keep in mind: Changing your SANs generates a new certificate, which you must install on your server. Your old certificate only remains valid only for 72 hours and has to be replaced with new entries.
- Public trusted CA’s shall not issue a certificate with an Expiry Date later than 1 November 2015 with a SAN or Subject Common Name field containing a Reserved IP Address or Internal Server Name. As from 1 October 2016, CAs shall revoke all unexpired Certificates.
- If you are a server admin using internal names, you need to either reconfigure those servers to use a public name, or switch to a certificate issued by an internal CA before the 2015 cutoff date. All internal connections that require a publicly-trusted certificate must be done through names that are public and verifiable (it does not matter if those services are publicly accessible).
What things comes under internal name ?Any server name with a non-public domain name suffix. For example, http://www.contoso.local or server1.contoso.internal.
NetBIOS names or short hostnames, anything without a public domain. For example, Web1, ExchCAS1, or Frodo.
Any IPv4 address in the RFC 1918 range.
Any IPv6 address in the RFC 4193 range.
Thanks
Sathish Veerapandian
MVP – Exchange Server


