Monthly Archives: June 2015

Creating SQL instances for messaging related services

We will come across  certain scenarios where we need to integrate our Exchange Servers with other products for additional functionality.

Few examples are installing an automated mail signature software on the Transport Server for customizing and applying the email signatures automatically to all users.

Installing an additional layer of Anti-spam product on the email servers.

Configuring a Meeting room solution for integrating our  room mailboxes,Equipment mailboxes with additional product and integrating with meeting schedule display monitors.

Bringing up an archive solution for all the primary mailboxes and the list goes on.

Most of the products which are coming on the above category will require a centralized database where it needs to store its information related to the  configuration,logs, reports,etc.

In most of the cases these products will be using SQL DB’s for storing these data and values.

So planning in these kind of scenarios is very very important.Since an improper configuration of SQL instance and installation of the related product can interrupt the Exchange functionality very easily.

When we come across these kind of scenarios its always better to interact with the associated product expert .Get recommendations from a SQL expert with regards to the SQL configuration for the product.

I have collected few things which will help an Messaging guy during these scenarios

1) First get in touch with a SQL person and explain him about the requirement of the SQL for the product.Basically what kind of job it writes and stores in the SQL.

2) Reach the associated product expert and get advise on configuring the SQL instance for the product.

If  your environment is or the product that you are going to install is not that complex and does not require SQL enterprise then you can go ahead and install the local SQL instance on the corresponding Exchange Server.

I have collected few points based on my experience which might help during configuring SQL instance if you are going to configure the instance :

Make sure during the installation you select the SQL authentication mode and create a service account for the same. Though the builtin sa account will have the permission but its better to create a dedicated service account for the admin.

SQ

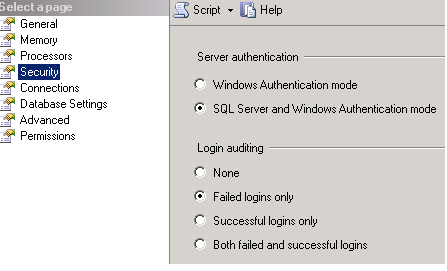
Advantages of selecting SQL server authentication mode

SQL Authentication is the typical authentication used for various database systems, composed of a username and a password. Obviously, an instance of SQL Server can have multiple such user accounts (using SQL authentication) with different usernames and passwords. In shared servers where different users should have access to different databases, SQL authentication should be used for better security since the users only with Windows authentication cannot connect to the database.

Also make sure that you set the file db and the log file value to some greater figure as below example

SQ1


Make sure the auto-close option is set to false

Functionality of Auto Close :-

Having this option set to true will annoy us from unwanted SCOM alerts.
When we set this option to True the DB will go offline when it doesn’t receive any active connections and will resume back whenever it gets new connections. So when we have a SCOM agent monitoring this SQL we will get unwanted alerts from them.

Its better to set this parameter to false

Launch Management Studio –> Select the Database  –> Right Click Properties–> Options –> “Auto Close” value to “False”

Autoclsoe


After the installation is done check the total and target server memory to see if its eating up any additional memory by executing the below query

Select * from sys.dm_os_performance_counters

where counter_name in

(‘Target Server Memory (KB)’,

‘Total Server Memory (KB)’)

or (object_name=’SQLServer:Buffer Manager’ and counter_name in(‘Buffer cache hit ratio’,

‘Page life expectancy ‘))


Also you can check the physical memory ,available committed memory , memory utilization percentage by running the below query

select * from sys.dm_os_process_memory

SQLM

If we are not sure about these values its better after the configuration you can show your SQL installation to an SQL expert and check if all the settings are in right place.

Thanks 

Sathish Veerapandian

MVP – Exchange 

RBAC role to Manage end user contacts through (Exchange Control Panel)

There might be a requirement to delegate the management of contacts for all the staffs especially for the HR team.Since the staffs position title change, phone numbers, city, extension , address change will happen randomly for all the staffs.

Its better to delegate this task alone to the HR team member so that the help desk calls for changing these information will be reduced. Also there is no need to wait for a period of time to make these changes from the help desk team.

Basically we can create a custom RBAC role and assign this to a HR staff who would be able to manage this task through ECP .

Create a new management role :

New-ManagementRole -Parent “Mail Recipients” -Name “Contact Management”

RBAC1

Now we need to create a new role group

Create a new role group :

New-RoleGroup –Name “Contact Editor” –Roles “Contact Management”

RBAC2

Remove all of the unwanted cmdlets from our newly created  role, since we need to give the bare minimum permission of modifying only  the contacts.

Get-managementRoleEntry “Contact Management\*” | where { $_.Name –ne “Set-User”} | Remove-ManagementRoleEntry


Add only the required entries for the new role

Set-ManagementRoleEntry “Contact Management\Set-User” -Parameters “Phone,city,phone,fax,mobilephone,department,title,street address”

RBAC4


New-ManagementRoleAssignment -Role Contact Management -User TestITHRAdmin RBAC7


Run the below command to check and ensure that only set-user  editor rights are assigned Get-managementRoleEntry “Contact Management\*” RBAC6

When this RBAC role  person can login through ECP  and he would be able to manage only the AD contacts

Thanks 

Sathish Veerapandian

MVP – Exchange Server

Sending Mass Mailers ,Marketing Emails, News letters via Exchange ?

At times we might get requirement where we want to  send mails in bulk from our messaging system to internal/external users for business case.

Though sending bulk emails is not at all advised due to many factors but however when business demands we do not have any other option other than going further.

The business may demand where we need to configure our mailing system to send advertisements, newsletters to the partners, customers in a week , in a day or even in every 2 hours.

We  would need to configure this requirement  in a way that it should not be getting affected on the below parameters :

a) Without affecting our normal email operations and without affecting our messaging system performance.

b) Without getting blacklisted as a spammer.

c) The Mass email that we send should Land-Up in the end users inbox ,not in spam folder and shouldn’t be trapped in their filters.

Based on industry best practices i have collected few points which can be taken into consideration when we plan for this type of requirements:

1) Determine how the mass mails are going to be sent  from which application ( Whether its internal ip  or external ip). Then  the mass mailers recipients ( whether it goes only to internal recipients or to both internal and external recipients). If its for internal recipients only the job wouldn’t be more complex.

2) If its going to be from an external IP then better don’t allow to relay these bulk emails through your domain.

3) Its not advised to allow sending bulk emails from an unregistered external ip to external users  from your domain since your IP and domain will get blacklisted in a matter of day.

4) If still there is a requirement to send mass mailers from external IP’s make sure the below are met :-

a) Send the mail using a known and registered sender address(domain) of which the domain part is traceable using reverse lookup, and has a valid  SPF.

b) Make sure they send all the emails with the correct subject ,message bodies, unsubscribe and adhere to all the local and legal requirements.

c) Try convincing the marketing team or the team who sends bulk email  to use  a different domain and a different IP address as your connecting IP  will  get blacklisted easily and will affect your production emails.

5) There are few SMTP appliance that can be placed in the DMZ which can accept emails from the mass mailing apps and can do the job.

There are more number of cheap bulk emailing tools that will do this job easier, including dealing with bounces, unsubscribe requests etc. Its even better to outsource  this requirement to any one of them.

Since the major outsourced providers are doing this business for a while in the market they will have all the configurations and settings in place with the ISP’s which will increase the delivery success rate of these emails.


But still if you would like to go for the mass mailing for external IP’s domains to external users  through exchange make sure the below conditions are met :

1) Create a dedicated server (CAS+MBX) for doing this job. Configure relay on this server.

2) Create a new database , Create the sender mailbox alone on this new database.

3) Create additional number of transport servers for load balancing  since SubmissionServerOverrideList  switch cannot be used from Exchange 2013. If you add Exchange 2010 hub server for this then you can use SubmissionServerOverrideList for that DB to use only that HUB server which will not affect the other transport servers.

Also make sure the below values are set in the send connectors :

Maximum concurrent outbound connections: 1000 *

Maximum concurrent outbound connections per domain: 20*
Set-SendConnector -SmtpMaxMessagesPerConnection 200


Also make sure  that you alter and configure these values on the relay receive connectors according to the number of  bulk emails  :

ConnectionInactivityTimeout
ConnectionTimeout
MaxInboundConnection
MaxInboundConnectionPercentagePerSource
MaxInboundConnectionPerSource
MaxRecipientsPerMessage
MessageRateLimit

Finally make sure these bulk emails are sent only during off business hours in-order to avoid load on the transport services during production hours.

Hope this helps !!

Thanks

Sathish Veerapandian

MVP – Exchange Server

Lync 2010/2013 Migration to another domain

When we plan for migration of lync servers from one domain to another few factors needs to be kept in mind and considered. In this article i have mentioned few best practices that can be followed during these kind of scenarios.

Below are some tips that can be used during the migration :

The first and the foremost thing that you will need to do is to bring up the Lync Infrastructure in the new Forest.

Meanwhile when you plan for migrating AD user accounts from the source domain  you can created linked lync accounts in the resource forest. Make sure EWS ,Auto discover everything is setup correctly.

AD user accounts not residing in the target would authenticate via edge . Later after the first logon password cache entry is made. End users wouldn’t be prompted for the password,since edge server allows communication with federated companies.

Then Use DBIMPEXP in Source domain where lync 2010 is running to export their contacts to the new forest.

What is DBimpExp ?

Its an inbuilt Microsoft utility for Lync server 2010 located in C:\Program Files\Common Files\Microsoft Lync Server 2010\Support on the Lync Front End Server.
By using this utility we would be able to connect to the lync SQL DB exporting the XML files which contains (users contact lists and conference directories).

Its located in the folder C:\Program Files\Common Files\Microsoft Lync Server 2010\Support

Below is the example

dbimpexp.exe /sqlserver:”lync-sql.sip.exchangequery.com\LYNC” /hrxmlfile:”C:\test.xml”

Store2

You need to navigate to the above location to access this utility and this command is for enterprise edition server.

After you export these XML config’s you cannot import directly to Lync 2013 or SFB since the import-csuserdata will not accept this direct xml format and will accept only these datas in ZIP format.

From lync 2013 this dbimpexp.exe utility has been depreciated and replaced with the importcsuser data cmdlets. So you wouldn’t be able to find this utility in Lync2013 and SFB.

We need to Use Import-Csuserdata commandlet to import the contacts.

So after exporting the config information from lync 2010 you will need to convert these values by running the below commands

First run the below commands to convert the xml type exported file to *.zip format.

Convert-CsUserData -InputFile “C:\test.xml” -OutputFile “C:\_Install\Restore\test.zip” -TargetVersion Current

Later run the below command to import the data in the target forest containing Lync 2013 or later version.

Import-CsUserData -PoolFQDN “LyncPool.Domain.com” -FileName “C:\_Install\Restore\test.zip”


During the final cut-over date you can break the linked accounts (source account) by clearing “msRTCSIP-OriginatorSID” attribute and enabling the target account.

Basically what you need to do is move the SID from the user forest into the msRTCSIPOriginatorSId for each lync enabled user in the resource forest.


Below are the things that we need  to consider for federation :
To make sure there is no issues happening with your federated partners you have to tell  them to change  Lync Edge access IP and FQDN to the new Forest values in their end.

But practically if you have more number of federated partners then it might take some time to make these changes on their end.

As a work around for a while you can configure the below settings and keep them for a while until your partners change the federation values to the new one.

Below is an Example :

To make sure there is no issues happening with your federated partners after migration

Basically changing from oldsip.company.com to newsip.company.com  would break federation.

Go back and reissue your certificate on the Lync 2013 Edge and add oldsip.company.com entry.
This will work because Federation isn’t dependent on the name you pick in topology builder. It’s  just that the SRV record goes to a server with a corresponding matching name.

For example if source domain SIP  oldsip.company.com points to  IP  10.0.0.1 and your target SIP is newsip.company.com on the IP 10.0.0.2.

For a temporary fix you can create oldsip.company.com and point it to 10.0.0.2 . This will be working if you have a valid certificate in place for the oldsip.company.com and that certificate present on the new  target domain  lync edge server.

Note: 

These steps will not apply for all the migrations as each and every migration varies according to every domain setup, config, DNS setup,Trust relationship, Enterprise voice plan , SIP trunk, SIP config, PBX,etc. So according to those configuration based on your environment planning needs to be done properly .There are few tips which can be helpful during these kind of migration scenarios.

Thanks 

Sathish Veerapandian

MVP – Exchange Server

After upgrade to Skype4Business incoming calls to phones might not show the caller ID

After upgrade to Skype4Business incoming calls to phones might not show the original  caller ID (Might be hidden or unknown)

This is a small misconfiguration which we might have left out during the upgrade.

This is due to a value called Forward PAI which might be set to false

What is this Forward PAI ?

Its a value that  sends the  P-Asserted-Identity (PAI) header  along with the call. This P-Asserted-Identity (PAI) will have headers through which it will verify the original  identity of the caller.

When the call is being processed by the SIP network, a P-Asserted-Identity header will be part of all SIP messages for that complete call transaction (i.e. INVITE, ACK, BYE).

In-order to check this value in your settings you can run the below command

Get-CstrunkConfiguration

I just ran Get-CsTrunkConfiguration | Fl “*Forward*” to filter the appropriate value

LYNC

In my case it was set to false. You have to set this value to True

Run the below command to set this value to true

Set-CsTrunkConfiguration -Identity Site:ExchangeQuery  ForwardPAI $True


You can enable this value through edit trunk configuration settings through control panel  also

ee


I just explored the other below options as well and thought of adding them up in this blog itself .Below are them


Enable Media by Pass :

If we enable this option bypass will be attempted for all PSTN calls. You can enable this if there is a full connectivity strength between clients and PSTN gateways.Typically by enabling this option we can minimize the number of Mediation Servers deployed.This improves the voice quality by reducing the latency since the number of hops gets reduced.

Centralized Media Processing :

By enabling this Media bypass can improve voice quality by reducing latency, needless translation, possibility of packet loss, and the number of points of potential failure.Enabling Centralized Media Processing is a useful feature in that it allows the CircuitID Gateway to handle as much of the SIP responsibility as possible.

Enable forward call history: If we enable this value then all the call history information will be forwarded through the SIP trunk.

Enable RTP latching: Indicates whether or not the SIP trunks support RTP latching. RTP latching is a technology that enables RTP/RTCP connectivity through a NAT (network address translator) device or firewall.

Enable forward call history: Indicates whether call history information will be forwarded through the trunk.

Note:

All of the above will not be standard configuration setting in all deployments.For each UI setting in the Trunk Configuration we need to understand and plan accordingly to your PSTN connectivity , SIP configuration and your current Lync setup.

Hope this is useful

Thanks

Sathish Veerapandian

MVP – Exchange Server