
The concept of throttling policy is first introduced in Exchange 2007, by which admin can impose some policies that prevents user application from sending number of Remote Procedure Call per second.
Throttling policies are meant for enhancing the Exchange performance in the organization. It keeps a track of consumption of resources by the end-user and also imposes the bandwidth limits. Continue reading
Category Archives: Exchange 2010/2013 Monitoring/Operational Scripts
Configure Throttling Policy In Exchange Server 2016/13/10
Remove Exchange Server 2010 From a DAG
If you are interested in removing existing Exchange Server 2010 from a Database Availability Group then this article completely belongs to you. Continue reading
Exchange 2010/2013 Mailbox Quota , Message size planning for end users
In this article i’m giving some best suggestions that can be scoped in-terms of storage for any new implementation and redesigning of existing environment for Exchange messaging Platform.
There is no such in recommendation of giving a standard best practice for mailbox size, Maximum message size , retention and archive as it varies according to each every org structure based on Storage , Email flow per day , Server hardware , memory, requirement etc..,
Before taking up any new implementation its always better to set up scope on the below things
1) Mailbox Size per user.
2) Maximum Size of Message.
3) Retention of Mailbox items.
The first step we will look in planning mailbox size for users
The better way i would suggest is to first collect the daily, weekly and monthly email statistics for the whole environment
These amazing scripts from nuno mota will help you on collecting the statistics which is very useful.
Emails sent per hour – https://gallery.technet.microsoft.com/office/ec7940c1-be9a-45d5-9ea1-921677fa081c
Emails sent per day and size – https://gallery.technet.microsoft.com/office/f2af711e-defd-476d-896e-8053aa964bc5/view/Discussions
Emails sent per week and size – https://gallery.technet.microsoft.com/office/Total-Emails-Sent-and-c1daf5e7
Calculate the average size of the emails sent per user on daily basis from the above output
Based on that calculate the mailbox quota that you need to set for all the users .
You need to make sure that all the mailboxes are balanced equally on existing mailbox servers before planning.
Measure the currently allocated disk size in each mailbox server based on the current value and expected value in 1 year.
multiply the value and calculate the growth of expected users in 1 year.
Calculate the current log space , database space and the expected value after 6 months
Always keep a buffer value of 30 percent on the total value of the disk space required to be on the safer side.
Better you can set some exclusions for mailbox quota for VIP users.When we say VIP users you can better define a policy with the client before taking up the project. Example for executive users the mailbox size will be unlimited and for the number of users and fix a static value for the remaining mailboxes and finalize the agreement. Define these policies clearly before taking up any new project.
Because a poor capacity planning will bring the following causes :
1) Increased storage cost as days passes.
2) More network bandwidth usage between servers and clients since all the users will have their emails stored in their mailbox.
3) Affecting the storage subsystem in terms of I/Ops.
2) Maximum message size
Planning for maximum message size for the whole organization is also very important.
Following things can be impacted of improper message size planning
1) First thing will affect you is mass mailing from the organizations itself (HR,Marketing Team). They will start sending mass mails with large attachments if the message size is not restricted properly.Impact of this will be your hub servers will go down.
Always you need to give a clear note of this part during the planning and make a best practice of sending mass mails after production hours since the normal emails will be affected.
2) It increases the network utilization of messaging system which will create again an impact.
3) If the network is compromised by a hacker then he can utilize the network/system resources by sending emails with large attachments.
4) Also it will be difficult for anti-spam solutions to scan these emails with large attachments and more possibly exclude most of the attachments if they are encrypted with large size and no exclusions set for encrypted attachments in the anti-spam filter.
3) Retention and archive
Planning for retention and archive is very important
Also it would be good if you implement some archiving solution in place for emails older than 10 months so that your primary mailbox will not be loaded always and less load on the exchange server.
When you bring up archive make sure that the retention for the archived items is planned properly (depending upon your client suggestion) as few orgs would like to have emails of more than 5 years since the retention of the archive cannot be restored at any cost unless we have alternative solution in that place.
Planning this part and convincing the client is little bit tough and difficult since the cost is involved more in this factor when they say they want to keep the retention items in archive for ever.
Hope this reading is helpful
Thanks
Sathish Veerapandian
MVP- Exchange Server
Managing Exchange 2010/2013 calendar permissions in Daily operations
Managing calendar permissions in daily operations will be little bit difficult for an admin since there will be more requests coming in for the calendar permissions.
I have collected few scripts which will be useful in managing the calendar requests that are coming in the daily operations.
Use the below command to check the calendar permission for single user
Get-MailboxFolderPermission -Identity mailbox@domain.com:\Calendar | FL

To add the calendar permission for single user use the below command
Add-MailboxFolderPermission -Identity newtestuser1:\calendar -User Usermailbox -Accessrights editor

To check the calendar permission for a mailbox for a single user you can see the below command.
Get-MailboxFolderPermission -Identity mailbox@domain.com:\Calendar -User Test2

To change the default calendar permission for all the mailboxes in entire org you can use the below command.
$all=Get-Mailbox -RecipientTypeDetails UserMailbox
$all | ForEach {Set-MailboxFolderPermission -Identity “$($_.alias):\Calendar” -User default-AccessRights “LimitedDetails”

To change the mailbox access default permission for all the users for one mailbox you can use the below command
Get-Mailbox -resultsize unlimited | foreach {add-mailboxfolderpermission -identity “$($_.alias):\calendar” -User testuser -Accessrights “editor”}
![]()
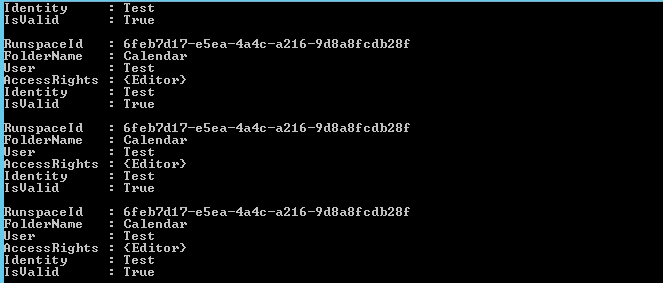
To check the calendar permission for all the users run the below command
ForEach ($Mailbox in (Get-Mailbox -ResultSize Unlimited)) {Get-MailboxFolderPermission -Identity “$($Mailbox.Name):\Calendar” | Select @{n=’Calendar’;e={$Mailbox.Name}},User,AccessRights}

To take the calendar permissions for all the users in csv format do the following things
First run the below command to store the value of all the calendar permission by running the below command
$Results = ForEach ($Mailbox in (Get-Mailbox -ResultSize Unlimited)) {Get-MailboxFolderPermission -Identity “$($Mailbox.Name):\Calendar” | Select @{n=’Calendar’;e={$Mailbox.Name}},User,AccessRights}
![]()
Take the output in text file by running the below command
$Results | out-file -filepath C:\CalendarPermission.txt
![]()
Now run the below command to join the string and show the access rights for each user in the csv file
$Results = ForEach ($Mailbox in (Get-Mailbox -ResultSize Unlimited)) { Get-MailboxFolderPermission -Identity “$($Mailbox.Name):\Calendar” | Select @{n=’Mailbox’;e={$Mailbox.Name}},User,@{Name=’AccessRights’;Expression={[string]::join(“;”, ($_.AccessRights))}}
![]()
Now export the results
$Results | Export-Csv C:\permission8.csv

Hope this is helpful
Thanks
Sathish Veerapandian
MVP – Exchange Server
Update – ExPerfWiz 1.4 has been released
ExPerfWiz 1.4 has been released on October 25th 2014
Following are the recent updates in the Experfwiz 1.4
Fixed Circular Logging bug in Windows 2008+
Added ability to convert BLG to CSV for 3rd party application analysis (does not need to be run from EMS, just Powershell 2.0+)
Updated maxsize for Exchange 2013 to default to 1024MB
Fixed filepath bug on Windows 2003
Added/Removed various counters
Fixed location of webhelp
Updated -help syntax
ExPerfWiz is a script developed by Microsoft to to collect the performance data together on Servers running Exchange 2007,2010 and 2013.
In the earlier version we have the option of running -nofull switch by which it will collect only the role based counters.The current version runs in full mode meaning which it collects all the performance counters related for Exchange troubleshooting purposes.
Below is the example to run the perfmon for a duration of 4 hours
Set duration to 4 hours, change interval to collect data every 5 seconds and set Data location to d:\Logs
.\experfwiz.ps1 -duration 04:00:00 -interval 5 -filepath D:\Logs

If it finds previous data of Perfwiz logs it prompts for an option to delete the old entries, Stops the data collector sets, creates a new data collector sets and then it starts collecting the data.
Note: This script will take the local server name and will run locally on the serve if no remote server parameter is specified.
More Examples can be found at – http://experfwiz.codeplex.com/
Source of Information – https://social.technet.microsoft.com/Forums/exchange/en-US/f8aa3e90-d49f-479f-b00b-c8444afefa65/experfwiz-14-has-been-released?forum=exchangesvrgeneral
Thanks
Sathish Veerapandian
MVP – Exchange Server
Script for Conference Room Conversion
We often receive a request in daily job in messaging environment with regards to conference room. We might receive a request to convert an existing conference room from auto accept to delegate and vice versa.
It could be easier if there is a script to change the room type for these kind of bulk requests . Below script can be used for converting the conference room types. The Script configures conference rooms for Auto Accept or delegate configuration according to the input given.
You can use the below script for conference room conversion
***********************************************************************
<#
.SYNOPSIS
SetConferenceRoom.ps1 configures conference rooms for AutoAccept or delegate configuration.
.DESCRIPTION
Rooms are configured as AutoAccept room or delegate room using the parameters defined below. Both types are converted to the RoomMailbox recipient type if they are not already. This is a one-way operation.
If configured as an AutoAccept room, no resource delegates are set and the AllBookIn and AllRequestIn policies are left at true with AutoAccept processing turned on.
If configured as a delegate room, the AllBookIn policy is set to false. At least one delegate must be supplied in the syntax described below, and will be configured on the room. Delegates can be added to rooms as part of this script, and delegates cannot be removed. It will only take the existing delegate list and add to it.
.PARAMETER Room
The CDSID, DN or LegacyDN of the room to configure. Quote if necessary.
.PARAMETER AutoAccept
Boolean parameter to define whether AutoAccept is on or off. If set to $true, then -Delegates must not be used.
.PARAMETER Delegates
An array of delegates to add to the room. Specify multiple delegates using a comma, and quote individual delegates.
.INPUTS
None – no pipeline input.
.OUTPUTS
System.String.
.EXAMPLE
C:\PS>.\SetConferenceRoom.ps1 -Room NARoom100 -AutoAccept:$true
Room is configured as a RoomMailbox if not already, and all AutoAccept settings are configured. Delegates are not configured.
.EXAMPLE
C:\PS>.\SetConferenceRoom.ps1 -Room NARoom100 -AutoAccept:$false -Delegates userid1
Room is configured as a RoomMailbox if not alreayd, and all delegate settings are configured. Delegate userid1 is added to the existing list, empty or not.
.EXAMPLE
C:\PS>.\SetConferenceRoom.ps1 -Room NARoom100 -AutoAccept:$false -Delegates “userid1″,”userid2”
Room is configured as a RoomMailbox if not alreayd, and all delegate settings are configured. Delegates userid1 and userid2 are added to the existing list, empty or not.
.LINK
Insert script documentation link here.
#>
Param([string]$Room,[bool]$AutoAccept = $false,[Array]$Delegates = $null)
if (($AutoAccept -eq $false) -and ($Delegates -eq $null))
{
write-host “Cannot configure room as a delegate room without a delegate list. Please see ‘help .\SetConferenceRoom.ps1 -detailed’ for more information.”
exit
}
if (($AutoAccept -eq $true) -and ($Delegates -ne $null))
{
write-host “Cannot configure room as an AutoAccept room WITH delegates. Please see ‘help .\SetConferenceRoom.ps1 -detailed’ for more information.”
exit
}
try
{
write-host (“`r`nValidating mailbox `”$room`”…”) -ForegroundColor white
$d = Get-mailbox $Room -erroraction Stop
}
Catch
{
write-host (“`r`nCannot find mailbox `”$room`”. Reason: ” + $Error[0]) -ForegroundColor white
write-host `r`n”Exiting…”
exit
}
$RecType = (get-mailbox $room).RecipientTypeDetails.ToString()
write-host “`r`nConverting $room to recipient type RoomMailbox…” -ForegroundColor white
if ($RecType -ne “RoomMailbox”)
{
$answer = read-host -Prompt “`r`nRoom About to convert $room to object type Room from $RecType. This is required in order to configure the conference room. Do you wish to continue? (y/n)”
if ($answer.ToString().Tolower() -eq “y”)
{
set-mailbox $room -type Room
write-host “`r`nConfigured $room as recipient type RoomMailbox.”
}
else
{
write-host “`r`nOperation aborted. No longer processing room conversion.”
}
}
else
{
write-host “$room is already of type RoomMailbox. Skipping conversion…”
}
if ($AutoAccept -eq $true)
{
write-host “`r`nChecking room for existing delegates…” -ForegroundColor white
$currentdelegates = @()
$currentdelegates += (get-calendarprocessing $room).resourcedelegates
if ($currentdelegates.Count -gt 0)
{
write-host “`r`n$Room has the following delegates:”
$currentdelegates |select name
write-host “`r`nThese delegates should be cleared if the room is to be configured as AutoAccept.”
$answer = Read-Host “Do you wish to clear these delegates from the room? (y/n)”
if ($answer.tostring().tolower() -eq “y”)
{
set-calendarprocessing $Room -ResourceDelegates $null
write-host “Cleared delegates on $room.”
}
else
{
write-host “Not clearing delegates on $room.”
}
}
else
{
write-host “`r`n$Room has no existing delegates. Skipping warnings…”
}
write-host “`r`nConfiguring calendar processing on $room…” -ForegroundColor white
set-calendarprocessing $room -TentativePendingApproval:$true -OrganizerInfo:$false -additionalresponse “This meeting had the Subject, Comments and Attachments removed. This meeting is not public and should be treated as private.” -AddNewRequestsTentatively:$false -AutomateProcessing AutoAccept -BookingWindowInDays 365 -ForwardRequestsToDelegates:$false -AddOrganizerToSubject:$false -AddAdditionalResponse:$true -AllRequestInPolicy:$true -AllBookInPolicy:$true
write-host “`r`nConfigured calendar processing on $room for standard AutoAccept configuration.”
}
else
{
write-host “`r`nSetting delegate configuration on $room…” -ForegroundColor white
$currentdelegates = @()
$currentdelegates += (get-calendarprocessing $room).resourcedelegates
if ($currentdelegates.count -gt 0)
{
write-host “`r`n$room currently has these delegates:”
$currentdelegates |select Name
write-host “`r`nThe following delegates will replace the existing list:”
$delegates
$answer = read-host -prompt “`r`nIf you do not wish to proceed, delegates will not be added but proocessing options will still be confgured as a delegate room. Delegates can be added later. `r`nAlso, if there are any users in the list of additions that are already delegates, do not proceed and remove the duplicates from the list. `r`nDo you wish to proceed? (y/n)”
if ($answer.ToString().ToLower() -eq “y”)
{
Set-CalendarProcessing $room -ResourceDelegates $null
set-calendarprocessing $room -resourcedelegates $delegates
write-host “Delegates configured. These may not appear in the properties of $room for a few minutes.”
}
else
{
write-host “Skipping delegate configuration.”
}
}
else
{
write-host “`r`n$Room currently has no delegates. Adding these:”
$delegates
set-calendarprocessing $room -resourcedelegates $delegates
write-host “Delegates configured.”
}
write-host “`r`nConfiguring calendar processing on $room..” -ForegroundColor white
set-calendarprocessing $room -TentativePendingApproval:$true -OrganizerInfo:$false -additionalresponse “This meeting had the Subject, Comments and Attachments removed. This meeting is not public and should be treated as private.” -AddNewRequestsTentatively:$false -AllBookInPolicy:$false -AllRequestInPolicy:$true -AutomateProcessing AutoAccept -BookingWindowInDays 365 -ForwardRequestsToDelegates:$true -AddOrganizerToSubject:$false -AddAdditionalResponse:$true
write-host “`r`nConfigured calendar processing on $room for standard delegate configuration.”
}
write-host “`r`n$room configuration complete.`r`n” -ForegroundColor white
***********************************************************************
Just download the script and navigate to the location through EMS
Run the below command to make it to delegate type
.\conf.ps1 –Room “roommbx” –AutoAccept:$false –Delegates “specify delegates”

This script can be used to change the delegate of the conference room as well

For auto accept
The below output is for autoaccept

Cheers
Sathish Veerapandian
Technology Evangelist
Microsoft Pelnet Tool
Microsoft has released an excellent tool called Pelnet created by MSFT Michael Hall. This tool can be used for validating the transport changes like changing config of send connectors and everything.
This tool can also be used for troubleshooting mail flow issues i.e., connectivity issues with transport servers as well.
Basically it’s a Power-Shell script which does this transport validation as well.
Few Advantages of using Pelnet
1) IT can be used in organization where the Telnet Functionality on member servers is disabled due to security reason.
2) Manual testing of Telnet and NSLOOKUP on each and every transport servers can be eliminated which consumes more time.
Just download the script from the Tech-net Gallery
http://gallery.technet.microsoft.com/office/PelNetps1-1cb7b6d7
Open exchange management shell and navigate to the location where we have this script downloaded
You can run update-help for the list of parameters that can be included
Refer below Microsoft Team blog for few more examples.
http://blogs.technet.com/b/exchange/archive/2014/04/30/released-introducing-pelnet.aspx

Below is the output of get-help with example
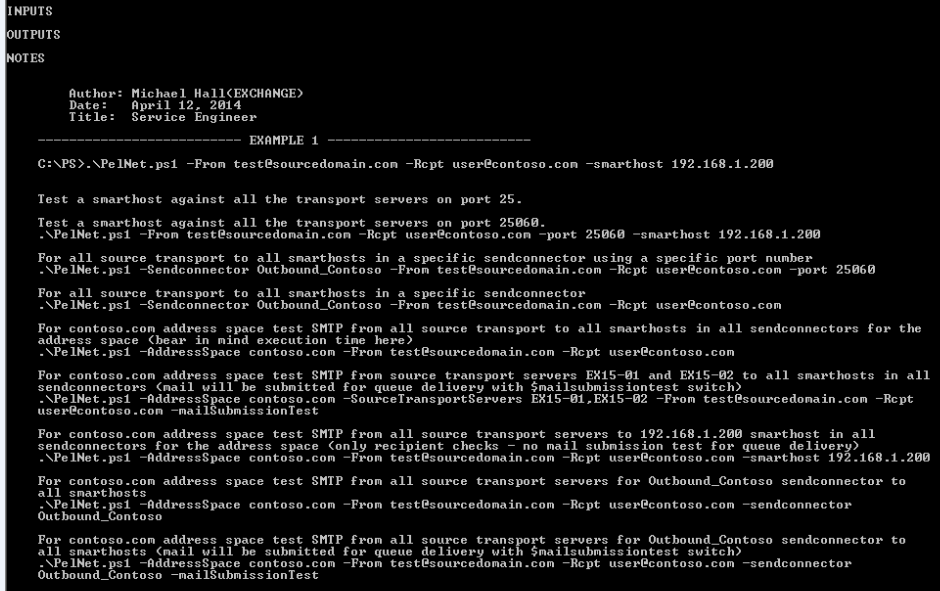
Now as a part of testing in Exchange 2010 & 2013 mixed environment I just performed the following task
Disabled the transport services on Exchange 2013.
Created a test Send connector in Exchange 2010 .
Included only address space Toybox.com on the test send connector.
Now ran the script and below is the output

It was able to identify the test send connector with the address space toybox.com.

Also it throws an error connecting to Exchange2013 since we have stopped the transport services on the Exchange 2013 servers.
Additionally it creates associated txt files in the script location as well.

This script can be used for daily monitoring the mail-flow for few parameters to check the source transport server’s functionality. It can be executed on a specified time by using the Windows Task Scheduler.
Monitoring Hub Transport Server
Monitoring the queue is one of the important tasks in the Daily Exchange Server Check list.
I have identified and modified a script for monitoring the Transport Queues on all the Hub servers .I have tested this output. This script runs on all hub servers and then it triggers an output email to the given recipients. Below are the screenshots and the script which will be helpful to us in terms of monitoring the Queue in the exchange 2007 & 2010.

Output of the HTML result.

Also this can be sent to a recipient email address and here is the sample output of an test performed ‘

Below is the Script file
***************************************************************************
$Msg = new-object system.net.mail.MailMessage
$msg.IsBodyHtml = $True
$msg.Body = $Queue
$msg.Subject = “Hub Transport Queue Information”
$msg.To.add(“Sathish@exchangequery.com”)
$msg.To.add(“Administrator@exchangequery.com”)
$msg.From = “Sathish@exchangequery.com”
$SmtpClient = new-object system.net.mail.smtpClient
$smtpclient.Host = ‘testlab.exchangequery.com’
$smtpclient.Send($msg)
$Queue = Get-TransportServer | Get-Queue | Select Identity,DeliveryType,Status,MessageCount,NextHopDomain,LastRetryTime, NextRetryTime | ConvertTo-Html -head $BodyStyle
$BodyStyle | Out-File C:\scripts\QueueInfo.html
$BodyStyle = “<style>”
$BodyStyle = $BodyStyle + “BODY{background-color:peachpuff;}”
$BodyStyle = $BodyStyle + “TABLE{border-width: 1px;border-style: solid;
border-color: black;border-collapse: collapse;}”
$BodyStyle = $BodyStyle + “TH{border-width: 1px;padding: 0px;
border-style: solid;border-color: black;background-color:thistle}”
$BodyStyle = $BodyStyle + “TD{border-width: 1px;padding: 0px;
border-style: solid;border-color: black;background-color:PaleGoldenrod}”
$BodyStyle = $BodyStyle + “</style>”
***************************************************************************
Script for removing adding users from multiple distribution groups/Specific Distribution Group
Adding and removing users randomly from a Distribution group for an administrators is always an hectic job.
For example if an user who is an part of HR team leaves the company then administrator will receive an request from the HR team to remove the user out of all the HR distribution group.
This is an painful job for an admin to find the user on all associated distribution groups and then remove the user.
This job will be simple if there could be some kind of an automation script which could remove the users from the associated distribution groups
This task can be achieved by using Dsmod and tweaking the DSmod according to our criteria.Below script will be useful in terms of removing users who have left the organization from their department associated distribution group.
Step 1: copy the below text and save it in batch file
FOR /F “usebackq delims=” %%* in (“c:\test folder\users.txt”) do (
DSGET.exe USER “%%*” -memberof | DSMOD.exe GROUP -C -RMMBR “%%*”)
I have created an user named exchangequerytest and exchangequeryIT to execute this script as shown below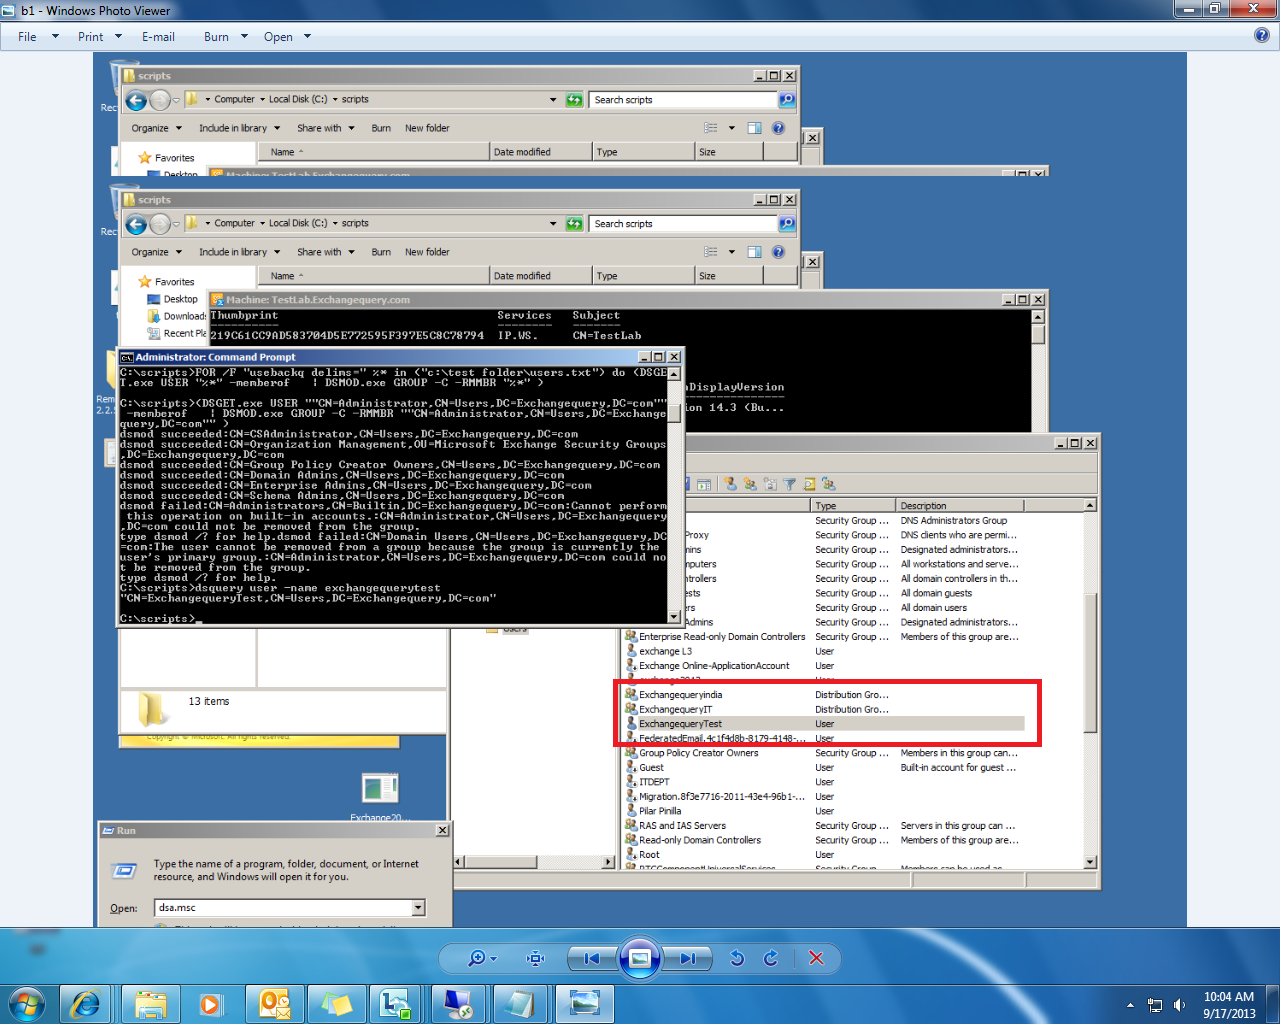
Step 2: Add the users DN in a text file in your own desired location or the test location which i have specified in the batch file
EX:
Test Location where i save list of users whom i need to remove
c:\test folder\users.txt

Copy the DN name of the users and not alias
use the following command to get the alias –
Below is an sample output for query for an admin account
C:\scripts>dsquery user -name administrator
“CN=Administrator,CN=Users,DC=Exchangequery,DC=com”
Copy the output and save it within quotation as shown above in the test location specified in the batch file
Then navigate to the folder where we have the batch file saved and it will pick the users from the text file we have specified and will remove them automatically from all the distribution groups as output shown in the below example.We do not need to specify any DG name

Finally the user is removed from the distribution group

The above batch file will remove the user from all ditrsibution group he was member of.In few cases we might come across some scenario in which we need to remove only from a particular distribution group.You can use the below script to remove from a specific distribution group
Below is an example for removing the user only from the group ITDEPT
FOR /F “usebackq delims=” %%* in (“c:\test folder\users.txt”) do (
dsmod group “ITDEPT” -rmmbr “%%*”)
Note: In the dsmod group ” ” specify the DN of the ITDEPT group and it will remove the users only from ITDEPT group.


