Category Archives: Lync

Extending Persistent Chat on Mobile Devices

Currently Skype for business persistent Chat is not supported on mobile devices by default. Only the Lync and Skype for Business  desktop client supports Persistent Chat.

To extend this feature on mobile devices we need to bring an additional component software from MindLink. Mind Link Software is a Microsoft Gold Partner who is offering support for Persistent Group Chat on mobile devices (iOS, Android and BlackBerry). Mind-link are the only developer available at the moment who would be able to fill the gap and extending this functionality to the mobile devices.

In this article we will have a look at configuring MindLink software for Persistent chat feature on mobile

You can download the evaluation version from the below Link

http://www.mindlinksoft.com/products

Basically  they have 3 servers in their architecture which are having different roles if we consider as a whole package.

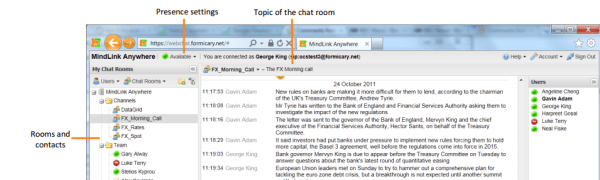
1) Mind Link Anywhere server – Can be used for Having corporate Persistent chat feature on the Web(like Whats-app web) and integrating SharePoint sites with the chat services.

E.g. below for Mind Link Anywhere :

Having persistent chat on the web

Test.png


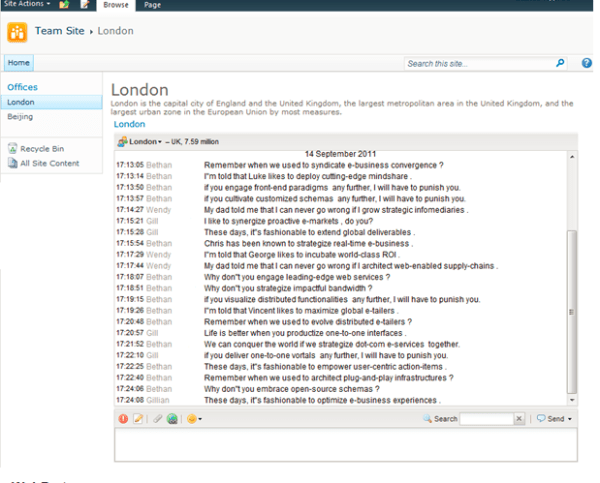
Having this chat feature enabled on the SharePoint sites

3.png

2) MindLink Integration server – Used for integrating social  News Feed and  social twitter feed.

3) MindLink Mobile Server – Used for integrating with our persistent chat pool.

So we require only one server at this point to extend persistent chat functionality to the mobile devices.So now lets look into the steps to extend the persistent chat functionality alone  on the mobile devices since we are focusing only on them in this blog.

Hardware Requirements:

Each host machine should meet the following minimum requirements:

  • Dual or Quad core, 64-bit CPU (Minimum 2.4GHz)
  • 4GB RAM
  • Gigabit Ethernet connection
  • 1Gb disk space (80Mb for installation of binaries and up to 1Gb for Preferences to support over 1000 users)
  • Additional Disk Space may be required for storing log files, minimum of 100MB
  • Windows Server 2008 R2, 2012, or 2012 R2

Readiness for the persistent chat integration:

  • A trusted application pool needs to be created between your Lync/SFB server and the MindLink server FQDN or pool FQDN if its multiple servers based on the environment.
  • An URL must be decided for the MindLink server to publish them externally so that users can access them from mobile devices for persistent chat.
  • An SSL certificate must be purchased for the external URL for secure communication.
  • An internal certificate from Trusted CA must be placed in the MindLink server to trust this application pool.
  • Apple device APN’s certificate must be placed on the MindLink server for Apple devices push notifications and revocation check.

Ports and protocol requirements :

  • Port 7072 for socket server needs to be opened
  • Port 7074 for web service needs to be opened
  • Port 7073 for file service needs to be opened
  • APN port 2195 for gateway.push.apple.com needs to be opened


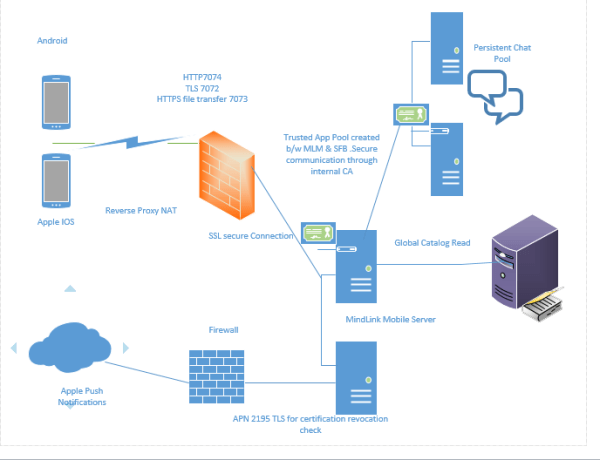
Overall the Architecture of the MindLink provision should look like below


MindLink

Installation :

The installation of the software is very simple. All you need to do is download and install the Mindlink mobile on the new server . MindLink uses REST API. It integrates data from existing Lync servers and persistent chat groups through the trusted application pool.
This allows users to access and discuss information within the right context.
MindLink API provides a straight forward web services layer that simplifies the publishing and dependency on .net platform.

Make sure that you have the local trusted CA, Public SSL for the url published and the apple device APN’s placed on that server in the local computer account.

After this is done we just need to enter the url in the location , import the license file from Mind Link support and start the Mind Link service.

After this what happens is that when a user logs in from the mobile client it reaches the MindLink server. It identifies a trusted application created between the MLM and Lync. Post verification of the user account it provides successful authentication.

You might face some challenges in these customized non standard ports on the firewall to the internet and to the server apart from that rest all would be smooth.

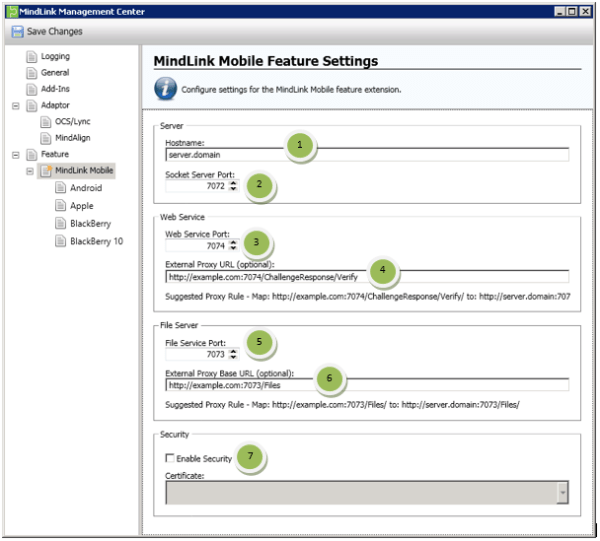
An example below of entering the external host name

Note: Only the first hostname URL is mandatory and rest all are optional. Enter the URL name here that will be publishing outside.

image015.png


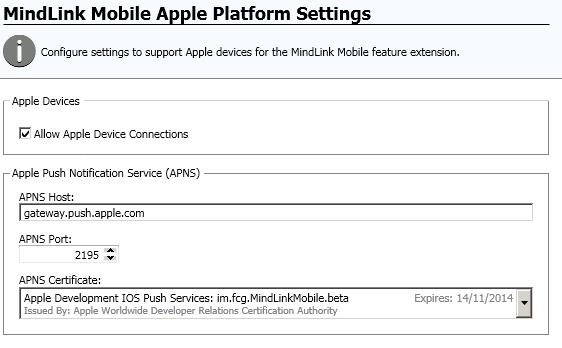
This is an example for apple device connection settings

image017

MindLink Mobile App Experience

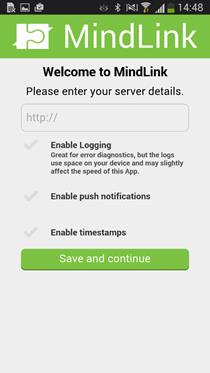
After successful configuration we just need to enter the URL that has been published externally for this service

image062

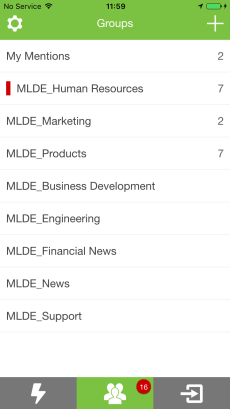
After successful login users will have the below option

They can see live streaming of the persistent chat groups where they are member of

They can send and receive  messages in the persistent chat

They can search for persistent chat groups

They can search and IM individuals

Users can receive IM notifications even if they are not logged in to their Lync/SFB mobile client

Users can search for persistent chat messages, hashtag and mention option is also there.

Visible Persistent Chat Groups

image4.3a.jpg

Able to change the IM and Presence

P1

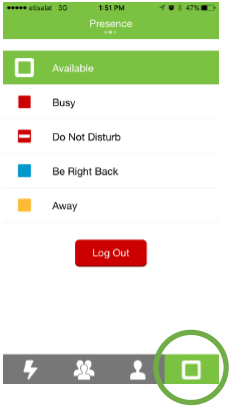
Live streaming of the persistent chat can be seen

P2.png

Overall Features & Limitations:

  • Its a secure Enterprise Group Chat compatible with Microsoft Lync & Skype for Business.
  • IM Presence can be updated.
  • They cannot participate in audio and video calls from this application.
  • Currently users have the ability to open files which are sent from Lync desktop.
  • File Transfer and sharing from the application is not available at the moment.However an option to insert a weblink option in the chat is available.
  • Custom Ports for the application to be accessed from externally is little bit difficult. Its not possible to change them to the default ports since the application API is configured to bind and listen on these ports 7072,7073 & 7074 only.

Thanks 

Sathish Veerapandian

MVP – Office Server & Services


Inplace upgrade from Lync 2013 to Skype for Business

For the first time in the enterprise platform Microsoft has given the option of an in-place Upgrade for its universal platform .

Since Skype for Business hasn’t changed much with Lync 2013 server architecture,and the hardware prerequisites remains the same. If we have a good hardware configuration or if you have recently migrated to Lync 2013 in your infrastructure this option completely makes sense to perform and inplace upgrade .
This will obviously help in reducing the IT cost for this new deployment and reducing the time required for this new deployment.

Recently our team had an experience in upgrading from Lync 2013 to Skype for business and i this article we will have a look at the best practices and the prerequisites that needs to be followed in the upgrade procedure.

Supported coexistence scenarios for the SFB in-place upgrade:

  1. Lync 2013 Standard standalone .
  2. Lync 2013 Enterprise Pool.
  3. Lync 2013 Multiple pools
  4. No upgrade path available from Lync 2010 to SFB.
  5. No upgrade from Lync 2010\2013 coexistence scenarios

Readiness for the upgrade:

  1. Take a snapshot backup all your servers, This will help you  to revert the changes on each server just in case if the upgrade wasn’t smooth with the downtime provided.
  2. Save the previous Topology and take a backup of them.
  3. Take a backup of file server.
  4. If the Lync 2013 is running on Windows Server 2008 R2 then its not recommended to perform an in-place upgrade.
    Never upgrade the OS of a Lync server. Install a new pool on a fresh OS and move all accounts and objects over . In-place upgrade will not help in this scenario.


Prerequisites for the upgrade:

1. net 3.5 on FE, Edge and mediation  servers.

2. Below hotfixes needs to be installed in following order.

https://www.microsoft.com/en-us/download/details.aspx?id=42162

https://support.microsoft.com/en-us/kb/2919355

https://support.microsoft.com/en-us/kb/2982006

3. RTC local instance should be Microsoft SQL server 2012 SP1 or later.

So make sure on the Lync 2013 FE’s and servers that we are going to upgrade should have a local instance of 2012 SP1 or later.

4.  One member server in the same domain where the lync pool resides.

On this we will be installing the SFB administrative tools , upgrade the existing topology and then publishing them.  It should be a non-lync server.

5.  All the lync servers needs to be updated to minimum  8308.815. Better to have the          latest version.

Upgrade can be done in the following order:

1.  Install the SFB Administrative tools on the newly introduced member server.

Upgrade the topology in the below order.

a) First upgrade the Front end pool.

b) Upgrade the persistent chat pool.

c) Upgrade the edge server pool.

d)  Upgrade the Trusted Application pool.

In-order to upgrade the topology perform the below :

Open SFB topology builder from the newly installed admin server – Right click on the front end pool – Select the option Upgrade to Skype for business server 2015 as below


01

This process will take few minutes and after it gets completed we need to publish the newly updated topology first.

Failing to do this and proceeding with other pools (persistent, edge, Trusted) will result in the  below error.

02

Once the topology is updated and published now we need to upgrade all of the existing lync 2013 servers to Skype for Business.

In-Order to perform that action  we just need to run the setup from each servers.

Note: If there is only one front end pool in the deployment (this should be the setup in most of the environments) the servers then there will be user interruption till the pools are upgraded. So it requires a downtime when performing this upgrade.

We need to run the below command to make sure that the replicas are up to date

Get-CsManagementStoreReplicationStatus

imp

Before running the setup we need to disable all the services on the existing front end services. Run the below command in the Lync management shell to perform the action

Disable-CsComputer -Scorch 

After running the above command make sure that you close topology builder, Lync Management shell , Deployment wizard . Make sure all consoles are closed for the upgrade to complete smoothly.

Once performing the above action just run the setup from each existing lync 2013 servers.Better to start with FE’s , Mediation , Director , Persistent and then Edge.

You will be prompted with the below screen.

RE.png

upgrade will go through the process as below

33

We will get a screen like below on a successful upgrade

3366556.png

We can continue to point all URLs to the existing pool since its an in-place upgrade and this make this task very easier.

Thanks & Regards

Sathish Veerapandian

Troubleshooting addressbook issues in Lync 2013/Skype For Business


You might come across a scenario where end users might report that they are not able to search for contacts  through Lync/Skype for Business client.

In this article i have collected few troubleshooting steps based on my experience which might help in addressing these kind of issues

Before looking into troubleshooting lets have a small idea on the address book synchronization :

The address book creation in Lync client happens separately and it never talks to Exchange.

The core component user replicator which was introduced from Lync 2010 contacts Active Directory very frequently once in every 60 seconds and updates the information of the users present in the Lync server. This interval is set by default and can be altered.

These updated information is stored in the backend SQL database named RTCab.

After the above job is completed it doesn’t mean that the address book is updated.After this the responsible server for  update process of  address book will start a synchronization pass once in every 24 hours usually 1:30 AM local server time.

This information will be updated in the address book files in the shared folder in the type dabs file.

So by looking into the above process there can be so many factors which might block searching the address book from client perspective.

Below  troubleshooting steps which might help in fixing these issues.

1)  First identify how many users are affected. Check the version of the client Lync 2013, Skype for business 2015 or Skype for Business 2016 client.

Pick any one of the affected user and perform the below tests.

From the affected PC try to access the URL you have published for lync  https://webs.contoso.com/abs and see if you get the authentication prompt.

If you are not getting the authentication prompt then there is some serious issue with the connectivity from your end reaching the server. You have to fix this issue.

2)  Run the command Get-CsUserReplicatorConfiguration and see the replication cycle interval.

Lync2

The replication cycle interval by default is 60 seconds. If this value has been modified then we need to wait till the replication interval period gets completed.

3)  Its better to check the Synchronizepolling interval .This is the value which the addressbook server looks for any pending synchronization events for the lync users.Because there are more chances this value might be altered if you don’t want to happen this for every 5 minutes. In that case we need to wait till the interval period completes or run the Update-CsAddressBookConfiguration.

This value can be altered from 5 minutes to 3 hours.

Lync3

4) Check the Csclientpolicy

Run the command Get-CSClientPolicy and see the AddressBookAvailabilty configuration.

Lync1

Basically there are 3 options which we can set based on our requirement for this Lync/Skype for business address book availability.

a) Websearchandfiledownload.

b) Websearchonly.

c) FileDownloadOnly.

Its very self explanatory based on the names that we have for the addressbook.

By default this value is set to Websearchandfiledownload only. By having this option what it does is a local address book cache file from each client will be downloaded from the server. After that the Lync client will use the local cache. In-turn it will use the websearch functionality to download the user photos only.

So basically it takes 24 hours of time to have a fully updated local cache files.

When we have a web search only option  it does a direct lookup to the RTCAB database which will give the fully updated information for the lync/SFB clients. This is more or less similar like difference between having users in Outlook Cache Mode and in online Mode.

It would be better if we have a separate client policy only for the top VIP users. This will help them to see all the updated information from the Active Directory.

Inorder to create the client policy you can run the below command

New-CsClientPolicy -Identity VIP -AddressBookAvailability WebSearchOnly.

You can use this option for all users as well if we have less number of users where the user attribute changes happens very often and provided your network bandwidth is strong.

5) One last step that we can try is to run the below command.

The output of the command result should say there are no unindexed or abandoned objects.

Lync4

If you see any errors on them then you can try running Update-CSAddressBookConfiguration and see if it helps.

Hope this helps

Thanks

Sathish Veerapandian

MVP – Exchange Server 

Installing Monitoring server role in Lync 2013/SFB in SQL remote instance

In this article we will have a look at configuring the monitoring server role for enterprise deployment  in a remote instance for Lync server 2013 and SFB.

If you want to monitor Lync server 2013/SFB  and Lync client 2013 you need deploy Lync Monitoring server role.

As an overview deploying the monitoring role into an Existing Lync enterprise deployment would look easier. Un proper planning according to your environment and  installation will result you in Empty reports.

But when we look into the real time practical scenarios the situation changes on each and every environment basis according to your SQL setup.

So we cannot follow the installation  as such  unless and until we are clear on the SQL configuration.

In this article based out of my real time experience i will post few points and tips  :

1) Before installing the monitoring server role ,You need to deploy the monitoring server and then you need to deploy the monitoring reporting service.

2) For that your Lync Admin user account should have SYSADMIN on the SQL server (assigned through SQL Server Management Studio > Security > Logins).


3) Lync only supports Windows Authentication.  So the remote SQL Server instance  you have chosen to install the monitoring role  will need Windows Authentication enabled, similarly user who launches topology builder needs to have permissions to create/edit databases and access the SRS you have configured.

Lync Security

Make sure the use windows credentials is selected.

lync20133

4) You need to have  lcsqoeq and lcsCDRQ on the public queues of Message Queuing accessible from the Lync Server so that it can pull the data and show you the reports.

For example you can try accessing the reporting services instance you configured from the Lync Monitoring server and the configured SRSS should show as below.

Lync20132


5) The lync monitor server name (NETBIOS) should not be more than 15 characters
If this is the case MSMQ will not able to deliver the messages

Basically the approach should be the below:

a) First you need to configure the SRS instance on your remote SQL.
b) Install the SQL reporting services.You’ll have to run the SQL report server setup wizard to define the report server URL. usually sql.domain.com/reportserver_lync
c) Define the monitoring server in the topology.
d) Publish the topology.
e) And then install the reports from the installation wizard.

f) Make sure the lync server monitoring services is started, and the connectivity is good with sql server

g) Make sure that your SSRS instance SQL version (version and SP level) match the SQL version of your database instance that has the monitoring databases.

h) You should verify that the LcsCDR database was created in the SQL Server instance that you specified for Monitoring Server.

i) You need to run the dbo.RtcRecreateSummaryTable once the databases are created from the management studio.

Very IMP : You need to make sure that you are allowing the required ports for the srs url

Example if you have multiple srs configured on a SQL enterprise farm like one for Archive solution use a different port rather than 80 since the other application will be using this port.

Make sure that you are able to access the webpage of the report service URL from the Monitoring  server you are trying the installation

Usually the url would be your SQL server the port you defined and then the reports

Example :- http://SQL:8888/reports

If you have multiple applications using the SRS then you need to create the URL for the lync and make them to listen on different ports. Also you can see the other instances created under this location.

5678

If its not accessible then you are having an issue with the permission with the account you have logged in on the SQL server.


Finally a healthy report should look like below

Lync20133


Hope this helps

Thanks

Sathish Veerapandian

MVP – Exchange Server

Normalization Rules in Lync 2013 and Skype for Business

Normalization rules are Created to translate phone numbers in different format so that lync/SFB  can understand and transfer them to a correct location, User.

It is created to translate dial strings to E.164 format for the purpose of performing reverse number lookup.

This reverse lookup  is applied and reverse number lookup is performed, the called number is translated to  appropriate format so that the Lync/SFB mediation or the PBX receives the number in their understandable format so that they can perform the routing.

Its better to Classify  Normalization rules in the below scope :

User Dial plan –  Per User basis

Pool Dial plan –  Applicable to PSTN or registrar

Site dial plan –  Applies to Entire site

Global Dial plan – For all users

Its always better to create normalization rules rather than leaving the global as such . It will be easier to assign valid number patterns for each site according to the country and their area codes.

You need to keep these things in mind while creating a Normalization Rule

Dial plan – Per user, Per site , Pool or Global.
Country code – Choose the correct country codes according to your area.
Area code – Choose the right area code.
Length of extension – Make sure choose the correct length of extension that your PBX supports.

Below is the sample  format

^(\d{4})$

A regular expression should start with a ^ – This is a beginning of the string
Should end with $ – which should be at the end.

So any number within the brackets is counted as variable : $1

Test111

Similarly add the digit line URI format that your PBX supports for the SIP Trunk integration. So you need to input the right pattern and the correct  digits which combines and creates a right translation rule.

These Translation rules modify the number before it leaves your Lync server so that your integrated PBX setup can understand the routing correctly.

Basically the normalization rules input is provided by the address book service.So the rules are triggered once the number is received from the Address Book Service.The Address Book Service is designed in a way that it removes all the non-mandatory characters before the rule triggers. So you wouldn’t need to worry about these non-mandatory characters.

So you need to make sure the phone numbers are correctly populated in the Active Directory so that they can be fetched and used for the Lync.

If you already have provided the numbers in E.164 format then your job would be pretty much easy.

Now we will see how to populate these values in Lync 2013 and Skype for Business

If its Lync server 2013 you need to use Company_Phone_Number_Normalization_Rules.txt file located in your Lync File Store location. Open the topology builder and see your file store location in the below folder

Webservices\ABfiles\Company_Phone_Number_Normalization_Rules.txt

In the above example we need to open the text file and add below and save it

(\d{4})
+971$1

Once the above is done you need to run the below command

Get-CsAddressBookConfiguration

Make sure that use normalizationrules is set to true

444

Also there will be a notepad named Invalid_AD_Phone_Numbers created inside ABS files folder

Those numbers you get them in the txt are not acceptable number formats and you need to change them form the AD.

You can also test the normalization rule by running ABServer.exe file in the below path

C:\Program Files\Microsoft Lync Server 2013\Server\Core\ABServer.exe -testPhoneNorm “1234565”

From Skype for Business this job has been made simpler. There is no such files we need to modify them for this functionality.

The only thing you need to make sure is that you have entered the phone numbering format in the correct pattern E.164

If that is the case you can run the below commands from which we need to modify the new set of default roles according to your region and country , area codes

These can be defined in the Organizational  Level by the below commands

New-CsAddressBookNormalizationConfiguration

Set-CsAddressBookNormalizationConfiguration

In-turn we need to create rules for translations and conversions.

New-CsAddressBookNormalizationRule

Set-CsAddressBookNormalizationRule

Thanks & Regards

Sathish Veerapandian

MVP – Exchange server

Warning all persistent chat servers are down

I recently went through this above error while implementing persistent chat . To fix this error we went around circles and finally we were able to fix this permanently.

There is no single problem that can bring this error.There are so many factors that can cause this persistent chat functionality to break.

In this article i’m going to write up few factors that can cause this functionality to be broken.

Below is the error message that you will be getting when you try to enable PC functionality


PCe


Following below factors can cause the above issue:

1. Issue with SQL database connectivity:

First check  that  SQL database for the persistent chat has been created successfully. If you get             any warnings  related to SQL when you publish the topology for  persistent chat then you shouldn’t         proceed with the setup. Connect to the associated instance  from your SQL back end DB and check         if the DB is created for the newly introduced PC role. If you don’t see anything then you need to             first fix this issue.

Note: Also make sure the below configurations are set correctly on the FE,PC and SQL back-end         database server for a successful SQL DB creation.

a) Make sure the port number 1433 is open between PC role server and the back end SQL. You can            telnet to port 1433 vice versa from SQL back end to PC and check the connectivity.

b) You need to have the network discovery and enable file and printer sharing option to be turned              on in both the servers in-order for the connectivity vice versa.

c) Make sure that you have the sa(super admin) rights on the SQL instance or the server where you           are trying to create the DB for this new server.

2.  Once you publish the persistent chat server from the topology builder you need to run the lync                 deployment wizard .

ldw

Just run the first two steps alone to install the PC component roles and update them.

3. You can run the below command to set the persistent chat servers . Although this is not a                   mandatory step but at times even this can cause this problem.So its better to run this command             from Lync management shell.

Set-CsPErsistentChatActiveServer NAME -ActiveServers @{Add=”NAME_OF_PC_SERVER”} -v

4. Make sure you have the latest Cumulative Updates installed on the PC server. In my case this was   the issue. So as a thumb rule its always better to look for the latest CU’s in the persistent chat               server. Also make sure that the persistent chat services are running fine in the PC servers.

5. Final step is to go back to your Topology Builder ,delete the Chat Pool and rebuild it if none of the     above works.

Delete the chat pool that you have created from the topology builder.Then go to your deployment wizard and run install or update server system and setup or remove lync server components.

Following the above troubleshooting steps will most likely bring up the persistent chat channels in a environment.

Hope this helps

Thanks

Sathish Veerapandian

Technology Evangelist

Lync 2010/2013 Migration to another domain

When we plan for migration of lync servers from one domain to another few factors needs to be kept in mind and considered. In this article i have mentioned few best practices that can be followed during these kind of scenarios.

Below are some tips that can be used during the migration :

The first and the foremost thing that you will need to do is to bring up the Lync Infrastructure in the new Forest.

Meanwhile when you plan for migrating AD user accounts from the source domain  you can created linked lync accounts in the resource forest. Make sure EWS ,Auto discover everything is setup correctly.

AD user accounts not residing in the target would authenticate via edge . Later after the first logon password cache entry is made. End users wouldn’t be prompted for the password,since edge server allows communication with federated companies.

Then Use DBIMPEXP in Source domain where lync 2010 is running to export their contacts to the new forest.

What is DBimpExp ?

Its an inbuilt Microsoft utility for Lync server 2010 located in C:\Program Files\Common Files\Microsoft Lync Server 2010\Support on the Lync Front End Server.
By using this utility we would be able to connect to the lync SQL DB exporting the XML files which contains (users contact lists and conference directories).

Its located in the folder C:\Program Files\Common Files\Microsoft Lync Server 2010\Support

Below is the example

dbimpexp.exe /sqlserver:”lync-sql.sip.exchangequery.com\LYNC” /hrxmlfile:”C:\test.xml”

Store2

You need to navigate to the above location to access this utility and this command is for enterprise edition server.

After you export these XML config’s you cannot import directly to Lync 2013 or SFB since the import-csuserdata will not accept this direct xml format and will accept only these datas in ZIP format.

From lync 2013 this dbimpexp.exe utility has been depreciated and replaced with the importcsuser data cmdlets. So you wouldn’t be able to find this utility in Lync2013 and SFB.

We need to Use Import-Csuserdata commandlet to import the contacts.

So after exporting the config information from lync 2010 you will need to convert these values by running the below commands

First run the below commands to convert the xml type exported file to *.zip format.

Convert-CsUserData -InputFile “C:\test.xml” -OutputFile “C:\_Install\Restore\test.zip” -TargetVersion Current

Later run the below command to import the data in the target forest containing Lync 2013 or later version.

Import-CsUserData -PoolFQDN “LyncPool.Domain.com” -FileName “C:\_Install\Restore\test.zip”


During the final cut-over date you can break the linked accounts (source account) by clearing “msRTCSIP-OriginatorSID” attribute and enabling the target account.

Basically what you need to do is move the SID from the user forest into the msRTCSIPOriginatorSId for each lync enabled user in the resource forest.


Below are the things that we need  to consider for federation :
To make sure there is no issues happening with your federated partners you have to tell  them to change  Lync Edge access IP and FQDN to the new Forest values in their end.

But practically if you have more number of federated partners then it might take some time to make these changes on their end.

As a work around for a while you can configure the below settings and keep them for a while until your partners change the federation values to the new one.

Below is an Example :

To make sure there is no issues happening with your federated partners after migration

Basically changing from oldsip.company.com to newsip.company.com  would break federation.

Go back and reissue your certificate on the Lync 2013 Edge and add oldsip.company.com entry.
This will work because Federation isn’t dependent on the name you pick in topology builder. It’s  just that the SRV record goes to a server with a corresponding matching name.

For example if source domain SIP  oldsip.company.com points to  IP  10.0.0.1 and your target SIP is newsip.company.com on the IP 10.0.0.2.

For a temporary fix you can create oldsip.company.com and point it to 10.0.0.2 . This will be working if you have a valid certificate in place for the oldsip.company.com and that certificate present on the new  target domain  lync edge server.

Note: 

These steps will not apply for all the migrations as each and every migration varies according to every domain setup, config, DNS setup,Trust relationship, Enterprise voice plan , SIP trunk, SIP config, PBX,etc. So according to those configuration based on your environment planning needs to be done properly .There are few tips which can be helpful during these kind of migration scenarios.

Thanks 

Sathish Veerapandian

MVP – Exchange Server

After upgrade to Skype4Business incoming calls to phones might not show the caller ID

After upgrade to Skype4Business incoming calls to phones might not show the original  caller ID (Might be hidden or unknown)

This is a small misconfiguration which we might have left out during the upgrade.

This is due to a value called Forward PAI which might be set to false

What is this Forward PAI ?

Its a value that  sends the  P-Asserted-Identity (PAI) header  along with the call. This P-Asserted-Identity (PAI) will have headers through which it will verify the original  identity of the caller.

When the call is being processed by the SIP network, a P-Asserted-Identity header will be part of all SIP messages for that complete call transaction (i.e. INVITE, ACK, BYE).

In-order to check this value in your settings you can run the below command

Get-CstrunkConfiguration

I just ran Get-CsTrunkConfiguration | Fl “*Forward*” to filter the appropriate value

LYNC

In my case it was set to false. You have to set this value to True

Run the below command to set this value to true

Set-CsTrunkConfiguration -Identity Site:ExchangeQuery  ForwardPAI $True


You can enable this value through edit trunk configuration settings through control panel  also

ee


I just explored the other below options as well and thought of adding them up in this blog itself .Below are them


Enable Media by Pass :

If we enable this option bypass will be attempted for all PSTN calls. You can enable this if there is a full connectivity strength between clients and PSTN gateways.Typically by enabling this option we can minimize the number of Mediation Servers deployed.This improves the voice quality by reducing the latency since the number of hops gets reduced.

Centralized Media Processing :

By enabling this Media bypass can improve voice quality by reducing latency, needless translation, possibility of packet loss, and the number of points of potential failure.Enabling Centralized Media Processing is a useful feature in that it allows the CircuitID Gateway to handle as much of the SIP responsibility as possible.

Enable forward call history: If we enable this value then all the call history information will be forwarded through the SIP trunk.

Enable RTP latching: Indicates whether or not the SIP trunks support RTP latching. RTP latching is a technology that enables RTP/RTCP connectivity through a NAT (network address translator) device or firewall.

Enable forward call history: Indicates whether call history information will be forwarded through the trunk.

Note:

All of the above will not be standard configuration setting in all deployments.For each UI setting in the Trunk Configuration we need to understand and plan accordingly to your PSTN connectivity , SIP configuration and your current Lync setup.

Hope this is useful

Thanks

Sathish Veerapandian

MVP – Exchange Server

Setup federation only to specific domains in Lync 2013

There is an option in Lync2013 where we can enabled federation only to selected domains.
We can set this option where only these domains will be able to contact us .

In-order to do that perform the following steps

Open Lync Control Panel select “Federation & External Access”

FA1


Navigate to SIP federated domains

Here we have two options to allow specific domains and also we can block Specific domains.

Inorder to allow specific domains . Select Allow domains and add the domains that you want to have.

FA2


In-order to block the domains add the domains select block the domains and block them

FA3

Also you need to keep in mind that if you want to have federation only with specific domains then you need to make sure that Enable Partner Domain Discovery option is unchecked which disables open federation.

FA4


Note :

By default, if you enable federation, it won’t allow other domains to connect to you except the domain that you add in Hosting Provider and Public IM Provider, Allowed Partner Domain and Federated Domains.

So you need to plan accordingly based upon your requirement.

Hope this article is helpful.

Thanks 
Sathish Veerapandian

MVP – Exchange Server


Quick Tip – Analyzing logs in Lync server 2013

In this article we will have a look at the Centralized Logging Service (CLS)  and csclslogging feature in Lync 2013.

These both logging features will help us to identify any issues in the pool.

These 2 features are available only from Lync 2013

First lets have a look at the Centralized Logging Service (CLS)

This is located in the directory

C:\Program Files\Common Files\Microsoft Lync Server 2013\ClsAgent


CLS


Below are the commands that can help you out to identify an issue through clscontroller

ClsController.exe -start –scenario <scenario> –pools <pool fqdn>
ClsController.exe -stop –scenario <scenario> –pools <pool fqdn>
ClsController.exe -flush –pools <pool fqdn>
ClsController.exe -search –pools <pool fqdn> –components <component> –loglevel <loglevel>
Below are the supported scenarios
AlwaysOn, MediaConnectivity, ApplicationSharing, AudioVideoConferencingIssue, HybridVoice, IncomingAndOutgoingCall, VoiceMail, IMAndPresence, AddressBook, DeviceUpdate, LYSSAndUCS, CLS, SP, WAC, UserReplicator, HostedMigration, MonitoringAndArchiving, LILRLegacy, LILRLYSS, MeetingJoin, RGS, CPS, XMPP and CAA.

Note : This ClsController.exe is present only in the RTM release and later microsoft came up with this powershell based  control which is CsClsLogging

CsClsLogging :

The Search-CsClsLogging cmdlet provides a command line option for searching the log files generated by the centralized logging service. Lync administrators can analyze the issue with the cmdlet.

1

You can run run Search-CsClsLogging cmdlet with start time and end time

2


You can use show-cslogging to check the current status of the centralised logging service

323


The following inputs are supported

Search-CsClsLogging
Show-CsClsLogging
Start-CsClsLogging
Stop-CsClsLogging
Sync-CsClsLogging


There is a service responsible for this operation which is called Lync Server Centralized Logging Service Agent.

66


So make sure that this service is running else we will face issues in running these commands.

Thanks
Sathish Veerapandian

%d bloggers like this: