Category Archives: Scripts

Microsoft Teams – script to generate teams owners ,visibility type, owners count, members count and archive status

Microsoft Teams utilization have phenomenally increased with the current COVID situation where almost everyone of us are working from the home. Microsoft Teams being one of the top collaboration software helping all of us to stay better connected during this time.

Most of the organizations doesn’t restrict the Team creation from Microsoft Teams because this factor is heavily influenced on better adoption rate of the Teams communication platform. The below script can be used to run in task scheduler or in Azure Function on a monthly basis for reviewing the Teams Created in last 30 days especially to see the Teams that have been archived and to see the fashion of teams created private or public by the users.

Below is the sample output of the script which will provide us the below details.

Teams Raw – This has the total number of teams with below information.

Teams Single Member – This is to identify teams with just single member

Teams Single Owner – This will report Teams with single Owner

Teams wit no Owner – This will report Teams with no Owner

Continue reading

Script to generate office 365 groups created on last 30 days

By default it is enabled for users to create the office365 groups. There are few organizations where they do not need to restrict this group creation because these groups are heavily influenced on utilizing the office365 services Sharepoint,Yammer, Microsoft Teams, PowerBI , Outlook, Planner and Road Map which in turn might decline the office 365 user adoption rate.

The below script can be used to run in task scheduler on a monthly basis for reviewing the Office 365 groups which have been created in last 30 days and will email us the report.

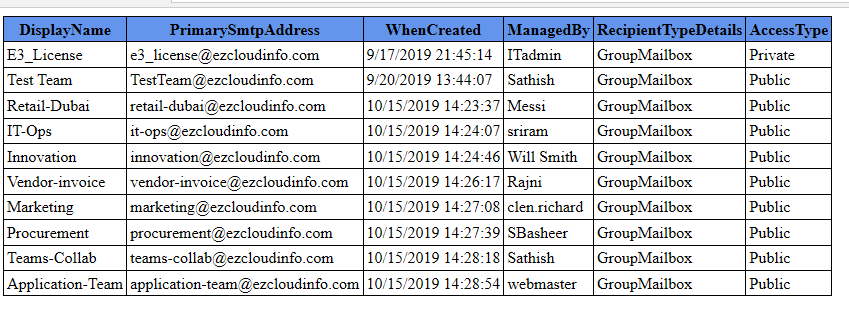
Below is the sample output of the script which will provide us the below details.

Continue reading

Script to offboard resigned employee in a hybrid environment

The below script can be used in off-boarding below tasks for a resigned employees as a bulk operation.

This script will help in below actions for Exchange online and AD tasks to be removed in a Exchange hybrid environment:

  1. Convert exchange online mailbox to shared Mailbox.
  2. Disable the Mailbox protocols – OWA,ActiveSync, POP, IMAP, MAPI & OWA for devices.
  3. Hide the user from GAL.
  4. Remove the user from respective licenses E3,E5,EMS E3 & EMS E5 Licenses.
  5. Cancel all the calendar future meetings.
  6. Remove the user account from all groups.
  7. Set the account expiry of the AD account.
  8. Remove the IP Phone Attribute.
  9. Remove the manager field.
  10. Set out of office.
Continue reading

Quick Tip – Reduce the amount of Mailbox Audit log information generated by a service account

Usually we enable Mailbox auditing to monitor actions taken by mailbox owners, delegates and administrators. But we do not require mailbox audit to be enabled for service accounts which are actually doing genuine operations.

We can configure mailbox audit logging bypass for service accounts which are configured in applications and access mailboxes frequently. This will Reduce the amount of audit log information generated by a service account.

Below steps can be performed to bypass audit for the service accounts:

To check the mailbox audit bypass we can run the below command

Get-MailboxAuditBypassAssociation -identity serviceaccount

The main parameter we need to look is AuditByPassEnabled.

The default value will be false for mailboxaudit enabled and disabled account.

AP

The AuditBypassEnabled parameter controls if the audit logging is enabled or disabled for this account.
When the value is set to $True this account will have the maiboxaudit disabled.
When the value is set to $false this account will have the maiboxaudit enabled.

We can run the below command to bypass the mailbox audit logging for service account.

Set-MailboxAuditBypassAssociation -Identity “service.crm” -AuditBypassEnabled $true

IMP Note:

By default the mailboxaudit logging is not enabled for newly created mailboxes and existing mailboxes.

We can check the mailboxaudit if its enabled or not with the below command.

Get-Mailbox usermbxx | fl *Audit*

The default value will be false like below and the default audit log age limit is 90 days.

AD
Below script can be used to enable bulk maibox audit based on OU level

The Script can be downloaded here – EnableMailboxAudit

##############################################################
# Description:
# This script enables the Mailbox Audit for new mailboxes in your Organization on OU level.
# You need to make them run on a task scheduler on a weekly basis for new mailboxes audit to be enabled.
# You need to mention the OrganizationalUnit in the script where the mailboxes are present.
# You need to mention the CSV location in Export-Csv.
# You need to mention To address From address and SMTPserver(exchangeserver) for sending this report in email.
################################################################

add-pssnapin Microsoft.Exchange.Management.Powershell.E2010 -ea SilentlyContinue
add-pssnapin Microsoft.Exchange.Management.Powershell.Support -ea SilentlyContinue
$mbxs = Get-Mailbox -OrganizationalUnit “mention OU Name” | where { $_.auditenabled -eq $false } | Select Name, DisplayName, UserPrincipalName,SamAccountName,PrimarySMTPAddress
$mbxs | Export-Csv C:\temp\auditlogs\Audit.csv -Encoding UTF8
$mbxs | % { Set-Mailbox $_.SamAccountName -AuditEnabled:$true -AuditAdmin Copy, Create, FolderBind, HardDelete, MessageBind, Move, MoveToDeletedItems, SendAs, SendOnBehalf, SoftDelete, Update }
$mbxs | % { Set-Mailbox $_.SamAccountName -AuditEnabled:$true -AuditDelegate Create, FolderBind, HardDelete, Move, MoveToDeletedItems, SendAs, SendOnBehalf, SoftDelete, Update }

Send-MailMessage -To emailadmin@domain.com -From reports@domain.com -Subject “Audit Enabled for the attached users” -Attachments C:\temp\auditlogs\Audit.csv -SmtpServer specifysmtpserver -Port 25025 -BodyAsHtml -Body “Audit Enabled”

***************************************************

Thanks 
Sathish Veerapandian

Script to identify the users forwarding, redirecting and forward as attachment emails to external ids

It’s always difficult to protect sensitive emails being leaked out from any organization. In order to avoid this there are few things that can be blocked on the global settings from the server end.

If we have the auto forwarding and autoreply  option enabled on the default remote domain then any users can create an external contact in his local outlook profile and then he can forward all his emails to his external ids. Here is the possibility  again where sensitive data being leaked out from organization.

The default remote domain will have autoforward and autoreply disabled . That is the recommended configuration.

We need to disable the autoforwarding, autoreply  option in the default remote domain.  If in case if we are forwarding any emails to trusted partners or vendors through any application we can specifically create a custom remote domain for them and enable auto forwarding for that particular remote domain  alone. By doing this no end users will be able to redirect, forward or forwardas attachment their internal emails to their external ID’s.

We can check that by running the below command

Get-RemoteDomain | ft Auto*

Autoreply

If it is enabled run the below commands to disable them

Set-RemoteDomain -Identity default -AutoForwardEnabled $false
Set-RemoteDomain -Identity default -Autoreplyenabled $false

Recently I was looking for a solution for this kind of issue and came up with an idea of a script that can be used to pull out users who have redirect, forward or forwardas attachment options enabled in their outlook rules.

I have created a script which can be used to pull out this kind of information. The below script will run on all mailboxes in entire organization and will pull out users who have external rules set, and then it will send an email to administrator in CSV format by which he can see who all has this option enabled.

***************************************************

Set-Adserversettings -viewentireforest $true

foreach ($mbx in (Get-Mailbox -ResultSize unlimited)) { Get-InboxRule -Mailbox $mbx.DistinguishedName | where {($_.ForwardTo -ne  $null) -or ($_.redirectto -ne $null) -or ($_.forwardasattachment -ne $null)} | select  MailboxOwnerID,Name,ForwardTo | export-csv d:\ForwardRule.csv} -Notypeinformation

Send-MailMessage -To alias@domain.com -cc alias@domain.com -From anyid@domain.com -Subject “Forward To” -Attachments d:\ForwardRule.csv -SmtpServer specifytransportserver

*******************************************************

Copy the above text in a notepad and then save them as ps1. Navigate to the location where you saved it and then you can execute the command

Things you need to modify in the above script

Set the drive location for the csv file in a place where you wish to save.

For sending email in the to and cc field give user for whom you need this report to be sent

From address specify the address from where it needs to be sent and give the mailbox server as smtp server if it’s 2013 or hub server if it is 2010 or 2007.

Here is the example

Just copy the code in text file and save it in ps1 format.

navigated to the location and ran.

Rules5


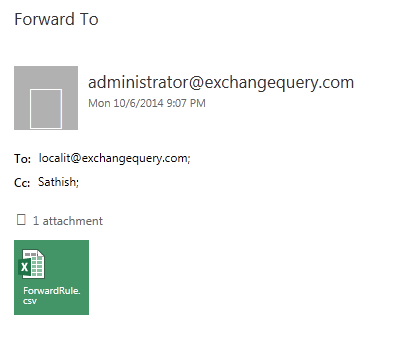
Received the email

rules4


When we open the csv file the output is displayed for users who have forwardto,redirectto and forwardasattachment option set in outlook rules for external id’s.

Rules3


Note:

This command pulls out rules from user’s mailbox only if they are enabled. If the user has a rule created and if he has disabled it temporarily then it won’t fetch that information.


Thanks

Sathish Veerapandian

MVP – Exchange Server

Script to Start, Stop and query exchange counters on all Exchange servers

I have developed a script which can be used to Query, Start and Stop Exchange counters on all servers in Exchange environment.

This script can be executed in scenarios where we need to enable Perfmon counters for Exchange on all Exchange servers during troubleshooting scenarios.

Copy the list of Exchange servers for which we need to run Perfmon and save them in a notepad in the below format in the server where you are going to execute this command.

Scrip1


Probably if you have difficulty in collecting the list of servers manually we can run the below command and take the output by running the below command.

Get-ExchangeServer | select name  >c:\servers.txt

Once you get the output just format the text file and ensure no spaces and other characters are present apart from servers as above screenshot.


Copy the below text and save it in ps1 file. Ensure you change the server path alone in this script which has the server list.


***************************************************************************

write-host ”

1.List Available Counters for Exchange_All

2.Start Counter for  Exchange_All

3.Stop Counter for Exchange_All

$option = Read-host

$server = get-content “Example- d:\exserver.txt”

switch ($option)


{


1


{


$server | foreach {logman query Exchange_All -s $_}


}


2

{


$server | foreach {logman start Exchange_All -s $_}


}


3


{


$server | foreach {logman stop Exchange_All -s $_}

}


4


{

}


}

********************************************************************************

Navigate to the location where we have this file saved and run.

We will get 3 available options as below.

Option 1 –  To List Available Counters for Exchange_All

Option 2 – To Start Counter for Exchange_All

Option 3 – To Stop Counter for Exchange_All


scrip2


Choose the required option and the command will be executed accordingly.

Below is example for querying the Perfmon counters for Exchange_All in all exchange servers.

script3


Below is example for starting the Perfmon counters for Exchange_All in all exchange servers.

scrip4

Below is example for stopping the Perfmon counters for Exchange_All in all exchange servers

scrip5

This command can be useful when we might need to enable Perfmon on multiple exchange servers at one time in troubleshooting scenarios.

Thanks

Sathish Veerapandian

Configure PowerShell in client PC to remotely manage Exchange server 2010/2013

Sometimes we might run into a situation where we need to perform admin tasks from a client PC where we do not have management tools installed in office location.

In those scenarios we can always connect to the Exchange Management shell and import all the modules from exchange through windows PowerShell.

By using this we can grant access  to the help desk team with only view only admin rights or recipient management rights on their PC without having the Exchange management tools installed so that they can view user mailbox settings and perform basic troubleshooting from their power shell.

Prerequisites

The client PC must be a member of the domain Windows 7 or Windows 8 or minimum windows server 2008.

The client PC must have minimum Windows PowerShell 2.0 and no exchange management tools is required

The user for whom we are going to grant this access should be having local admin rights on his PC as well as  Admin rights on the Exchange Servers( You can give the user administrative roles , end user roles ,organizational management or recipient management according to your criteria)

Applies for Exchange 2010 and 2013

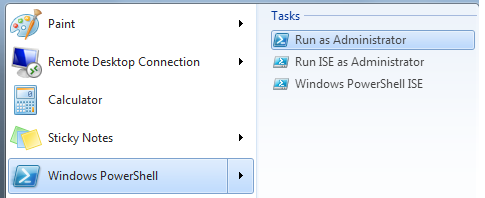
Go to start – Right click on windows power shell and click run as administrator.


powershell0

Now we need to check if the PowerShell profile is created for the user who has logged into the PC  by running  $profile in powershell

Though it will display the below default path we need to check if the file actually resides.

powershell2


Run the below command to check if the file exists in the location.

Test-Path $profile

powershell3

By default the ps1 profile will not be created and that’s the reason it shows as false.

We need to create it by running the below command

New-Item -path $profile –Type File -Force

powershell4

Now we can see the file is created.

Now open the file through PowerShell

Notepad.exe $profile

powershell5


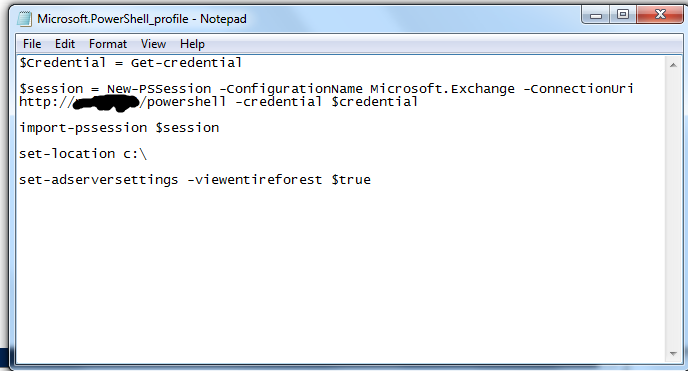
Now we need to establish a remote session to connect to Exchange server to import the commands. In order to do those add the following command

The first line of below command will help us to authenticate with the exchange server.

The second line to create a new session with specified exchange server

The third line to import all the pss session from that particular  server.

The last fourth and fifth are optional since I have set directory location in this client PC and command to view all value from all the Exchange Servers in entire forest.

Below is the command. Just copy ,paste the value in the powershell file and save .

************************************************************************

$Credential = Get-credential

$session = New-PSSession -ConfigurationName Microsoft.Exchange -ConnectionUri http://casservername/powershell -credential $credential

import-pssession $session

set-location c:\

set-adserversettings -viewentireforest $true

***********************************************************************

powershell6


Now open the PowerShell with run as admin and will prompt you for credentials.

powershell7


Once you have authenticated you will see the below screen which says you have successfully connected remotely with Exchange server.


powershell8


We can create PowerShell ISE profile for this user as well which will be very useful and provide additional informational while typing any commands since  the help desk team might not be aware of Exchange commands.

Do the same procedure for creating PowerShell ISE profile

Go to start and run windows PowerShell ISE.

powershell9


Opens the below window.

powershell10


Type the same command to create profile for ise and click on Run Script Icon or press F5 button to execute.

New-Item -path $profile –Type File -Force

powershell11


Now copy ,paste the same command as we did for PowerShell   file in the below location.

powershell12


Now open Windows PowerShell.ISE and it will prompt for credentials and get connected to Exchange modules.

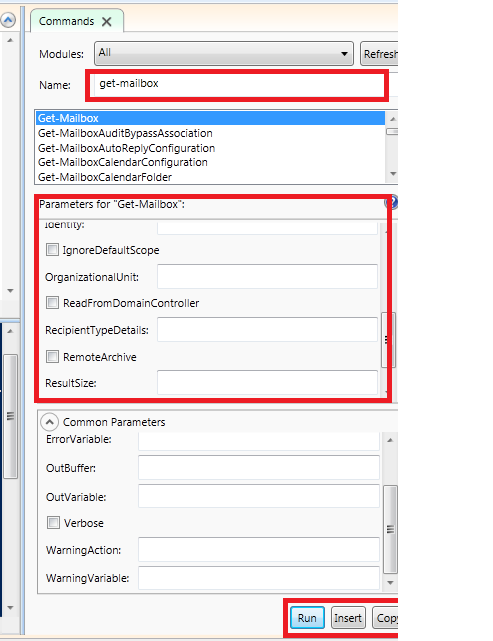
Below is an example of executing from PowerShell ISE which gives us suggestions while executing the commands in the command pane.

We have an option to choose our command and either Run, Insert or Copy the file in the script pane.

Note : The below option is available only from Windows PowerShell 3.0

final2

Final


We are done with connecting to Exchange through Client PC windows power shell.

Cheers

Sathish Veerapandian


Exchange Mailbox Folder Permission Script

One of the important task of the Exchange admin to assign the folder permission to the delegates, When new delegates added to the generic mailbox and Resource mailboxes. If the mailboxes has multiple folders and sub folders its time consuming process. The script simplifies the task and eliminates the manual errors

Browse to the folder and run the ps1 file, the initial screen looks below and select the option based on your action


***************************************************************************

<#
.SYNOPSIS

Add mailbox folder permission to the delegates for user and resource mailboxes

.DESCRIPTION

Important task of the Exchange admin to assign the folder permission to the delegates
when new delegates added to the generic mailbox and Resource mailboxes.
the script simplify the task and eliminate the manual errors

#>

Write-host ”

Assign Mailbox folder Permission
——————————–

1.Assign Folder permission to Single folder

2.Assign Folder Permission to All folders(includes user created,default,recoverable mailbox folders)

3.Assign Folder permission only to the default folders(inbox,calendar,….)

4.Assign Folder permission only to the user created folders

5.Exit ” -ForeGround “Cyan”

$option = Read-host “Choose the Option”

switch ($option)
{

1 {

$Mailbox = Read-Host “Enter Mailbox ID ”

$Folder = Read-Host “Enter the FOLDER NAME ( Examplles : Inbox,calendar…)”

$delegate = Read-Host “Enter Delegate ID ”

$Permission = Read-Host “Enter Type of Permission(Author, Editor, Owner, Reviewer, none)”

$foldername = $Mailbox + “:\” + $folder

If ($folder -ne “”)

{
Add-MailboxFolderPermission $foldername -User $delegate -AccessRights $Permission -confirm:$true

}

Else

{ Write-Host ” Please Enter Folder name ” -ForeGround “red”}

;break

}

2
{

$Mailbox = Read-Host “Enter Mailbox ID”

$delegate = Read-Host “Enter Delegate ID ”

$Permission = Read-Host “Enter Type of Permission(Author, Editor, Owner, Reviewer, none)”

$AllFolders = Get-MailboxFolderStatistics $Mailbox | Where { $_.FolderPath.ToLower().StartsWith(“/“) -eq $True }

ForEach($folder in $AllFolders)

{

$foldername = $Mailbox + “:” + $folder.FolderPath.Replace(“/”,”\”)
Add-MailboxFolderPermission $foldername -User $delegate -AccessRights $Permission -confirm:$true

}
;Break}
3 {

$Mailbox = Read-Host “Enter Mailbox ID”

$delegate = Read-Host “Enter Delegate ID ”

$Permission = Read-Host “Enter Type of Permission(Author, Editor, Owner, Reviewer, none)”

$Default = Get-MailboxFolderStatistics $mailbox | ?{$_.foldertype -ne “user created” -and $_.foldertype -ne “Recoverableitemsroot” -and $_.foldertype -ne “RecoverableItemsDeletions” -and $_.foldertype -ne “RecoverableItemspurges” -and $_.foldertype -ne “RecoverableItemsversions” -and $_.foldertype -ne “syncissues” -and $_.foldertype -ne “conflicts” -and $_.foldertype -ne “localfailures” -and $_.foldertype -ne “serverfailures” -and $_.foldertype -ne “RssSubscription” -and $_.foldertype -ne “JunkEmail” -and $_.foldertype -ne “CommunicatorHistory” -and $_.foldertype -ne “conversationactions”}

ForEach($folder in $default)

{

$foldername = $Mailbox + “:” + $folder.FolderPath.Replace(“/”,”\”)
Add-MailboxFolderPermission $foldername -User $delegate -AccessRights $Permission -confirm:$true
}

;break}

4 {

$Mailbox = Read-Host “Enter Mailbox ID”

$delegate = Read-Host “Enter Delegate ID ”

$Permission = Read-Host “Enter Type of Permission(Author, Editor, Owner, Reviewer, none)”

$Default = Get-MailboxFolderStatistics $mailbox | ?{$_.foldertype -eq “user created”}

ForEach($folder in $default)

{

$foldername = $Mailbox + “:” + $folder.FolderPath.Replace(“/”,”\”)
Add-MailboxFolderPermission $foldername -User $delegate -AccessRights $Permission -confirm:$true

}

;break}

5 {

}
}

************************************************************************

copy above code and save it as ps1 as extension(addmailboxfolderperm.ps1)