Monthly Archives: January 2018

Renew SSL certificate for ADFS URL

This document outlines the steps to renew the SSL certificate for ADFS claims providers federation metadata URL

1) To take the application ID and the certificate hash run the below command.

netsh http show sslcert

ADFS1

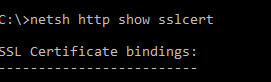
copy only application id value. This we require for the certificate renewal. Better to take a copy of this results.

2) Run this command to see the ADFS listners

netsh http show urlacl 

ADFS2

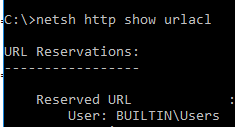
This is just to take a copy of the ACL url’s before the certificate renewal. This part is so sensitive because ADFS will have some URL reservations in the HTTP.SYS. This will help us just in case if we face any issues after the certificate renewal.

3) Delete the old certificates –

$Command = “http delete sslcert hostnameport=adfs.exchangequery.com:443”
$Command | netsh

$Command = “http delete sslcert hostnameport=adfs.exchangequery.com:49443”
$Command | netsh

$Command = “http delete sslcert hostnameport=localhost:443”
$Command | netsh

$Command = “http delete sslcert hostnameport=EnterpriseRegistration.exchangequery.com:443”
$Command | netsh

4) Delete the old hostIP and port entries:

$Command = “http delete sslcert hostnameport=0.0.0.0:443”
$Command | netsh

5) Now we can add the new certificates:

Prerequisite:

Take the APP id which was noted down in the step 1

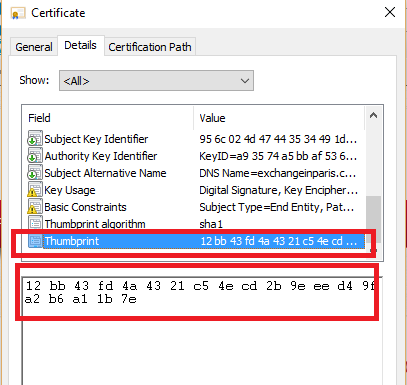
Take the certificate Hash – This can be taken from the new certificate thumbprint

example below –  remove all the spaces and copy the new certificate hash value.

ADFS3

# APP ID
$guid = “paste the appid here”

# Cert Hash
$certhash = “paste the certificatethumbprint”

To renew actual metadata URL:

$hostnameport = “adfs.exchangequery.com:443”
$Command = “http add sslcert hostnameport=$hostnameport certhash=$certhash appid={$guid} certstorename=MY sslctlstorename=AdfsTrustedDevices clientcertnegotiation=disable”
$Command | netsh

To renew localhost:

$hostnameport = “localhost:443”
$Command = “http add sslcert hostnameport=$hostnameport certhash=$certhash appid={$guid} certstorename=MY sslctlstorename=AdfsTrustedDevices clientcertnegotiation=disable”
$Command | netsh

To renew Device Registrations:

$hostnameport = “adfs.exchangequery.com:49443”
$Command = “http add sslcert hostnameport=$hostnameport certhash=$certhash appid={$guid} certstorename=MY clientcertnegotiation=enable”
$Command | netsh

The above is required because Changes were made in ADFS on Windows Server 2012 R2 to support Device registration and happens on port 49443.

$hostnameport = “EnterpriseRegistration.exchangequery.com:443”
$Command = “http add sslcert hostnameport=$hostnameport certhash=$certhash appid={$guid} certstorename=MY sslctlstorename=AdfsTrustedDevices clientcertnegotiation=disable”
$Command | netsh

The above is also  required for device registration service.

Hope this helps.

Quick Tip – Reduce the amount of Mailbox Audit log information generated by a service account

Usually we enable Mailbox auditing to monitor actions taken by mailbox owners, delegates and administrators. But we do not require mailbox audit to be enabled for service accounts which are actually doing genuine operations.

We can configure mailbox audit logging bypass for service accounts which are configured in applications and access mailboxes frequently. This will Reduce the amount of audit log information generated by a service account.

Below steps can be performed to bypass audit for the service accounts:

To check the mailbox audit bypass we can run the below command

Get-MailboxAuditBypassAssociation -identity serviceaccount

The main parameter we need to look is AuditByPassEnabled.

The default value will be false for mailboxaudit enabled and disabled account.

AP

The AuditBypassEnabled parameter controls if the audit logging is enabled or disabled for this account.
When the value is set to $True this account will have the maiboxaudit disabled.
When the value is set to $false this account will have the maiboxaudit enabled.

We can run the below command to bypass the mailbox audit logging for service account.

Set-MailboxAuditBypassAssociation -Identity “service.crm” -AuditBypassEnabled $true

IMP Note:

By default the mailboxaudit logging is not enabled for newly created mailboxes and existing mailboxes.

We can check the mailboxaudit if its enabled or not with the below command.

Get-Mailbox usermbxx | fl *Audit*

The default value will be false like below and the default audit log age limit is 90 days.

AD
Below script can be used to enable bulk maibox audit based on OU level

The Script can be downloaded here – EnableMailboxAudit

##############################################################
# Description:
# This script enables the Mailbox Audit for new mailboxes in your Organization on OU level.
# You need to make them run on a task scheduler on a weekly basis for new mailboxes audit to be enabled.
# You need to mention the OrganizationalUnit in the script where the mailboxes are present.
# You need to mention the CSV location in Export-Csv.
# You need to mention To address From address and SMTPserver(exchangeserver) for sending this report in email.
################################################################

add-pssnapin Microsoft.Exchange.Management.Powershell.E2010 -ea SilentlyContinue
add-pssnapin Microsoft.Exchange.Management.Powershell.Support -ea SilentlyContinue
$mbxs = Get-Mailbox -OrganizationalUnit “mention OU Name” | where { $_.auditenabled -eq $false } | Select Name, DisplayName, UserPrincipalName,SamAccountName,PrimarySMTPAddress
$mbxs | Export-Csv C:\temp\auditlogs\Audit.csv -Encoding UTF8
$mbxs | % { Set-Mailbox $_.SamAccountName -AuditEnabled:$true -AuditAdmin Copy, Create, FolderBind, HardDelete, MessageBind, Move, MoveToDeletedItems, SendAs, SendOnBehalf, SoftDelete, Update }
$mbxs | % { Set-Mailbox $_.SamAccountName -AuditEnabled:$true -AuditDelegate Create, FolderBind, HardDelete, Move, MoveToDeletedItems, SendAs, SendOnBehalf, SoftDelete, Update }

Send-MailMessage -To emailadmin@domain.com -From reports@domain.com -Subject “Audit Enabled for the attached users” -Attachments C:\temp\auditlogs\Audit.csv -SmtpServer specifysmtpserver -Port 25025 -BodyAsHtml -Body “Audit Enabled”

***************************************************

Thanks 
Sathish Veerapandian

Unable to open PST file . Error Details: Header File length is zero. If this file is from a previously failed PST export, please delete the file and resume the export

We might come across the below error in the PST import/export

Error code: -2146233088

Unable to open PST file ‘\\fileshare\Archive\testuser.pst’. Error details: Header file length is zero. If this file is from a previously failed pst export, please delete the file and resume the export. –> Header file length is zero. If this file is from a previously failed pst export, please delete the file and resume the export.

There can be so many issues causing this factor and below tips can be helpful:

1) The mailbox import/export uses the Microsoft Exchange Mailbox Replication service on the CAS server. When a  import/export request is triggered a remote powershell connections will be established from the source CAS to the appropriate destinations to the shared folder to initiate this process. So better to have the shared location network drive in the same VLAN where the exchange is hosted and this will speed up the import/export option.

2) Restart Microsoft Exchange Mailbox Replication service – Since the MRS service is handling this job and if the MRS is stuck processing the huge jobs a restart of this service will definitely help  to speed up the migration process.

3) Remove the Failed import/export requests with the below commands

Get-MailboxExportRequest -Status Failed | Remove-MailboxExportRequest

Get-MailboximportRequest -Status Failed | Remove-MailboximportRequest

4)  We can run this command import/export to exclude and skip few errors

For Import –
New-MailboxImportRequest  -Mailbox  -filepath ‘\\fileshare\Archive\testuser.pst’ -Baditemlimit unlimited -AcceptLargeDataLoss -Priority High -AssociatedMessagesCopyOption Copy  -Confirm:$false  -ConflictResolutionOption KeepLatestItem  -ExcludeDumpster
For Export-
New-MailboxExportRequest  -Mailbox  -filepath ‘\\fileshare\Archive\testuser.pst’ -Baditemlimit unlimited -AcceptLargeDataLoss -Priority High -AssociatedMessagesCopyOption Copy  -Confirm:$false  -ConflictResolutionOption KeepLatestItem  -ExcludeDumpster

5) Also better to check the free space available on the shared network drives where the PST export is happening.  Also better to see the free space available on the disk where the database resides from where the PST export/import is happening.

6) If we are experiencing a mailbox import/export for a specific user a mailbox repair might also help. We can perform the mailboxrepair with the below command.

New-MailboxrepairRequest –Mailbox “usernanme” –CorruptionType ProvisionedFolder,SearchFolder,AggregateCounts,FolderView