Category Archives: Office 365

All about new Clutter Feature in Office 365

Clutter is a new feature introduced  in Office 365.
This feature automatically analyzes once mailbox , checks the most read/unread emails and moves the unwanted unread emails that are in the users mailbox to a new folder called Clutter.
It creates a new folder called clutter under each user’s mailbox for whom this feature is enabled.

When will the clutter feature available in my office 365 tenant?

Admins who have opted for First Release in their Office 365 Admin Center would be able to see the Clutter feature enabled.

Also check if you have enabled for first release.

In-order to check
Navigate to Office 365 Admin portal

Select Office 365 – click on service settings – choose updates and scroll the option towards right to opt for first release.


first release1


If you have opted for standard release then users will need to wait for 3 weeks from November 13th for this feature to be enabled.

By default this clutter feature is not enabled for all users once this feature is available for office 365 tenant.

This feature can be enabled for users through owa
Follow these steps to enable it:

1. Open OWA.
2. Click the Settings (“gear”) icon in the navigation  bar.
3. Click options
4. Select the option clutter and there you will have 2 options to enable or disable the clutter feature as shown below.


onclutter

We could see the clutter feature is disabled by default for all the users. When we select the first option then it separates those clutter identified emails and then it moves it to the clutter folder.


Once  the user enables this feature in his mailbox he gets a confirmation email in his inbox of clutter enabled and a small summary of this feature as below.

confirmation


Once this feature is enabled user will  have an option to right click on any emails in inbox and have an option as mark as clutter as shown below.

markclutter


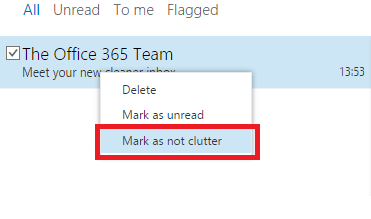
Also if we right click on any emails that is in clutter folder we have an option to mark as not clutter. This option can be used by end users if in case they identify any important emails moved to the clutter folder.


Mark2


How does this clutter work ?

Once end user enables  this clutter functionality  it actually needs some time to analyze the way of work the person is doing in his mailbox. It will try to prioritize the users most frequently visited emails and the unread emails. Once it identifies the unused emails it would move all those emails to the clutter folder which would be created under inbox for the user who has clutter feature enabled.

Also if you need this feature to understand more about the way to organize your mailbox you can simply move the unused emails to this clutter folder created in your mailbox. By this way this feature will be able to understand and make this functionality work very fast in your mailbox.

Clutter works only on the emails that have been already processed by Anti-spam filters, Agents and it does not works on any spam emails.Basically it does not create any folders under clutter folder and move emails like rules.

Also if an end user creates a rule and moves few emails to a specific folder under his inbox then clutter feature does not disturb those emails as rules take precedence over clutter feature.Clutter works only on the emails which are not mostly viewed under inbox.

The main functionality of Clutter is to keep the inbox organized and clean only with priority emails and move the unread,untouched emails to the clutter folder.

Lets say if we are receiving daily company updates/changes which are not in top priority of daily job which would always be in unread then those emails would be moved to the clutter folder if its not been seen for some days (not sure about exact time period). So this reduces the end user job to create  rule for this unread daily updates. If the user feels like reading these updates on his free time then he can always come to his clutter folder and have a look at these emails.

This clutter feature works on Outlook Client, OWA and also Active Sync Enabled Devices.
Clutter is a good feature which would be definitely useful for end users to keep their inbox organized way in their daily  busy schedule.

Thanks 

Sathish Veerapandian

MVP – Exchange Server

Microsoft Office Delve for Office 365

What is Delve ?

Delve is a new option introduced in Office 365 which can be enabled for users and is a new way to search and discover content across office 365.Its a kind of a sticky notes which will help end users to glance through in their busy day and prioritize their work.
Based on every individual work Delve will analyze and will give the information to each users in the Delve Views. So basically the Delve information what you see in yours will be entirely different from other person Delve View.
What Kind of Files does Delve Shows to users ?

Delve shows users videos, PDF, PowerPoint, Excel, or Word documents that they have access to. Delve prioritizes content that’s been modified or viewed in the last three months and shows them accordingly in the Delve view for each and every user.

Below is an example Screen Shot of how Delve would look like for the end user

Delve

Core Functionality involved in Delve

The core functionality part for the Delve is the contents that are stored in the share point Online and in One-drive for Business.
Its kind of a cached information visible to users as a sticky notes for the documents you and your colleagues viewed,edited and shared in share-point and one-drive.

Functionality of Delve in Exchange Online

For Exchange Online it fetches the right people(most communicated people through exchange online) , Most searched email content and creates a cached information for that user and makes them visible in the Delve view for each and every user.

Functionality of Delve in Lync Online

For Lync  Online it fetches the right people(most communicated people through Lync online)
Users would be able to see them in their delve and would be able to communicate with those users directly from  Lync Online.

Delve updates and changes the people information, documents every 24 hours according to their work. It keeps the information of last 3 months.
How to Activate Delve ?

Delve is on by default. If you turn Delve off, the Office Graph Index will still get built but will not be used in search. It will also remove the ‘Delve’ link in the O365 navigation bar if we turn of Delve.

What Office 365 subscription do i need to activate Delve ?

If Your organization uses any one of Office 365 Enterprise (E1, E3, and E4), Office 365 Education (A2, A3 and A4) or Office 365 Government (G1, G3 and G4) Delve can be enabled. Delve is supported in all versions of Office 365 subscriptions.

Ensure that you are in First Release Group only

To verify, go to Admin in Office 365 Portal > Service settings > Updates and make sure that First Release toggle is set to ON.

Few things that can be checked to enable Delve Functionality

Make sure that the user has licenses assigned.
Make sure that users can access the Office graph
Make sure that you allow your organization to access the Office graph. To verify, go to Office 365 admin center > SharePoint Online admin center > Settings > Office graph and make sure that you’ve selected Allow access to the Office graph.

How to Turn off Delve

1. Sign in to the Office 365 Admin Center.
2. Choose Admin > SharePoint. You’re now in the SharePoint admin center.
3. Click Settings > Under ‘Office Graph’ select ‘Allow’ or ‘Don’t Allow’

Delve22

 Also Refer –  http://social.technet.microsoft.com/wiki/contents/articles/28508.microsoft-office-delve-for-office-365.aspx

Thanks & Regards

Sathish Veerapandian

MVP – Exchange Server

Convert bulk mailbox users to mail enabled users after staged Exchange Migration to Office 365 from Exchange 2007

The most important step that we need to do after a Exchange Migration from On-premise Exchange server to office 365 is to convert all the on premise Exchange mailboxes to Mail Enabled users.

What happens if we decommission on-premise servers without converting them to MEU’s

All the messaging related user information on the Cloud will be lost. Meaning which Dir-sync wont be able to find an associated target address for the users and users wont be able to connect to the cloud mailboxes which will result to an incomplete off-boarding to office 365.
Dir-sync wont be able to connect to the cloud mailbox and the user account in the DC.
Dir-sync wont be able to identify the target proxy address if we don’t have a MEU’s for the same and wont be able to locate the remote routing address.
Initially these values were stamped and provided on the on-premise mailboxes but now since we have moved all the mailboxes now we need to disable all the on-premise mailboxes, create a associated MEU’s for the same and then decommission the on-premise servers

There are scripts to help you convert mailboxes to MEUs which will make our job very easy.

•ExportO365UserInfo.ps1    Collects information from your cloud mailboxes and saves it to a CSV file. The Exchange2007MBtoMEU.ps1 script uses the information in the CSV file to bulk-create the MEUs.

•Exchange2007MBtoMEU.ps1   Conerts on-premises  mailboxes to MEUs

Please follow the below link to download these scripts

http://community.office365.com/en-us/w/exchange/845.convert-exchange-2007-mailboxes-to-mail-enabled-users-after-a-staged-exchange-migration.aspx


If you want to change this value to single user you can use the below steps

First run the below command to get these values

$user = Get-ADUser username -IncludeAllProperties mail,department,ProxyAddresses

Then disable the on-premise mailbox

Get-Mailbox -identity $user | Disable-Mailbox -Confirm:$false

Now enable MEU for the single user

Enable-Mailuser -identity  username -PrimarySmtpAddress “give the value”  -externalemailaddress “give the value

Set the associated  proxy address for the single user

$user.ProxyAddresses = “set the proxy address value”


Imp Note : This article applies only for Exchange 2007 on premise and still if  you  bring any 2010/2013 into coexistence in onprem then  don’t need to follow since it  will convert the mail-enabled users to a MailUser after the remote move completes automatically.

Thanks

Sathish Veerapandian

MVP – Exchange Server

Migrate from Lotus notes to Office 365 with Quest Co-Existence Manager

With Microsoft Office 365 becoming the most successful product most of the organizations prefer to move their messaging systems to Office 365 or they prefer to have a coexistence kind of hybrid setup with their on premise.

In this article we will have a look at readiness to prepare  the Lotus Notes environment  for successful migration from lotus notes to Microsoft Office 365.

First we need to prepare the readiness before we move all users to Office 365 cloud since 2 messaging systems are entirely different (Eg: notes uses mailin database ,routing mailboxes and exchange has mailboxes and connectors) and we need to achieve a way so that these 2 different systems can interact until the migration is complete.

We need to have a mediator which will be able to interact with both of these messaging systems. In order to accomplish this we have multiple third party solutions through which we can integrate.

There is Microsoft tool called Microsoft Notes Online Inspector. There is an article written for the same which you can refer below

http://www.v-and-m.com/vmhomepage.nsf/Content/Microsoft’s+%22Secret%22+Mail+Migration+Tool+?OpenDocument

You can do it from below Microsoft recommended  third party migration partners as well

1) Quest Coexistence Manager.

2) Full Armor

3) Binary Tree Co-Existence

4) CASAHL Technology

In this article we will look at the Components, functionality and readiness to migrate with Quest coexistence manager

Overview of Quest Coexistence Manager

Quest Coexistence manager is a product of Quest software used for migrating from lotus notes to Microsoft Messaging platforms and Office 365

What this software does?

This software integrates and creates a pipeline between notes and Microsoft Exchange platform.

By doing the above

  • We can have an effective coexistence between the lotus notes and Exchange platforms
  • We can transfer the messaging system smoothly from lotus notes to Microsoft Messaging Platform without any hassle.

Basically this software consists of 3 roles or we can call it as components as well.

  • Directory Co-Existence.
  • Mail Co-Existence.
  • Free/Busy Co-Existence.

These above components are same as we had these 3 components in Microsoft Exchange Transport Suite which was legacy  tool of Microsoft used to migrate from notes to Exchange 2007.

Below are the functionality of these 3 roles

Directory Coexistence Role:

Updates the directory data between the domino directory and Microsoft Active Directory or Microsoft Azure directory if it’s Office 365 .

This role is used to keep the data in users, Groups located in 2 different directories i.e, Domino directory and Microsoft Active Directory if it’s on premise or Microsoft Azure if its office 365 to be intact. Since in   a organization new people can come and people can resign so these information should be reflected in office 365 Azure directory. So this Directory coexistence role gives a bidirectional update vice versa and keeps the directory information intact.

Mail Co-Existence Role:

This role is used to communicate users between the 2 different messaging platforms.It is used for communication and routing emails between non migrated users mailin database residing in notes database to the mailboxes which are present in the Microsoft Exchange server or office 365 environments.

Free/Busy Co-Existence Role:

This role is used to share the free busy information between notes and Exchange on premise/ Office 365 environment.

QcalCON

There is a separate component called QcalCON component of free/busy co-existence which needs to be installed on any one of the notes server. By using  this component the notes server will route the calendar request that needs to goes to exchange server and vice versa.

Prerequisites:

We need to install these roles separately on hardware’s according to the number of users  and size of environment we have.

If the organization has less number of users we can install all these 3 roles together on a single server.

If the organization has more number of users and domino servers  then we need to install all these roles on separate servers for better synchronization.

These servers(Domino, Mail and Free/Busy) can be installed on minimum Windows server 2003 to Windows server 2008 R2Sp1

Hardware can be planned according to the size of the environment

Minimum Powershell version 2.0 is required on F/B connector


Source Servers should be the following:

Supported Domino Server versions

Versions – Minimum 6.5.1 to  to maximum 8.5.3

Supported Notes Server Versions

Versions – Minimum 6.5.1 to  to maximum 8.5.3


Target servers should be the following:

Exchange Servers version – Minimum Exchange 2007 RTM to Microsoft Office 365

SQL Servers Required

We need to have SQL server to store all these information as Co-Existence Manager uses SQL server to store the config information.

Licensing Quest Software:

Quest software sells licensing based on number of users present in the environment. They provide a single licensing by which we will be able to put this license on all these roles.

Coexistence between Notes and Office 365

Direct Coexistence between notes and office 365 practically is not possible. In these scenario we need to create a 2 step coexistence for both migration as well as hybrid scenarios

In order to achieve perform the following

  • Create a local AD server to sync the data between domino directory and Microsoft AD locally.
  • At least one local Exchange 2010 server with 3 roles installed which then synchronizes the data to office 365 through ADFS.
  • Create ADFS and Directory Synchronization between local AD server and Microsoft Azure Directory.
  • Configure Hybrid Deployment Wizard on the on premise Exchange server.
  • We need to choose the migration type as IMAP in the Hybrid Configuration Wizard as non Microsoft -Messaging platforms should be done only in IMAP Migration.

Note: Migration from notes to Office 365 will take time more than migration done from on prem exchange to office 365. The reason because since multiple components are involved and the MAPI throttling might take place.

Once we have met the above prerequisites we can  migrate all the users from notes to office 365 with quest software without any issues.

Thanks

Sathish Veerapandian

Office 365 and Exchange 2013 post migration testing plan

It is always better to have a set of testing plan to be done after we complete a major task.Office 365 being  a major preferred product in the current messaging trend most of the companies decide to have office 365 in their environment.

Most of the companies would like to have a coexistence kind of setup between existing exchange 2010/2013 servers  in on-premise and office 365.Few of them keep this kind of a hybrid setup for a while to experience the office 365 service and then they slowly get transitioned to office 365.Rest of them would like to continue with the coexistence hybrid setup of office 365 and exchange on premise together always.

Administrators and end users might not be aware if there are any functionality broken after the complete migration until we execute a post migration testing plan.

Below are the list of possible post migration testing that can be performed for a healthy hybrid O365 Exchange on premise coexistence.

1) Test Email from O365 Mailbox to On-Prem mailbox account.
2) Test Email from On-Prem mailbox account account to O365 Mailbox.
3) Test Email from O365 account to external Gmail/hotmail account.
4) Test Email from external Gmail/hotmail to O365 Mailbox.
5) Test Private Meeting from O365 Mailbox.
6) Test Private Meeting from On-Prem Mailbox to office 365 Mailbox.
7) Free Busy Information of O365 visible for On-prem Mailbox.
8) Free Busy Information of On-prem Mailbox visible for O365.
9) On-Prem Mailbox visible for O365 users in GAL.
10) O365 Mailbox Visible for On-Prem in GAL.
11) Accessing a shared calendar in On-Prem by O365 User.
12) Accessing a shared calendar in O365 by On-Prem User.
13) Test Email to O365 account from Iphone/Andriod device through activesync.
14) Test Email from O365 Account to Iphone/Andriod Device through activesync.
15) Mail Contacts of On Prem Visible for O365 and Vice Versa.
16) OOF of On Prem Account Visible for O365 and Vice Versa.
17) Mail Delay Delivery from O365 to On prem and Vice Versa.
18) Granting Delegate access for On-Prem Mailbox to O365 Mailbox and Vice Versa.
19) Send email to distribution list from O365 to On prem and Vice Versa.
20) Meeting Requests Forward from O365 to On-Prem and Vice Versa.
21) Setting up E-Fax Account creation for O365 Mailbox.
22) Application related Relay setup for O365 Mailboxes where the application resides in onpremise.
23) Email Encryption setup for O365 Mailboxes.
24) External OWA Setup(limitations if any) and testing for O365 Mailboxes.
25) Recover email from Recover Deleted Items Folder.

Also refer :

Post-deployment checklist for Office 365 –  http://technet.microsoft.com/en-us/library/hh852456.aspx

Cheers

Sathish Veerapandian

Technology Evangelist