Setting up SPF record for on premise and hybrid domain setup

In this article lets have a look at setting up SPF record for Exchange on premise setup and Exchange hybrid setup

Why SPF ?

Nowadays email domains over the internet can be easily forged in many ways. The current standard protocols used for the email systems does not play an important role in restricting and controlling the reverse path of the emails , domains that are sent through SMTP transits.

Sender Policy Framework (SPF) is a simple email validation system designed to detect email spoofing by providing a mechanism to allow receiving mail exchange to check that incoming mail from a domain is being sent from a host authorized by that domain’s administrators.

By using this SPF record we are authorizing the hosts to our domain and letting everyone know that we will be sending only through these hosts. By doing this the receiver will check the hosts that are sent from our domain and if they find any non registered hosts they will drop the emails.

This will finally reduce the spamming and blacklisting of our domains.By doing this we can block other entities using our domain names, often with malicious intent to blacklist our domain. But the whole spamming can’t be blocked.

SPF records may define zero or more mechanisms. Mechanisms can be used to describe the set of hosts which are designated as authorized, outbound mailers for the domain. The following list are common mechanisms included in an SPF record:

all | ip4 | ip6 | a | mx | ptr | exists | include

I don’t want to provide detailed explanation on SPF  since there are more number of  articles related to the same in the web written by so many experts.

Lets see how to setup SPF record for an on-premise setup :

First choose any one of the below  mechanisms to create the SPF
all,ip4,ip6,a,mx,ptr,exists,include

Below is an mechanism with soft-fail

v=spf1 ip4:10.10.10.1/16 (CIDR) mx ptr:Sender1.domain.com include:domain.com ~all

Benefits of using all

If the sender domain has an SPF record and have list of IP’s added then it allows only those emails from these IP’s for the domains who has SPF configured and rejects the ips which are not added in this list.

If you don’t have SPF configured the target who receives the email  has SPF configured will check your domain .If you don’t have SPF record configured then it will mark them as soft fail and move these emails to junk folder.

Imp note during creating SPF with (all) mechanism :

Make sure that you add all the required Ip ranges, domain names in the SPF permitted set.

Make sure that you create a TXT record as well as an SPF record since some mail servers won’t support only the SPF record.

How do i handle SPF records during office365 hybrid migration :

If you are doing a full cutover migration from onpremise to office365 then you no need to worry about this setup. Because once you are migrated completely to office 365 Microsoft will automatically create SPF for your domain.
Reason not to add:
You need to add all your existing public IP’s of your email system and also office 365 SPF’s .
So its better you can wait till the migration completes.

If you already have SPF records for your on-premise setup and you are in the phase of office365 migration, then don’t delete existing record but just add Office 365 record to your Public DNS.
How do i find the office 365 SPF record ?

use the below one

v=spf1 include:Spf.protection.outlook.com ~all

Below is an example of adding the office 365 SPF along with onprem in your public DNS server

v=spf1 ip4:10.10.10.1/16  mx ptr:Sender.domain.com include:spf.protection.outlook.com ~all

If you still like to  have a custom DNS records to route traffic to services from other  providers after the office 365 migration, then create an SPF record for them and respective address in the custom DNS records in Office 365 portal

Test11
In addition to this its better to create a PTR record for the IP address that is sending the mail in Public DNS.

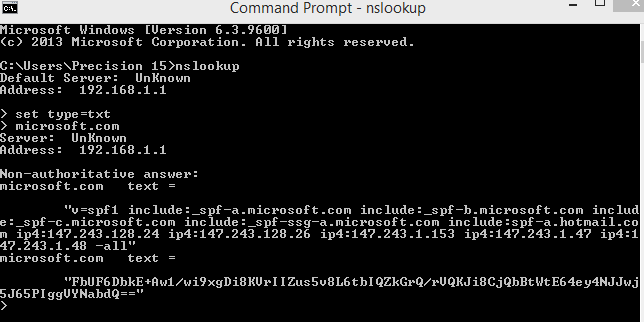
How to check the SPF record of your domain

Below is an example to check them through NSlookup for Microsoft domain

Capture22


SPF implementations will limit the number of mechanisms and modifiers to a value of 10 per SPF check, including any lookups caused by the use of the “include” mechanism or the “redirect” modifier. If this number is exceeded during a check, a PermError MUST be returned.
So consider having a value of 10 DNS lookups per SPF

Summary:

An SPF record won’t do anything to prevent a spam attack.  It helps prove that the mail your users send is coming from a trusted source and won’t be marked as spam.

Thanks

Sathish Veerapandian

Restrict end users from using third party active sync enabled applications

Now a days there are so many active sync enabled applications which end users can  download, install on their mobile devices and access emails .

If we have any MDM solutions in place to control the end users mobile devices then we don’t need to worry about this part.

In most of the MDM solutions the implementation will be segregation of the devices own device policy ,corporate device policy and applications that can be downloaded and accessed from the devices.

The challenge comes when we do not have an MDM solution in place and users accessing the emails from their mobile devices without any active sync policies configured.

In this article lets have a look at some troubleshooting guidelines that we can perform to block users trying to access the emails from their mobile device through any third party active sync enabled application.


How to find the Active Sync connections coming from different mobile applications ?

You can  filter and see the active-sync requests in the reverse-proxy/firewall.This is the best way and you can find them easily.
To find the users who are using any app to access emails via active-sync  perform the following :-

1) Filter the active sync requests in your firewall or reverse proxy accordingly and start the query.

2) Usually in most of the firewall and reverse proxy it will show you the source,destination and the request after the filter.

You need to concentrate on the request alone

Below is an example of normal active sync request

POST http://domain.com/Microsoft-Server-ActiveSync?User=userID&DeviceId=00ijhsad6564g2fd&DeviceType=iPhone&Cm

If the user device is connected through any application  Eg: cloudmagic you can see the word “cloud magic” in the request URL. By this way you can identify the users . It should be easy.

POST http://domain.com/Microsoft-Server-ActiveSync?User=userID&DeviceId=00ijhsad6564g2fd&DeviceType=iPhone&Cm=CloudMagic


Also you can use the exchange commands query string parameter and filter device access rule.This will help you to identify what type of devices are connecting .Use the below command to see the type of the connections through Active-sync

Get-ActivesyncDeviceAccessRule | Format-Table Name, Characteristic, QueryString, Accesslevel -AutoSize

Note: 

You will get any output of the above only if you have created any device access rule for the same.

In the Query String parameter you can see the type of the software that the active sync is used for connecting.

There is one more method to identify the type of devices that connect through active-sync from the IIS logs

Just an example below of how the log entry shows for the android device type.

POST http://domain.com/Microsoft-Server-ActiveSync?
default.eascmd=sync&deviceID=5a5d4d5fg8755gf5gh5g&DeviceType=Andriod


Now how do we block all these types of connections and allow only Native client ?

I have mentioned few points which will definitely help in address these kind of issues

1) Create a new device access rule and block the applications through which end users should not connect through

In my example i have created a new device access rule to stop the connections coming from cloudmagic application.

New-ActiveSyncDeviceAccessRule -AccessLevel Block -Characteristic DeviceType -QueryString “CloudMagic”

2) Add a query string value in the web.config file to stop the connection from specific applications

Edit the EWS web.config file on the mailbox server and add the below string to block the users accessing the emails through application in my case its cloud-magic

Below is the location – 
C:\Program Files\Microsoft\Exchange Server\V15\FrontEnd\HttpProxy\ews

<denyStrings>

     <add string=”CloudMagic” />

</denyStrings>


Better to add this value in the CAS front end proxy server as well

C:\Program Files\Microsoft\Exchange Server\V15\FrontEnd\HttpProxy\sync

do an iisreset after this

Note: Make sure that you take a backup of the web.config file before making this change.
Also additionally create a rule in the firewall,reverse proxy stating that any active-sync requests that come with the url “cloud magic” drop the connection and do not proceed.

After performing the above log into your  reverse proxy perform a filter and see if this query type with cloud magic is getting blocked(definitely it should be).

Hope this helps

Thanks

Sathish Veerapandian

MVP – Exchange Server

Creating SQL instances for messaging related services

We will come across  certain scenarios where we need to integrate our Exchange Servers with other products for additional functionality.

Few examples are installing an automated mail signature software on the Transport Server for customizing and applying the email signatures automatically to all users.

Installing an additional layer of Anti-spam product on the email servers.

Configuring a Meeting room solution for integrating our  room mailboxes,Equipment mailboxes with additional product and integrating with meeting schedule display monitors.

Bringing up an archive solution for all the primary mailboxes and the list goes on.

Most of the products which are coming on the above category will require a centralized database where it needs to store its information related to the  configuration,logs, reports,etc.

In most of the cases these products will be using SQL DB’s for storing these data and values.

So planning in these kind of scenarios is very very important.Since an improper configuration of SQL instance and installation of the related product can interrupt the Exchange functionality very easily.

When we come across these kind of scenarios its always better to interact with the associated product expert .Get recommendations from a SQL expert with regards to the SQL configuration for the product.

I have collected few things which will help an Messaging guy during these scenarios

1) First get in touch with a SQL person and explain him about the requirement of the SQL for the product.Basically what kind of job it writes and stores in the SQL.

2) Reach the associated product expert and get advise on configuring the SQL instance for the product.

If  your environment is or the product that you are going to install is not that complex and does not require SQL enterprise then you can go ahead and install the local SQL instance on the corresponding Exchange Server.

I have collected few points based on my experience which might help during configuring SQL instance if you are going to configure the instance :

Make sure during the installation you select the SQL authentication mode and create a service account for the same. Though the builtin sa account will have the permission but its better to create a dedicated service account for the admin.

SQ

Advantages of selecting SQL server authentication mode

SQL Authentication is the typical authentication used for various database systems, composed of a username and a password. Obviously, an instance of SQL Server can have multiple such user accounts (using SQL authentication) with different usernames and passwords. In shared servers where different users should have access to different databases, SQL authentication should be used for better security since the users only with Windows authentication cannot connect to the database.

Also make sure that you set the file db and the log file value to some greater figure as below example

SQ1


Make sure the auto-close option is set to false

Functionality of Auto Close :-

Having this option set to true will annoy us from unwanted SCOM alerts.
When we set this option to True the DB will go offline when it doesn’t receive any active connections and will resume back whenever it gets new connections. So when we have a SCOM agent monitoring this SQL we will get unwanted alerts from them.

Its better to set this parameter to false

Launch Management Studio –> Select the Database  –> Right Click Properties–> Options –> “Auto Close” value to “False”

Autoclsoe


After the installation is done check the total and target server memory to see if its eating up any additional memory by executing the below query

Select * from sys.dm_os_performance_counters

where counter_name in

(‘Target Server Memory (KB)’,

‘Total Server Memory (KB)’)

or (object_name=’SQLServer:Buffer Manager’ and counter_name in(‘Buffer cache hit ratio’,

‘Page life expectancy ‘))


Also you can check the physical memory ,available committed memory , memory utilization percentage by running the below query

select * from sys.dm_os_process_memory

SQLM

If we are not sure about these values its better after the configuration you can show your SQL installation to an SQL expert and check if all the settings are in right place.

Thanks 

Sathish Veerapandian

MVP – Exchange 

RBAC role to Manage end user contacts through (Exchange Control Panel)

There might be a requirement to delegate the management of contacts for all the staffs especially for the HR team.Since the staffs position title change, phone numbers, city, extension , address change will happen randomly for all the staffs.

Its better to delegate this task alone to the HR team member so that the help desk calls for changing these information will be reduced. Also there is no need to wait for a period of time to make these changes from the help desk team.

Basically we can create a custom RBAC role and assign this to a HR staff who would be able to manage this task through ECP .

Create a new management role :

New-ManagementRole -Parent “Mail Recipients” -Name “Contact Management”

RBAC1

Now we need to create a new role group

Create a new role group :

New-RoleGroup –Name “Contact Editor” –Roles “Contact Management”

RBAC2

Remove all of the unwanted cmdlets from our newly created  role, since we need to give the bare minimum permission of modifying only  the contacts.

Get-managementRoleEntry “Contact Management\*” | where { $_.Name –ne “Set-User”} | Remove-ManagementRoleEntry


Add only the required entries for the new role

Set-ManagementRoleEntry “Contact Management\Set-User” -Parameters “Phone,city,phone,fax,mobilephone,department,title,street address”

RBAC4


New-ManagementRoleAssignment -Role Contact Management -User TestITHRAdmin RBAC7


Run the below command to check and ensure that only set-user  editor rights are assigned Get-managementRoleEntry “Contact Management\*” RBAC6

When this RBAC role  person can login through ECP  and he would be able to manage only the AD contacts

Thanks 

Sathish Veerapandian

MVP – Exchange Server

Sending Mass Mailers ,Marketing Emails, News letters via Exchange ?

At times we might get requirement where we want to  send mails in bulk from our messaging system to internal/external users for business case.

Though sending bulk emails is not at all advised due to many factors but however when business demands we do not have any other option other than going further.

The business may demand where we need to configure our mailing system to send advertisements, newsletters to the partners, customers in a week , in a day or even in every 2 hours.

We  would need to configure this requirement  in a way that it should not be getting affected on the below parameters :

a) Without affecting our normal email operations and without affecting our messaging system performance.

b) Without getting blacklisted as a spammer.

c) The Mass email that we send should Land-Up in the end users inbox ,not in spam folder and shouldn’t be trapped in their filters.

Based on industry best practices i have collected few points which can be taken into consideration when we plan for this type of requirements:

1) Determine how the mass mails are going to be sent  from which application ( Whether its internal ip  or external ip). Then  the mass mailers recipients ( whether it goes only to internal recipients or to both internal and external recipients). If its for internal recipients only the job wouldn’t be more complex.

2) If its going to be from an external IP then better don’t allow to relay these bulk emails through your domain.

3) Its not advised to allow sending bulk emails from an unregistered external ip to external users  from your domain since your IP and domain will get blacklisted in a matter of day.

4) If still there is a requirement to send mass mailers from external IP’s make sure the below are met :-

a) Send the mail using a known and registered sender address(domain) of which the domain part is traceable using reverse lookup, and has a valid  SPF.

b) Make sure they send all the emails with the correct subject ,message bodies, unsubscribe and adhere to all the local and legal requirements.

c) Try convincing the marketing team or the team who sends bulk email  to use  a different domain and a different IP address as your connecting IP  will  get blacklisted easily and will affect your production emails.

5) There are few SMTP appliance that can be placed in the DMZ which can accept emails from the mass mailing apps and can do the job.

There are more number of cheap bulk emailing tools that will do this job easier, including dealing with bounces, unsubscribe requests etc. Its even better to outsource  this requirement to any one of them.

Since the major outsourced providers are doing this business for a while in the market they will have all the configurations and settings in place with the ISP’s which will increase the delivery success rate of these emails.


But still if you would like to go for the mass mailing for external IP’s domains to external users  through exchange make sure the below conditions are met :

1) Create a dedicated server (CAS+MBX) for doing this job. Configure relay on this server.

2) Create a new database , Create the sender mailbox alone on this new database.

3) Create additional number of transport servers for load balancing  since SubmissionServerOverrideList  switch cannot be used from Exchange 2013. If you add Exchange 2010 hub server for this then you can use SubmissionServerOverrideList for that DB to use only that HUB server which will not affect the other transport servers.

Also make sure the below values are set in the send connectors :

Maximum concurrent outbound connections: 1000 *

Maximum concurrent outbound connections per domain: 20*
Set-SendConnector -SmtpMaxMessagesPerConnection 200


Also make sure  that you alter and configure these values on the relay receive connectors according to the number of  bulk emails  :

ConnectionInactivityTimeout
ConnectionTimeout
MaxInboundConnection
MaxInboundConnectionPercentagePerSource
MaxInboundConnectionPerSource
MaxRecipientsPerMessage
MessageRateLimit

Finally make sure these bulk emails are sent only during off business hours in-order to avoid load on the transport services during production hours.

Hope this helps !!

Thanks

Sathish Veerapandian

MVP – Exchange Server

Lync 2010/2013 Migration to another domain

When we plan for migration of lync servers from one domain to another few factors needs to be kept in mind and considered. In this article i have mentioned few best practices that can be followed during these kind of scenarios.

Below are some tips that can be used during the migration :

The first and the foremost thing that you will need to do is to bring up the Lync Infrastructure in the new Forest.

Meanwhile when you plan for migrating AD user accounts from the source domain  you can created linked lync accounts in the resource forest. Make sure EWS ,Auto discover everything is setup correctly.

AD user accounts not residing in the target would authenticate via edge . Later after the first logon password cache entry is made. End users wouldn’t be prompted for the password,since edge server allows communication with federated companies.

Then Use DBIMPEXP in Source domain where lync 2010 is running to export their contacts to the new forest.

What is DBimpExp ?

Its an inbuilt Microsoft utility for Lync server 2010 located in C:\Program Files\Common Files\Microsoft Lync Server 2010\Support on the Lync Front End Server.
By using this utility we would be able to connect to the lync SQL DB exporting the XML files which contains (users contact lists and conference directories).

Its located in the folder C:\Program Files\Common Files\Microsoft Lync Server 2010\Support

Below is the example

dbimpexp.exe /sqlserver:”lync-sql.sip.exchangequery.com\LYNC” /hrxmlfile:”C:\test.xml”

Store2

You need to navigate to the above location to access this utility and this command is for enterprise edition server.

After you export these XML config’s you cannot import directly to Lync 2013 or SFB since the import-csuserdata will not accept this direct xml format and will accept only these datas in ZIP format.

From lync 2013 this dbimpexp.exe utility has been depreciated and replaced with the importcsuser data cmdlets. So you wouldn’t be able to find this utility in Lync2013 and SFB.

We need to Use Import-Csuserdata commandlet to import the contacts.

So after exporting the config information from lync 2010 you will need to convert these values by running the below commands

First run the below commands to convert the xml type exported file to *.zip format.

Convert-CsUserData -InputFile “C:\test.xml” -OutputFile “C:\_Install\Restore\test.zip” -TargetVersion Current

Later run the below command to import the data in the target forest containing Lync 2013 or later version.

Import-CsUserData -PoolFQDN “LyncPool.Domain.com” -FileName “C:\_Install\Restore\test.zip”


During the final cut-over date you can break the linked accounts (source account) by clearing “msRTCSIP-OriginatorSID” attribute and enabling the target account.

Basically what you need to do is move the SID from the user forest into the msRTCSIPOriginatorSId for each lync enabled user in the resource forest.


Below are the things that we need  to consider for federation :
To make sure there is no issues happening with your federated partners you have to tell  them to change  Lync Edge access IP and FQDN to the new Forest values in their end.

But practically if you have more number of federated partners then it might take some time to make these changes on their end.

As a work around for a while you can configure the below settings and keep them for a while until your partners change the federation values to the new one.

Below is an Example :

To make sure there is no issues happening with your federated partners after migration

Basically changing from oldsip.company.com to newsip.company.com  would break federation.

Go back and reissue your certificate on the Lync 2013 Edge and add oldsip.company.com entry.
This will work because Federation isn’t dependent on the name you pick in topology builder. It’s  just that the SRV record goes to a server with a corresponding matching name.

For example if source domain SIP  oldsip.company.com points to  IP  10.0.0.1 and your target SIP is newsip.company.com on the IP 10.0.0.2.

For a temporary fix you can create oldsip.company.com and point it to 10.0.0.2 . This will be working if you have a valid certificate in place for the oldsip.company.com and that certificate present on the new  target domain  lync edge server.

Note: 

These steps will not apply for all the migrations as each and every migration varies according to every domain setup, config, DNS setup,Trust relationship, Enterprise voice plan , SIP trunk, SIP config, PBX,etc. So according to those configuration based on your environment planning needs to be done properly .There are few tips which can be helpful during these kind of migration scenarios.

Thanks 

Sathish Veerapandian

MVP – Exchange Server

After upgrade to Skype4Business incoming calls to phones might not show the caller ID

After upgrade to Skype4Business incoming calls to phones might not show the original  caller ID (Might be hidden or unknown)

This is a small misconfiguration which we might have left out during the upgrade.

This is due to a value called Forward PAI which might be set to false

What is this Forward PAI ?

Its a value that  sends the  P-Asserted-Identity (PAI) header  along with the call. This P-Asserted-Identity (PAI) will have headers through which it will verify the original  identity of the caller.

When the call is being processed by the SIP network, a P-Asserted-Identity header will be part of all SIP messages for that complete call transaction (i.e. INVITE, ACK, BYE).

In-order to check this value in your settings you can run the below command

Get-CstrunkConfiguration

I just ran Get-CsTrunkConfiguration | Fl “*Forward*” to filter the appropriate value

LYNC

In my case it was set to false. You have to set this value to True

Run the below command to set this value to true

Set-CsTrunkConfiguration -Identity Site:ExchangeQuery  ForwardPAI $True


You can enable this value through edit trunk configuration settings through control panel  also

ee


I just explored the other below options as well and thought of adding them up in this blog itself .Below are them


Enable Media by Pass :

If we enable this option bypass will be attempted for all PSTN calls. You can enable this if there is a full connectivity strength between clients and PSTN gateways.Typically by enabling this option we can minimize the number of Mediation Servers deployed.This improves the voice quality by reducing the latency since the number of hops gets reduced.

Centralized Media Processing :

By enabling this Media bypass can improve voice quality by reducing latency, needless translation, possibility of packet loss, and the number of points of potential failure.Enabling Centralized Media Processing is a useful feature in that it allows the CircuitID Gateway to handle as much of the SIP responsibility as possible.

Enable forward call history: If we enable this value then all the call history information will be forwarded through the SIP trunk.

Enable RTP latching: Indicates whether or not the SIP trunks support RTP latching. RTP latching is a technology that enables RTP/RTCP connectivity through a NAT (network address translator) device or firewall.

Enable forward call history: Indicates whether call history information will be forwarded through the trunk.

Note:

All of the above will not be standard configuration setting in all deployments.For each UI setting in the Trunk Configuration we need to understand and plan accordingly to your PSTN connectivity , SIP configuration and your current Lync setup.

Hope this is useful

Thanks

Sathish Veerapandian

MVP – Exchange Server

Troubleshoot Outlook Connectivity issues in Exchange 2013

In earlier versions of exchange prior to Exchange 2013 troubleshooting outlook connectivity issues should be classified into  categories according to the versions of exchange type of connections that we have configured in our environment.

Now lets see a small summary of Outlook connections from Exchange 2007 :

1) In Exchange 2007 though the other  client connections was handled by Client Access server but still the MAPI connections were established directly to the mailbox server.


2) In Exchange 2010 all the client connections including RPC went through the Client Access Server since the new service RPC client access service was introduced .

3) From Exchange 2013 we do not have the direct RPC over TCP connections at all and all connections should come only through RPC over HTTPS (Outlook Anywhere) or MAPI over HTTP if we have Exchange 2013 SP1 with outlook 2013 SP1  and mapi over http enabled.

I have collected few steps which will be useful if we come across these kind of scenarios in our environment :

Below are the things that can be checked during troubleshooting outlook connectivity issues in Exchange 2013 :

1) Check if you have MAPI over http or RPC over http enabled in your organization.

If you have MAPI enabled then please run the command Get-MapiVirtualDirectory and check the Mapi internal and external URL

MAPI1

Now run the command to check if MAPIhttp is enabled .By default it will be disabled and we need to enable them.

MAPI2


Now lets look into troubleshooting Outlook connectivity issues in both the scenarios:

Telnet from the affected Workstation to your outlook anywhere external URL and  ensure that the Outlook Anywhere URL is accessible on port 443.

Below is an example

Telnet


Telnet1


Check the Outlook Anywhere authentication settings.By default it should be NTLM or it can be NTLM & Basic Authentication settings

Get-OutlookAnywhere | fl Externalclientauthenticationmethod,internalclientauthenticationmethod

OA11

If Outlook anywhere is not accessible from a particular network or site then most likely the issue could be on their network side.
Probably you can check if Outlook anywhere URL is reachable from their side . Ping the Outlook Anywhere URL from any of the affected workstations and see the results.
Also you can check if there are any recent changes in their network ,on their proxy servers.
If the affected site is routing their internet connections through the proxy site then you can test the connectivity by excluding your outlook anywhere url in the proxy exclusions as below

Proxy

By doing this it will provide a direct connectivity to your site . Most likely these kind of issues might occur due to proxy connections.


If its happening only for a single or few sets of users possibly check the MAPIBlockOutlookRpcHttp settings for that affected user by running the below  command

Get-CASMailbox mailboxname | fl MAPIBlockOutlookRpcHttp

MAPI112

so this value should be set to false for the outlook anywhere to work. If this value is set to true then you have to set this value to false.

Ensure that the outlook anywhere hostnames are correct and they are added in your public certificates

You can use the below command to check the host names

get-outlookanywhere |fl *hostname

hs

If its for all users you can run outlookrpcselftestprobe on the affected mailbox server by running the below command

Test-OutlookConnectivity -ProbeIdentity "OutlookRpcSelfTestProbe"

Check if the RPC can connect to store’s port by using RPC ping utility test by runnig the below command

RpcPing –t ncacn_http –s ExchangeMBXServer -o RpcProxy=RpcProxyServer -P “user,domain,password” -I “user,domain,password” -H 1 –F 3 –a connect –u 10 –v 3 –e 6001

If it returns as following: Completed 1 calls in 60 ms 16 T/S or 60.000 ms/T, it means the RPC Ping Utility test succeeds.

You can also use EXRCA and see the results

https://testconnectivity.microsoft.com/

Steps to perform the EXRCA tests :

  1. On the ExRCA website, under Microsoft Office Outlook Connectivity Tests, select Outlook connectivity, and then select Next at the bottom of the page.
  2. Enter the required information on the next screen, including email address, domain and user name, and password.
  3. Choose whether to use Autodiscover to detect server settings or to manually specify server settings.
  4. Accept the disclaimer, enter the verification code, and then select Verify.
  5. Select Perform Test.

Though there are more factors that can block the outlook anywhere connections in Exchange 2013 above troubleshooting steps can be helpful in some cases.

Hope this article is helpful.

Thanks 

Sathish Veerapandian

MVP – Exchange Server

Setup federation only to specific domains in Lync 2013

There is an option in Lync2013 where we can enabled federation only to selected domains.
We can set this option where only these domains will be able to contact us .

In-order to do that perform the following steps

Open Lync Control Panel select “Federation & External Access”

FA1


Navigate to SIP federated domains

Here we have two options to allow specific domains and also we can block Specific domains.

Inorder to allow specific domains . Select Allow domains and add the domains that you want to have.

FA2


In-order to block the domains add the domains select block the domains and block them

FA3

Also you need to keep in mind that if you want to have federation only with specific domains then you need to make sure that Enable Partner Domain Discovery option is unchecked which disables open federation.

FA4


Note :

By default, if you enable federation, it won’t allow other domains to connect to you except the domain that you add in Hosting Provider and Public IM Provider, Allowed Partner Domain and Federated Domains.

So you need to plan accordingly based upon your requirement.

Hope this article is helpful.

Thanks 
Sathish Veerapandian

MVP – Exchange Server


Quick Tip – Analyzing logs in Lync server 2013

In this article we will have a look at the Centralized Logging Service (CLS)  and csclslogging feature in Lync 2013.

These both logging features will help us to identify any issues in the pool.

These 2 features are available only from Lync 2013

First lets have a look at the Centralized Logging Service (CLS)

This is located in the directory

C:\Program Files\Common Files\Microsoft Lync Server 2013\ClsAgent


CLS


Below are the commands that can help you out to identify an issue through clscontroller

ClsController.exe -start –scenario <scenario> –pools <pool fqdn>
ClsController.exe -stop –scenario <scenario> –pools <pool fqdn>
ClsController.exe -flush –pools <pool fqdn>
ClsController.exe -search –pools <pool fqdn> –components <component> –loglevel <loglevel>
Below are the supported scenarios
AlwaysOn, MediaConnectivity, ApplicationSharing, AudioVideoConferencingIssue, HybridVoice, IncomingAndOutgoingCall, VoiceMail, IMAndPresence, AddressBook, DeviceUpdate, LYSSAndUCS, CLS, SP, WAC, UserReplicator, HostedMigration, MonitoringAndArchiving, LILRLegacy, LILRLYSS, MeetingJoin, RGS, CPS, XMPP and CAA.

Note : This ClsController.exe is present only in the RTM release and later microsoft came up with this powershell based  control which is CsClsLogging

CsClsLogging :

The Search-CsClsLogging cmdlet provides a command line option for searching the log files generated by the centralized logging service. Lync administrators can analyze the issue with the cmdlet.

1

You can run run Search-CsClsLogging cmdlet with start time and end time

2


You can use show-cslogging to check the current status of the centralised logging service

323


The following inputs are supported

Search-CsClsLogging
Show-CsClsLogging
Start-CsClsLogging
Stop-CsClsLogging
Sync-CsClsLogging


There is a service responsible for this operation which is called Lync Server Centralized Logging Service Agent.

66


So make sure that this service is running else we will face issues in running these commands.

Thanks
Sathish Veerapandian