Author Archives: Sathish Veerapandian

Configure SSL certificate in Exchange server 2016

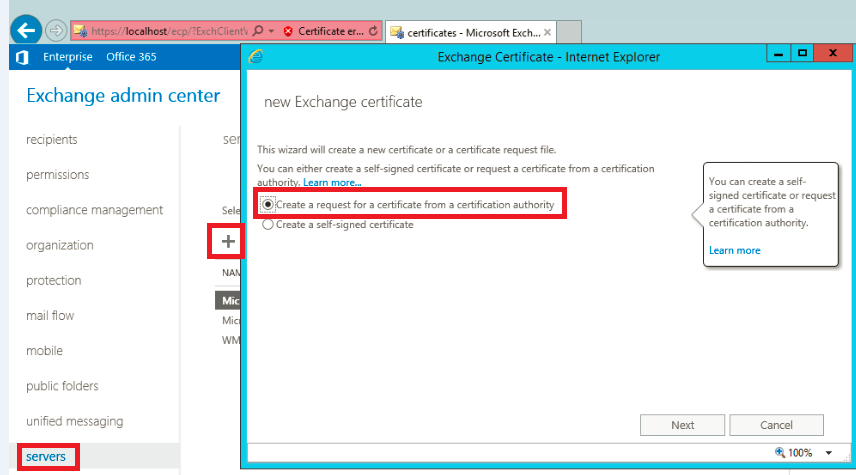
In this article we will have a look at the steps to configure SSL certificates in Exchange 2016 post installation.

If you have exchange 2016 in exchange 2013 coexistence you wouldn’t need to worry about this part. Because the already configured Exchange 2013 CAS server will have the capability to up proxy the requests to Exchange 2016 servers and you can stay relaxed for a while until the you decide to remove the exchange 2013 .

But if you have them in Exchange 2010 coexistence then you will need to move all of your external URL’s and place your SSL certificates into the Exchange 2016 servers.

Now we will have a look at how to place an  SSL certificate request in Exchange 2016 and complete them using a third party CA.

The configuration is the same as exchange 2013 and the only change  is the for internet facing CAS server will be now  internet facing mailbox server.

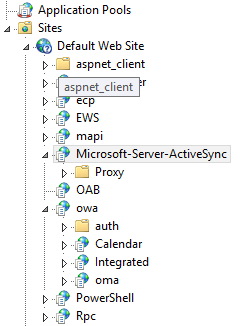
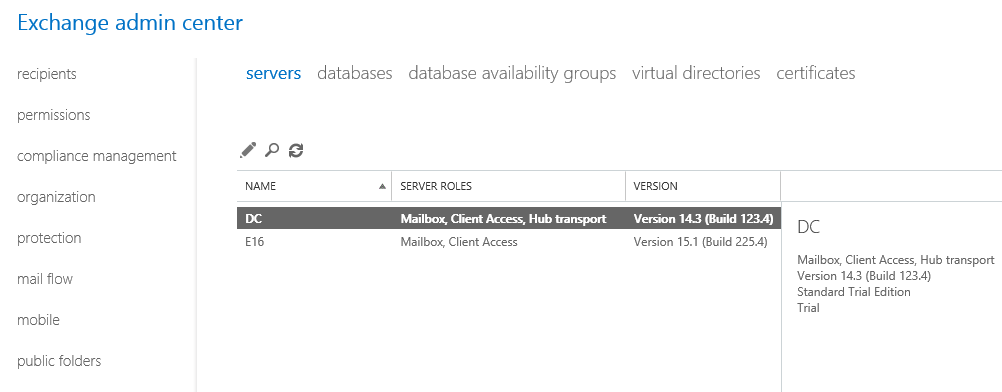
In-order to perform this action open EAC – click servers – and select certificates

C1

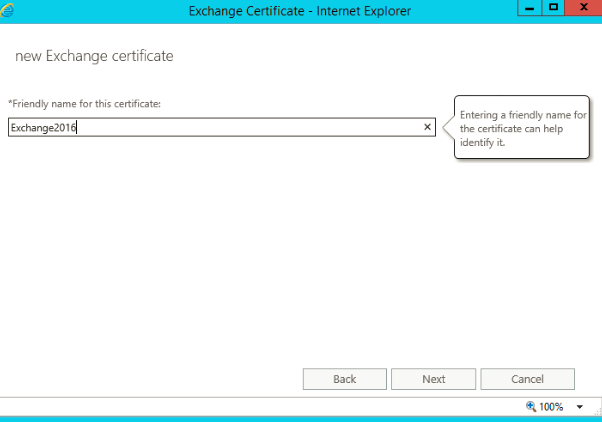
Give it a friendly name as below

Tets

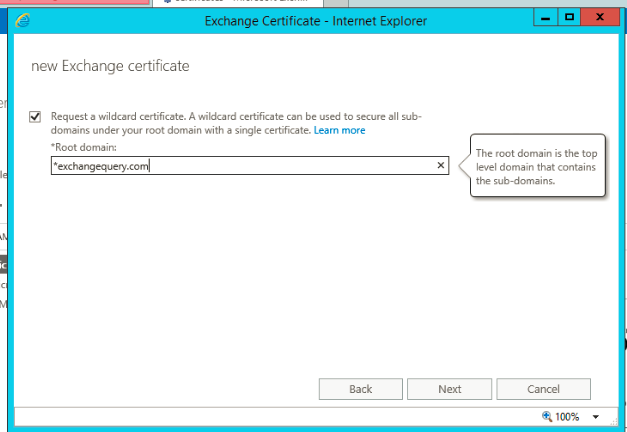
Enter the domain name

If you are going to use wild card you can select the wild card certificate option.

Using wild card will cover your root domain and additional it covers one subdomain .

In my case i’m using wild card since its a lab and i’m using a complimentary subscription provided by digicert through MVP program.so in my case it would cover mail.exchangequery.com, Autodiscover.exchangequery.com, owa.exchangequery.com etc.,

C3

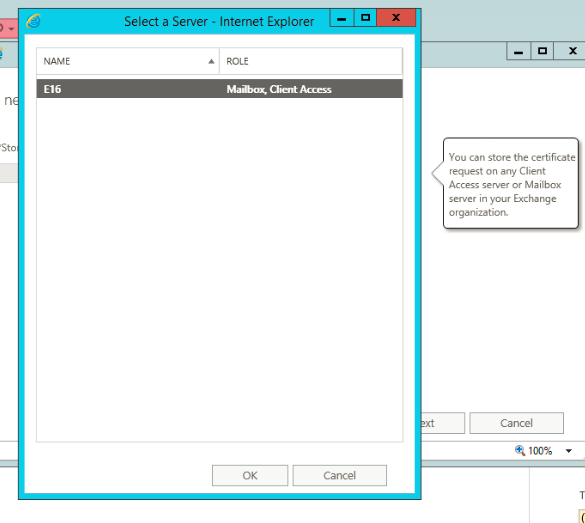
After this completes just click on next and choose one internet facing mailbox server in Exchange 2016

C4

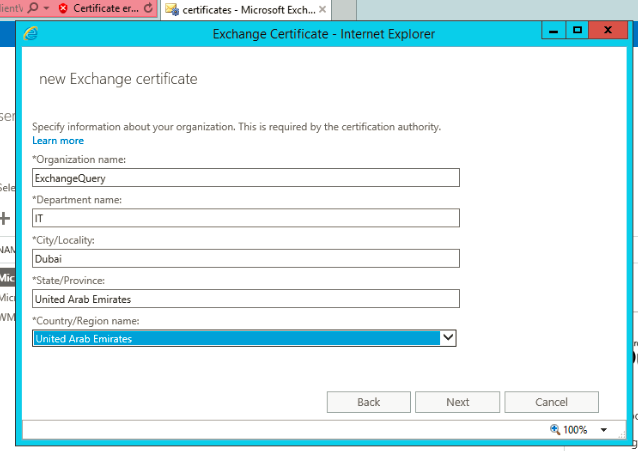
Fill the required information as below

C5

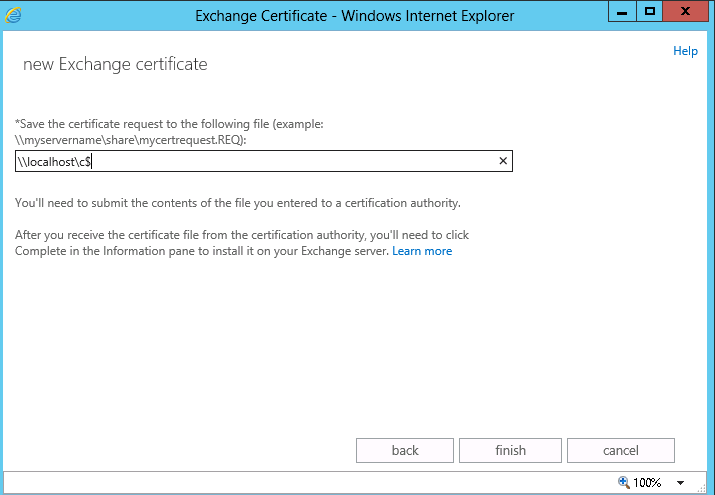
place a location to save the private key as below

33

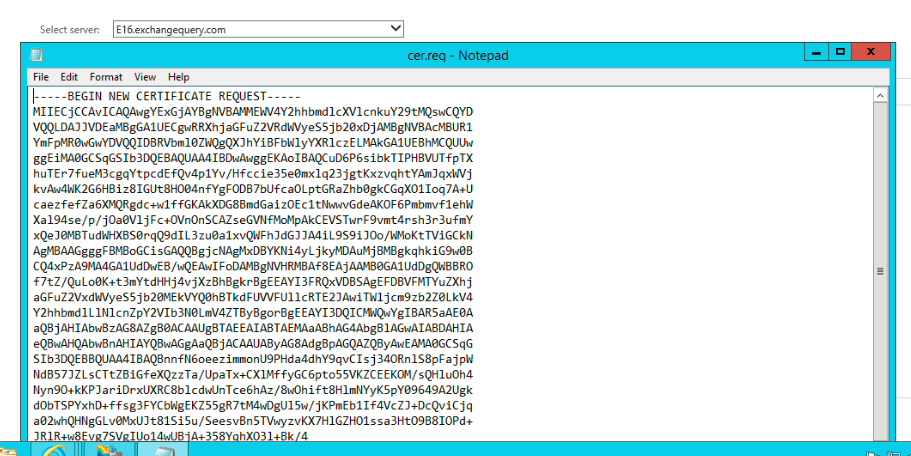
You can see the cert request generated as below in the location you mentioned

C6

After the above task is completed  you can see the certificate request in pending state in the certificates tab as below

Now we can submit this request to a third party CA and get a new SSL certificate for your domain.

There are so many good providers but i recommend digicert as i have seen their support to be very prompt and all together provide a competitive pricing

C7

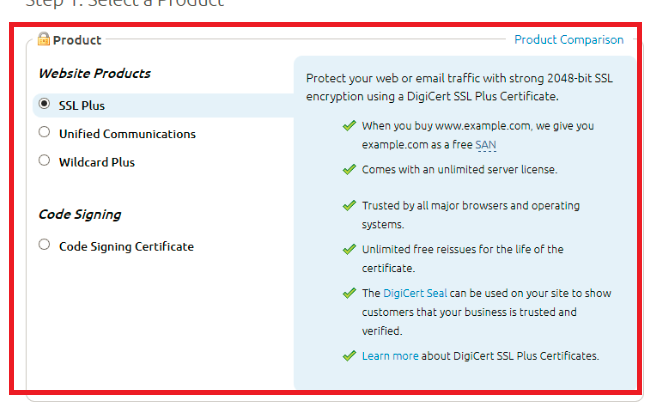
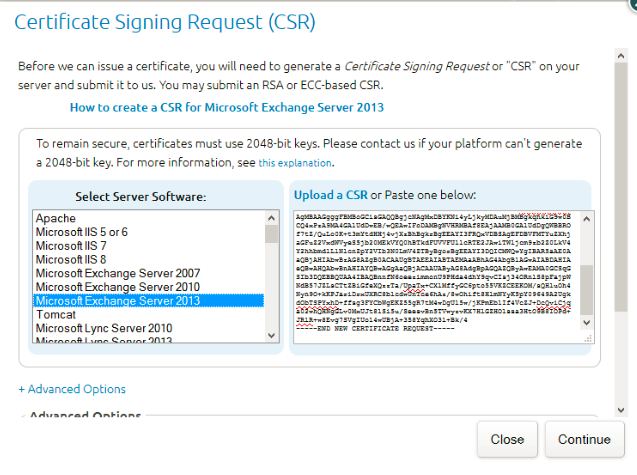
Now copy paste the CSR request we generated in Exchange 2016 as below .Now you can select the server software as exchange 2013 and with that it would be working until they add exchange 2016.

s3

Once you get the SSL certificate from the certificate provider now we need to complete this request by importing them into the Exchange 2016 internet facing  server.

You can see the certificate that we requested in pending state as below

Final

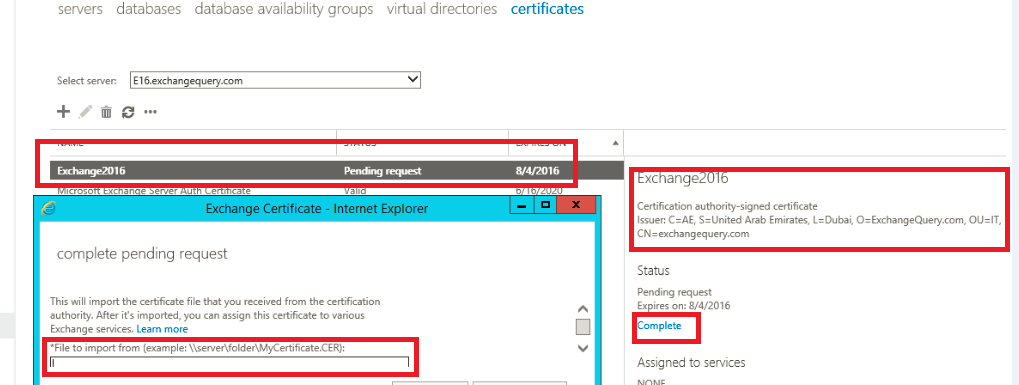
So click on complete and you will get a pop up window to import the SSL certificate.

Just import the certificate that you got from the certificate provider and then complete the request.

Now we have successfully completed the SSL certificate request in Exchange 2016

Thanks 

Sathish Veerapandian 

MVP – Exchange Server 

Configure Exchange 2016 with exchange 2010 coexistence

In this article we are going to look into few things that we need to consider for coexistence of Exchange server 2016 with Exchange 2010.

Below are the things that we need to think for Outlook Anywhere, OWA, Active Sync , EWS , ECP

For Outlook Anywhere Coexistence

In Exchange 2010 – 

Enable Outlook Any-where on exchange 2010 servers

Set the IIS authentication to BASIC + NTLM in Exchange 2010

In Exchange 2016 –

If you are doing SSL offload then perform the below

Direct the connections to the exchange 2016 from your firewall.

Note: If you are having exchange 2013 then don’t need to make any changes since exchange 2016 supports up-version of proxy with exchange 2013 . i.e exchange 2016 can accept the connections from exchange 2013 CAS server. Unfortunately we don’t have this functionality  with exchange 2010 coexistence.

Perform the below settings in exchange 2016

Open EAC – select outlook anywhere


432


Select Basic Authentication

876

If you don’t select basic then you will get  the below  warning message with NTLM . You don’t need to worry if you are doing this in exchange 2013 coexistence,but for exchange 2010 it should be only basic.

36


Uncheck require SSL in all of the virtual directories if  you are doing SSL offload for all of the services

369


789

Exchange 2016  Active Sync  virtual directories  can proxy to 2010 end point without any issues.


Its similar for OAB , OWA and other virutal directories.


All the above settings is for one site with exchange 2010 coexistence.

If its the same site it does proxy the 2010 users requests straight to 2010 CAS server.

If you have a different site then 2 scenarios comes into picture according to your setup

If its is a non internet facing site with the same URL’s then it does a proxy to CAS server for all the requests of that site.

If it is a internet facing external site with external url then it does a redirect to that URL.

I have the same setup in my lab setup with single AD site  and so far all setting seems to be working fine.

More to explore on the configuration , features and coexistence. Will keep you posted !!

Thanks

Sathish Veerapandian

MVP – Exchange Server

Install Exchange 2016 in Exchange 2010 Coexistence

In this article lets have a look at installing exchange 2016 in exchange 2010 coexistence.

Before proceeding with the installation i would like to give a small summary and features of exchange 2016 not a detailed one  since there are good articles on the new features of exchange 2016 written by senior MVP’s.

Below are new features of the product :- 

One Mailbox role with all the functionality

The mailbox server in exchange 2016 hosts all the components – Client Access protocols, Transport service, Mailbox databases, and Unified Messaging.

The main reason of this design is to simplify the architecture, reducing the hardware dependency by running on a healthy CPU power which is less expensive, and easier way to isolate any issues if we come across.

Edge transport role is coming with RTM

Considering the legacy RPC technology all Outlook connections will be MAPI over HTTP.

Note:
By default this is not enabled if you are installing on Exchange 2010/2013 coexistence and you can enabled them.
But if you have this already enabled in Exchange 2013 then it will be enabled.
If you are installing only exchange 2016 then its enabled mapi over http as a default

For further information on the architecture you can go through the below excellent  series from MVP Prabhat and tech-net

Exchange Server 2016: All You Need Part 1

Exchange Server 2016: All You Need to know Part 2

Exchange Server 2016: All You Need to know Part 3

http://blogs.technet.com/b/exchange/archive/2015/07/22/announcing-exchange-server-2016-preview.aspx

Now lets go through the installation part

Readiness to be prepared for Exchange 2016 in Exchange 2010 environment :-

. Exchange 2010 SP3 with RU9 should be updated  ,  for all Exchange 2010 servers.

· At least one Windows Server 2008 or higher Global Catalog in each AD site with Exchange installed

· At least one writable Domain Controller in each AD site with Exchange Servers installed (It can be a GC.)

· AD Forest must be Windows Server 2008 Forest Functional Level or higher

· Coexists with Exchange 2010 SP3 RU9 and Exchange 2013 CU7 *may be increased by RTM*

· Outlook for Windows – 2010 or later

· Outlook for Mac – 2011 or later

If you wish to enable mapi/http then you must have atleast outlook 2013 SP1 or later.


Operating System Prerequisites:

· Windows Server 2012 R2 64-bit Standard or Datacenter editions

· .NET framework 4.5.2.

· Windows Management Framework 4.0 .

· Unified Communications Managed API (UCMA) 4.0

 (DNS) namespaces:

Following types are supported

Contiguous

Noncontiguous

Single label domains

Disjoint
IPv6 support:

In Exchange 2016, IPv6 is supported only when IPv4 is also installed and enabled. In the n\w if IPV6 enabled then it will take IPv6 addresses.

Hardware Requirements :

Processor : x64 architecture-based computer with Intel processor that supports Intel 64 architecture
Memory :
For Mailbox – 8 GB Minimum recommended

Page File – minimum and maximum must be set to physical RAM plus 10 MB

Disk Space – Better to have 50 GB on the drive on which we install the exchange binaries.


Install the prerequisites on the  Exchange 2016 server : ( Applies for Windows server 2012R2)

.NET Framework 4.5.2

Click here to download http://www.microsoft.com/en-us/download/details.aspx?id=42642

Microsoft Unified Communications Managed API 4.0, Core Runtime 64-bit.

Click here to download http://go.microsoft.com/fwlink/p/?linkId=258269

install the below features

Install-WindowsFeature RSAT-ADDS

Install-WindowsFeature AS-HTTP-Activation, Desktop-Experience, NET-Framework-45-Features, RPC-over-HTTP-proxy, RSAT-Clustering, RSAT-Clustering-CmdInterface, RSAT-Clustering-Mgmt, RSAT-Clustering-PowerShell, Web-Mgmt-Console, WAS-Process-Model, Web-Asp-Net45, Web-Basic-Auth, Web-Client-Auth, Web-Digest-Auth, Web-Dir-Browsing, Web-Dyn-Compression, Web-Http-Errors, Web-Http-Logging, Web-Http-Redirect, Web-Http-Tracing, Web-ISAPI-Ext, Web-ISAPI-Filter, Web-Lgcy-Mgmt-Console, Web-Metabase, Web-Mgmt-Console, Web-Mgmt-Service, Web-Net-Ext45, Web-Request-Monitor, Web-Server, Web-Stat-Compression, Web-Static-Content, Web-Windows-Auth, Web-WMI, Windows-Identity-Foundation


Download the Setup - 

http://www.microsoft.com/en-us/download/details.aspx?id=48210 

Once the setup is downloaded just open the setup.exe file which will bring you to below screen


M1


M2


Installation is pretty much straight forward and it remains the same as exchange 2013

M3

The only change we see here is the role selection part without the CAS role 
Select mailbox role and proceed next

M4

We have the same option as we had in Exchange 2013

M5

It goes through the readiness checks and 15 setup progress one by one same as Exchange 2013 and the setup will finish with the below screen

3211


Once the setup completes you get the EAC console like below

Test11

You can check the coexistence 
Exchange 2010 and Exchange 2016 version 15.1

432

And we are done with installing Exchange 2016 in Exchange 2010 coexistence.
In future as we get more updates from Microsoft on Exchange 2016 we will explore more on this product.

Thanks
Sathish Veerapandian
MVP - Exchange Server


Custom address list for Unified Messaging and update speech grammar file in Exchange 2013

In this article lets have a look at few important things that we need to consider before enabling Unified Messaging feature for the end users.

When the Unified Messaging server feature is enabled it requires a grammar file to provide voice user interface (VUI) that uses Automatic Speech Recognition (ASR). It updates the  grammar for  the  UM enabled users through global address list based on the speech grammar filters , languages that are configured.

Its better to create a custom address list for the UM auto attendant and allow callers to send voice messages only to this custom address list.

There are few benefits of doing this.

1) You add only the users who require UM enabled on this custom address list.

2) You create the custom address list only with the mailbox users so that the contacts present in the address list will be excluded.

Now lets have a look at how to accomplish this task.

Run the below command to create a custom address list for the Unified Messaging.

New-Addresslist -Name UMVoice -IncludedRecipients MailboxUsers

AL1


IMP: For a grammar file to be generated for a distribution list, the distribution list must not be hidden.

Later scope the UMAutoAttendant only for this custom address list created as below.

Open EAC – Navigate to Unified Messaging –

UM2


Select the Transfer & Search option  and choose only the address list which was created for UM .You can add only the users for whom you have UM feature enabled.

UM3

You can run the below command as well to accomplish this task

Set-UMAutoAttendant -Identity MyUMAutoAttendant -ContactScope UMVoice

By this way you can exclude the contacts.

Exchange Unified messaging role gets the Speech inputs from users to perform directory look-ups. Then it looks the display name of  the UM enabled user in the GAL and then inserts into the speech grammar.

When the Display Names had periods then the speech inputs might not be recognized properly at times in Exchange 2010 UM servers.

You can run the below command to rectify this issue for exchange 2010:

Set-Csuser -Identity sathish@exchangequery.com -PhoneticDisplayName ‘Sathish Ravi’

After performing the above you need to ran Galgrammargenerator.exe/GGG.exe

For Exchange 2010 run this command – Galgrammargenerator.exe -d MyUMDialPlan

For Exchange 2013 as there is no commands to perform this action.

For Exchange 2013 the GAL speech grammar file is stored in the arbitration mailbox and then later downloaded to all Mailbox servers in that Exchange organization.

By default, the Mailbox Assistant runs every 24 hours. You can adjust the frequency by using the Set-MailboxServer -ManagedFolderWorkCycle assistant cmdlet and change the frequency.

But the better way to address this is to just restart the Microsoft Exchange Mailbox Assistants after you create a new dial plan and leave the generation cycle as such to 24 hours.So when we restart t all the GAL speech grammar files will be updated.

Thanks 
Sathish Veerapandian

MVP – Exchange Server


Configure Office Web apps server for exchange,Skype for Business and sharepoint

In this article we will have a look at how to enable the Office Web Apps server functionality on Exchange, Lync2013, Skype for Business and share point

Before going further you need to know the below

What is the benefits of Office Web Apps Server ?
Will i loose anything if i go ahead without having OWApps Server?
Here is your answer!!

Office Web Apps Server is a new Office server that delivers browser-based version of Word, PowerPoint, Excel and One-note .
Office Web Apps Server is not only for PPT sharing in Lync Server.

You should install an OWA 2013 server. If you want to share PowerPoint Presentations in conferences.
This OWA server not only serves Lync or SFB.

OWA 2013 Server can be used by Lync 2013,SFB, SharePoint 2013 and Exchange 2013.
By doing this users can use a rich user interface to preview and modify the attachment online through OWA, Sharepoint intranet/internet sites and during the lync conferences.
The reason to use it is that Microsoft has outsourced the rendering of PowerPoints etc. to the Office 2013 Web Apps Server.

So you can watch PowerPoints in conferences from each common desktop web browser if you don’t have a Lync 2013 Client and MS office installed on your OS.

Without a Office Web Apps server, you could not share any Powerpoint with a Lync 2013 client.

You could only use desktopsharing to show the PPT, Word, excel which will be tedious.

So lets see how to enable OWA functionality on exchange,lync and sharepoint

I’m not going to explain how to install WAC server since there are more number of articles in the internet on the same.
So in this article we will have a look at how to enable this functionality on Exchange,Lync and SharePoint after you install the Office Web Apps farm in your environment.
Also we will have a look at the ports,firewalls and certificate requirements for the same.

For Exchange: 

Run the below commands

Set-OrganizationConfig –WACDiscoveryEndPoint http://<wac server>/hosting/discovery

Capture

You can run the below command after that and confirm that WACDiscoveryEndPoint value is populated

Get-OrganizationConfig | Format-List WACDiscoveryEndPoint

Then you need to run the below commands for the owa vdir to render documents via Office web app
Set-Owavirtualdirectory -WacViewingOnPublicComputersEnabled $True -WacViewingOnPrivateComputersEnabled $true –identity <OWA virtual directory identity>

Then run the below command to check if its enabled

Get-OwaVirtualDirectory “<OWA virtual directory identity” | Format-List Name,WacViewing*

You can use the below command to force the owa vdir to render via Office web app.
Set-Owavirtualdirectory -ForceWacViewingFirstOnPublicComputers $true -ForceWacViewingFirstOnPrivateComputers $true –identity <OWA virtual directory identity>

For Sharepoint :

Run the below commands
New-SPWOPIBinding -ServerName “office1.contoso.com”

$config = (get-spsecuritytokenserviceconfig)
$config.allowoauthoverhttp = $true
$config.update()

Set-SPWOPIZone –zone “external-https”

For Lync 2013/Skype for Business :

Just use the FQDN published under “InternalURL” when configuring Office Web Apps Server through the Topology Builder

321

No need to use the external FQDN which you have mentioned in the OWA’s server. It will work with the internal FQDN of the OWA’s server.

Once you publish this on the lync/sfb then you are done with this part.

Certificate requirements and DNS config :

DNS Config:

For Office Web Apps server  to work externally  External URL needs to be published and the request needs to be forwarded to the Internal server. So we need to perform the below things in-order to achieve that functionality.

Office web apps has 2 URL s. one internal and other external. The external one should have a DNS A record in public DNS just like Lync external web services and should be published over a reverse proxy. You need to  have a dedicated public IP for this as it use 443 and can’t use the one of Lync external web services.
Make sure the web Clients (usually web browsers) need to be able to make requests to the farm. These are normal HTTP/HTTPS requests on port 80 or 443 respectively.
Machines in the Office Web Apps farm initiate requests to  that particular service on the file host (e.g., SharePoint,Exchange). These requests are also HTTP/HTTPS on port 80 or 443. This is
how the Office Web Apps machines operate on the files they are rendering or editing.
At times file hosts occasionally need to request information directly from the Office Web Apps Server farm through the load balancer. These requests are also HTTP/HTTPS requests on port 80 or 443.

So there is no special config required for you on the firewall apart from port 80 and 443 traffic to the office web apps farm.
All the machines which are in the Office Web Apps Server farm will  communicate with each other via port 809. The reason behind this is because these machines are treated on a private network so  that no
other machines can join the farm or listen in on traffic they receive. So make sure you have the port 809 reachable b/w the owa servers and the firewall turned off in the windows machine of these web apps server.

Certificate Requirements :
Since the OWA’s server has 2 URL s. one internal and other external.
Have an internal certificate for internal communications.
Get a public certificate from public provider for your external published url.
Basically you need to put the public certificate on your reverse proxy server and leave your private certificate on the office web app server.
By doing this the external requests will be decrypted in the reverse proxy with the public certificate .

There is no need to place the public certificate on the OWAS server since for internal FQDN’s its doesn’t require a public key.

Hope this helps

Thanks

Sathish Veerapandian

MVP – Exchange Server 

Setting up SPF record for on premise and hybrid domain setup

In this article lets have a look at setting up SPF record for Exchange on premise setup and Exchange hybrid setup

Why SPF ?

Nowadays email domains over the internet can be easily forged in many ways. The current standard protocols used for the email systems does not play an important role in restricting and controlling the reverse path of the emails , domains that are sent through SMTP transits.

Sender Policy Framework (SPF) is a simple email validation system designed to detect email spoofing by providing a mechanism to allow receiving mail exchange to check that incoming mail from a domain is being sent from a host authorized by that domain’s administrators.

By using this SPF record we are authorizing the hosts to our domain and letting everyone know that we will be sending only through these hosts. By doing this the receiver will check the hosts that are sent from our domain and if they find any non registered hosts they will drop the emails.

This will finally reduce the spamming and blacklisting of our domains.By doing this we can block other entities using our domain names, often with malicious intent to blacklist our domain. But the whole spamming can’t be blocked.

SPF records may define zero or more mechanisms. Mechanisms can be used to describe the set of hosts which are designated as authorized, outbound mailers for the domain. The following list are common mechanisms included in an SPF record:

all | ip4 | ip6 | a | mx | ptr | exists | include

I don’t want to provide detailed explanation on SPF  since there are more number of  articles related to the same in the web written by so many experts.

Lets see how to setup SPF record for an on-premise setup :

First choose any one of the below  mechanisms to create the SPF
all,ip4,ip6,a,mx,ptr,exists,include

Below is an mechanism with soft-fail

v=spf1 ip4:10.10.10.1/16 (CIDR) mx ptr:Sender1.domain.com include:domain.com ~all

Benefits of using all

If the sender domain has an SPF record and have list of IP’s added then it allows only those emails from these IP’s for the domains who has SPF configured and rejects the ips which are not added in this list.

If you don’t have SPF configured the target who receives the email  has SPF configured will check your domain .If you don’t have SPF record configured then it will mark them as soft fail and move these emails to junk folder.

Imp note during creating SPF with (all) mechanism :

Make sure that you add all the required Ip ranges, domain names in the SPF permitted set.

Make sure that you create a TXT record as well as an SPF record since some mail servers won’t support only the SPF record.

How do i handle SPF records during office365 hybrid migration :

If you are doing a full cutover migration from onpremise to office365 then you no need to worry about this setup. Because once you are migrated completely to office 365 Microsoft will automatically create SPF for your domain.
Reason not to add:
You need to add all your existing public IP’s of your email system and also office 365 SPF’s .
So its better you can wait till the migration completes.

If you already have SPF records for your on-premise setup and you are in the phase of office365 migration, then don’t delete existing record but just add Office 365 record to your Public DNS.
How do i find the office 365 SPF record ?

use the below one

v=spf1 include:Spf.protection.outlook.com ~all

Below is an example of adding the office 365 SPF along with onprem in your public DNS server

v=spf1 ip4:10.10.10.1/16  mx ptr:Sender.domain.com include:spf.protection.outlook.com ~all

If you still like to  have a custom DNS records to route traffic to services from other  providers after the office 365 migration, then create an SPF record for them and respective address in the custom DNS records in Office 365 portal

Test11
In addition to this its better to create a PTR record for the IP address that is sending the mail in Public DNS.

How to check the SPF record of your domain

Below is an example to check them through NSlookup for Microsoft domain

Capture22


SPF implementations will limit the number of mechanisms and modifiers to a value of 10 per SPF check, including any lookups caused by the use of the “include” mechanism or the “redirect” modifier. If this number is exceeded during a check, a PermError MUST be returned.
So consider having a value of 10 DNS lookups per SPF

Summary:

An SPF record won’t do anything to prevent a spam attack.  It helps prove that the mail your users send is coming from a trusted source and won’t be marked as spam.

Thanks

Sathish Veerapandian

Restrict end users from using third party active sync enabled applications

Now a days there are so many active sync enabled applications which end users can  download, install on their mobile devices and access emails .

If we have any MDM solutions in place to control the end users mobile devices then we don’t need to worry about this part.

In most of the MDM solutions the implementation will be segregation of the devices own device policy ,corporate device policy and applications that can be downloaded and accessed from the devices.

The challenge comes when we do not have an MDM solution in place and users accessing the emails from their mobile devices without any active sync policies configured.

In this article lets have a look at some troubleshooting guidelines that we can perform to block users trying to access the emails from their mobile device through any third party active sync enabled application.


How to find the Active Sync connections coming from different mobile applications ?

You can  filter and see the active-sync requests in the reverse-proxy/firewall.This is the best way and you can find them easily.
To find the users who are using any app to access emails via active-sync  perform the following :-

1) Filter the active sync requests in your firewall or reverse proxy accordingly and start the query.

2) Usually in most of the firewall and reverse proxy it will show you the source,destination and the request after the filter.

You need to concentrate on the request alone

Below is an example of normal active sync request

POST http://domain.com/Microsoft-Server-ActiveSync?User=userID&DeviceId=00ijhsad6564g2fd&DeviceType=iPhone&Cm

If the user device is connected through any application  Eg: cloudmagic you can see the word “cloud magic” in the request URL. By this way you can identify the users . It should be easy.

POST http://domain.com/Microsoft-Server-ActiveSync?User=userID&DeviceId=00ijhsad6564g2fd&DeviceType=iPhone&Cm=CloudMagic


Also you can use the exchange commands query string parameter and filter device access rule.This will help you to identify what type of devices are connecting .Use the below command to see the type of the connections through Active-sync

Get-ActivesyncDeviceAccessRule | Format-Table Name, Characteristic, QueryString, Accesslevel -AutoSize

Note: 

You will get any output of the above only if you have created any device access rule for the same.

In the Query String parameter you can see the type of the software that the active sync is used for connecting.

There is one more method to identify the type of devices that connect through active-sync from the IIS logs

Just an example below of how the log entry shows for the android device type.

POST http://domain.com/Microsoft-Server-ActiveSync?
default.eascmd=sync&deviceID=5a5d4d5fg8755gf5gh5g&DeviceType=Andriod


Now how do we block all these types of connections and allow only Native client ?

I have mentioned few points which will definitely help in address these kind of issues

1) Create a new device access rule and block the applications through which end users should not connect through

In my example i have created a new device access rule to stop the connections coming from cloudmagic application.

New-ActiveSyncDeviceAccessRule -AccessLevel Block -Characteristic DeviceType -QueryString “CloudMagic”

2) Add a query string value in the web.config file to stop the connection from specific applications

Edit the EWS web.config file on the mailbox server and add the below string to block the users accessing the emails through application in my case its cloud-magic

Below is the location – 
C:\Program Files\Microsoft\Exchange Server\V15\FrontEnd\HttpProxy\ews

<denyStrings>

     <add string=”CloudMagic” />

</denyStrings>


Better to add this value in the CAS front end proxy server as well

C:\Program Files\Microsoft\Exchange Server\V15\FrontEnd\HttpProxy\sync

do an iisreset after this

Note: Make sure that you take a backup of the web.config file before making this change.
Also additionally create a rule in the firewall,reverse proxy stating that any active-sync requests that come with the url “cloud magic” drop the connection and do not proceed.

After performing the above log into your  reverse proxy perform a filter and see if this query type with cloud magic is getting blocked(definitely it should be).

Hope this helps

Thanks

Sathish Veerapandian

MVP – Exchange Server

Creating SQL instances for messaging related services

We will come across  certain scenarios where we need to integrate our Exchange Servers with other products for additional functionality.

Few examples are installing an automated mail signature software on the Transport Server for customizing and applying the email signatures automatically to all users.

Installing an additional layer of Anti-spam product on the email servers.

Configuring a Meeting room solution for integrating our  room mailboxes,Equipment mailboxes with additional product and integrating with meeting schedule display monitors.

Bringing up an archive solution for all the primary mailboxes and the list goes on.

Most of the products which are coming on the above category will require a centralized database where it needs to store its information related to the  configuration,logs, reports,etc.

In most of the cases these products will be using SQL DB’s for storing these data and values.

So planning in these kind of scenarios is very very important.Since an improper configuration of SQL instance and installation of the related product can interrupt the Exchange functionality very easily.

When we come across these kind of scenarios its always better to interact with the associated product expert .Get recommendations from a SQL expert with regards to the SQL configuration for the product.

I have collected few things which will help an Messaging guy during these scenarios

1) First get in touch with a SQL person and explain him about the requirement of the SQL for the product.Basically what kind of job it writes and stores in the SQL.

2) Reach the associated product expert and get advise on configuring the SQL instance for the product.

If  your environment is or the product that you are going to install is not that complex and does not require SQL enterprise then you can go ahead and install the local SQL instance on the corresponding Exchange Server.

I have collected few points based on my experience which might help during configuring SQL instance if you are going to configure the instance :

Make sure during the installation you select the SQL authentication mode and create a service account for the same. Though the builtin sa account will have the permission but its better to create a dedicated service account for the admin.

SQ

Advantages of selecting SQL server authentication mode

SQL Authentication is the typical authentication used for various database systems, composed of a username and a password. Obviously, an instance of SQL Server can have multiple such user accounts (using SQL authentication) with different usernames and passwords. In shared servers where different users should have access to different databases, SQL authentication should be used for better security since the users only with Windows authentication cannot connect to the database.

Also make sure that you set the file db and the log file value to some greater figure as below example

SQ1


Make sure the auto-close option is set to false

Functionality of Auto Close :-

Having this option set to true will annoy us from unwanted SCOM alerts.
When we set this option to True the DB will go offline when it doesn’t receive any active connections and will resume back whenever it gets new connections. So when we have a SCOM agent monitoring this SQL we will get unwanted alerts from them.

Its better to set this parameter to false

Launch Management Studio –> Select the Database  –> Right Click Properties–> Options –> “Auto Close” value to “False”

Autoclsoe


After the installation is done check the total and target server memory to see if its eating up any additional memory by executing the below query

Select * from sys.dm_os_performance_counters

where counter_name in

(‘Target Server Memory (KB)’,

‘Total Server Memory (KB)’)

or (object_name=’SQLServer:Buffer Manager’ and counter_name in(‘Buffer cache hit ratio’,

‘Page life expectancy ‘))


Also you can check the physical memory ,available committed memory , memory utilization percentage by running the below query

select * from sys.dm_os_process_memory

SQLM

If we are not sure about these values its better after the configuration you can show your SQL installation to an SQL expert and check if all the settings are in right place.

Thanks 

Sathish Veerapandian

MVP – Exchange 

RBAC role to Manage end user contacts through (Exchange Control Panel)

There might be a requirement to delegate the management of contacts for all the staffs especially for the HR team.Since the staffs position title change, phone numbers, city, extension , address change will happen randomly for all the staffs.

Its better to delegate this task alone to the HR team member so that the help desk calls for changing these information will be reduced. Also there is no need to wait for a period of time to make these changes from the help desk team.

Basically we can create a custom RBAC role and assign this to a HR staff who would be able to manage this task through ECP .

Create a new management role :

New-ManagementRole -Parent “Mail Recipients” -Name “Contact Management”

RBAC1

Now we need to create a new role group

Create a new role group :

New-RoleGroup –Name “Contact Editor” –Roles “Contact Management”

RBAC2

Remove all of the unwanted cmdlets from our newly created  role, since we need to give the bare minimum permission of modifying only  the contacts.

Get-managementRoleEntry “Contact Management\*” | where { $_.Name –ne “Set-User”} | Remove-ManagementRoleEntry


Add only the required entries for the new role

Set-ManagementRoleEntry “Contact Management\Set-User” -Parameters “Phone,city,phone,fax,mobilephone,department,title,street address”

RBAC4


New-ManagementRoleAssignment -Role Contact Management -User TestITHRAdmin RBAC7


Run the below command to check and ensure that only set-user  editor rights are assigned Get-managementRoleEntry “Contact Management\*” RBAC6

When this RBAC role  person can login through ECP  and he would be able to manage only the AD contacts

Thanks 

Sathish Veerapandian

MVP – Exchange Server

Sending Mass Mailers ,Marketing Emails, News letters via Exchange ?

At times we might get requirement where we want to  send mails in bulk from our messaging system to internal/external users for business case.

Though sending bulk emails is not at all advised due to many factors but however when business demands we do not have any other option other than going further.

The business may demand where we need to configure our mailing system to send advertisements, newsletters to the partners, customers in a week , in a day or even in every 2 hours.

We  would need to configure this requirement  in a way that it should not be getting affected on the below parameters :

a) Without affecting our normal email operations and without affecting our messaging system performance.

b) Without getting blacklisted as a spammer.

c) The Mass email that we send should Land-Up in the end users inbox ,not in spam folder and shouldn’t be trapped in their filters.

Based on industry best practices i have collected few points which can be taken into consideration when we plan for this type of requirements:

1) Determine how the mass mails are going to be sent  from which application ( Whether its internal ip  or external ip). Then  the mass mailers recipients ( whether it goes only to internal recipients or to both internal and external recipients). If its for internal recipients only the job wouldn’t be more complex.

2) If its going to be from an external IP then better don’t allow to relay these bulk emails through your domain.

3) Its not advised to allow sending bulk emails from an unregistered external ip to external users  from your domain since your IP and domain will get blacklisted in a matter of day.

4) If still there is a requirement to send mass mailers from external IP’s make sure the below are met :-

a) Send the mail using a known and registered sender address(domain) of which the domain part is traceable using reverse lookup, and has a valid  SPF.

b) Make sure they send all the emails with the correct subject ,message bodies, unsubscribe and adhere to all the local and legal requirements.

c) Try convincing the marketing team or the team who sends bulk email  to use  a different domain and a different IP address as your connecting IP  will  get blacklisted easily and will affect your production emails.

5) There are few SMTP appliance that can be placed in the DMZ which can accept emails from the mass mailing apps and can do the job.

There are more number of cheap bulk emailing tools that will do this job easier, including dealing with bounces, unsubscribe requests etc. Its even better to outsource  this requirement to any one of them.

Since the major outsourced providers are doing this business for a while in the market they will have all the configurations and settings in place with the ISP’s which will increase the delivery success rate of these emails.


But still if you would like to go for the mass mailing for external IP’s domains to external users  through exchange make sure the below conditions are met :

1) Create a dedicated server (CAS+MBX) for doing this job. Configure relay on this server.

2) Create a new database , Create the sender mailbox alone on this new database.

3) Create additional number of transport servers for load balancing  since SubmissionServerOverrideList  switch cannot be used from Exchange 2013. If you add Exchange 2010 hub server for this then you can use SubmissionServerOverrideList for that DB to use only that HUB server which will not affect the other transport servers.

Also make sure the below values are set in the send connectors :

Maximum concurrent outbound connections: 1000 *

Maximum concurrent outbound connections per domain: 20*
Set-SendConnector -SmtpMaxMessagesPerConnection 200


Also make sure  that you alter and configure these values on the relay receive connectors according to the number of  bulk emails  :

ConnectionInactivityTimeout
ConnectionTimeout
MaxInboundConnection
MaxInboundConnectionPercentagePerSource
MaxInboundConnectionPerSource
MaxRecipientsPerMessage
MessageRateLimit

Finally make sure these bulk emails are sent only during off business hours in-order to avoid load on the transport services during production hours.

Hope this helps !!

Thanks

Sathish Veerapandian

MVP – Exchange Server