Category Archives: Exchange2013

Microsoft Exchange 2013 CU5 Released

Microsoft has finally released Exchange 2013 CU5

The main Enhancements in CU5 are

1) Introduction of New service – Microsoft Exchange shared Cache Service.

The Microsoft Exchange Shared Cache Service is a new service that is added to Exchange Server 2013 Cumulative Update 5 to meet future needs of the product.

It improves System Performance through Caching few system Information.Currently this service is not been used as of now. It the readiness for enabling this functionality it the future Cumulative updates.

Note : We might be experiencing some probe config in Managed Availability frequently restarting this service Microsoft Exchange Shared Cache Service after CU5 upgrade because this service is yet to be fully functional.

Inorder to fix this Microsoft has published a Windows PowerShell script that you can use to disable the probes to prevent the Exchange Shared Cache service from restarting.More information is available in KB2971467.

2) Improvements in Managing OAB for Multi site Environments which was already mentioned by Ross Smith IV on the Exchange Team blog.
3) New options in the Hybrid Configuration Wizard
It has an option My Office 365 Organization is hosted by 21viaNet.

For more information about HCW read Micheal’s Blog – http://vanhybrid.com/2014/05/27/new-hybrid-configuration-wizard-features-in-exchange-2013-cu5/
Read more information about Cu5 in Exchange Team Blog – http://blogs.technet.com/b/exchange/archive/2014/05/27/released-exchange-server-2013-cumulative-update-5.aspx
You can look more detailed information about CU5in Tony Redmond’s blog as well – http://windowsitpro.com/blog/exchange-2013-cu5-a-good-update

Cheers

🙂

Sathish Veerapandian


Exchange 2013 Domain Security

In this article we will be looking at how to configure Domain Security in Exchange 2013.

This Domain Security provides session based authentication by using Mutual TLS. This new feature was introduced from Exchange 2010.The Functionality in Exchange 2013 remains the same as we had in Exchange 2010 except we need to configure this on Exchange 2013 CAS server if we don’t have edge server configured .

The main points about Domain Security

1) Domain Security is server to server level configuration for securing SMTP traffics.

2) We do not need any user level encryption i.e., without configuring any options for encryption on Outlook on sender as well as recipient end.

3) We can enable this type of connection for trusted partners to secure SMTP traffic in an organization level.

Below are the steps to configure Domain Security

I’m just going to explain this with configuring Domain Security between two organizations exchangequery.com  and toybox.com  in my lab as an example .

The first and the foremost thing is that we would need valid certificate for Domain Security for these 2 domains exchangequery.com  and toybox.com  .

The main reason for certificate is

To establish a trust between two organizations for a secure transmission.

Each server would verify the connections with other server by means of a valid certificate .This will ensure that the encrypted connection is coming from valid domain which is already in the Domain Security List.

Configuring Certificate can be achieved in the following ways (we have multiple ways to achieve this is regular practice)

1) We can use public trusted certificates for both the domains.

2) We Can Cross-import Root CA certificates on both the domains as well.

3) Assign certificates for SMTP for both Exchange organizations from a single trusted RootCA.

4) Note: The Exchange self-signed certificate TLS is only for opportunistic TLS and not for Mutual TLS and so the Exchange self-signed certificate for TLS will not work for Mutual TLS.

5) We must have appropriate names in certificate. Precisely Certificate that you assign to SMTP service must have the exact same name that your SMTP connector has (created for Domain Security) is using.

Now we will look into how to configure the Connector Settings.

In our example we are going to configure Domain Security from Exchangequery.com for Toybox.com

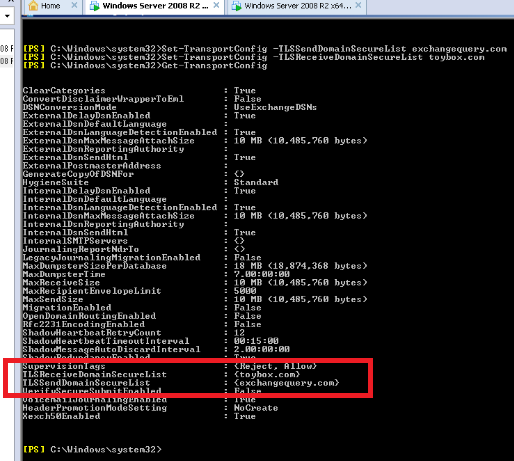
First we need to run Get-Transportconfig in Exchangequery.com domain to modify few setting globally for sending receiving emails from trusted partners.

Image


All we need to do is to look at below parameters

TLSReceiveDomainSecureList

TLSSendDomainSecureList

In our case we can see both the values are empty since we haven’t configured it yet.

Note: We can have multiple values i.e., multiple domains added in the TLSReceiveDomainSecureList and  TLSSendDomainSecureList since this commandlet accepts multivalued parameters.

In our case the following commands needs to be executed.

Set-TransportConfig -TLSSendDomainSecureList exchangequery.com –  for sending secure emails from Exchange query to toybox

Set-TransportConfig –TLSReceiveDomainSecureList toybox.com –  for receiving secure emails from toybox.com

Image


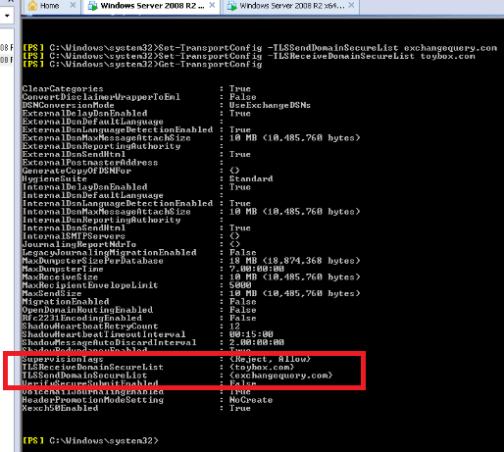
Now we need to run Get-TransportConfig once again and ensure that the domains are added.In our case we have toybox.com and exchangequery.com added respectively.

Image


After making the transport config changes globally now we need to configure CAS server to accept encrypted connections from the trusted partners.

Now we need to create a dedicated receive connectors for the same.

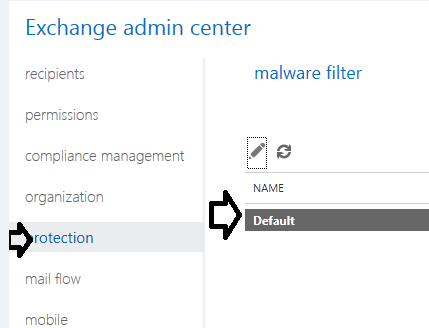
Open EAC – Click Receive Connectors – Select the appropriate CAS server.

Type desired name. Select the connector type as partner .

Image


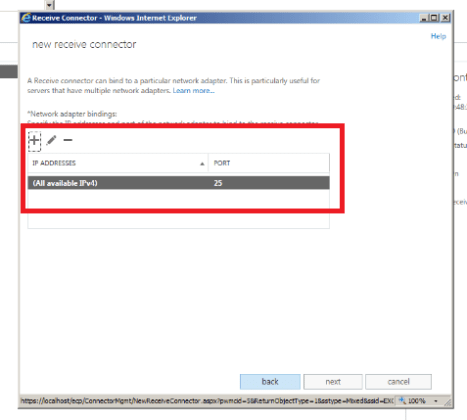
Click next and In the IP address tab just leave all available.

Image


In the remote network settings remove the default value and specify only the public IP of the partner from which we are going to receive the encrypted email.

This is very important because if we leave the remote network as such then all the external emails might hit this connector and all unencrypted emails will not be delivered to the users.

Image


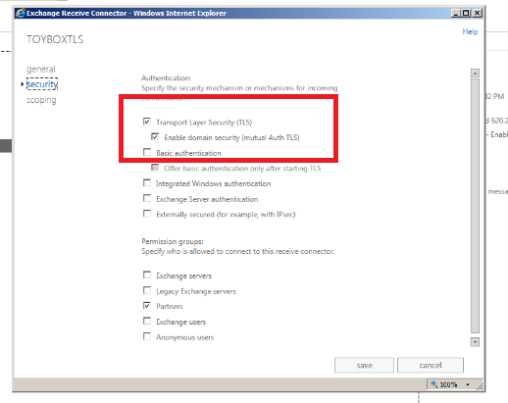
Ensure that TLS and enable domain security is enabled which is enabled by default.

Also ensure that partners is selected.


Image


Now we need to configure the send connector to send emails from exchangequery.com to toybox.com.A dedicated send connector for toybox.com from our end.

Click on new send connector and give desired name and select partner.

Image


Click on next and leave default option as MX record associated with recipient domain and don’t user smart host.

The reason why we are not using smart host is because if we are routing it to any spam filters these encrypted emails might be blocked thinking them to be suspicious.

Image


Click on next and then specify only the address space of the TLS domain. In our case we need to specify toybox.com as toybox.com is our trusted partner.

Select the source server in Exchange 2013 we have an option to select only CAS server since front end transport proxies all the requests.
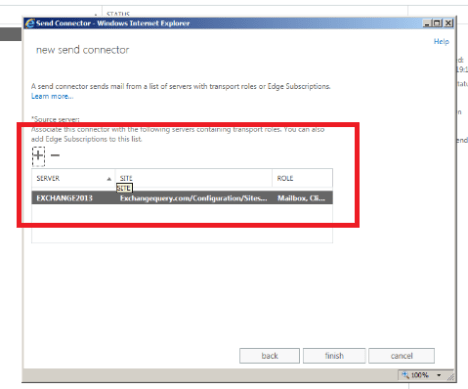
Image


Click on finish.

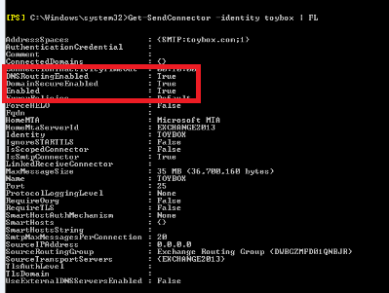
Now we need to ensure that DomainSecureEnabled is set to True.

Run the following command to check it

Get-SendConnector –identity toybox | FL

We could see is enabled.

If it’s not enabled you can enable it by running below command

Set-SendConnector –identityConnectorName –DomainSecureEnabled: $true

Image


That’s all and we are done setting up Domain Security between Exchangequery.com and Toybox.com.

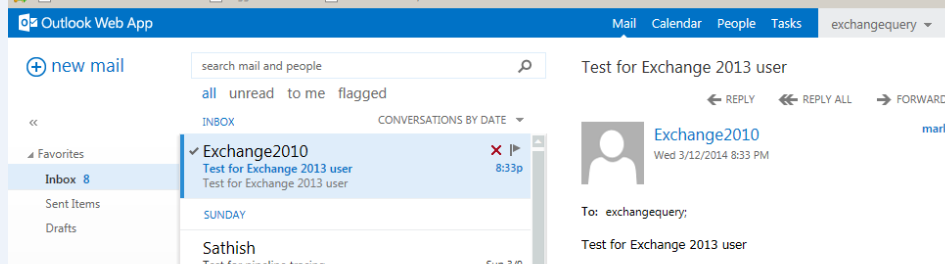
Now we are ready to send and receive secure emails between Exchangequery.com and toybox.com.

Cheers 🙂

Sathish Veerapandian

Exchange Evangelist.

Changes in OAB from Exchange 2013 CU5

We are eagerly waiting for the release date of Exchange 2013 CU5 which could fix transport agents not loaded  after Sp1 upgrade as mentioned in KB2938053, Shared mailboxes sent items  are not saved in the Sent Items folder of the shared mailbox and it gets stored in drafts folder of primary mailbox.

I just happened to read the latest Tech-net blog posted by Ross Smith which mentioned about Changes in OAB from Exchange 2013 CU5.

The main highlights are

1) Single OAB Generation Mailbox per site. Which stops multiple OAB download instances from multiple OAB generation mailboxes located in same site?

2) Having one OAB instance per site which stops multiple downloads of OAB files.

3)We can Specify  OAB generating Mailbox.

Read more from Source Tech-net Blog:

http://blogs.technet.com/b/exchange/archive/2014/05/13/oab-improvements-in-exchange-2013-cumulative-update-5.aspx

Hope this information will be helpful in planning for CU5 upgrade .

Cheers !!!

Things to consider before configuring Autodiscover in Exchange 2010/2013 coexistence scenarios

Based on my experience I have collected few guidelines before configuring autodiscover in Exchange 2010/2013 coexistence.

First and the foremost step that i would recommend is

Follow the steps from Exchange server deployment guide which is pretty simple and straightforward.

http://technet.microsoft.com/en-us/exdeploy2013/Checklist?state=2284-W-DQBEAgAAQAAICQEAAQAAAA~~

We need to consider below things before we proceed with the full fledged operation of autodiscover in Exchange 2010/2013 coexistence.

First we need to decide on using which internal and external url’s in Exchange 2013.

The following Steps needs to be configured in this order:
Configure Exchange 2013 external URLs.
Configure Exchange 2013 internal URLs.
Enable and configure Outlook Anywhere in Legacy i.e, (Exchange 2010 & 2013).
Configure service connection point,Change SCP of Exchange 2010 CAS VIP to Exchange 2013 CAS VIP.
Configure DNS records.
DNS entries should be pointed to Exchange 2013 CAS from Exchange 2010 CAS.

Note: To allow your Exchange 2013 Client Access server to redirect connections to your Exchange 2010 

servers, you must enable and configure Outlook anywhere on all of the Exchange 2010 servers.
You can probably run Get-Outlookanywhere on both Exchange 2010 and 2013 and see all the
internal and external url’s assigned and configured accordingly.

Note: We need to have legacy url for legacy users if they want to access outlook anywhere externally.

For Outlook Anywhere
Change authentication on Exchange 2010 CAS server client auth method to NTLM

Run the following commands on Exchange 2013 server to set outlook anywhere settings

Set-outlookanywhere -InternalHostname “hostname” -identity
“serverRpc (Default Web Site)”-InternalClientAuthenticationMethod ntlm -internalclientsrequiressl $True
Set-outlookanywhere –externalHostname “hostname “ –identity
“serverRpc (Default Web Site)” -ExternalClientAuthenticationMethod ntlm -externalclientsrequiressl $true
Set-outlookanywhere -iisauthenticationmethods basic,ntlm,negotiate -identity “Rpc (Default Web Site)”

Imp Note : Exchange 2013 supports Negotiate for Outlook Anywhere HTTP authentication,
this option should only be used when all the servers in the environment are running Exchange 2013.

To configure certificate based authentication we need to ensure following things

1. Please check if Certificate Mapping Authentication is installed on the server
2. Go to IIS manager and check if Active Directory Client Certificate Authentication is enabled.
3. Check if required Client certificate is enabled on ActiveSync VD. If not, enable it.
4. Check if basic authentication is disabled on ActiveSync VD. If not, disable it.
5. Check if the ClientCertificateMappingAuth is set true.

Apply a new certificate with all the required site names included in Exchange 2013 CAS.

For OWA –
Enable FBA authentication + windows Integrated authentication on OWA VD on exchange 2010 CAS server.
Users with mailboxes still on 2010 will be connecting to CAS 2013 and then proxy to CAS 2010.

Feel free to post your comments if any other things that needs to be taken into consideration .
Cheers

SysTools – Exchange EDB Recovery Software

I just found  this amazing  exchange  database recovery software developed by SysTools and  I would like to share the functionality of this tool.

SysTools is a company  delivers innovative software applications to enhance the lives of millions of IT Admins and computer users around the globe.

About Exchange recovery software (SysTools)

By using this software the email contents of single user ,multiple users can be extracted from a corrupted  exchange database (edb,stm) file.

The emails can be extracted  in the form of PST’s (even split pst’s), message format, eml format and also emails from damaged edb files can be directly imported into an active Exchange mailbox.

Even though if we maintain a proper exchange  backup in a healthy environment there is a lean possibility in scenarios where the Exchange admin would be  totally running out of options if the backup is not healthy,and the edb files are no longer recoverable.This software can be used in those kind of scenarios.

Also this tool can also be used in   recovering the emails from a (older  edb file/older backup ) in scenarios where their  exchange environment is  no longer existing or they have transitioned to new version of exchange.

Below is the installation and functionality of this tool

This tool can be run on environments which has Exchange 2003,2007,2010 & 2013.

Prerequisites

We just need to have .net 2.0 installed on the member server where we are going to install this tool. However even though if we do not install .net 2.0 manually  this tool automatically detects ,downloads and installs during the installation.

IMP:  We need to have Outlook 2007/2010 installed on the PC  where we are installing this tool.

And of course we need to have the  edb files from which we need to extract the PST

Below is the installation procedure

1) Download the setup from the below link.

http://www.systoolsgroup.com/exchange-recovery.html

2) Open the setup and click install

Image

3) Installation is pretty simple and just navigate through the setup  one by one.

Image

4) There is an option to create desktop icon and quick launch as well.

Image

Image

Image

Once the installation is completed launch systools Exchange Recovery software.You might get  the below error if there is any of the following prerequisites missing.As I mentioned earlier  we need to have an Outlook profile configured on the PC where we are installing this tool.

Image

Also we need to have outlook component which needs to be registered. When you click on details you have an option to register the outlook component and you will get the below message once done.

Image

Now let’s explore the functionality of this tool.

Launch Systools.

Image

It opens a window and asks for the associated edb file which needs to be opened.

Image

Open the EDB file from associated location.

Image

Once the file is selected  we get the below screen if the scan of edb is successful.

Image

Now we get below option after we click on ok.

It displays all the mailboxes with sub-folders,calendars,contacts which are present in the edb file.

Image

Also we have an option to view all the emails on the right hand  preview side.

Image

You can click on the export option and it displays the below limitation for demo version.

Image

Click on ok and then it  displays the below screen with the following options.

Image

Option 1 :  Exports the emails into PST. There is an option for split pst’s as well.

Option 2 :  Exports emails in the MSG format. We can export  individual emails as well.

Option 3 : Exports emails in the EML format.

Option 4 : Directly exports email to an active Exchange mailbox.

Note : The user account running systools should be having full access to the mailbox where we are going to export the emails if we are choosing option 4.

Choose the required method of export and once the export is completed we get the below screen.

Image

As a final result we also get a report generated.

Image

When we open the report we get the list of mailboxes exported nothing much information.

Image

Though this report gives info about the list of mailboxes exported it could be better if there is few more additional information like number of mailbox items imported successfully and number of failed items as well.

This tool is available in 2 versions as demo as well as full version. The demo version is restricted to 25 items per folder in a mailbox. The full version does  not have any restrictions in exporting the emails as well as in the size of edb files.

Overall this tool will be  really useful  for scenarios where we do not have an option to  recover an edb file due to required log files missing, in-case of backup failure  and finally in recovering emails from a database for a environment which is no longer existing.

Changes in msexchangemailboxreplication.exe.config file from Exchange 2013 SP1

I just happened to check maximum active moves per server before starting the migration batch for one of our client who is running Exchange 2013 SP1 and was excited to see the values increased from the earlier versions.

The XML file is located in the same bin directory as it was in Exchange 2013 CU3

<Exchange Installation Path>\Program Files\Microsoft\Exchange Server\V14\Bin\


1111

The interesting part is that we don’t need to increase the values of these anymore. Because they have increased the numbers to more than sufficient value while comparing from Exchange 2013 CU3 . Also I don’t think there should be any problem  if we modify this XML file.

Values till Exchange 2013 CU3.

Image

Values in Exchange 2013 SP1.

MaxActiveMovesPerTargetServer=”100″

MaxActiveMovesPerSourceServer=”100″

MaxActiveMovesPerTargetMDB=”20″

MaxActiveMovesPerSourceMDB=”20″

MaxMoveHistoryLength=”5″ RetryDelay=”00:00:30

This is really a great stuff which has been modified from Exchange 2013 SP1 which reduces the time of modifying the config file during Batch Migrations.

Steps to Disable Managed Availability in Exchange 2013 for few Health Checks

Managed availability is one of the best feature which is been introduced and it’s an excellent feature from Exchange 2013.By using this feature it’s very easy for monitoring the Exchange servers without adding any monitoring software pack like SCOM and few more.

In addition to this it also has the capability to resolve the issues by its own if it finds something wrong on any of the Exchange Functionality. Also it drops an email to the Health mailbox and specified mailbox (administrators) if in case the solution is unidentified by Managed Availability.


In a real time scenario it’s very useful in monitoring the Exchange servers in all aspects and definitely reduces the impact of the exchange servers from any disaster by its own. There can be few scenarios where there can be additional monitoring software’s installed on the servers  and in those cases we can disable the Managed Availability if at all we do not need the report to be generated twice for the same alert.


Also in case for few servers in  environment which is running on low memory this feature can  be disabled since it queries, polls hundreds of health metrics as it could consume extra memory.

It collects few logs and data by default which is present in the below location which occupies some disk space  depending upon each environment which should be considered for low hard disk space servers as well.

Below is the location.

<Exchange Install Drive>program files\Microsoft\Exchange Server\V15\Logging\Diagnostics\DailyPerformanceLogs

Image


I just explored in this part and I found there is an option to disable this monitoring totally as well as for few parameters too for which we think we don’t need the monitoring to happen.

The reason why we need to consider disabling this for few parameters can be because it can generate alerts for some known errors that we are trying to rectify in the environment and it can generate the alerts and create associated logs in the event viewer as well.We can just disable only those parameters until we find solution for them.

The core service involved in this functionality is the Microsoft Exchange health Manager. You can disable this service if at all there is any SCOM pack installed on the server and you are satisfied with those reports.

 Note: By Disabling this service will stop the whole monitoring functionality of the Managed Availability.

Image

You can also disable the scheduled tasks Exchangediagonosticsdailyperformancelog   & Exchangediagonosticsperformancelog  which is running under the Task scheduler.

Open location \Microsoft\Windows\PLA in Task Scheduler  and disable both of them

Note: By Disabling this scheduled tasks will stop the whole monitoring functionality of the Managed Availability

Image

If you need Managed Availability to be working with few exceptional like not to monitor for few parameters we can also do that by setting those values to false so that monitoring will not happen for them.

Below is an example for disabling the probe monitors for Autodiscover probe

Navigate to the below location and select client access proxytest.xml file and open them with the notepad.

Image

We just need to set the value for Autodiscoverprobeenabled value to false from true

Image

Save the ClientAccessProxyTest.xml and close it.
Restart Microsoft Exchange Health Manager and you will not receive probe alerts for the value that you have set to false.


Note:

It’s not  recommended to disable the Managed Availability until and unless there is any specific reason to be done because we will be losing this excellent monitoring feature available in Exchange 2013 at no additional cost.

Exchange Server Mailbox Statistics Report Tool

Managing the Exchange Servers in  storage capacity is little bit difficult for administrators when the server gets older and older and  when new users keeps adding in the list.

Even if there is any  daily monitoring report for mail flow, databases, disk space monitoring and everything still it’s difficult for administrators to monitor the end users having lot of old emails still in their inbox,sent items,subfolders which occupies lot of space.


It could be better if there is any kind of statistics report that can pull out the number mailbox items, oldest messages for all user so that we can ask the users to move old items to their PST archives.

There are lot of scripts which are available in the internet which  can be run on the mailbox server,DB’s to pull out these information.

I just found this excellent Tool developed  by author  Srinath Sadda and its available in the TechNet gallery for download.

http://gallery.technet.microsoft.com/office/Exchange-Server-Mailbox-7dd53529


The interesting part about this tool is that it doesn’t need power shell or EMS.Its a GUI based tool which can be run manually whenever required.

Note: This  tool can be run for a single mailbox, particular database as well as for  all mailboxes in a server.

 I just tested in my lab and its working fine and below are the results.

Downloaded the tool from the TechNet gallery (source file link above ) and installed.


Image

Once the installation is completed open the tool and you will get the below screen.

Image

Now we need to specify the DC,Exchange server and DB’s .If we select retrieve it fetches  the above information automatically. Select the oldest and newest items accordingly and click on perform mailbox search.

Image

Finally once the report is completed you can click on the report viewer.

Below is the final report status.

Image

We have option to send this report through  email as well.

Image

Apart from this we have multiple options like searching for mailbox globally that are hidden from GAL, Number of Disabled mailboxes ,Mailbox Type few more options.

Image

This tool is very useful in terms of monitoring the Mailbox statistics for individual users as well as all users.

Comparing the differences between Antispam agents from Exchange 2010 to Exchange 2013

Microsoft has built in Anti spam feature which can be enabled from Exchange 2003 versions. We can enable this feature as a part of additional security along with additional spam configurations and settings that have been configured before it reaches our network.

But we need to always ensure that we are aware of all the settings configured in the spam filtering in our organization in all the levels as it can interrupt the end users in sending and receiving emails if this configuration is not correct.

In this article we will be looking at how about Anti spam features in Exchange 2013 and its features

Now we will look at how to enable the Anti spam feature in Exchange 2013

By default the Anti spam agents are installed in Exchange 2013 if enable Anti spam option  during the time of installation. Else we need to install them after the installation.


In Exchange 2010 the Anti-spam will be enabled on the HUB & Edge servers.

In Exchange 2013 we need to enable Anti-spam agents in the Mailbox servers since the transport categorization takes place on mailbox server.

 From Exchange 2013 SP1 we have edge servers in which we can enable the Anti-spam agents as well.

The installation of the Exchange Anti-spam agents is the same step as we do it for Exchange 2010.

We just need to navigate to the exchange installation path directory and navigate to below location and install the Exchange Anti-spam.


Image


Image


Once the Anti-spam is installed  we need to restart the Microsoft Exchange Transport Service for the changes to take effect.

After we restart the transport service we can run Get-Transport agent and see if Exchange Anti-spam agents are installed.

We can further have a look at this by pipe-lining the output 

Image


Now comparing the differences between anti-spam agents in Exchange 2010 and 2013.

This is the output of the Exchange Anti-spam installed on Exchange 2010.

Image


This is the output of the Exchange Anti-spam installed on Exchange 2013.

Image


When we compare the Exchange Anti-spam agents between Exchange 2010 and 2013 we can see in Exchange 2013 there is a new transport agent  component called Malware agent which is been introduced. This is a built in Antimalware protection for on premise which can be enabled for additional security.

Also we can notice that the connection filtering agent is not present in Exchange 2013 mailbox servers and they are present in the Edge transport servers since the connection can be decided and filtered at the perimeter level itself.

Once after we enable this Anti-spam agents there will be a default Anti-spam created as we can modify them through EAC as well as shown below.

Image


In addition to the default malware policy we can always create custom policies as per our requirement and assign to our organization. There are more parameters which can be altered. Below is an example.


Image


This Exchange Anti-spam feature is a global level feature which cannot be altered server level and group level.

It’s always better to download antimalware engine and definition updates from Microsoft Download Engine and Definition Updates to keep the Anti-Spam Features up to date.

Steps to enable intraorgprotocollogginglevel in Exchange 2013

Intraorgconnectors are the connectors used for the communication for the internal Hub servers from Legacy servers as well as from the same version of hub servers for communications between different Sites,shadow redundancy and safety net.

We can enable this protocol logs at the time of troubleshooting in scenarios where there is mail flow issues happening between Exchange 2010 and Exchange 2013 and mailflow between sites .

In Exchange 2013 since the hub role is removed and split into 3 transport services it can be enabled only on the transport service running on mailbox server.

Now we will see how to enable this option

Run below command to see if the intraorgprotocollogginglevel is enabled or disabled

Get-Transportservice  “mbx2013servername” |fl*intra*.

Correction1

Run the below command to enable verbose logging in intraorg connector

Set-Transportservice  CAS2013servername  –intraorgprotocollogginglevel verbose

Below path is the location where we can see the logs recorded.

<installationdrive\Program Files\Microsoft\Exchange Server\V15\TransportRoles\Logs\Mailbox\Connectivity

Correction2

Now let’s send an email from Exchange 2010 server and see the output of the results

Test email sent from Exchange 2010 user to Exchange 2013 user 


Image

As soon as the email is sent from Exchange 2010 to 2013 you can see a separate queue created with Hub version 15 as shown below.

Image


This is again a good place for us to note in case of scenarios where mailflow not happening between Exchange 2007/2010 and 2013 and mailflow issues between hub transport servers and sites. It can give us few more information in the last error state.

Below is the email received by Exchange 2013 user . 

Image


Now when you open the logs and below is the result of a successful transaction

Image


This will be helpful in troubleshooting mailflow between Exchange 2007/2010 and 2013  servers.