Category Archives: Exchange2013

Pipeline Tracing in Exchange 2013

Pipeline tracing is one of the best feature which is available from Exchange 2007.

Like in Earlier versions of Exchange prior Exchange 2007 we used Microsoft Tool archive sink which we need to download and install them manually on the Exchange 2003/2000 servers. Also the main disadvantage of using this tool is unlike Exchange 2007/2010 & 2013 we do not have an option to enable it only for a particular affected user. Rather than it enables for the whole Exchange users and finally it fills up the drive space.

In this article we will be looking in working with Pipeline Tracing in Exchange 2013

In Exchange 2007/2010 we used to enable pipeline tracing on Exchange Hub Transport Servers and the Message snapshots are stored in the Hub Servers.

Now in Exchange 2013 where do we enable them? Is it Mailbox or CAS servers?

Answer is we enable them in Mailbox servers. The reason being why is because Microsoft Exchange Transport Service which is running in Mailbox server  is the core component of Categorization and it takes care of the Message categorization where it processes the message in different phases and this is the right place for us to take the Message Snap Shots.

Now we will look into how to enable Pipeline Tracing in Exchange 2013

Pipeline Tracing can be enabled only Via Shell and there is no GUI option available right from Exchange 2007 and it’s continued same in Exchange 2013

1)      Open Exchange Management Shell in Exchange 2013

Type in the below command to enable Pipeline Tracing First,

Set-TransportService Exchange2013 -PipelineTracingEnabled $true

Image


Once we enable the pipeline tracing you will be getting the below warning message. You can safely ignore this alert and proceed with the next step.

Now we need to enable pipeline tracing for the affected user (sender) with below command.

Set-TransportService Exchange2013 -PipelineTracingSenderAddress Sathish@exchangequery.com

Image

Now we need to enable the pipeline tracing path i.e., the location where to store these message snap shots by running the below command. This step is optional since for the Transport service on a Mailbox server, the default location is %ExchangeInstallPath%TransportRoles\Logs\Hub\PipelineTracing. For the Mailbox Transport service on a Mailbox server, the default location is %ExchangeInstallPath%TransportRoles\Logs\Mailbox\PipelineTracing. If you specify a custom path, the path must be on the local Exchange server.

Run the below command to enable pipeline tracing in a custom path

Set-TransportService Mailbox01 -PipelineTracingPath "D:\Hub\Pipeline Tracing"

Image

After we enable them you get a warning message as above. You can safely ignore them.

Now we have enabled the pipeline tracing.  It’s better to restart the Microsoft Exchange Transport service after you perform above steps.

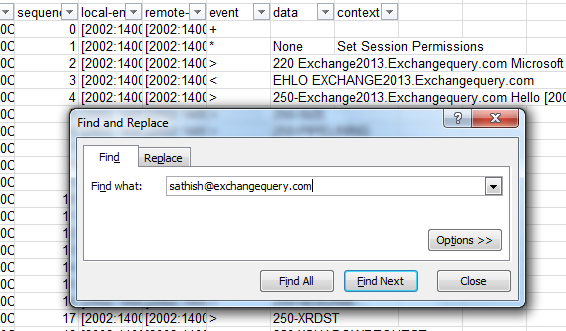
Now we need to ask the affected user to send an email for the Message snapshots to be recorded.

In our case since Sathish is the affected sender (just an example) I’m sending email from Sathish account for recording Message snapshots.

Image

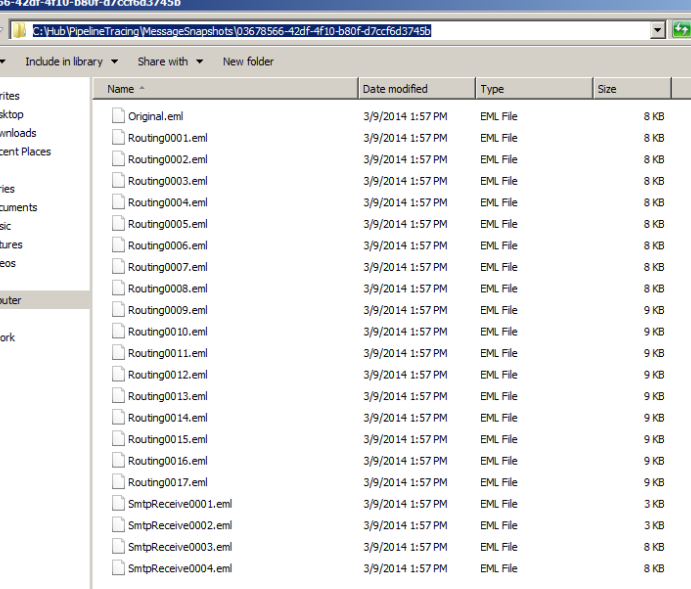
Once after the email is sent you will see the below folder created with the name Message snapshots and in turn there will be a folder created with some alpha numeric.

Image

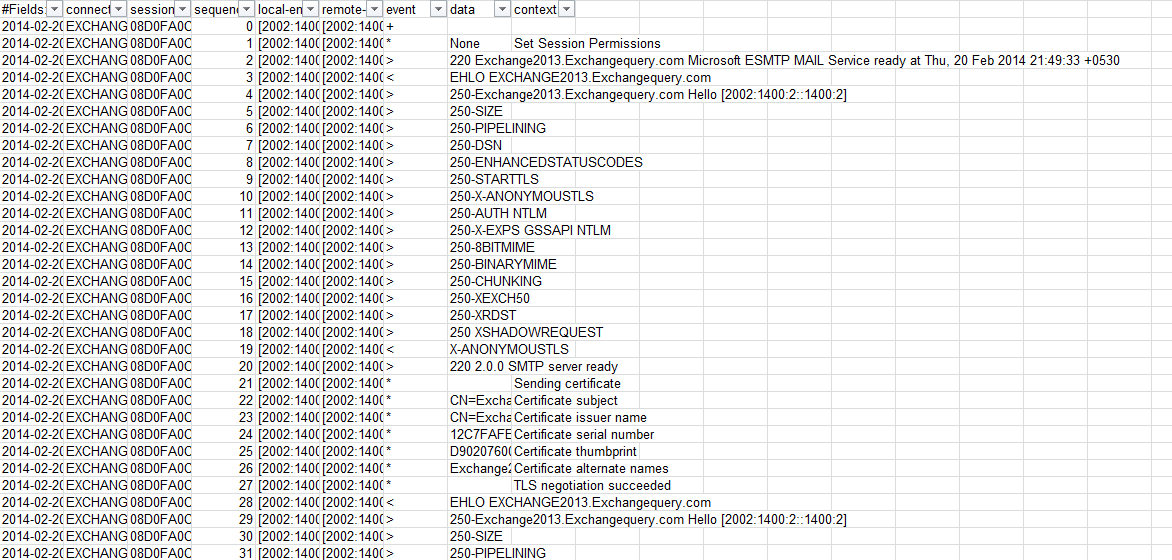
When you open this alpha numeric folder you can see the Message transactions as below. Also it has the original eml file for comparing with the message transactions.

Image

Now we can copy these eml files in your local machine where you have Outlook installed. We need to open each eml files with outlook and can see in which categorization part the message gets stripped out.

Steps to create Accepted Domain in Exchange 2013

In this article we will be looking at how to create accepted domain in Exchange 2013

Open Exchange admin center .Click on mail flow and click on accepted domains.

Image

Just click add and it takes you to the next window

Image

Just type the domain name which you wish to make it auth, internal relay  or external relay.

Also you have an option to make this domain as a default domain which make this to default domain .

Make the required settings and click save.


Delivery Reports in Exchange 2013

In this article we will be looking into how to perform Message tracking in Exchange 2013.

Unlike the previous version the message tracking has been replaced with the name Delivery reports. But both have the same functionality.

Open Exchange admin center – navigate to – mail flow and click on Delivery reports.

Image

Now click on browse and enter the mailbox which we need to search.

Image

We have an option to search messages received from as well. Also we can search messages with the subject line same options like we had in Exchange 2010

But this time the search results shows in a better GUI

Image

It displays only the subject and no contents same like previous versions and message tracking results will be unsuccessful for the users sending emails through POP and IMAP clients.


Troubleshooting OAB in Exchange 2013

In this article we will be looking into issues arising in OAB after users have been migrated from exchange 2007/2010 to Exchange 2013.
Unlike the previous versions of Exchange the OAB generation process in Exchange 2013 has been completely changed. So the troubleshooting OAB part in Exchange 2013 is little bit different while compared to older versions.

If you are running older version of Exchange 2007/2010 first run the below command to change the default OAB to Exchange 2013
1. Run the command in Exchange 2013 EMS to change the default OAB on Exchange 2013 databases:

Get-MailboxDatabase | Set-MailboxDatabase -OfflineAddressBook “\Default Offline Address Book (Ex2013)”

EX1

We can accomplish this task via EAC as well as shown below but this has to be done for each and every db’s one by one.
Click Servers – databases – client settings and select the default OAB to be selected for the databases.

EX2

Also check if the OAB virtual directories are set properly in Exchange 2013. You can check by running the below command

Set-OabVirtualDirectory -Identity “exchange2013\OAB (Default Web Site)” -InternalUrl https://mail.exchangequery.com/oab -ExternalUrl https://mail.exchangequery.com/oab

In our case since I have not set the virtual directories   on Exchange 2013 I’m running the below command to set the virtual directories first in exchange 2013 and I’m showing the output

After running the above command we can see the virtual directories showing up in external and internal url

EX3

Now let’s look into troubleshooting the OAB issues in Exchange 2013

First run Get-offlineaddressbook |fl and see if the default offline address book assigned has virtual directories linked with them and is set to true as shown below.

If there are no virtual directories specified the OAB will not work.

EX4

Now we need to look if there is anything wrong in the arbitration mailbox which holds the OAB by running the below command and see if there is associated  arbitration mailbox for OAB

Get-Mailbox –Arbitration | where-Object {$_.PersistedCapabilities –Like “*OabGen*”} | FL Name,Persisted*

EX5

There should be a associated arbitration mailbox for OAB. If there is not then create a new arbitration mailbox and assign it to OAB by running the below command

Set-Mailbox -Arbitration “arbitrationmbxname” -OABGen $true

If everything seems to be fine then please run the below command to see where the arbitration mailbox resides

EX6

Now run the below command to check if the arbitration mailbox database is healthy

EX7

If the database if healthy and mounted then run the below command to check the OAB generation cycle work point

EX8

What is OAB generation cycle check point?

The default setting of the OAB update is generated once in every day and that’s why we have it as 1 specified. So we need to have this setting. If there are no values specified and if it is then null OAB will not be functioning.

We can run the below commands to change the above parameters value and if there is no value set on them.

Set-MailboxServer <SERVERNAME> -OABGeneratorWorkcycle 00.05:00:00

Set-MailboxServer <SERVERNAME> -OABGeneratorWorkCycleCheckpoint 01:00:00

Also we can force the OAB download to happen by running the below command like we do it for Exchange 2007 & 2010 and see if users are able to download OAB.

Update-OfflineAddressBook -Identity “Default Offline Address List (Ex2013)”

Also we can run below command to see if the certificate is issued to name mail.exchangequery.com in our example

Get-OutlookProvider | FL Identity,CertPrincipalName
Run the below command if there is no cert principal name issued 
Set-OutlookProvider EXPR -CertPrincipalName:"msstd:<FQDN the certificate is issued to>"
This can be a guide for troubleshooting OAB since there could be few more factors considering OAB download not happening. Cheers :)

Thanks 
Sathish Veerapandian
MVP - Exchange Server

Analyzing the protocol logs and Message tracking logs in Exchange 2013

During the time of troubleshooting in mail delay and issues when users reporting emails being not received its little bit tougher part to isolate and identify the problem.

Message tracking and protocol logs analysis is one of the best way to identify whether the problem exists in exchange end or else to prove that exchange has successfully done its mail transaction on its end.

In this article we will be looking at how to enable protocol logging and Message tracking in Exchange 2013 and analyzing the protocol and message tracking logs as well in a little bit different way through Excel.Earlier in Exchange 2007 & 2010 we used to turn on Message tracking in Hub transport servers.

Since in Exchange 2013 the hub transport servers have been removed the Message tracking logs are stored in the mailbox servers.

Steps to turn on Message tracking in Exchange 2013

Use EAC to configure Message tracking

1. In the EAC, navigate to Servers > Servers.

2. Select the Mailbox server you want to configure, and then click Edit .

3. On the server properties page, click Transport Logs.

4. In the Message tracking log section, select the following:

◦Enable message tracking

5. Click Save.

Steps to turn on Protocol Logs in Exchange 2013

Open EAC

Click on mail flow

Image

Double click on receive connector tab and select the protocol logging level to verbose

Image

Now we are going to send few test emails so that the logs get generated which would be ideal for us to analyze the logs

So we are sending test email with subject “Test Email for Message Tracking”

For analyzing the verbose logs it’s always better we can use the log parser tool.

If still we need to analyze the data without log parser for single transaction it’s possible with sender and recipient to check if the mail transaction has been successful.

Below is an example

For analyzing the logs in message tracking you can follow the below steps

Copy the message tracking logs from the below location from the mailbox server

Image

Note: There will be 4 types of message tracking logs in Exchange 2013 unlike in Exchange 2010 we have only 2.

•MSGTRK   These logs are associated with the Transport service.

•MSGTRKMA   These logs are associated with the approvals and rejections used by moderated transport. For more information, see Moderated Transport.

•MSGTRKMD   These logs are associated with messages delivered to mailboxes by the Mailbox Transport Delivery service.

•MSGTRKMS   These logs are associated with messages sent from mailboxes by the Mailbox Transport Submission service

MSGTRKMS  is sufficient for us to calculate the message tracking in most of the situations.

We can use other logs in deep dive analysis of cases where we suspect the  mails being not delivered to mailbox server and in few cases where we are unable to find any transaction in MSGTRKMS logs to see if the mail is been delivered to the mailbox server from the CAS server.

But MSGTRKMS will give us the information 99 percent of the time.After copying the MSGTRKMS logs in the excel just filter the category column as shown below.

Image

Now we have number of options to filter message transactions. In below example we are going to filter a particular transaction with Message subject and below is the output for successful transaction.

Just select the Message subject column drop down and uncheck select all as shown below.

Image

Just select Test Email for Message Tracking as shown below

Image

Below output is the successful transaction of the message transaction after the filter is applied for our example scenario.

Image

The below screenshot is the important parameter which should be checked and for a successful transaction i.e column (source and event-id) as shown below

Image

For a failure transaction we will not be having the receive status as shown above

We have multiple options like date time, Client ip, server ip , recipients through which we will be able to isolate a particular transaction very easily . Getting used to this will take some time but once after if you start analyzing the message tracking through this then you will feel comfortable with this type of message tracking Cook for situations like where you need to filter out multiple parameters.

Now we will look into how to analyze the receive connector protocol logs with help of Excel as we did for Message tracking.

 First Copy the Logs from the below location

Image

Note:

It is very clear we  will be getting confused to see where to find the receive connector protocol logs since the transport level architecture have been bifurcated in exchange 2013 and we have multiple folders like front end, hub , protocol log unlike Exchange 2010 we have only this location

“D:\Program Files\Microsoft\Exchange Server\V14\TransportRoles\Logs\ProtocolLog\SmtpReceive”

We just need to navigate to the below location alone in Exchange 2013 and copy the receive connector logs which will be identical to analyze the protocol logs via excel.

“C:\program files\Microsoft\Exchange Server\V15\TransportRoles\Logs\Hub\ProtocolLog\SmtpReceive”

 Open them in Excel

Unlike in Message tracking we do not have many items for us to filter here as shown below. But we can always filter them via sender or recipient address who reported to be a problem with mail flow.

Image

Now we are going to identify a successful transaction for user id Sathish@exchangequery.com through receive connector protocol logs .For that we just need to open the receive connector logs in Excel and search for the above email id in the excel sheet.

Image

Below is the successful transaction for the above search result

Image

In the above screen it clearly mentions the mail from and the rcpt to . The final transaction result we can see is Transferred 3 resolved and 0 unresolved and 250 chunk received OK . This should be the output for a successful transaction.

 Note:  All we need to look is only at the data and context part  in receive and send connector protocol logs which gives us info about the successful \failure transaction.

You can also use log parser to analyze the protocol logs. The above steps is  just an additional part of troubleshooting steps through deep dive into message tracking and protocol logs to narrow down  mail flow issues to identify the root cause.


Steps to move arbitration mailbox in Exchange 2013

In this article we will be looking at how to move arbitration mailbox from exchange 2010 to Exchange 2013

The arbitration mailbox is used to store the original message that’s awaiting approval. By default, one arbitration mailbox is created for moderated transport during setup. It’s used for all moderated recipients. You can add additional arbitration mailboxes for load balancing purposes. If you’re using multiple arbitration mailboxes, you need to specify which mailbox to use for each moderated recipient

The main reason being why we are moving the arbitration mailbox is because after post migration it will not allow us to decommission the legacy exchange 2010/2007 server unless we move these system mailboxes to Exchange 2013.

 Run the below command to check the arbitration mailbox name.

Image

Now use EAC to move these system mailboxes to Exchange 2013.

Open EAC – Click on recipients and click on Migration Tab.

Image

Now click on add  and select the option move to a different database

Image


Now click on add and select the system mailboxes of legacy servers to be migrated to Exchange 2013

Image

Image


Now we need to select the target database and click ok.Click on next and finally we are done with moving the arbitration mailbox to Exchange 2013.

Image

Click on next and proceed with the instruction and the arbitration mailbox will be moved successfully.

Steps to install Exchange 2013 in Exchange 2010 environment

In this article we will be looking at the steps to install Exchange 2013 in Exchange 2010 environment.

Following Prerequisite checks needs to be confirmed before installation
1) Ensure that you do not have any exchange 2003 servers running in the environment. If so you have to decommission them.
2) Ensure if there is any Exchange 2007 in the environment make sure they have the atleast Exchange 2007 SP3 RU10
3)IF you have Exchange 2010 running in the environment just ensure that they have atlease Exchange 2010 SP3
4) Auto discover DNS records Configure the Auto discover public DNS records for your existing SMTP domains to point to an on-premises Exchange 2013 Client Access server
5) Certificates Install and assign Exchange services to a valid digital certificate else users might face problem in accessing emails via active sync
6) Ensure the administrator who is going to perform the installation has member of the Schema Admins group and the Enterprise Admins group
7) AD Forest Level- Active Directory must be atleast Windows Server 2003 forest functionality mode or higher.
8) You can use IPV6 in Exchange 2013.If you plan to use IPV6 ensure that you have both IPV4 and IPV6 enabled.
9) DC and GC Versions – Below only versions of DC’s and GC’s should be present
Windows Server 2003 Enterprise Edition with SP2 or later (32-bit or 64-bit)
Windows Server 2003 Standard Edition with Service Pack 2 (SP2) or later (32-bit or 64-bit)
Windows server 2008 RTM or Later (applicable for both standard and enterprise)
Windows server 2012 RTM or Later (applicable for both standard and enterprise)
10) Outlook 2003 is not supported in Exchange 2013 environment. Ensure that all the clients have atleast Outlook 2007 SP3 installed.

Install the below feature for CAS & MBX role combination
Open windows power shell and run the below command
Run Import-module servermanager
Install-WindowsFeature AS-HTTP-Activation, Desktop-Experience, NET-Framework-45-Features, RPC-over-HTTP-proxy, RSAT-Clustering, RSAT-Clustering-CmdInterface, RSAT-Clustering-Mgmt, RSAT-Clustering-PowerShell, Web-Mgmt-Console, WAS-Process-Model, Web-Asp-Net45, Web-Basic-Auth, Web-Client-Auth, Web-Digest-Auth, Web-Dir-Browsing, Web-Dyn-Compression, Web-Http-Errors, Web-Http-Logging, Web-Http-Redirect, Web-Http-Tracing, Web-ISAPI-Ext, Web-ISAPI-Filter, Web-Lgcy-Mgmt-Console, Web-Metabase, Web-Mgmt-Console, Web-Mgmt-Service, Web-Net-Ext45, Web-Request-Monitor, Web-Server, Web-Stat-Compression, Web-Static-Content, Web-Windows-Auth, Web-WMI, Windows-Identity-Foundation

Install the Following softwares

Microsoft .NET Framework 4.5
Windows Management Framework 3.0
Microsoft Unified Communications Managed API 4.0, Core Runtime 64-bit
Microsoft Office 2010 Filter Pack 64 bit
Microsoft Office 2010 Filter Pack SP1 64 bit
Microsoft Knowledge Base article KB974405 (Windows Identity Foundation)
Knowledge Base article KB2619234
Knowledge Base article KB2533623

You need to install the remote tools administration pack.Run the below command in powershell
Add-WindowsFeature RSAT-ADDS

Uninstall Microsoft Visual C++ 11 Beta Redistributable (x64)

After installing the following prerequisite on the server that we are going to install exchange 2013 we need to join that server into the domain.

In our case we are installing Exchange 2013 in Windows 2008R2

paint1

Open elevated command prompt and navigate to the setup where we have the exchange server setup and run the below command

paint2

It goes through the prerequisite analysis as shown below

paint3

Next it goes through the active directory schema and completes the schema extension completely as shown below

Paint4

Once schema is completed open the setup and it shows the below screen

Paint5

Setup starts copying files as shown below

paint6

Once the copy is complete it starts initializing the setup as shown below

Paint7

Then it brings into the introduction screen as shown below.Click next and accept the license agreement

Introduction

Then it takes to the recommended settings as shown below

Paint10

Click on next and it takes to the server role selection

Paint11

Click on next and choose the installation location

paint13

Click on next and it takes to the malware protection settings. Choose the required setup and click on next

paint14

Setup goes through 1 to 15 steps and usually takes less than a hour

paint15'

Once the setup completes it shows the below screen as shown below

paint16

After a reboot is completed we are done with the exchange 2013 server setup.
Open Exchange Management Shell and ensure that Exchange 2013 is installed in the domain by running the below command

Paint17

Then try opening EAC by typing https:\\www.exchange2013casfqdn\eac
Note:
Admin account should have permission to open EAC and it should be a member of domain admin,enterprise admin and schema admin else we will not be able to open EAC

Inorder to acheive this task we can either move admin account mailbox from exchange 2010 to exchange 2013 or we can create an admin account in 2013 and grant appropriate permissions
In our case we will move the admin account from ex2010 to ex2013
Run the below command to move admin mailbox from exchange 2010 to 2013

Before that you can run get-mailbox database to identify the mailbox DB name in Exchange 2013 and then run the below command with the exchange 2013 database as the target database

paint18

Once the move request is completed you can try logging into EAC in Exchange 2013 and you will be able to login without any issues.

Steps to configure POP3 in Exchange 2013


In this article we will be looking into how to configure POP3 in Exchange 2013.

The configuration steps are similar to Exchange 2010 unlike here we have 2 pop services running up Microsoft Exchange POP3 service – Running on CAS server role

Microsoft Exchange POP3 backend service – Running on Mailbox server role

Similarly we do have Microsoft Exchange IMAP service – Running on CAS server role

Microsoft Exchange IMAP backend service – Running on Mailbox server role

Below are the steps to configure POP3

 Open EAC – Click on Servers and choose the appropriate Client access server


Image

Select POP3 in the options below

Image

Now we have options to configure the POP3 settings

Here we got to choose the logon method which should be decided according to our requirement

Also we have the message sort order which will let us to download the copy of emails from server according to the type chosen

Image

Now we need to enable the binding if we have chosen the SSL connection.

Image


We have the session idle time out settings, Connection limits which can be configured.

Also we do have the maximum connection from a single user which will help us to keep any unauthorized access from any device

Moving mailboxes in Exchange 2013

In Exchange 2013 the mailbox move have been improved. It has lot of additional features added in like it gives us the results of the status of move, synched, moved and failed.

The below article will help us in performing mailbox move in Exchange 2013 through EAC.

Open EAC select recipients and click on the migration tab

Image

Click on the + sign and select the option move mailbox to a different database. This option can  be selected while we move any mailbox from Exchange 2007,2010 to Exchange 2013.

The second option move to this forest can be performed while performing a cross forest migration.

Image

Now we can select the mailboxes that we need to migrate.

Image

Also we have an option in which we can upload the CSV file which contains the users list.

Image

Here we can specify the Migration batch name. We have 3 options where it gives us options to move the primary mailbox and the archive or only the primary according to the requirement.

This is one of the best features which make the admins to migrate both the mailbox and the archive mailbox all at one go.

We need to specify the target database of the mailbox and the archive if specified.

Image

We have an option where the mail can be triggered to admins once the batch is completed.Also we have 2 options like automatically starting the batch and manually starting them as well.

Image

This will be the final output of the result which shows the batch status. Here it gives lot of info which will be very useful while performing the migration.

Image


Configure Malware in Exchange 2013

Microsoft Exchange 2013 has the basic antimalware settings which can be enabled during the installation

By default we have a default malware policy which can be modified according to our needs.But it cannot be deleted.

We can create our our malware policy according to the company needs.

Below are the steps to configure malware in Exchange 2013

Open EAC – Click on protection and you will get the malware filter tab

Click Edit to edit the default malware policy

Image

Click on settings and you can give any desired description on our own for this policy

Image


We have malware detection options as shown below and can use any of them .

Also we have options to send messages to the internal/External senders about the NDR

Image

Also we can notify administrator about the spam messages. We can specify customized notification text message as well.

Image


Image