Quick Tip – Analyzing logs in Lync server 2013

In this article we will have a look at the Centralized Logging Service (CLS)  and csclslogging feature in Lync 2013.

These both logging features will help us to identify any issues in the pool.

These 2 features are available only from Lync 2013

First lets have a look at the Centralized Logging Service (CLS)

This is located in the directory

C:\Program Files\Common Files\Microsoft Lync Server 2013\ClsAgent


CLS


Below are the commands that can help you out to identify an issue through clscontroller

ClsController.exe -start –scenario <scenario> –pools <pool fqdn>
ClsController.exe -stop –scenario <scenario> –pools <pool fqdn>
ClsController.exe -flush –pools <pool fqdn>
ClsController.exe -search –pools <pool fqdn> –components <component> –loglevel <loglevel>
Below are the supported scenarios
AlwaysOn, MediaConnectivity, ApplicationSharing, AudioVideoConferencingIssue, HybridVoice, IncomingAndOutgoingCall, VoiceMail, IMAndPresence, AddressBook, DeviceUpdate, LYSSAndUCS, CLS, SP, WAC, UserReplicator, HostedMigration, MonitoringAndArchiving, LILRLegacy, LILRLYSS, MeetingJoin, RGS, CPS, XMPP and CAA.

Note : This ClsController.exe is present only in the RTM release and later microsoft came up with this powershell based  control which is CsClsLogging

CsClsLogging :

The Search-CsClsLogging cmdlet provides a command line option for searching the log files generated by the centralized logging service. Lync administrators can analyze the issue with the cmdlet.

1

You can run run Search-CsClsLogging cmdlet with start time and end time

2


You can use show-cslogging to check the current status of the centralised logging service

323


The following inputs are supported

Search-CsClsLogging
Show-CsClsLogging
Start-CsClsLogging
Stop-CsClsLogging
Sync-CsClsLogging


There is a service responsible for this operation which is called Lync Server Centralized Logging Service Agent.

66


So make sure that this service is running else we will face issues in running these commands.

Thanks
Sathish Veerapandian

Exchange 2013 Unable to access ECP Encounter “500 Unexpected Error”

Today i faced an issue in accessing ecp  through an admin delegated account and got the below error. I thought of writing up a blog with few general checklists that can be performed if we come across this kind of issues.

ECP

Below are the troubleshooting  steps that can be performed in this order if we come across  issues with accessing the ECP virtual directory.

1) Check if there is any issue with the XAML file type

Find the file located in

C:\Program Files\Microsoft\Exchange Server\V15\ClientAccess\ecp\DDI\RemoteDomains.XAML

XAML

If you have any staging servers with the same version where it is working just copy this XML file or if you could find this file from the setup just replace with the existing one do an iis reset and see the results

2) Check on the Application Pools to view whether OWA and ECP Application Pool is running on .NET Framework v4.0. It maybe the incompletely or corrupted installation of Framework that causes this error.

APP

You might come across the above if you recently made any recent upgrade or its a new fresh installation.

If that’s the case try to run the following command as Administrator:

%windir%\Microsoft.NET\Framework\v4.0.30319\aspnet_regiis.exe -i

Change the MSExchangeECPAppPool from .NET Framework from v4.0 to v2.0. Then restart IIS and check the results.

XAML2

3) Check the bindings of the default website to confirm to Microsoft recommended settings:

({http port 80 *}{http port 80 127.0.0.1}
{https port 443 *}{https port 443 127.0.0.1})

XAML3

4) If none of the above steps works try recreating the ecpvirtualdirectory and see the results

 In EMS, please run the following command:

Remove-Ecpvirtualdirectory –Identity “CAS\Autodiscover (xxxxx)”

New-Ecpvirtualdirectory –Identity “CAS\Autodiscover (xxxxx)”

There are more cases where even recreating the ECP virtual directory or any virtual directory will still cause this same error 500 unexpected error

This is because of the stale entries present in the ecp objects as well as in the IIS metabase.

If recreating corresponding affected VD doesn’t help you then  try the below steps

Remove the newly created ECP virtual directory

Remove-Ecpvirtualdirectory –Identity “CAS\ECP(xxxxx)”

5)  Remove the ecp objects in AD container

a. Open ADSIEDIT.msc, locate:

Configuration–>CN=Services–>CN=Microsoft Exchange–>CN=Organization–>CN=Administrative Groups–>CN=Exchange Administrative Groups–>CN=Servers–>CN=Exchange–>CN=Protocols–>CN=HTTP

b. In the right pane, please check whether the CN=ECP(xxx) is present. If its present you can remove it.

XAML4

6. Delete the autodsicover in metabase

a. Download the IIS 6.0 Resource Kit Tools from the following link:

http://www.microsoft.com/downloads/en/details.aspx?FamilyID=56fc92ee-a71a-4c73-b628-ade629c89499&displaylang=en

b. Install it on the CAS server. Open the “Metabase Explorer” (Open it in elevated mode)

c. Locate: Exchange -> LM -> W3SVC -> 1 -> ROOT.

XAML5
d. Check if you are able to find ECP virtual directory  is present, if so, remove it.

7. After that, try recreating the ECP virtual directory and see the results

New-Ecpvirtualdirectory –Identity “CAS\Autodiscover (xxxxx)”

Most likely after following the above troubleshooting steps the affected ECP VD should start working. You can also follow the same troubleshooting steps if in case  you are getting the same error in accessing the OWA,EAC ,Autodiscover and PowerShell Virtual Directories.

Hope this article is helpful

Thanks 

Sathish Veerapandian

MVP – Exchange Server

Lost and Stolen Active Sync enabled Devices and procedure to handle them in EAS environment

Today mobile devices comes up in different flavours , versions , operating systems , hardwares etc,..This creates a big security hole in terms of managing the Active Sync devices enabled on these devices.

If we plan up to bring a MDM solution then lots of study on the product needs to be done since it comes up with different platforms , console, management, vendors , licenses , team to handle and finally cost factor in terms of resources and hardware is also considered.

So planning for managing this mobile devices is very much important.

In this article lets have a look at the best procedure to handle the lost and stolen active sync enabled devices.

There are many best practices to be followed in the web and i have mentioned few points that can be taken.


Note : – This point is applicable only of we have EAS enabled devices without any MDM and EMM integration.

If a user lost/stolen his EAS enabled device below procedure can be handled


First Run the below command to check what are all the EAS devices associated with the users account

Get-ActiveSyncDevice -Mailbox “email address” | select Name

ACSPNG


Run the command Get-ActiveSyncDeviceStatistics -Mailbox “Email Address” to see the last sync time of the device

ACSPNG1

If the user changes his password as soon as the device is lost then there is no way that the device can be authenticated , synced with his mailbox and will not receive the remote wipe command.

So it is better to leave the victim’s password unchanged so the sync attempt is successful and the device gets wiped


Run the below command to send you a notification email when the device is wiped out


Clear-ActiveSyncDevice -Identity Name -NotificationEmailAddresses administrator@domain.com


Note :

EAS doesn’t have the option to delete only the emails and the remote wipe command deletes the entire data present on the phone. Its better to inform the user before  you perform this action to ensure that he will be losing all of his data present on the device.

Also you can make use of the log parser tool along with this excellent script which will give you detailed information on Active sync devices in which you can see the last connection attempts made if any

http://blogs.technet.com/b/exchange/archive/2012/01/31/a-script-to-troubleshoot-issues-with-exchange-activesync.aspx

Thanks 

Sathish Veerapandian

Exchange 2010/2013 Mailbox Quota , Message size planning for end users

In this article i’m giving some best suggestions that can be scoped in-terms of storage  for any new implementation and redesigning of existing environment for Exchange messaging Platform.

There is no such in recommendation of giving a standard best practice for mailbox size, Maximum message size , retention and archive  as it varies according to each every org structure based on Storage , Email flow per day , Server hardware , memory, requirement  etc..,

Before taking up any new implementation its always better to set up scope on the below things

1) Mailbox Size per user.

2) Maximum Size of Message.

3) Retention of Mailbox items.

The first step we will look in planning mailbox size for users
The better way i would suggest is to first collect the daily, weekly and monthly email statistics for the whole environment

These amazing scripts from nuno mota will help you on collecting the statistics which is very useful.

Emails sent per hourhttps://gallery.technet.microsoft.com/office/ec7940c1-be9a-45d5-9ea1-921677fa081c

Emails sent per day and sizehttps://gallery.technet.microsoft.com/office/f2af711e-defd-476d-896e-8053aa964bc5/view/Discussions

Emails sent per week and sizehttps://gallery.technet.microsoft.com/office/Total-Emails-Sent-and-c1daf5e7

Calculate the average size of the emails sent per user on daily basis from the above output

Based on that calculate the mailbox quota that you need to set for all the users .
You need to make sure that all the mailboxes are balanced equally on existing mailbox servers before planning.
Measure the currently allocated disk size in each mailbox server based on the current value and expected value in 1 year.
multiply the value and calculate the growth of expected users in 1 year.
Calculate the current log space , database space and the expected value after 6 months
Always keep a buffer value of 30 percent on the total value of the disk space required to be on the safer side.

Better you can set some exclusions for mailbox quota for  VIP users.When we say VIP users you can better define a policy with the client before taking up the project. Example for executive users the mailbox size will be unlimited and for the number of users and fix a static value for the remaining mailboxes and finalize the agreement. Define these policies clearly before taking up any new project.

Because a poor capacity planning will bring the following causes :

1) Increased storage cost as days passes.
2) More network bandwidth usage between servers and clients since all the users will have their emails stored in their mailbox.
3) Affecting the storage subsystem in terms of I/Ops.
2) Maximum message size

Planning for maximum message size for the whole organization is also very important.

Following things can be impacted of improper message size planning

1) First thing will affect you is mass mailing from the organizations itself (HR,Marketing Team). They will start sending mass mails with large attachments if the message size is not restricted properly.Impact of this will be your hub servers will go down.
Always you need to give a clear note of this part during the planning and make a best practice of sending mass mails after production hours since the normal emails will be affected.

2) It increases the network utilization of messaging system which will create again an impact.

3) If the network is compromised by a hacker then he can utilize the network/system resources by sending emails with large attachments.

4) Also it will be difficult for anti-spam solutions to scan these emails with large attachments and more possibly exclude most of the attachments if they are encrypted with large size and no exclusions set for encrypted attachments in the anti-spam filter.

3) Retention and archive

Planning for retention and archive is very important

Also it would be good if you implement some archiving solution in place for emails older than 10 months so that your primary mailbox will not be loaded always and less load on the exchange server.
When you bring up archive make sure that the retention for the archived items is planned properly (depending upon your client suggestion) as few orgs would like to have emails of more than 5 years since the retention of the archive cannot be restored at any cost unless we have alternative solution in that place.

Planning this part and convincing the client is little bit tough and difficult since the cost is involved more in this factor when they say they want to keep the retention items in archive for ever.

Hope this reading is helpful

Thanks

Sathish Veerapandian

MVP- Exchange Server

Managing Exchange 2010/2013 calendar permissions in Daily operations

Managing calendar permissions in daily operations will be little bit difficult for an admin since there will be more requests coming in for the calendar permissions.

I have collected few scripts which will be useful in managing the calendar requests that are coming in the daily operations.

Use the below command to check the calendar permission for single user

Get-MailboxFolderPermission -Identity mailbox@domain.com:\Calendar | FL


Cal1


To add the calendar permission for single user use the below command

Add-MailboxFolderPermission -Identity newtestuser1:\calendar -User  Usermailbox -Accessrights editor


Cal2


To check the calendar permission for a mailbox for a single user you can see the below command.

Get-MailboxFolderPermission -Identity mailbox@domain.com:\Calendar -User Test2


cal3


To change the default calendar permission for all the mailboxes in entire org you can use the below command.

$all=Get-Mailbox -RecipientTypeDetails UserMailbox

$all | ForEach {Set-MailboxFolderPermission -Identity “$($_.alias):\Calendar” -User default-AccessRights “LimitedDetails”

Final


To change the mailbox access default permission for all the users  for one mailbox you can use the below command

Get-Mailbox -resultsize unlimited | foreach {add-mailboxfolderpermission -identity “$($_.alias):\calendar” -User testuser -Accessrights “editor”}

Cal4


Cal5


To check the calendar permission for all the users run the below command

ForEach ($Mailbox in (Get-Mailbox -ResultSize Unlimited)) {Get-MailboxFolderPermission -Identity “$($Mailbox.Name):\Calendar” | Select @{n=’Calendar’;e={$Mailbox.Name}},User,AccessRights}

Cal6


To take the calendar permissions for all the users in csv format do the following things

First run the below command to store the value of  all the calendar permission by running the below command

$Results = ForEach ($Mailbox in (Get-Mailbox -ResultSize Unlimited)) {Get-MailboxFolderPermission -Identity “$($Mailbox.Name):\Calendar” | Select @{n=’Calendar’;e={$Mailbox.Name}},User,AccessRights}


Cal8


Take the output in text file by running the below command

$Results | out-file -filepath C:\CalendarPermission.txt

Cal9

Now run the below command to join the string and show the access rights for each user in the csv file

$Results = ForEach ($Mailbox in (Get-Mailbox -ResultSize Unlimited)) { Get-MailboxFolderPermission -Identity “$($Mailbox.Name):\Calendar” | Select @{n=’Mailbox’;e={$Mailbox.Name}},User,@{Name=’AccessRights’;Expression={[string]::join(“;”, ($_.AccessRights))}}

Cal10


Now export the results

$Results | Export-Csv C:\permission8.csv

Cal11

Hope this is helpful

Thanks 

Sathish Veerapandian

MVP – Exchange Server

Skype for Business Client Testing in Lync 2013 on PremiseEnvironment

Microsoft has released Skype for Business Client.  Lync 2013 client will become Skype for Business after April 14, 2015 as part of regular Office monthly updates if performed by the organizations.

This Skype for business client will be working on  Lync 2010 & 2013 on premise registrars servers and Lync Online . But specific server builds are required on Lync Server 2013 and Lync Server 2010 onpremise in order to set client policies

Below are the prerequisites for Lync 2010 & 2013 OnPremise Servers

Minimum server Build for Lync 2013 – Deploy server build 5.0.8308.857 (December, 2014) or later.

Minimum server Build for Lync 2010 – Deploy server build 4.0.7577.710 (February, 2015) or later.

If you have the above build version on your Lync 2013 server you can go ahead and start testing .

But before setting this policy to all the users it is better that if we test this new client in few of the users and then we can deploy them to rest of the users.

Inorder to to that follow the below steps

First run Get-CsClientPolicy to check how many policies you have .

True1


If we have any test client policy already you can try with the policy. In most of the cases we might be having only default global policy. It is better not to  play around with this since it will affect all the users if at all there is any issues.

So its better to create a new Client Policy to test this client on the few user accounts.

Run the below command to create a test client policy

New-CsClientPolicy -Identity SkypeforBusiness -EnableSkypeUI $True

Untitled32


Run the below command to grant the client policy to the  users for testing this client functionality.


Grant-CsClientPolicy  -Identity username -PolicyName SkypeForBusiness


Untitled33


Once the above is done you can download the Skype for Business client for the test users and start testing the client functionality.

https://www.microsoft.com/en-us/evalcenter/evaluate-skype-for-business

Thanks 

Sathish Veerapandian

MVP – Exchange Server

General troubleshooting steps for inbound/outbound mail flow issues

Mail flow can be stopped for various reasons in a organization. Also it depends entirely on the environment design as there are various factors involved in affecting the mail flow like network, ports , firewall , antivirus , anti-spam , transport agents , directory services , connectors misconfiguration , exchange server services not running up and the list goes on.

Its always better to design the mail flow architecture  in a easy understandable way and also we need to ensure that the SMTP security inbound\outbound is tightened in the perimeter level to make sure no spam emails are circulated.

In this article i have mentioned few basic troubleshooting steps that can be followed during mail flow issues in a environment

This applies for both inbound/outbound mail flow issues

Following things can be done

1) First run EXBPA to check if we get any misconfig errors ( applies only for exchange 2007/2010). You can skip this step if you are running Exchange 2013 and upcoming versions.

2) Go through your event logs on hub transport if its 2010 , Mailbox Server if its 2013 to see if we get any clue (at times it may be a back pressure as well so its better to check logs). Its better to check all the exchange services at this time  and ensure if they are running.

3) Do a telnet from internal to external network and see if everything is fine and also perform telnet test from external domain to your domain.This test will usually help you to identify if there is any SMTP traffic block in your firewall.

Below is the example of performing a telnet test

Type Telnet domainname orIP 25


Telnet2

Above is an example of successful delivery to the target domain.

4)  Check whether the MX record is valid for the affected domain.

Below is an example of performing mx validation for google.com domain.

Nslookup
5) Enable protocol logging both send and receive connectors and see if you are able to track anything.

6) Check if  the connecting IP is in  blacklist

We need to obtain the following tool to do the check:

If there is a blacklisting, please contact the providers of Blacklist. They will take a look into the reason behind blacklisting and remove the domain from the blacklist for you.
7) Check for NDR message.Enable message tracking for those  nondelivery mails and see if you get where the message gets dropped.This will help you a lot to identify the problem.
8) Analyze  Message header of the NDR to see in which hop the email was dropped.
9) Check the send connector and receive connector config and make sure the settings are correct according to your environment setup.
10) Check your firewall config and make sure port 25 inbound/outbound are open. Also check if there is any  SMTP filtering in your firewall which will be the culprit in most of the cases.
Hope this article is helpful in troubleshooting mail flow issues.
Thanks & Regards 
Sathish Veerapandian
MVP – Exchange Server 

Change your logo on the Lync Web App meeting join page in Lync 2013

In this article we will have a look at changing the default  lync logo in the meeting page.

You can change your Lync  logo 2013 on  lync webapp meeting join page in Lync

In-order to do that please perform the following things

Navigate to the below location

C:\program files\Microsoft Lync Server 2013\Web Components\LWA\Ext\Images\LyncWebApp_logo.png

Change the highlighted below logo to your company logo or the logo wish you keep

LWA1


The above one is for external meeting page. If you want to change the meeting page for internal as well you need to navigate to the below location.

C:\program files\Microsoft Lync Server 2013\Web Components\LWA\INT\Images\LyncWebApp_logo.png

LWA2


Note:

There will be another logo below the logo LyncWebApp_logo.png which is LyncWebApplogo.png .This file is  for backup for the original file. So better not to delete them for future use.

The customized  image will get overwritten while upgrading roll-ups or service packs. So its better to change this logo to customized from default during every upgrades.

Thanks 

Sathish Veerapandian

MVP – Exchange Server

Steps to add additional SIP domains in already existing Lync 2013 deployment

In this article we will have a look at the steps to add additional SIP domain in the already existing Lync 2013 deployment.

In short we need to perform the following tasks to add a new SIP domain

1) Add the new SIP domain  in the existing Lync topology.

2) Publish the Topology and install the wizard on all the front end and edge servers.

3) Update your internal certificate with the new SIP domain entry through CA and then assign the new internal CA to the FE servers

4) Create the certificate for the new SIP domain and then install them on the edge servers and on the reverse proxy server .


Steps to add new SIP domain 


1) First we need to add the new SIP domain to our topology

Inorder to do that we need to perform the following task

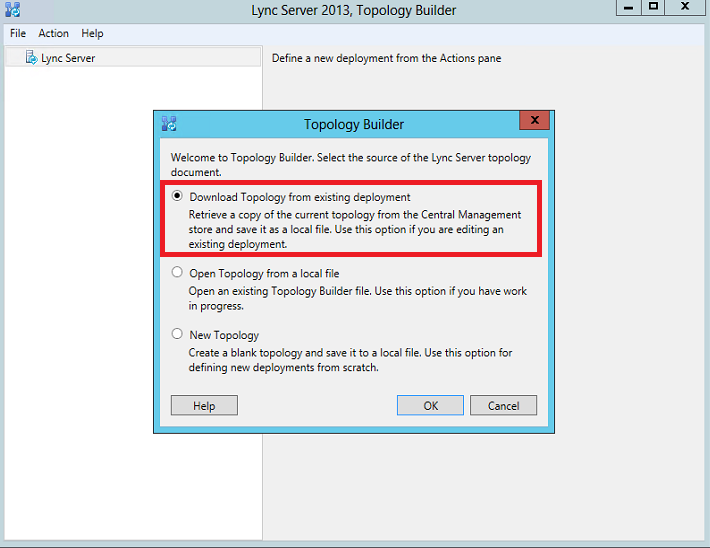
Open the Lync Server Topology Builder

Select download the topology from the existing deployment since we are going to modify the existing topology only


Topo


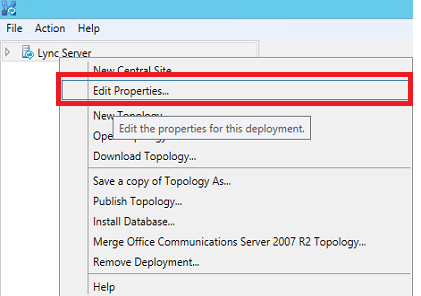
Once the topology builder is open – Right click on the topology and click edit properties


Topo1


Click on add new domain and add the new sub domain.

Topo2


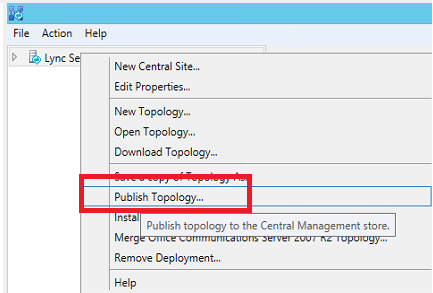
Once done click on publish topology


topo3


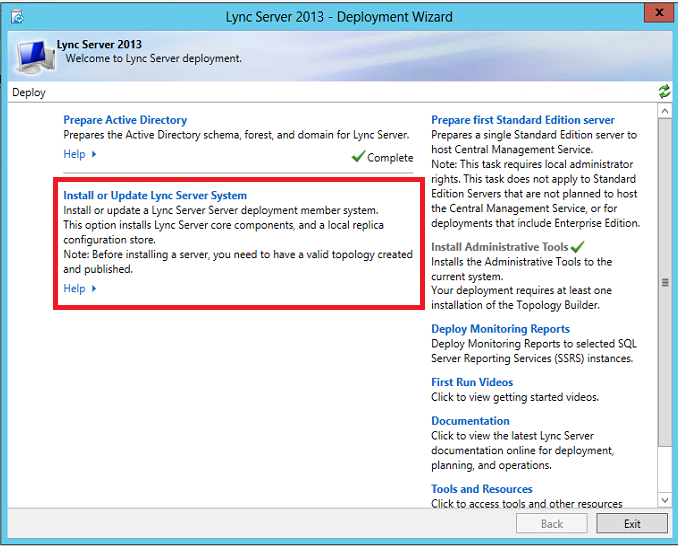
Once it’s done click on the setup and rerun the setup

Topo4


Note : 

We have to rerun the above setup on all the FE servers and the edge servers.


Now we need to create the DNS records

The DNS records must be created in the following order


Port Service Protocol Type Entry Server Request Type
CNAME lyncdiscover.exchangequery.com Add it to your public DNS entry New
A sip.exchangequery.com Point it to your FE server pool
A meet.exchangequery.com Point it to your FE server pool
5061 _sipfederationtls SRV sip.exchangequery.com Should be created on your public DNS
443 _sip sip.exchangequery.com Should be created on your public DNS


Note:

This above creation is only for IM and presence. For dial-in ,Audio/Video respective entries should be created in the DNS.

Now we need to create the certificate for the new SIP domain.

Updating your internal Certificate  with the new SIP domain  through CA and then assign the new internal CA to the FE servers is a normal process so im not explaining that part in this article. But make sure that you run the certificate wizard in the FE server and assign the new updated internal certificate.

For external certificate we can create the certificate through digicert,go daddy etc depending upon with whom you have  bought the public certificates.

In this scenario lets take an example of creating certificate from the digicert.

Download the digicert utility tool for windows.

Create your private key and CSR by using this utility and request certificate from digicert.

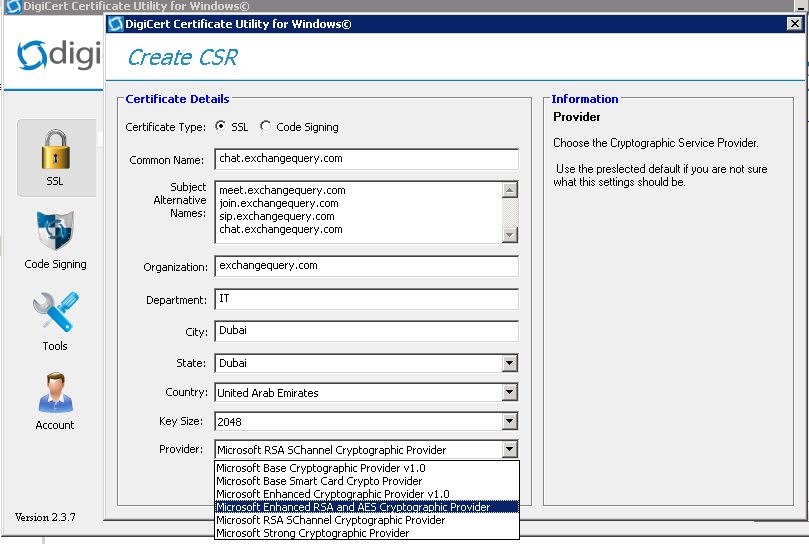
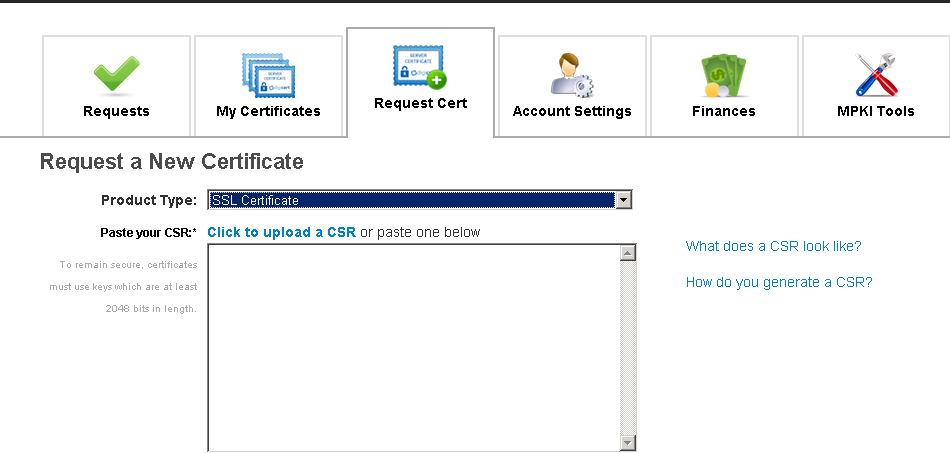
Open digicert and click on create CSR.

Test111


Type in common name and select SSL certificate since we require SSL certificate.

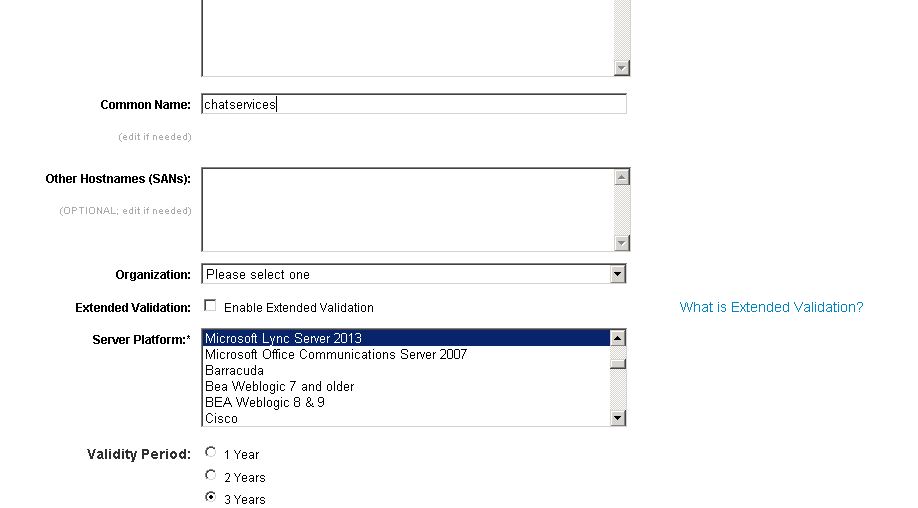
Add all the required SAN’s should be added as shown below.

Choose the provider type


Cer3


Now after click on create we will get the private CSR key generated for the new SIP domain as below


cer4


Now send this private CSR to digicert for the certificate . Once they issue for this new domain just download this certificate and install them on the edge servers and your reverse proxy servers.

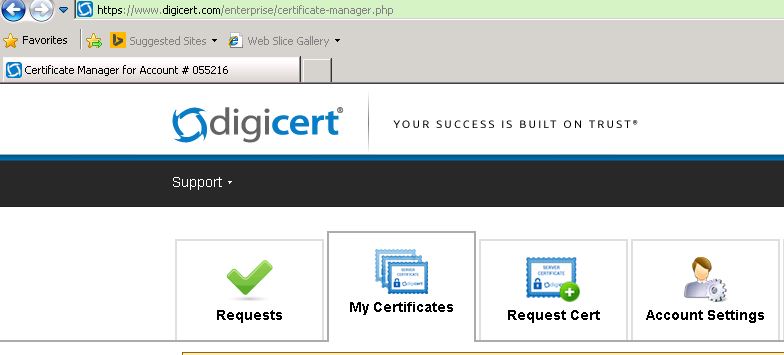
Inorder to do that please log into http://www.digicert.com and log in to your account and click on request certificate.

cer5


Now choose the new SSL certificate type and paste the private CSR request we generated.

Cer6


Now type the common name you wish to call the certificate . In our case we need to choose the server platform Lync server 2013 since we need to import this certificate on our edge server.


cer7


After this go to my certificates and download the certificates.Once they issue for this new domain just download this certificate and install them on the edge servers and your reverse proxy servers.

Now import this certificate on the edge servers by using Lync Server Deployment wizard.

Later request this same certificate for your reverse proxy server (F5,Kemp or TMG) on your certificate request and then install them on reverse proxy server for the mobile connectivity.

Now we have successfully added the new domain in our Lync Environment.

Thanks
Sathish Veerapandian

MVP- Exchange Server

Exchange 2010-failed to execute Troubleshoot-DatabaseSpace.ps1 Error formatting a string

We will get a SCOM alert for Exchange 2010 Management Pack unable to run the Troubleshootdatabase,ps1 after we install windows management framework 3.0 or higher versions  on the exchange servers.

What is this TroubleshootDatabase.ps1 ?

The Troubleshoot-Database.Ps1 is located by default on the C:\Program Files\Microsoft\Exchange Server\V14\Scripts.

TD1
This script is triggered  from the SCOM Management Pack to the SCOM agent on the exchange servers  every 15 minutes to detect and correct any excess log growth or exchange database log growth.

What is the impact if SCOM MP is unable to trigger this script every 15 minutes ?
The Exchange log file growth and database growth becomes unmonitored for people who have SCOM monitoring system for exchange daily monitoring due to which it can cause the database down time.

 What is the root cause if we find this issue in our environment ?

It happens when you have Windows Management Framework 3.0(Powershell 3.0) installed on the mailbox server recently and thus you’re running Powershell v3.0. You might be upgrading this for any recent backup software upgrade for the mailbox servers there are few backup software for which the recent upgrade requires WMF 3.0. Hence you will never be able to identify why scom stopped monitoring your databases and log files.
How do you find this ?

When you open Exchange Management shell it will run PS v2.0 and the command will execute just fine, but if you just click on the Powershell button next to start menu and add PSsnapins for Exchange 2010 it will run PS v3.0 and the command will fail to execute. You can verify the version of Powershell run by calling $Host.Version in your PS/EMS window. The reason for this is, that whenever the script is ran by SCOM it will call PS from “NT AUTHORITY\SYSTEM” context which will run the latest version of PS available while Exchange Management Shell is always calling version 2.0


By default this script (Troubleshoot-DatabaseSpace.ps1) is triggered to run   by the Exchange 2010 Monitoring Management Pack.

Exchange 2010 Management Pack versions 14.03.0038.004 and earlier required only  PowerShell 2.0 to be installed on the Exchange server for it to work. When PowerShell 3.0 or higher is installed on Exchange 2010 servers that were working with only PowerShell 2.0 installed, Exchange Management Pack  on the SCOM stops monitoring the  exchange databases.

If you login to the SCOM server and check the exchange management pack for SCOM it should be lesser than version 14.03.0038.004 and earlier as shown below.

Inorder to check

Login to the SCOM server – Open operations manager console – Click on Administration and – select management packs

Over the right check the version of the management pack installed for exchange server and it should be lesser than 14.03.0038.004

SSA


Solution:

We need to upgrade our  management pack for exchange  to the latest version  to start monitoring our databases  by SCOM. Version 14.3.210.2 of the Exchange 2010 Management Pack released last December helps when PS 3.0 and PS 2.0 are installed together on the same server. There is no need to uninstall PS 3.0 where the monitoring fails.


SCOM Management pack 14.3.210.2 can be downloaded from this location  – http://www.microsoft.com/en-za/download/details.aspx?id=692

The new MSI (Exchange2010PowershellFix.MSI) script  that has been included in this release enables Exchange 2010 MP to work on servers that have PowerShell 2.0 installed side by side with PowerShell 3.0+. This new MSI should be used only if existing Exchange 2010 MP isn’t able to monitor the Exchange 2010 servers that has PowerShell 2.0 and PowerShell 3.0+ installed side by side. This will NOT work if the server has only PowerShell 3.0 or higher installed.

In-order to upgrade to the latest version of the SCOM login to the SCOM server.

Open operations manager console – click on management pack – select import management packs and import the latest downloaded Exchange 2010 management pack 14.3.210.2 which will solve this problem.

Captures

Hope this helps.

Thanks 

Sathish Veerapandian

MVP – Exchange Server