Author Archives: Sathish Veerapandian

General troubleshooting steps for inbound/outbound mail flow issues

Mail flow can be stopped for various reasons in a organization. Also it depends entirely on the environment design as there are various factors involved in affecting the mail flow like network, ports , firewall , antivirus , anti-spam , transport agents , directory services , connectors misconfiguration , exchange server services not running up and the list goes on.

Its always better to design the mail flow architecture  in a easy understandable way and also we need to ensure that the SMTP security inbound\outbound is tightened in the perimeter level to make sure no spam emails are circulated.

In this article i have mentioned few basic troubleshooting steps that can be followed during mail flow issues in a environment

This applies for both inbound/outbound mail flow issues

Following things can be done

1) First run EXBPA to check if we get any misconfig errors ( applies only for exchange 2007/2010). You can skip this step if you are running Exchange 2013 and upcoming versions.

2) Go through your event logs on hub transport if its 2010 , Mailbox Server if its 2013 to see if we get any clue (at times it may be a back pressure as well so its better to check logs). Its better to check all the exchange services at this time  and ensure if they are running.

3) Do a telnet from internal to external network and see if everything is fine and also perform telnet test from external domain to your domain.This test will usually help you to identify if there is any SMTP traffic block in your firewall.

Below is the example of performing a telnet test

Type Telnet domainname orIP 25


Telnet2

Above is an example of successful delivery to the target domain.

4)  Check whether the MX record is valid for the affected domain.

Below is an example of performing mx validation for google.com domain.

Nslookup
5) Enable protocol logging both send and receive connectors and see if you are able to track anything.

6) Check if  the connecting IP is in  blacklist

We need to obtain the following tool to do the check:

If there is a blacklisting, please contact the providers of Blacklist. They will take a look into the reason behind blacklisting and remove the domain from the blacklist for you.
7) Check for NDR message.Enable message tracking for those  nondelivery mails and see if you get where the message gets dropped.This will help you a lot to identify the problem.
8) Analyze  Message header of the NDR to see in which hop the email was dropped.
9) Check the send connector and receive connector config and make sure the settings are correct according to your environment setup.
10) Check your firewall config and make sure port 25 inbound/outbound are open. Also check if there is any  SMTP filtering in your firewall which will be the culprit in most of the cases.
Hope this article is helpful in troubleshooting mail flow issues.
Thanks & Regards 
Sathish Veerapandian
MVP – Exchange Server 

Change your logo on the Lync Web App meeting join page in Lync 2013

In this article we will have a look at changing the default  lync logo in the meeting page.

You can change your Lync  logo 2013 on  lync webapp meeting join page in Lync

In-order to do that please perform the following things

Navigate to the below location

C:\program files\Microsoft Lync Server 2013\Web Components\LWA\Ext\Images\LyncWebApp_logo.png

Change the highlighted below logo to your company logo or the logo wish you keep

LWA1


The above one is for external meeting page. If you want to change the meeting page for internal as well you need to navigate to the below location.

C:\program files\Microsoft Lync Server 2013\Web Components\LWA\INT\Images\LyncWebApp_logo.png

LWA2


Note:

There will be another logo below the logo LyncWebApp_logo.png which is LyncWebApplogo.png .This file is  for backup for the original file. So better not to delete them for future use.

The customized  image will get overwritten while upgrading roll-ups or service packs. So its better to change this logo to customized from default during every upgrades.

Thanks 

Sathish Veerapandian

MVP – Exchange Server

Steps to add additional SIP domains in already existing Lync 2013 deployment

In this article we will have a look at the steps to add additional SIP domain in the already existing Lync 2013 deployment.

In short we need to perform the following tasks to add a new SIP domain

1) Add the new SIP domain  in the existing Lync topology.

2) Publish the Topology and install the wizard on all the front end and edge servers.

3) Update your internal certificate with the new SIP domain entry through CA and then assign the new internal CA to the FE servers

4) Create the certificate for the new SIP domain and then install them on the edge servers and on the reverse proxy server .


Steps to add new SIP domain 


1) First we need to add the new SIP domain to our topology

Inorder to do that we need to perform the following task

Open the Lync Server Topology Builder

Select download the topology from the existing deployment since we are going to modify the existing topology only


Topo


Once the topology builder is open – Right click on the topology and click edit properties


Topo1


Click on add new domain and add the new sub domain.

Topo2


Once done click on publish topology


topo3


Once it’s done click on the setup and rerun the setup

Topo4


Note : 

We have to rerun the above setup on all the FE servers and the edge servers.


Now we need to create the DNS records

The DNS records must be created in the following order


Port Service Protocol Type Entry Server Request Type
CNAME lyncdiscover.exchangequery.com Add it to your public DNS entry New
A sip.exchangequery.com Point it to your FE server pool
A meet.exchangequery.com Point it to your FE server pool
5061 _sipfederationtls SRV sip.exchangequery.com Should be created on your public DNS
443 _sip sip.exchangequery.com Should be created on your public DNS


Note:

This above creation is only for IM and presence. For dial-in ,Audio/Video respective entries should be created in the DNS.

Now we need to create the certificate for the new SIP domain.

Updating your internal Certificate  with the new SIP domain  through CA and then assign the new internal CA to the FE servers is a normal process so im not explaining that part in this article. But make sure that you run the certificate wizard in the FE server and assign the new updated internal certificate.

For external certificate we can create the certificate through digicert,go daddy etc depending upon with whom you have  bought the public certificates.

In this scenario lets take an example of creating certificate from the digicert.

Download the digicert utility tool for windows.

Create your private key and CSR by using this utility and request certificate from digicert.

Open digicert and click on create CSR.

Test111


Type in common name and select SSL certificate since we require SSL certificate.

Add all the required SAN’s should be added as shown below.

Choose the provider type


Cer3


Now after click on create we will get the private CSR key generated for the new SIP domain as below


cer4


Now send this private CSR to digicert for the certificate . Once they issue for this new domain just download this certificate and install them on the edge servers and your reverse proxy servers.

Inorder to do that please log into http://www.digicert.com and log in to your account and click on request certificate.

cer5


Now choose the new SSL certificate type and paste the private CSR request we generated.

Cer6


Now type the common name you wish to call the certificate . In our case we need to choose the server platform Lync server 2013 since we need to import this certificate on our edge server.


cer7


After this go to my certificates and download the certificates.Once they issue for this new domain just download this certificate and install them on the edge servers and your reverse proxy servers.

Now import this certificate on the edge servers by using Lync Server Deployment wizard.

Later request this same certificate for your reverse proxy server (F5,Kemp or TMG) on your certificate request and then install them on reverse proxy server for the mobile connectivity.

Now we have successfully added the new domain in our Lync Environment.

Thanks
Sathish Veerapandian

MVP- Exchange Server

Exchange 2010-failed to execute Troubleshoot-DatabaseSpace.ps1 Error formatting a string

We will get a SCOM alert for Exchange 2010 Management Pack unable to run the Troubleshootdatabase,ps1 after we install windows management framework 3.0 or higher versions  on the exchange servers.

What is this TroubleshootDatabase.ps1 ?

The Troubleshoot-Database.Ps1 is located by default on the C:\Program Files\Microsoft\Exchange Server\V14\Scripts.

TD1
This script is triggered  from the SCOM Management Pack to the SCOM agent on the exchange servers  every 15 minutes to detect and correct any excess log growth or exchange database log growth.

What is the impact if SCOM MP is unable to trigger this script every 15 minutes ?
The Exchange log file growth and database growth becomes unmonitored for people who have SCOM monitoring system for exchange daily monitoring due to which it can cause the database down time.

 What is the root cause if we find this issue in our environment ?

It happens when you have Windows Management Framework 3.0(Powershell 3.0) installed on the mailbox server recently and thus you’re running Powershell v3.0. You might be upgrading this for any recent backup software upgrade for the mailbox servers there are few backup software for which the recent upgrade requires WMF 3.0. Hence you will never be able to identify why scom stopped monitoring your databases and log files.
How do you find this ?

When you open Exchange Management shell it will run PS v2.0 and the command will execute just fine, but if you just click on the Powershell button next to start menu and add PSsnapins for Exchange 2010 it will run PS v3.0 and the command will fail to execute. You can verify the version of Powershell run by calling $Host.Version in your PS/EMS window. The reason for this is, that whenever the script is ran by SCOM it will call PS from “NT AUTHORITY\SYSTEM” context which will run the latest version of PS available while Exchange Management Shell is always calling version 2.0


By default this script (Troubleshoot-DatabaseSpace.ps1) is triggered to run   by the Exchange 2010 Monitoring Management Pack.

Exchange 2010 Management Pack versions 14.03.0038.004 and earlier required only  PowerShell 2.0 to be installed on the Exchange server for it to work. When PowerShell 3.0 or higher is installed on Exchange 2010 servers that were working with only PowerShell 2.0 installed, Exchange Management Pack  on the SCOM stops monitoring the  exchange databases.

If you login to the SCOM server and check the exchange management pack for SCOM it should be lesser than version 14.03.0038.004 and earlier as shown below.

Inorder to check

Login to the SCOM server – Open operations manager console – Click on Administration and – select management packs

Over the right check the version of the management pack installed for exchange server and it should be lesser than 14.03.0038.004

SSA


Solution:

We need to upgrade our  management pack for exchange  to the latest version  to start monitoring our databases  by SCOM. Version 14.3.210.2 of the Exchange 2010 Management Pack released last December helps when PS 3.0 and PS 2.0 are installed together on the same server. There is no need to uninstall PS 3.0 where the monitoring fails.


SCOM Management pack 14.3.210.2 can be downloaded from this location  – http://www.microsoft.com/en-za/download/details.aspx?id=692

The new MSI (Exchange2010PowershellFix.MSI) script  that has been included in this release enables Exchange 2010 MP to work on servers that have PowerShell 2.0 installed side by side with PowerShell 3.0+. This new MSI should be used only if existing Exchange 2010 MP isn’t able to monitor the Exchange 2010 servers that has PowerShell 2.0 and PowerShell 3.0+ installed side by side. This will NOT work if the server has only PowerShell 3.0 or higher installed.

In-order to upgrade to the latest version of the SCOM login to the SCOM server.

Open operations manager console – click on management pack – select import management packs and import the latest downloaded Exchange 2010 management pack 14.3.210.2 which will solve this problem.

Captures

Hope this helps.

Thanks 

Sathish Veerapandian

MVP – Exchange Server

New Boomerang feature to prevent Backscatter (Reverse NDR Attack)

Reverse NDR attack is one of the most common method of spamming a mail server by the hackers. Even though if they are unable to compromise any user accounts by this method in an organization they can increase the load on the messaging system and our network bandwidth  by bouncing the NDR’s back and forth. This makes the end users more annoying to think why they got NDR’s for the message which they never sent.


What is Reverse NDR Attack?

1) Spammer creates and email address with the spam victim’s address in the sender field since sender can always be anonymous and in the recipient he addresses them with random common names at your domain.

Ex: from:Sathish@contoso.com , To:Jack@exchangequery.com,Jim@exchangequery.com

2) He attaches an spam email and sends to the random addressed recipients of the victims domain.
3) Your mail server cannot deliver the message and sends an NDR email back to what appears to be the sender of the original message, the spam victim.
4)The return email carries the non-delivery report and possibly the original spam message. Thinking it is email they sent, the spam victim reads the NDR and the included spam.


Microsoft has brought some basic filtering setup for this Backscatter detection in EOP(Exchange Online Protection) which is more beneficiary. It uses a method called BATV( Bounce Address Tag Validation)


What is BATV ?

BATV( Bounce Address Tag Validation) is a standard internet draft of validating a reverse NDR email to see whether it is legitimate with a tag value or not.

How does this works ?

It uses a cryptographic hash. This cryptographic hash contains a valid return path of an email address, time stamp in the encoded format.So any NDR that is returned to a system without this cryptographic has tag value will be halted/rejected and hence no bounce backs.

BATV replaces an envelope sender like sathish@hotmail.com with prvs=tag-value=sathish@hotmail.com, where prvs, called “Simple Private Signature” . This PRVS is one of the possible method of tagging the values though there are few more in the standards followed.

This cryptographic token cannot be forged at any cost until they come to know the PRVS tag value.

For on-premise setup If you have this reverse NDR filtering setup in your anti-spam filtering agent you need not worry about this setup since your spam filtering will take care of this part.

If you are an on-premise customer and if you have your email filtering with EOP then Microsoft recommends to turn on this feature .

If your Mailboxes are hosted with Office 365 you no need to worry about turning on this feature. However Microsoft recommends to turn this feature ON if your outbound email goes through Office365(Not sure why)


Below are the steps to turn on this feature in through EAC

Open EAC – Click on protection – Navigate to your Policy – Click Advanced

Capture


Turn on the NDR back scatter option

Capture1

Enabling this option will definitely add additionally layer of security especially for reverse NDR attacks. Hope this helps.

Thanks 
Sathish Veerapandian

MVP – Exchange Server

Touch Down features and overview

Basically it is difficult for an admin to track and secure the EAS connected android ,IOS and windows devices  if there is no MDM solution in place.

Its always better to have a tight security when the email services are extended and used outside our organization firewall.

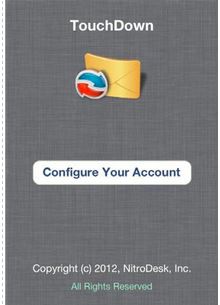
In this article we will have an overview of touch down features and functionality.

Touch Down was developed by a company called Nitro Desk initially and later Symantec acquired nitro desk.

Touch Down had been a personal favorite Exchange client for most of the people because it offers more features at affordable cost.

Key Features 


1) NitroDesk’s Touchdown application  separates corporate data from personal data on a mobile device using a secure container. By having this option we have a secured way of preserving the corporate date in mobile devices and an option to wipe only the corporate information rather than performing a factory reset.

2) Touch Down uses advanced AES-256 and SSL encryption by which it supports IRMS as well as DLP and the data in transit will be always secure.

To download and configure touchdown follow the below steps

Lets take an example of configuring them in IOS device

To download TouchDown from the App Store, 

  1. On your device, go to the App Store.
  2. Tap Search, tap the search field and enter NitroDesk, then tap Search.
  3. Navigate to TouchDown.

This will open the product information screen.

  1. Tap the price, then tap Buy Now.

If you already purchased the app, you won’t be charged if you download it again.

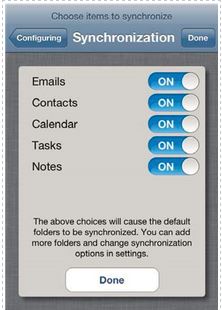
Configuring TouchDown

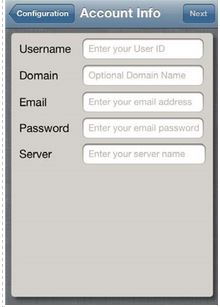
You must have the following information before you can configure TouchDown.

USERNAME Desired username

DOMAIN : Specify your domain

EMAIL: Specify your email ID

PASSWORD This is the password you use to connect your mailbox to your Microsoft® Exchange server. Note that if your password changes or expires, it will not be updated automatically in TouchDown. You must manually update it in TouchDown.

SERVER : Specify the activesync url

SERVER CERTIFICATES : use this option if you have a certificate based authentication for secure ssl.

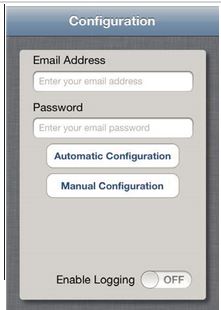
When you launch TouchDown for the first time, the following screen will appear.

T1

Enter the Email Address and Password.

T2

NOTE: If you turn Enable Logging to On, it logs recent activities in TouchDown and is a helpful troubleshooting tool. You can email the log to iossupport@nitrodesk.com for help in troubleshooting the problem you may be having with the application.

If you choose manual configuration the following information needs to be filled

T3


NOTE: If your password changes or expires, it will not be updated automatically in TouchDown. You must manually update it in TouchDown.

T4

The following menu is available when you select a message.

DELETE will delete the email from TouchDown.

MOVE will open up a list of folders to select where to move the email.

MARK will allow you to do the following with the email:

  • Mark Read/Unread
  • Flag
  • Flag Complete
  • Clear Flag
  • Tags

JUNK moves the email to the Junk folder.

CLEAR removes the checkbox from the email so it’s no longer selected.

The following menu options are  available with an email open through touchdown.

SECURITY lets you view the security for that email.

ATTACHMENTS shows if there is an attachment.

RECIPIENTS lists the recipients for the email.

CATEGORIZE allows you to add a category or create a new category for the message.

REPLY will reply to sender. See “Compose Email” on page 9 for information on using the formatting toolbar and how to edit your signature.

MOVE will open up a list of folders to select where to move the email.

DELETE will delete the email from TouchDown.

FLAG flags the email for follow up.

NEW will bring up the compose email screen to create a new email.

Touch Down supports Remote Wipe of exchange data when connecting to an exchange  2007,2010 and 2013 server via ActiveSync mode, and when PUSH is enabled Remote wipe is instantaneous as long as push is active. If push is not active, and you are polling, the wipe will happen only at the next poll interval

Below is the procedure to perform remote wipe from owa

Click Options on the top right corner of owa and select see all options
Select Mobile devices or phones on the left side
Select the device you want to wipe and click the Remote Wipe Data

Now after performing this action what are all the data that are wiped ?

Touch Down wipes the  database stored on the device.
All data under the /NitroDesk/ folder under the SD card (this is where attachments are downloaded, and databases and backups are stored)
Note : Touch Down does NOT reset the phone to factory defaults (no app can do that on Android)

There is another feature called User-Initiated Wipe

This is a feature in Touch Down where a user can cause a remote wipe by sending an email to themselves using a specially crafted subject line.

To set this up

  1. Go to Touchdown Settings, to the Advanced tab
  2. Press Remote Kill button
  3. Type in a secret code, e.g.: SECRETCODE
  4. Press OK, and provide your exchange password to confirm
  5. Press Save in the settings screen


At this point Touch Down is ready for a remote kill. From this point, if Touch Down receives an email with the subject line containing TDKILL: SECRETCODE anywhere in it, all the corporate data will be deleted. Since this can be quite an inconvenience if you did not intend it, make sure no one else knows about the kill code you have set.

Overall I  find this app to be user friendly, more secure communication to exchange server ,affordable cost  and no complications of setup required since we don’t require a server setup and we can integrate this app easily with an MDM solution.

Thanks

Sathish Veerapandian

MVP – Exchange Server

Configuring federation , external access and limitations in Lync 2013

Configuring external access in lync 2013 is one of the challenging part for the administrators.

In this article we will see the options to configure external access and few limitations that we have on them.

In order to perform that open Lync Server Control Panel  and click on federation and external access as shown below.


Fe1


Choose the type of external access policy that you would like to have configured


Note : By default there will be global policy and its not enabled until we enable them.This policy is created while you deploy edge servers.

In the access edge configuration we have the below settings as shown


Fe2


Public IM – for Outlook,Hotmail and public messenger that are supported refer more on technet for this part.

Enable Anonymous – For users joining the meeting by providing the link

The below option SIP Federated Providers that are hosted providers running Microsoft Office 365, Microsoft Lync Online and Microsoft Lync Online 2010


Fe3


We have an option to specify allowed domain as well as blocked domain.

Fe4


Below option is for SIP federated providers.

fe5


Below is the option for the SIP federated providers

fe6


Below is the option for specifying XMPP federated partners

fe7


Can we control this federation access services to few users and give full access to rest of the users ?

Lets take an example where a company wants to federate with us but we don’t want them to have A/V access to all of their users but need to enable full federation services IM,Presence,A/V only for few users.

Can we achieve this with the policy ?

The answer is no . Because the policies are not defined that granular.We can block outside AV access altogether through firewall or stopping the A/V edge service but making this change will stop a real user from our organization from using A/V when connected remotely.

So the final conclusion is that the current policies cannot be configured as of now to control federation in few services A/V for few users and to allow for rest of the users but still this can be achieved with some third party products.


Thanks 
Sathish Veerapandian

MVP – Exchange Server

Modifying the log file size for safety net on Exchange 2013

In this article lets see how to change the values of safety net in Exchange 2013.

Transport Dumpster  is replaced with Safety Net in Exchange 2013 unlike the earlier versions.It prevents data loss by maintaining a queue of successfully delivered messages. Unlike the earlier version of transport dumpster it also holds emails of mailbox that is not a member of DAG and also public folder mailboxes.

From exchange 2013 safety net does not mandatory requires DAG.Now the safety net is no more single point of failure since it has 2 queues primary safety net and shadow safety net.

Because of this we will notice huge difference in the log file size compared  to 2010 in 2013.

This is because of the safety net holding primary safety net and shadow safety net information in the queue.

So where does this Safety Net Queue Location resides ?

There is no dedicated Safety Net location in Exchange 2013 and it stores the messages in the same transport queue that is located in the mailbox server.

All the different queues are stored in a single ESE database. By default, this queue database is located on the transport server at %ExchangeInstallPath%TransportRoles\data\Queue.

Below is the location of the safety net queue in exchange 2013

Transport Queue

At times there might be a situation where the safety net queue will grow abnormally. Below are the steps that can be followed when we run into these kind of scenarios.

First we can create a new transport queue.

In-order to do that follow the below steps.

On each server with a large mail.queue file:
a. Stop the MSExchangeTransport service.
b. Delete the mail.que file.
c. Start the MSExchangeTransport service.

Also we can troubleshoot safety net by changing the safety net hold time.

By Default the hold period for the safety net will be 2 days. If you wish to change these values follow the below procedure.

To check the safety net hold time run the below command
Get-TransportConfig | ft name,Safety*

Transport2

In-order to change the value run the below command

Set-TransportConfig –SafetyNetHoldTime 1.00:00:00

Transport3

You will get the above warning once you run the above command. So you need to ensure that the SafetyNetHoldTime’ needs to Exceed ‘ReplayLagTime. Keep this in mind that  you need to plan this according to your lag copies. You need not worry about this if you do not have any lag copies.

Now there is something a value called message expiration time out. This is actually the message in the shadow safety that can remain the queue before it expires.

To see this value run the below command.

Get-TransportService |ft name,messageexpiration*

Transport4

To change this value run the below command

Transport5

These values can be changed from the EAC as well

Inroder to change the value through EAC perform the following steps

Open EAC- Click on mail flow tab – Click on receive connectors

Click on more and click on organizational transport settings

TransportEAC

Below you have the option to change the value of the safety net hold time as shown

TransportEAC2

Hope this article will help to change the safety net value in Exchange 2013.

Cheers

Sathish Veerapandian

Technology Evangelist

Enable Office 365 External Sharing

In this article we will have a look at enabling the office 365 external sharing option

Following services can be shared externally from your office 365 tenant.

1) SharePoint Sites.

2) Calendar free/busy sharing.

3) Lync – You can add people outiside your organizations , skype and  can communicate provided the following conditions are met.

Login to the office 365 portal with admin privilige

Click on Admin and click on external sharing

E1

Now we have external sharing options for 3 of the services

When we click on SharePoint we get the below option as shown below

E2

Also we have an option to share individual site by selecting them and then it gives us the same option.

When we click on the Calendar we have the below option

C3

C4

Once sharing is enabled, users can use Outlook Web App to share their calendars with anyone inside or outside the organization. People inside the organization can view the shared calendar side-by-side with their own. People outside the organization will be sent a URL that they can use to view the calendar. Users decide when to share, how much to share, and when to keep their calendars private

Note: If you want to share calendars with an organization that uses Exchange Server 2013 (an on-premises solution), the Exchange administrator will need to set up an authentication relationship with the cloud.

Below is the option that we have for enabling external sharing for lync

Online2

The organization you’re communicating with must also allow communication with your domain. If the other organization has Lync Server on premises, refer them to the TechNet article Configuring Federation Support for a Lync Online Customer.

When you’re communicating with someone in a federated domain, you can only use Lync features (for example, video conversations or desktop sharing) that are turned on in both organizations.

If the external access setting is changed from “On only for allowed domain” to “On except for blocked domain”, the domains that are listed won’t be kept.

Thanks 

Sathish Veerapandian

All about enterprise vault services and its tasks

I Just went through Enterprise Vault services, Tasks and its functionality. I have collected few points about its functionality and would like to share the same.

In this article we will have a look at the enterprise vault version 11 services and its tasks.

Basically EV version 11 has 4 services . The previous version 10 had 6 services and they have reduced it to 4 from 6 in EV11.

Below are the functionality of the 4 services.

Enterprise vault storage service

The Enterprise Vault Storage Service reads the objects from the Storage Archive queue and stores the associated mailbox items to the Storage Device.

What is storage archive queue?

This is the actual  queue which EV server queues the messages from the end users mailbox for archival.

It actually holds the emails that EV needs to archive in its storage.

It integrates and works with the windows message queuing service (MSMQ) and that’s the reason it needs to be installed on the OS during EV installation.

Once the items are copied to this storage queue the below process takes place


  • The copied file from the user will be marked for archive pending.
  • The copied item will be added as .EVSQ file in the Storage queue location. Usually the storage queue location should be redundant path (SAN Storage)
  • Once when all the items are archived this .evsq file is emptied and keeps only the empty .evsq file(not sure why it leaves this file trace).

Below are the different types of queues


Enterprise Vault Exchange Mailbox task for server queue A1

This queue holds the Enterprise Vault Exchange Mailbox Pending items to update in the corresponding users archive. It also has the  failed operations.


Enterprise Vault Exchange Mailbox task for server queue A2

This queue holds the Individual items that needs to process. Used for end user manual archive requests and whenever Enterprise Vault cannot directly communicate with the Storage Archive queue of the Storage service.


Enterprise Vault Exchange Mailbox task for server queue A3

This queue is  Used if you start archiving using the Run Now option in the Administration Console. If the administrator forces the task to run then it comes in this queue.


Enterprise Vault Exchange Mailbox task for server queue A4

This queue is used during the retry of the failed archive.


Enterprise Vault Exchange Mailbox task for server queue A5

This queue is used during scheduled archive runs. This queue is not processed outside the scheduled archiving times, so you cannot use Run Now to clear a backlog on this queue.


Basically this enterprise vault storage service  has 3 tabs as shown below

ee

General Tab

Just tells us about the site and the computer name and doesn’t hold much information


Storage Queue Tab

Tells the queue status open or closed, queue location free space and available space, queue total length and pending length.


Advanced Tab

This queue contains archive processes and restore processes.

ee1


Archive processes

It’s about the number of archiving task that this service can handle at time (can be exchange archive, SharePoint archive, etc..,)


Restore processes

It’s the same as archive and it is the number of the restoring task that this service can handle at a time


Restore thread per process

It’s the number of threads that the restore process must handle while restoring the items. We need to ensure that this value is increased when you increase the value of the number of processes else the restore will take long time.

Note:

We need to make sure that we are aligning the values for archive process and threads correctly else there will be some issues and will take time in the restore


EV Shopping service

This service manages the selected items to be restored when the end user manually chooses to archive few items through browser search and archive explorer. As the name indicates that this service is used only when the user tries to manually archive any items to EV from his end.


ee2

This service will log events in the event log whenever it starts and then stops. So it’s better to monitor this service events once in a while on every day.

Apart from this I do not find any much more information on this service


Enterprise Vault Task Controller Service

The Enterprise Vault Task Controller Service controls all provisioning, archiving, and retrieval tasks for Enterprise Vault. At the completion of every task it records an event about the status (whether it’s completed or its failure) of the task that was completed.

The Enterprise Vault Indexing Service:

This service is responsible to handle the indexing part for the archived data.

The Indexing Service will index items once they are being archived. Each archive will have its own index

It keeps the index all up to date.

Also it fetches the search results for the end users that they are searching for any emails from their EV archive

It’s better to have this functionality enabled as the end users will search for their archived emails for sure.


Tasks

Now we will start looking into the tasks functionality.

So these tasks will be working depending upon all the above services.

Below are the list of tasks that can be created from EV server for the applications as shown below.

ee4


And after we create a task these tasks have options to schedule and run on a timely basis which I find it to be very useful.

There are few more options to explore apart from the schedule

ee5

Note: We would be able to  set only one task for one server.

Example for one mailbox server we can set only one archive task schedule  and that task can be configured.

There are more topics to know on Enterprise Vault since it’s a pretty much complicated big product with more features and functionalities. We will discuss about the rest of the features in the upcoming blogs.

Thanks 

Sathish Veerapandian