Author Archives: Sathish Veerapandian

BlackBerry Server Migration Planning

In this article we will be looking on how to Migrate from BES 4.0 to 5.0.

Below are the few technologies which have been improved much in BES 5.0.4 compared to earlier versions.

Advanced security features enhanced

BlackBerry Enterprise Server ensures sensitive information is transmitted in a highly protected environment.

Customizable user permissions increased

With over 500 IT policies and BlackBerry Balance technology, administrators can manage user settings, control groups and wirelessly adjust security levels and capabilities.

Stable Remote device management

Track and manage smart phones remotely, without interrupting business

 Designed to meet the needs of enterprise and government, BlackBerry® Enterprise Server is for organizations that have an on premise email server and require a high level of IT control.

BlackBerry Enterprise Server can be run in environments alongside BlackBerry® Enterprise Server Express for organizations that only have a subset of users that require advanced IT management.

Includes BlackBerry® Balance™ technology to enable employees’ BlackBerry smart phones to be used for business and personal use without compromise.


 Premigration Checklist


Infrastructure Network latency: Ensure there is no network latency in the environment.

Messaging Server/Service Location: Make sure the Messaging server is located in the same AD site.

Service accounts: Ensure the service accounts going to be used for BB account has full domain admin rights

LDAP (Kerberos) : Check for any LDAP errors by running DCDIAG

Microsoft SQL Server database mirroring: Plan accordingly whether we need db mirroring or it can run with the same setup or not according to the environment.
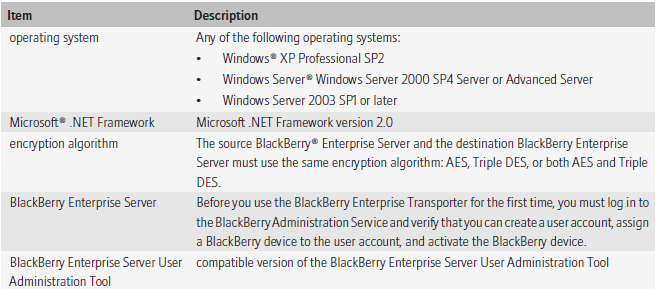
System Requirements


Image

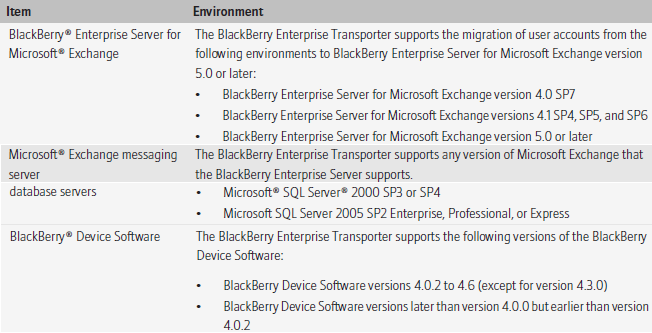
Supported Environments

Image

Preparing the source domain for migration process

Image

Preparing the destination domain for migration process

Image


Steps to use BET Tool for Migration.

You can use the BlackBerry® Enterprise Transporter to move one or more user accounts from one BlackBerry Domain to a different Blackberry Domain

You can use the BlackBerry Enterprise Transporter when your organization upgrades the BlackBerry® Enterprise Server and you want to create a new BlackBerry Domain, or if you need to move user accounts between BlackBerry Domain instances. For example, if you want to upgrade your organization’s BlackBerry Enterprise Server from version 4.0 SP7 to version 5.0, you can create a separate Blackberry Domain version 5.0 and use the BlackBerry Enterprise Transporter to move your organization’s user accounts to the new Blackberry Configuration Database. You can also use the BlackBerry Enterprise Transporter to move user accounts from a production Blackberry Domain to a test BlackBerry Domain and back.

When you run the BlackBerry Enterprise Transporter, users do not need to delete BlackBerry device data or reactivate their Blackberry devices, if the BlackBerry Enterprise Transporter supports the BlackBerry® Device Software version that they are using. The destination BlackBerry Enterprise Server resends service books, and the BlackBerry devices can start receiving new messages after the BlackBerry devices receive the service books. Synchronization of organizer data and calendar information over the wireless network might occur after the migration process completes.

BET works in 2 modes

Live

 BES instances in both BB Domain instances must use different SRP IDs.

Move user accounts when the BES instances in both the destination BB Domain and the source BB Domain are running.

Bulk

 During the migration process BB Enterprise Server instances in both the source and the destination domains must be turned off.

 In the destination BB Domain, BB Administration Service must be running.

 During the migration process, based on the source BB server, the BB Enterprise Transporter searches the source BB Configuration Database for all user accounts that are associated with the BB Enterprise Server, and moves them.

 Configure the destination BB Enterprise Server instances to use the same

     SRP IDs that the source BB Enterprise Server instances use.

Advantages of BET tool During Migration

Users do not need to delete BB device data or reactivate their BB.

 The destination BB Enterprise Server resends service books, and the BB devices can start receiving new messages after the BB devices receive the service books.

 Synchronization of organizer data and calendar information over the wireless network might occur after the migration process completes.

Preview user move to check for potential errors

Image

Below steps need to be done for the data that is not migrated

Image

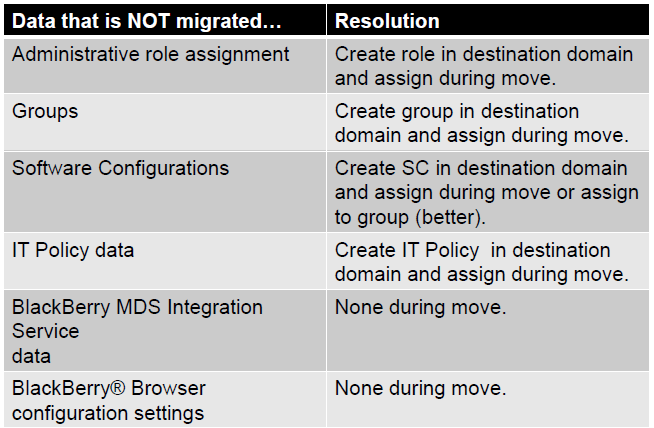
BB Enterprise Transporter (BET) performs two validations

Global Validation

 BAS is installed in destination BB Domain.

Sends a test BB Administration Service command to verify that the BB Administration  Service is available and can respond.

User Validation

 User account is associated with a valid email address.

 Account does exist in the source BB Domain and does not exist in the destination BB Domain.

 IT Policy can be applied to the BB Smartphone.

BB device is running an unspecified version of the BB Device Software

BB device is operating on BB Device Software version 4.0.2, and less the ITPolicyKeyMapping table does not exist.

BB device is operating on BB Device Software version 4.3.0

Preparing the move user accounts with the BB Enterprise Transporter:

Create the manifest file.

1. Configure the source and destination BB Configuration Database instances.

2. Configure the default settings for user accounts in the destination BB Domain.

3. Selecting the user accounts to move to the destination BB Domain or select all user accounts associated with a source BB Enterprise Server.

4. Move the user accounts


Installing the BB Enterprise Transporter

1. Create a folder to store the BB Enterprise Transporter files.

2. In a browser, visit na.BB.com/eng/support/server_resourcekit.jsp.

3. Download the BB Enterprise Transporter installation package.

4. Extract the contents of the installation package to the folder that you created.

5. Double-click the brk-bbenterprisetransporter.msi file.

6. Complete the instructions on the screen

Image

Image

Create a Manifest file in xml


Image

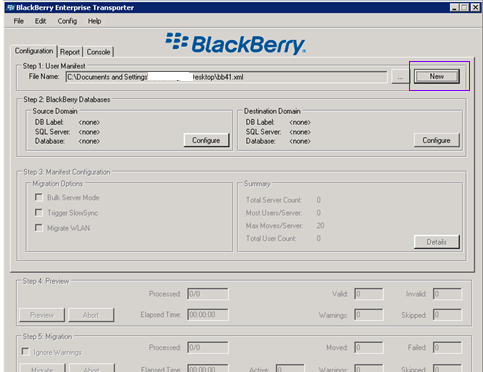
Configure the source database

Image

Configure Destination database

Image

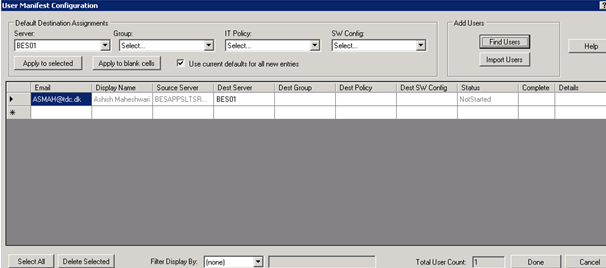
Verify the server names and database click on details to choose users for migration

Image

Click on find users choose users and done

Image

Verify the user list and click on done

Image

Click on Preview to validate the user

Image

Image

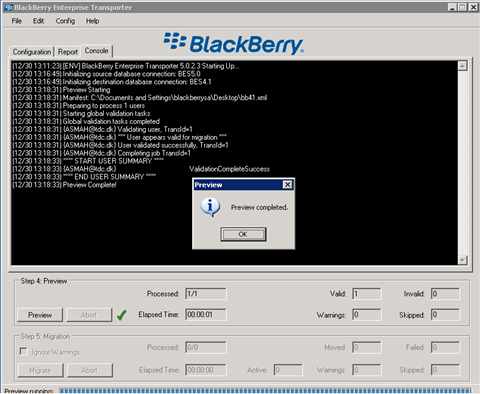
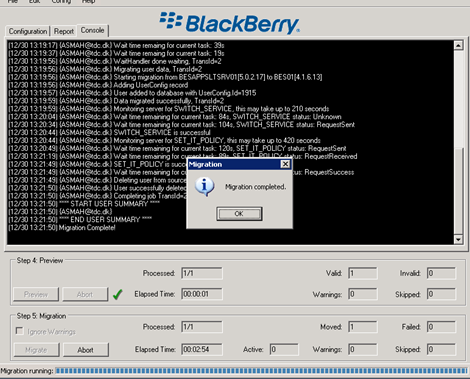
Migration Progress and completion

Image

Image

Checklist to be performed before Migration

  Backup current environment.

  Confirm pre-requisites.

  Start BB Enterprise Server setup application on a new server.

  Create new BB Configuration Database.

  Restart server & Complete configuration.

  Recreate IT Policy and Software Configurations in BES 5.0 environment.

  Shutdown services on BB Enterprise Server 4.x.

  Start the BAS service on BB Enterprise Server 5.0. Move users with BET (bulk mode)

Conclusion


BES 5.0 infrastructure can be deployed independent of already existing BES 4.X deployment.

•Separate BB configuration database created for BES 5.0 environment.

•IT Policy(s), Application Control Policy(s), and Software Configurations are created and validated in BES 5.0 environment.

•BB User(s) is migrated using the BB Enterprise Transport (BET) Tool Live mode or Bulk mode.

• We can view, but not change, the properties of previous versions of the BB MDS Integration Service, BB MDS Connection Service, and BB Collaboration Service from BAS.

  •  Before you try to move the user accounts, upgrade the source BB Enterprise Server for Microsoft Exchange to version 4.1 SP6 MR5 or later.

Steps to configure anonymous or authenticated relay in Exchange 2013

Basically there can be 2 types of relay which will be used in an organization for relaying applications.

1) Internal Relay: Which might be an application which submits emails to exchange and in turn it delivers emails to users mailbox as a daily report, faxes etc.,

2) External Relay: An application might send out fax like invoice, quotation etc., to an external vendor for daily operation purpose.In turn the vendor can also send out some automated emails like daily sales report to user’s mailbox.

In order for both the functionality to work we need to have relay configured on the exchange side

The submission of the relay can happen in 2 ways

1) Anonymous

This relay happens through anonymous connection which means any account within that subnet assigned in the relay connector is authorized to submit emails to the organization.

2) Authenticated

This relay happens only through specific authenticated account by which the emails are submitted to the exchange side from the application, fax etc.,

For the authenticated relay to happen first we need to Create/configure a service account for the applications/copier to use

In this article we will be seeing on how to configure relay permission on Exchange 2013

First open EAC and then click on Mail Flow

Select the required server and then click on + Sign

Image

Type the name of the connector and then select Custom

Image

Click next and now we need to assign the correct subnets and the ip address

Note:This is very important point since giving permission to unknown subnets will make the server to behave as an open relay which is ready to accept spam messages. Ensure that you are giving only to the known subnets which requires relay.

Image

Now add the subnets

Image

Click finish. And now we need to give permission accordingly to the type of relay that we are going to assign to this connector

1) Anonymous

2) Authenticated

First we will look on how to give anonymous permission

Double click or click on edit on the relay connector

Image

Select anonymous users which is under security and click save

Image

Now we need to give required authentication to this anonymous users account for this connector. This can be done in 2 ways

Through Exchange Management Shell

Through ADSI Edit

We will see on how to grant permission through ADSI edit.

Open adsiedit and navigate to below location

Image

Click security and select anonymous logon and click submit messages to any recipient

Note: This permission should be granted only on relay connectors and it should never be granted on default receive connector.

Image

Follow the same steps for authenticated relay except for giving permission to anonymous user account give submit messages to any recipient permission to the associated service account.

Also you can run the below command to grant permission on anonymous account for relay connector alone.
Get-ReceiveConnector “Anonymous Relay” | Add-ADPermission -User “NT AUTHORITY\ANONYMOUS LOGON” -ExtendedRights “Ms-Exch-SMTP-Accept-Any-Recipient”

Sathish Veerapandian

Setting up Retention Policy in Exchange 2013

A Retention policy is a group of retention tags that can be applied globally to all the users . This helps us in maintaining the email lifecycle globally from the server end.

This will help users and the organization in terms of not loading up the server with unwanted old emails and end users maintaining their mailbox not as a part of their daily task. Messages are expired based on settings defined in the retention tags linked to the policy. There is no difference in retention policies from exchange 2010 to 2013 apart from the configuration part.

Below are the steps to set up retention policy in Exchange 2013.

1)      Open EAC –> Select Compliance Management -> and click on retention policies


Image

2) We have 3 options as shown above and we can choose as per the option and click on the + sign


3) In the next window you get the space where you can type the retention policy name. You can type any desired name since this name will not be displayed to the end users.


Image

4) Then we need to choose the required retention tags and add them as shown in the below screenshot.

Image


Image

Then we have options to edit the created retention policy and we can add, edit and remove the retention tags any time.

Image

Then use EMS to apply retention policy to single user with the below command

Set-Mailbox “Exchangequeryadmin” -RetentionPolicy “Exchangequerytest”

We can refer the below article to apply retention policy to bulk/group users

http://technet.microsoft.com/en-us/library/dd298052(v=exchg.150).aspx


Thanks 

Sathish Veerapandian

MVP – Exchange Server 

Steps to Deploy Data Loss Prevention in Exchange 2013

Most of the organization like Financial,Banking,Production etc.,will be having lot of sensitive,confidential and secure data.These data s are stored in most of the users mailbox and communicated even through IM.

It is really a difficult part in terms of protecting these kind of company confidential data since these data can be copied by means of USB,Printing,Email Communication,IM etc.,

Microsoft have introduced a new package which comes along with exchange 2013 in terms of protecting the company sensitive data stored in the form of emails.

Data Loss Prevention is a premium feature that requires an Enterprise Client Access License (CAL).

Below are the steps to configure the DLP in Exchange 2013

Open EAC -> Click on Compliance Management -> and select Data Loss Prevention

Image


You have three options as shown
New DLP policy
Import DLP policy
New Custom DLP polic

Image


The next screen brings you the DLP policy template where you define name,description,choose template and mode of requirements as below

Image


Choose the  options as required and click on save.

We are done with DLP created and it will show an option as enforcing and we can see few other options to test the created DLP policyImage


Once the policy is enforced we can see the DLP created.When we click on the created DLP we have multiple options as shown in the screen below like including override as well.

Image


We can create a custom DLP according to our requirement as well as we can import an existing template.

This will be very helpful for any organization in terms of protecting sensitive data.

Thanks

Sathish Veerapandian 

MVP – Exchange Server 

Custom RBAC role for setting “Full Mailbox folder“ and “Send as” permission

I tried to create an Custom RBAC role for setting the “Full Mailbox “ and “Send as” permission by going through few blogs and TechNet discussion. I just tried to implement in my lab and it was successful. I tried hard for Delegate and there is no option to  assign the permission to any of the Security Group Members for setting the Delegates. Delegate is an option which can be set only through outlook.

Below are the steps to create an custom RBAC role for Full Mailbox and Send As and it might be useful for if it suits some of their environment.

We can assign the permission to any of the security group Members for setting the “Full Mailbox” and “SendAs” Access rights on the User Mailboxes through RBAC custom role.

We can accomplish this task by  assigning the Permissions to one of the security group Members for setting the “Full Mailbox” and “SendAs” Access rights on the User Mailboxes, Shared Mailboxes

In order to test this in lab I first created a distribution group named Exchange Mailbox Folder.

Image

We can use  the below command to check the default management role entry

get-ManagementRoleEntry “Mail Recipients\*”

Image

Here we have the list of Mail recipients. We cannot modify the default Role   “Mail Recipients”, so we have to create the new custom role.

We can remove all the unwanted cmdlets from the custom Role and then we can assign the below listed permission to the created  Security Group Only.

1)       Add-MailboxPermission

2)       Add-MailboxFolderPermission

First we need to create a new management role with the below command

New-ManagementRole “Custom AddMailbox Permission” -Parent “Mail Recipients”

Image

Now we need to view the list of management role entry assigned for a custom role. We do not need all of the entries which are assigned for a default custom role.

get-ManagementRoleEntry “Custom AddMailbox Permission\*”

Image

Now we can go ahead and remove all of the role entries which we do not require and keep only add-mailbox permission and send as permission by running the below command.

get-ManagementRoleEntry “Custom AddMailbox Permission\*” | where {($_.name -ne “Add-Mailboxpermission”) -and ($_.name -ne “Add-MailboxFolderPermission”)} | Remove-ManagementRoleEntry

Image

We then  have to assign the permissions through  the managementRoleAssignment.

For Full Mailbox Folder  run the below command –

New-ManagementRoleAssigment “add mailbox permissions” -role “Custom AddMailbox Permission” -securityGroup “Exchange MailboxFolder ”  

For SendAsPermissions run the below command  –

New-ManagementRoleAssigment  “add mailbox permissions” -role “Active Directory Permissions” -securityGroup “Exchange MailboxFolder ”  

Image

I was successfully able to assign the Permission to “Exchange MailboxFolder “ security Group Members for setting the “Full Mailbox” and “SendAs” Access rights on the User Mailboxes.

Thanks

Sathish Veerapandian – MVP

Exchange 2013 Key Improvements and Enhancements

1)      Managed Availability in Exchange 2013

In Exchange 2013, native, built-in monitoring and recovery actions are included in a feature called Managed Availability.

Managed Availability is the integration of built-in, active monitoring and recovering any issues of its own without any admin help and the Exchange 2013 high availability platform,allowing Exchange to make a determination on when to fail over a database based on service health.

To view the health of a server, you use the cmdlets Get-ServerHealth to retrieve the raw health data and Get-HealthReport that operates on the raw health data and provides a snapshot of the health

2)      Managed Store in Exchange 2013

This is a replacement for Information store in  earlier versions

Microsoft Exchange 2013 Managed Store is a mechanism used in Exchange Server 2013 to isolate failures at the database level.

The Managed Store in Exchange 2013 replaces the Exchange Information Store of past versions. The primary benefit of the

Exchange 2013 Managed Store is that if a single database process encounters any sort of error, only that database is affected. That said, the Managed Store also presents numerous enhancements over the Information Store, including:


•Improved integration with the Exchange Replication service,

•Better performance and resilience,

•Improved integration with Microsoft FAST search.

The Exchange 2013 Managed Store also reduces the number of potentially mounted databases per mailbox server from 100 (Exchange 2010) to 50 (Exchange 2013). This change should aid companies that rely on database availability groups (DAGs) as part of their general Exchange Server infrastructure.

3)      Safety net in Exchange 2013

Transport Dumpster  is replaced with Safety Net in Exchange 2013 unlike the earlier versions.

It prevents data loss by maintaining a queue of successfully delivered messages. Unlike the earlier version of transport dumpster It also holds emails of mailbox not a member of DAG and also public folders.

4)      Public Folders

There is no more public folders in exchange 2013.Instead the public folders are created  and associated to a parent public folder mailbox. There is no separate public folder DB in exchange 2013.Discussions can be stored, indexed, and searched

5)      Exchange Administration Center

The GUI-based EMC (Exchange Management Console) and the Web-based ECP (Exchange Control Panel) are being replaced by a single Web-based UI.No GUI and it’s an web based application.


6)      Exchange architecture revisions:

Exchange 2007 and 2010 are broken into five server roles, mainly to address performance issues like CPU performance, which would suffer if Exchange were running as one monolithic application. But Microsoft has made progress on the performance side, so Exchange 2013 has just two roles: Client Access server role and Mailbox server role. The Mailbox server role includes all the typical server components (including unified messaging), and the Client Access server role handles all the authentication, redirection, and proxy services. You can deploy Exchange 2013 with an Exchange 2010 Edge Transport server role but a 2013 Edge role is planned post-RTM.

7)      Storage Architecture

The sizing recommendations for Exchange 2010 and 2013 are the same, maximum of 2TB per database.

In 2013, the number of databases you can mount have changed, 5 in Std, but only 50 in Enterprise Exchange 2013. It is 100 in 2010 Enterprise.


8)      Transport Architecture

Divided into three Front End Transport service, Transport service, Mailbox Transport Service

Front End Transport service :  This service runs on all Client Access servers and acts as a stateless proxy for all inbound and outbound external SMTP traffic for the Exchange 2013 organization. The Front End Transport service doesn’t inspect message content, only communicates with the Transport service on a Mailbox server, and doesn’t queue any messages locally.


Transport service   This service runs on all Mailbox servers and is virtually identical to the Hub Transport server role in previous versions of Exchange. The Transport service handles all SMTP mail flow for the organization, performs message categorization, and performs message content inspection. Unlike previous versions of Exchange, the Transport service nevercommunicates directly with mailbox databases.


Mailbox Transport service   This service runs on all Mailbox servers and consists of two separate services: the Mailbox

Transport Submission service and Mailbox Transport Delivery service. The Mailbox Transport Delivery service receives SMTPmessages from the Transport service on the local Mailbox server or on other Mailbox servers, and connects to the localmailbox database using an Exchange remote procedure call (RPC) to deliver the message.


9)      Client Access Server Change

Outlook Connectivity:

CAS supports only RPC/HTTP (aka Outlook Anywhere). This architecture change is primarily to drive a

stable and reliable connectivity model.

The Exchange 2013 Client Access Server role simplifies the network layer. Session affinity at the load balancer is no longer required as CAS2013 handles the affinity aspects. CAS2013 introduces more deployment flexibility by allowing you to simplify your namespace architecture, potentially consolidating to a single world-wide or regional namespace for your Internet protocols. The new architecture also simplifies the upgrade and inter-operability story as CAS2013 can proxy or redirect to multiple versions of Exchange, whether they are a higher or lower version, allowing you to upgrade your Mailbox servers at your own pace.


10)   Changes in Active Sync

New Exchange ActiveSync provides more additional  following features:

•Support for HTML messages

•Support for follow-up flags

•Conversation grouping of email messages

•Ability to synchronize or not synchronize an entire conversation

•Synchronization of Short Message Service (SMS) messages with a user’s Exchange mailbox

•Support for viewing message reply status

•Support for fast message retrieval

•Meeting attendee information

•Enhanced Exchange Search

•PIN reset

•Enhanced device security through password policies

•Auto discover for over-the-air provisioning

•Support for setting automatic replies when users are away, on vacation, or out of the office

•Support for task synchronization

•Direct Push

•Support for availability information for contacts


11)   Outlook Web Access Replaced with outlook web app

Outlook Web App, or OWA, is completely revamped, with a new look and the ability to access it offline as a real mail client. Outlook is the rich desktop client; OWA is also a client but runs over the Web. The new OWA is also designed to be more suitable for touch interfaces, which makes it more appealing for smartphones and tablet devices.

12)   Retired Tools

Mail flow, performance troubleshooters and Exchange Best Practices Analyzer have been retired and no longer

13)   Data loss protection (DLP) in Exchange 2013

Data loss protection (DLP) is a feature that is built into the Exchange platform. A powerful tool to reduce the amount of sensitive data that leaks outside of the boundaries of the organization is written directly into the new transport rules.

This allows you to set up policies that do one or more of the following:

Enforce boundaries by preventing or limiting transmissions between groups of users, including between groups internal to a company

Apply different treatment to messages sent inside a company from messages sent outside of a company

Stop inappropriate content from coming into a company or leaving it.

Strip out confidential or otherwise sensitive data from transmissions

Archive or journal messages that are sent to or received from users or a group of users

Catch inbound and outbound messages and route them to a manager or administrator for inspection and approval prior to final delivery.

Add disclaimers to messages as they enter or leave the mail flow


14)   CDO/MAPI download for Exchange 2013


There is no support for BlackBerry Enterprise Server (BES) to communicate with Exchange Server 2013. The CDO/MAPI download is not yet available for Exchange 2013 and is “likely the primary reason” BES support is not yet available.Mobile devices can be supported Unless you are using a third-party solution that rides on top of ActiveSync.

15)   New in In-Place eDiscovery & Hold in Exchange 2013

Multi-Mailbox Search is known as In-Place eDiscovery.In Exchange Server 2010 and Office 365, Litigation Hold makes it possible to preserve mailbox items. When a user or a process attempts to delete an item permanently, it is removed from the user’s view to an inaccessible location in the mailbox. Additionally, when a user or a process modifies an item, a Copy-on-write (COW) is performed and a copy of the original item is saved right before the changed version is committed, preserving original content. The process is repeated for every change, preserving a copy of all subsequent versions.

The ability to give end users a tool to perform eDiscovery searches without the need for IT is great. Please refer the below blog.

References: http://blogs.technet.com/b/exchange/archive/2012/09/26/in-place-e-discovery-and-in-place-hold-in-the-new-exchange.aspx

Steps to perform a restore in Exchange 2010/2013 from a lag copy in DAG

In real time scenarios we will come across several issues where users will be requesting for an restore from the backup.

Restore can be in 2 scenarios

1) User might request for a recent data within 2 weeks of time.

2) User might request for a very old data a months back.

From Exchange 2010 we had the concept of LAG copy from which we will be able to perform restore of mailboxes according to the replay lag time set.

We can alter this value from 0 to 14 days . The LAG copies are not full backup solution but they can help us during DR scenarios as well as restoring mailbox contents for user only for shorter period of date i.e, within 14 days maximum.

We can perform a restore from a lag copy in exchange 2010/2013 and below are the steps

1)  Find the user requirement for restore. (Folder level restore or Mails missing restore)

2)   If its mails missing restore try to recover them by using MFCMAPI by following the below technet article

http://support.microsoft.com/kb/2750293

3) If it’s a folder level restore then we need to go ahead with our standard restore procedure since the folder can’t be recovered by using mfcmapi.


4) First we need to check the user is in which database by running the below command

Get-mailbox   <username> | fl database


5) After finding the database of that user find the lag copy of that associated database

get-mailboxdatabase  <DBname> -status | fl mountedonserver,replaylagtimes


6) Suspend the lag copy server and start copying the logs and database folder into separate folders. Resume the replication once copied.


7)      Take copy of the original database copied from the lag server in a separate folder.

8)    Check the database state by running the below command.

Navigate to drive where DB located:eseutil /mh “DB Location”


09) Copy the required logs till date for which the user requested for restore  to a different location in log sequence. Run the below cmd for checking any damaged log files.

eseutil /ml eXX


a) Navigate to the location where you have copied the required logs which we saw on the previous step while running eseutil /MH. Copy the  required logs in log sequence and then run the command.(usually soft recovery gets completed  with /a if it initially fails with required logs)

b) While running eseutil /ml e00 we need to specify the number accordingly to the sequence of the log generated. EX  in our case the log sequence starts with E06 so we  have mentioned eseutil / e06.If the log sequence is going to be E03 then we need to mention eseutil / E03

c) All the required logs should show ok.Else the restore will not be successful.


10) Perform soft recovery to bring the database to the clean shutdown by running the below command.

eseutil /r /a exx  /d “DB location” /l “log file location”


Modify the location accordingly and run the above command and you will get the below output

Restore1


11)You will get the below output once the soft recovery is complete


Restore2


12) Now when you check the database health it should show in clean shutdown as below

Restore3


13)      Create a new recovery database with the below command

New-MailboxDatabase -Name RECOVERYDB  -Recovery -LogFolderPath “path location” -EdbFilePath ” path location” -Server  Recovery server name

Note:  If the below steps are not followed you will get error and the DB will not mount.

Do not mount the RDB which you have created.We need to rename the database which we repaired according to the RDB name .In our case we need to rename the EDB file as RECOVERYDB.edb


14) Check if the mailbox is present in Recovery database by running the below command. We are taking it as an output for our reference.

 [PS] C:>Get-MailboxDatabase RECOVERYDB| Get-MailboxStatistics   > D:output.txt


15)  Export to data to test mailbox folder or restore mailbox account from which we can extract the user data later.

 [PS] C:>New-MailboxRestoreRequest -SourceDatabase RECOVERYDB -SourceStoreMailbox “john”  -TargetMailbox recoverymbx -TargetRootFolder “testrecover”–AllowLegacyDNMismatch


16) Run the below command to check the mailbox restore status.


[PS] C:>Get-MailboxRestoreRequest   -Status Queued

Wait for 10 minutes and run the below command and the restore will be completed.

Get-MailboxRestoreRequest   -Status Completed

After restore gets completed extract the PST from the restored mailbox and hand it over to the user.

Thanks

Sathish Veerapandian

Monitoring Hub Transport Server

Monitoring the queue is one of the important tasks in the Daily Exchange Server Check list.

  I have identified and modified a script for monitoring the Transport Queues on all the Hub servers .I have tested this output. This script runs on all hub servers and then it triggers an output email to the given recipients. Below are the screenshots and the script which will be helpful to us in terms of monitoring the Queue in the exchange 2007 & 2010.

Image    

Output of the HTML result.

Image  

Also this can be sent to a recipient email address and here is the  sample output of an test performed ‘


Image  


Below is the Script file 

 ***************************************************************************


$Msg = new-object system.net.mail.MailMessage


$msg.IsBodyHtml = $True


$msg.Body = $Queue


$msg.Subject = “Hub Transport Queue Information”


$msg.To.add(“Sathish@exchangequery.com”)


$msg.To.add(“Administrator@exchangequery.com”)


$msg.From = “Sathish@exchangequery.com”


$SmtpClient = new-object system.net.mail.smtpClient


$smtpclient.Host = ‘testlab.exchangequery.com’


$smtpclient.Send($msg)


$Queue = Get-TransportServer | Get-Queue | Select Identity,DeliveryType,Status,MessageCount,NextHopDomain,LastRetryTime, NextRetryTime | ConvertTo-Html -head $BodyStyle


$BodyStyle | Out-File C:\scripts\QueueInfo.html


$BodyStyle = “<style>”


$BodyStyle = $BodyStyle + “BODY{background-color:peachpuff;}”


$BodyStyle = $BodyStyle + “TABLE{border-width: 1px;border-style: solid;

border-color: black;border-collapse: collapse;}”


$BodyStyle = $BodyStyle + “TH{border-width: 1px;padding: 0px;

border-style: solid;border-color: black;background-color:thistle}”


$BodyStyle = $BodyStyle + “TD{border-width: 1px;padding: 0px;

border-style: solid;border-color: black;background-color:PaleGoldenrod}”


$BodyStyle = $BodyStyle + “</style>”

***************************************************************************


Script for removing adding users from multiple distribution groups/Specific Distribution Group

Adding and removing users randomly from a Distribution group for an administrators is always an hectic job.
For example if an user who is an part of HR team leaves the company then administrator will receive an request from the HR team to remove the user out of all the HR distribution group.

This is an painful job for an admin to find the user on all associated distribution groups and then remove the user.
This job will be simple if  there could be some kind of an automation script which could remove the users from the associated distribution groups

This task can be achieved by using Dsmod and tweaking the DSmod according to our criteria.Below script will be useful in terms of removing users who have left the organization from their department  associated distribution group.

Step 1: copy the below text and save it in batch file

FOR /F “usebackq delims=” %%* in (“c:\test folder\users.txt”) do (
DSGET.exe USER “%%*” -memberof | DSMOD.exe GROUP -C -RMMBR “%%*”)

I have created an user named exchangequerytest and exchangequeryIT to execute this script as shown belowImage 


Step 2: Add the users DN in a text file in your own desired location or the test location which i have specified in the batch file

EX:
Test Location where i save list of users whom i need to remove

c:\test folder\users.txt


Image

Copy the DN name of the users and not alias

use the following command to get the alias –

Below is an sample output for query for an admin account

C:\scripts>dsquery user -name administrator
“CN=Administrator,CN=Users,DC=Exchangequery,DC=com”

Copy the output and save it within quotation as shown above in the test location specified in the batch file

Then navigate to the folder where we have the batch file saved and it will pick the users from the text file we have specified and will remove them automatically from all the distribution groups as output shown in the below example.We do not need to specify any DG name

Image

 Finally the user is removed from the distribution group

Image


 The above batch file will remove  the user from all ditrsibution group he was member of.In few cases we might come across some scenario in which we need to remove only from a particular distribution group.You can use the below script to remove from a specific distribution group

Below is an example for removing the user only from the group ITDEPT

FOR /F “usebackq delims=” %%* in (“c:\test folder\users.txt”) do (
dsmod group “ITDEPT” -rmmbr “%%*”)

Note: In the dsmod group ” ” specify the DN of the ITDEPT group and it will remove the users only from ITDEPT group. 

Steps to run Process Tracking Log (PTL) tool for use with Exchange 2007 and Exchange 2010

Monitoring the mail flow  in an organization in the parameters of top email senders,non delivery report triggered,top domain sent list ,large email attachments is a tedious job for an exchange admin.

In-order to overcome these hectic scenarios and make the job of admins simpler Microsoft has introduced  Process Tracking Log which made the job very simple

Below are the steps to run the Process Tracking Log

Step 1 : Download the vb script and save it on “C:\” drive of your Hub server

Download Link : http://gallery.technet.microsoft.com/Process-Tracking-Log-PTL-904448


Step 2: Create this directory in your hub server for output file to be saved

c:\temp\MSGTRACK\Output\


Step3: save all your accepted domains in the below directory

c:\temp\MSGTRACK\Output\Archive\Get-AcceptedDomain.log


Step 4 :To parse one file in a single directory :

Image

To parse all files in a single directory:

Image


Output will be saved here: c:\temp\MSGTRACK\Output\

Below are the few examples of the outputs generated after running this script :

Image


Image


Image


References : http://blogs.technet.com/b/exchange/archive/2011/10/21/updated-process-tracking-log-ptl-tool-for-use-with-exchange-2007-and-exchange-2010.aspx