Exchange 2016 policy tips explained

Policy tips are used to notify senders who are violating the company security policies.
For example if you have a DLP configured on your exchange to prevent users sending credit card numbers, this policy tip can notify end users about the risk of sending this email since you are violating the company’s compliance policy.

Also there is an option to provide a business justification for the message that you are sending  via policy tip.These policy tips are managed by the exchange administrator

What is the difference between Mail tips & Policy Tips ?

The policy tip configuration are applicable only to the DLP rules configured in your environment.

Mail tips settings are specific to each exchange account that you have configured outlook to connect  . There is an option to set mail tips preferences for each account by selecting that account in the apply to this account.

An example below for mail tip

M1

Mail Tips is an organizational config which can be viewed by running the below command

Get-OrganizationalConfig | fl mail*

M2

How does policy tip and mail tips work?

EWS is the main component for both policy tips and mail tips.
The service configuration operation in ews is responsible to get the configuration information for policy tips and mailtips.Service configuration uses WSDL (web service definition language) operation.

GetServiceConfiguration operation for policy tip returns  below things:

Policy nudges- Policy nudges for display in your client.
PolicyNudgeRulesServiceConfiguration – Contains the policy tip configuration data
PolicyNudgeRulesConfigurationType – Specifies the set of DLP rules and classification definitions that are sent to a client.
PolicyNudgeRulesType – Specifies a collection of DLP rules.
PolicyNudgeRuleType – Specifies a single DLP rule.

How Policy Tips functions in the background:

a) Sender Composes a new message and addresses the message to a recipient.
b) During message composition the client submits a GetServiceConfiguration (Policy Nudges) request  through the  Exchange web services.The request is submitted as a SOAP message over HTTPS.
c) Exchange Web Service receives this SOAP request and uses the information to authenticate the SOAP request and then queries:
Active Directory – for the recipient. The active directory request is executed as an LDAP query.
Mailbox Servers – To retrieve DLP configuration and check the policy tips message notification configured for this DLP.
The Active Directory and mailbox servers then return the results to exchange web services.
Exchange web services – returns the result to the client.
Client-  will be able to see the Policy Tip information for that user account who is trying to compose an email which does not meet the company compliance policy according to the configured DLP.

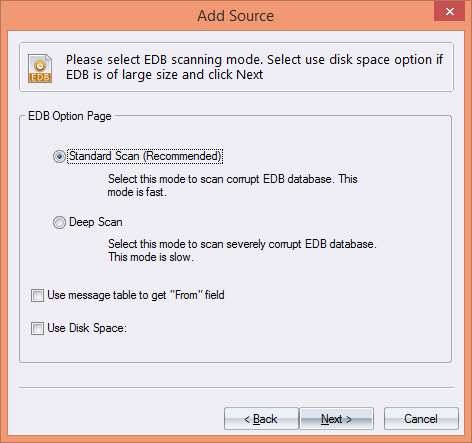
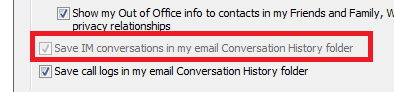
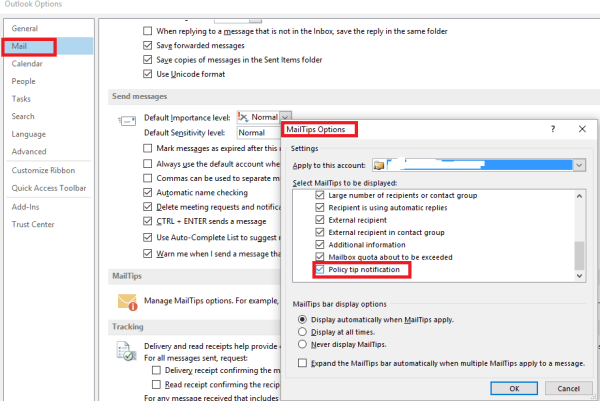
In-order for the policy tip to work on Outlook the below option  policy tip notification must be enabled on the client side.

p1 (1).png

To enable the policy tip for the DLP we need to select either enforce or Test with policy tips option on the DLP we created like an example below

P2

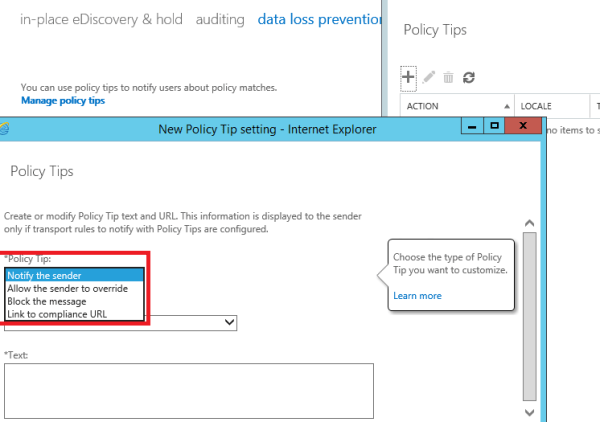
We can further customize the policy tip from the below options

Notify Only – This shows an informative Policy Tip notification message about a policy violation.But the sender can send this message.
Allow the sender to override – Block the message unless it’s a false positive, Block the message, but allow the sender to override and send.
Block the message – Your text only appears when a Block the message action is initiated.
Link to compliance URL – This link is displayed in the Policy Tip when a user clicks the More details link.

P3


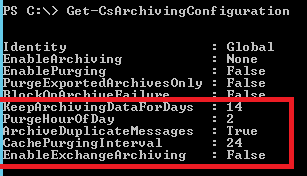
Further the policy tip configuration can be viewed by running the below command

Get-PolicyTipConfig | fl 

Note:

1.Policy Tips are available to people sending mail from Outlook 2013, Outlook Web App, or OWA for Devices.

2. Policy tips aren’t supported in Office 2010 or earlier versions of Office.

Thanks & Regards

Sathish Veerapandian
MVP – Office Server and Services

Lepide Exchange Recovery Manager – Product Review

For one of my colleague customer project  where the database was corrupted and they did not have any backup in their environment. He reached me for a help and suggestion to recover this data.

So what  we all did in that situation is, searched online for a solution, and came across Lepide Exchange Recovery Manager. After a short trial I quickly determined that it would do what we  needed enable me to restore this data quickly and easily. I found this solution specifically helped me with both the data recovery, Exchange to Office 365 migration and the backup/restore. Let me share with you my experience of using Lepide.

How Lepide Exchange Recovery Manager works

There are two main components of Lepide Exchange Recovery Manager; the source and the destination. Before proceeding for Exchange recovery, both source and the destination must be specified.

Adding Source

  1. It gives you multiple options to select your source. After Exchange corruption, I was left with an offline EDB file only so I added it as a source.

LP

  1. After selecting the source type, the following dialogue box appeared.

LP1


  1. There were two ways to add EDB files.
  • Select the EDB files manually: To select the EDB files manually, click on the Browse button and then select the location where the EDB file is stored.

LP2

  • Search for EDB: Search the computer and shared locations to add the EDB files.
  1. Click on the Search button to access the search dialog box.
  2. Click on the Browse button to select the location. After selecting the location click on the Go button.
  3. Then click on the Search button to start the search.

LP3

  1. Select the desired EDB file from the result displayed and then click OK.


  1. Select the EDB scanning mode and then select the next button. There are two types of EDB scanning:


  • Standard Scan: If your EDB file is less corrupted or if you just want to migrate the data from a working offline EDB file to any destination then you can opt for Standard scan.
  • Deep Scan: If the EDB file is severely corrupted, large sized, or oversized, then you can opt for deep scan.

I simply opted for Standard scan, which is also a recommended method for scanning.

LP4

  1. Click on the Next button to start the scanning process. After the successful completion of scanning, the following wizard appeared.

LP5

  1. Click on the Finish button to complete the process.
  2. The selected offline EDB files will be showed in the Source List.

LP6

Adding Destination

  1. I then needed to export the mailboxes in the EDB to another Live Exchange Server, so I selected Live Exchange Server as a destination (there are other destinations options as well, as shown below):

LP7

2. After selecting the destination, the following wizard will appear.

It gives you five ways to add mailboxes and public folders as destination. I was having multiple mailboxes, so I opted for connect multiple mailboxes option.

lp8

3. To get the list of mailboxes, establish the connection with the Exchange Server.

4. After the successful connection, the user mailbox list appeared onscreen.

LP9

5. The users whose mailboxes were to be recovered had to be selected in this stage and the software will connect with the respective mailboxes.

LP10

Source List Operations

Select the folder from the source list to display the list of the messages.

LP10

The last step was simply to copy and paste the selected mailboxes into the destination and I had all the important data in a working state all again.

There were many more options to enable you to accommodate different scenarios.

Source message operations:

  • Filter messages – to streamline mailbox items and move only required items
  • Sort messages
  • Copy messages – to copy and paste individual items, folders or entire mailboxes
  • Export messages – into PST or EML formats
  • Extract attachments – I liked this option which allowed extracting attachments through a range of parameters.
  • Select all

Destination List Operations

  • Copy and Paste messages

This will allow you to copy the messages from the Source Message List and paste them into the Destination message List.

  • Import MSG/EML files

This will allow you to import the MSG and EML files from the disk drive to the PST files and Mailboxes of Exchange Server/Office 365.

  • Import messages from a folder

This will allow you to import the files (MSG and EML) from a folder to the PST files and Mailboxes of Exchange Server/Office 365.

Lepide Exchange Recovery Manager (Operation Logs)

One more brilliant capability of Lepide Exchange Recovery Manager is its Operation Logs which comes inbuilt with this software. With the help of Operation Logs, one can view the logs of the items such as mailboxes, folders, and messages exported/copied from the Source to the Destination or to the disk.

LP11

Lepide Exchange Recovery Manager provided me a way to repair my corrupt databases without burning a hole in my pocket. It even didn’t used much of my resources. The process was very simple, add Offline EDB files in the source and Live Exchange Server in the destination and move the mailboxes.

Other features of Lepide Exchange Recovery Manager that attracted me were:

  • It can repair almost all aspects of your Exchange environment.
  • It has extremely powerful capabilities for search, select, preview and export features.
  • The attachments extraction feature and backup restoration.
  • With it one can even migrate their data to and from Exchange and Office 365.
  • It requires no agent installation


Final Verdict

It’s a very useful application and absolutely superseded my expectations. Its interface is really simple yet powerful. Lepide Exchange Recovery Manager provided a really simple way of ensuring a quick and painless recovery. It enabled me to both recover and export mailbox data and perform simple migrations. Any organization that relies heavily on exchange needs this in their arsenal to ensure that in the event of an Exchange Server failure they are able to recover with minimal disruption to service.

I certainly don’t want to get myself into a situation like this again, but it’s nice to know that if I did, Lepide Exchange Recovery Manager would be there to rescue me.

 You can reach them from the below sources:

Product page – http://www.lepide.com/exchange-manager/

Product download –   http://www.lepide.com/exchange-manager/download.html

Product Pricehttp://www.lepide.com/exchange-manager/buy-online.html


UC Analytics by Code Software

UC Analytics – Monitoring and reporting for Skype for Business

Available anywhere and on all devices the powerful analytics enable organisations to get smart about the areas that matter most to their businesses. UC Analytics is a user driven solution which delivers relevant information through its customisable dashboards and the automated reports.

Skype for Business allows users to connect from anywhere using different communication methods such as voice, video, IM and conferencing allowing you to improve your business outcomes in a sustainable way.

It can reduce the operational costs of travel, telecoms and IT and increase response times and productivity but only if you are smartly managing the resources. UC Analytics ensures that users are adopting the new modes of communication and the expected cost savings are being realised. It will highlight potential problems areas showing usage trends assisting you in driving user adoption through education and training.

Monitoring reports provide basic analytical reports with some useful information.

It has the comprehensive user adoption reports and dashboards for Lync but also can collate data from other data sources such as Cisco UCM, Avaya and mobile phones.

Solution overview:

UC Analytics is a monitoring and reporting tool which delivers a 360⁰ view of Skype for Business usage and associated costs. Trends in use of voice, video, IM, conferences, file transfers and app sharing can be compared highlighting user acceptance, performance metrics and cost savings enabling more effective use of resources.

It is easy to use, displaying information either through the customizable dashboard user interface or automated reports in a simple to view format suitable for use by any employee within an organisation without the need for any time consuming manual processes.

DASHBOARD USER INTERFACE

The dashboards deliver a real-time snapshot of Skype for Business usage updating every 60 seconds. Enjoy the flexibility of a user experience the way you want it, you decide what charts go where and what information is displayed. Filters can be applied directly to the charts ensuring only relevant information is displayed and click through reporting produces detailed reports with a single click.

Example of few samples:

We have an option to see which client, IP the user is logging

SFC1

This can be integrated to a dashboard  which displays automated daily reports as below

SFC3.png

We have an option to generate outbound and inbound calls and choose the pie chart options of our choiceSFC4

The report has options to choose top destinations, top usage employees , unused extensions and queue status

SFC5.png

Good thing is that this product supports multi-tenancy as well  and we have option to automate reports based on OU.

SFC6.png

We have option to collect response group utilization and check the cost usage by every users for enterprise voice.

SFC7

REPORTS

All reports can be scheduled to run automatically or generated on a one-off basis. Delivery is typically via email or saved to disk and can be in a variety of formats such as Excel, PDF or CSV. Standard report templates are available for user adoption, capacity planning, conferences, call carrier comparisons, costs and more.


The varying reporting requirements of organisations using Skype for Business means the reporting solution must be flexible enough to reflect these diverse needs. The report designer allows users to define the fields displayed in reports ensuring the information is entirely relevant. The report builder allows reports to be sorted and grouped by up to 3 levels such as date, department, employee, cost, duration or call volume. Filters can be applied including date, time, call direction, call type, employee, extension, department, response group and more. There is the option to include or exclude charts which can be bar, pie, line or stacked bar. Details displayed on the Y-Axis can also be selected dependant on report type. It is easy to brand the reports with an organisations logo and relevant colour scheme.


ALARMS AND BUDGET

It is possible to set up as many system alarms as required. When a user defined call criteria has been met such as low MOS, specific error ID, calls over a defined cost or duration an alarm is instantly delivered by email and immediate action can be taken.  Using the budget feature you can even set a monthly cost threshold on an extension, when this has been reached outbound calling is barred allowing further investigation to be made which addresses employee abuse and the threat of toll fraud.

Hardware Specification and requirements:

One web application server
Intel Xeon or Equivalent 2 cores CPU with 2.66 Ghz Intel Processor
4 GB RAM Minimum
Windows 2008/2012 OS 64 Bit + IIS + ASPNET +FrameWork 4.5
SQL 2008\2012\2014 express 64 bit
Minimum 40 GB HDD
100/1000 Ethernet Cards

Connection to remote SQL  is required where the Skype for Business LCSCDR , QOEMetrics and LCSLog databases are hosted.
The reporting URL is published on MS SQL port which is usual 1433 but it can be changed based on the requirement.

Their Team  would be happy to organise a demonstration of the solution or a completely free of charge trial  and you can reach them through their website www.codesoftware.net

Thanks & Regards

Sathish Veerapandian


Monitor Exchange 2016 services

In this blog we will look on ways to monitor the exchange 2016 services.

Configure health probes on Load Balancers:

Till Exchange 2010 the monitoring exchange we were dependent on SCOM . The SCOM management pack contained SCOM’s health manifests and correlation engines which used to collect analyze and report through SCOM.

The Exchange CAS servers were load balanced on a VIP and the LB’s used to check the CAS nodes just by pinging or telneting them frequently on port 443 , 80 to check the availability.
Behind the scene there can be the application services which might not be available like Exchange services not running but still the LB’s can ping them on required port.

In this case still the connections will be going to the CAS server on which the exchange services are stopped and unavailable .This does not give a 100 percent high availability and monitoring.

To address this From Exchange 2013 Microsoft has released a new component called Managed Availability.This is a self healing internal component that runs on every exchange server to monitor and fix any issues with the services on their own.It polls and analyzes hundreds of health metrics every second.

So there is a component called health probes which should be configured  to monitor the Exchange services on the load balancers where the exchange services are published.

So we need to monitor the below probes from the loadbalancer:

https://server/microsoft-server-activesync/healthcheck.htm
https://server/microsoft-server-mapi/healthcheck.htm
https://server/microsoft-server-owa/healthcheck.htm
https://server/ecp/healthcheck.htm;
https://server/autodiscover/healthcheck.htm
https://server/ews/healthcheck.htm
https://server/oab/healthcheck.htm

So basically servers are monitored from the load balancers on each protocol level.

Meaning as per below example if the MBX1 has issues with OWA service and managed availability marks this service down the load balancer with the above configuration will be able to identify that MBX1 has only issues with OWA through offline responder and will take only the owa service out and keep the remaining service available and functional which is very good.

PRobe

We can run the below command to check  the component state

Get-ServerComponentState -Identity servername

proxy

We can take the required components inactive during our maintenance interval as well.

We will speak  only little bit about the components that are involved in managed availability since there are very good blogs about managed availablity written by  other experts and MVP’s and do not want to explain them  again here.

Managed Availability has two  groups:
Health Sets – This is an  internal view managed by managed availability using probes, monitors, and responders.It has the inbuilt capability to recover the services on its own if any issue occurs.

Below are the main components involved in Managed Availability

Probe – Check the services and its status very frequently.

Monitor – Monitors the probe result

Responder- Component responsible to take necessary action.

Responder has again below components :

Restart Responder – Terminates and restarts a service
Reset AppPool Responder – Stops and restarts an application pool in Internet Information Services (IIS)
Failover Responder – Initiates a database or server failover
Bugcheck Responder – Initiates a bugcheck of the server, thereby causing a server reboot
Offline Responder – Takes a protocol on a server out of service (rejects client requests)
Online Responder – Places a protocol on a server back into production (accepts client requests)
Escalate Responder – Escalates the issue to an administrator via event logging.

So the above tasks  for health sets is an automated action and we do not need to perform any steps from our side.

Health Groups – Health groups are exposed to System Center Operations Manager 2007 R2 and System Center Operations Manager 2012 and reported  via dashboard.This health group is required for the SCOM to give a detailed dashboard report of the exchange status.
Any issues that can’t be recovered automatically are escalated to the Exchange 2016 Management Pack as an alert
Responder that’s relevant for the Exchange 2016 Management Pack is the Escalate Responder.
When the Escalate Responder is triggered, it generates an event that the Exchange 2016 Management Pack recognizes and feeds the appropriate information into that alert that provides administrators with the information necessary to address the problem.

Below are the new additional health indicators added in the Exchange 2013 management pack

21

Customer Touch Points: This shows the end user experiencing status. If this indicator is healthy, it means that the end users do not have any issues with connecting to exchange and using its components.

Service Components: This shows the state of the particular service associated with the component.
For example, when navigated to the service component indicator for mapi this will indicate whether the overall mapi service is healthy.

Server Resources: This shows the state of physical resources that impact the functionality of a server.
Key Dependencies: This shows the state of the external resources that exchange requires to function. Examples like network connectivity, DNS ,Active Directory, storage.

Very IMP Note: There is not separate management pack available for Exchange 2016. Exchange 2013 & 2016 uses the same management pack as of now and Microsoft recommends to use only Exchange 2013 management pack for exchange 2016.

How to respond when Managed Availability cannot resolve a problem on its own:

Exchange team has centralized Exchanged monitoring inside of Exchange.
We can no longer configure monitoring thresholds in SCOM (other than turning on or off the SCOM monitor)
So how we admins can troubleshoot when the issue occurs :

Example if the owa says its unhealthy it is reported on the SCOM via an event logged on mailbox server

Check owa component state by running the below command on the affected mailbox server
Get-ServerHealth Server1.contoso.com | ?{$_.HealthSetName -eq “OWA.Proxy”}

Also check the owa healthcheck htm availability  and see if you are getting 200 ok response by accessing the below url

https://server/microsoft-server-owa/healthcheck.htm

Then we can start troubleshooting  on the affected component and try to bring them up.

Also noticed one thing that the managed availability will generate some logs on the below location.

Am

We can disable this and its not required and perform the below steps

Goto your exchange servers

Open <ExchangeInstallPath>:\bin\MSExchangeHMWorker.exe.config in a administrative notepad

Find the Line <add key=”IsTraceLoggingEnabled” value=”true” /> and change to false and save. Reboot server and you can now clear the logs in the monitoring path and they will not regenerate

Reason not required:If you take you time to look at the bottom of this config file it will say “Used for Exchange Online only” Microsoft have confirmed this has been set to true in error.

Note: Managed availability will never record any logs for the health probes and its value is stored in temporary memory only so we don’t need to worry about the health probes.

Hope this gives some idea in configuring the monitoring for Exchange 2016.

Thanks 
Sathish Veerapandian

MVP- Office Servers and services

Install & Configure Office Online Server

In this article we will have a look at installing and configuring Office Online Server for Exchange 2016, Skype for Business and Sharepoint server.

Office Online server is released last week.The OOS is available for download only at the Volume License Servicing Center .
To use the full feature of the office online server we need to have on-premise office suite license or office 365 pro plus subscription

The Office online server can be found at below location when logged in the VLSC portal account and can be downloaded.

VLSC -> Search for “Office Professional Plus 2016 ” -> Click download -> Now you can see oos download.

Below are the prerequisites:

System Requirements:
This office online server needs to be installed on a seperate Windows server 2012 R2.
Better to have this server on the same subnet where we have the dependent applications (Exchange,Skype for Business and Sharepoint).
No other applications should be dependent on this server and should be dedicated for Office Online Server.

Software requirements:

Visual C++ Redistributable for Visual Studio 2015
Microsoft .NET Framework 4.5.2
Below operating system feature is required
Install-WindowsFeature Web-Server, Web-Mgmt-Tools, Web-Mgmt-Console, Web-WebServer, Web-Common-Http, Web-Default-Doc, Web-Static-Content, Web-Performance, Web-Stat-Compression, Web-Dyn-Compression, Web-Security, Web-Filtering, Web-Windows-Auth, Web-App-Dev, Web-Net-Ext45, Web-Asp-Net45, Web-ISAPI-Ext, Web-ISAPI-Filter, Web-Includes, InkandHandwritingServices

All available Windows updates to be installed

It requires Windows identity foundation feature to be installed.

Certificate Requirements:

It basically requires 2 URL’s similar we required for Office web apps server in the earlier version.

It requires 2 certificates one internal to trust the connections coming from the internal URL and the one external to trust the connections coming from the external outside the firewall.

The internal certificate can be generated from the internal CA and imported to  the local store root of the OOS server.

The external certificate can be generated from  trusted third party CA and then installed on the reverse proxy server.

Network configuration:

We need to create internal URL and the external URL  on the DNS for the office web apps to work.

So for the internal URL we need to create a DNS records for the decided URL pointing to the OOS server.

Similarly the external URL needs to be published on port 443 on a public ip so that the external requests will reach the OOS server via reverse proxy.

Enable client affinity and ssl offloading for this OOS requests on the load balancer

Similarly we need to ensure that the dns resolution happens between the OOS server and the application (exchange, Skype for Business and Sharepoint) so that the rendering will happen successfully.


Installation:

The installation is pretty simple and straight forward and has no complex configurations . All we need to do is to run the downloaded setup with the default values.

Configure the certificate , DNS , network configurations before we install the setup which will make our job simpler.

Post installation we need to open the powershell in elevated mode and run the below command to configure the URL’s

Command for Same internal and external URL ( which is better)

New-OfficeWebAppsFarm -InternalURL https://oos.domain.com -ExternalURL https://oos.domain.com -CertificateName “OOS certificate”

After running the above command we can run the below command

Get-OfficeWebAppsFarm 

Below are the new properties available

OOS

Also we can see the below app pools are created on the OOS server after installation.

Basically we can see Excel,powerpoint ,word and few more pools.


oos1.png

These app pools function in the backgroud to provide rich user interface to preview and modify the attachment online through OWA, Sharepoint intranet/internet sites and sharing presentation during the Skype conferences.
The reason to use this is that Microsoft has outsourced the rendering of PowerPoints etc. to the Office online Server. So this can be used as a one server to server online document rendering for these three microsoft applications.

So this will help end users in watching PowerPoints in skype conferences from a desktop web browser and view modify MS office documents in exchange sharepoint even though the MS office is not installed on that computer.

We can also verify if the farm is installed correctly by navigation to the below URL

http://servername/hosting/discovery

The response should be the below.

ooo.jpg

Now we will have a look at configuring OOS endpoints on Exchange , Skype for Business and Sharepoint.

Configure OOS server for Exchange 2016:

We can option to configure the office online server on the organizational level and the mailbox server level. So we can decide according to the requirement.This has to be decided based on the Exchange versions that is running on the environment and DR setup.

Below is the command for configuring the OOS for mailbox level.

Set-MailboxServer servername -WacDiscoveryEndpoint “https://oos.internal.domain.com/hosting/discovery&#8221;

Below is the  command for configuring the OOS for Organizational level.

Set-OrganizationConfig -WacDiscoveryEndpoint “https://oos.internal.domain.com/hosting/discovery&#8221;

For Skype for Business :

Just use the FQDN published under “InternalURL” when configuring Office Web Apps Server through the Topology Builder

Here we need to specify the OOS FQDN and the URL alone.

321.png

Once we publish this on the SFB then we are done with this part.

For Sharepoint :

Run the below commands
New-SPWOPIBinding -ServerName “oos.domain.com”

Set-SPWOPIZone –zone “external-https”

$config = (get-spsecuritytokenserviceconfig)
$config.allowoauthoverhttp = $true
$config.update()


Hope this helps

Thanks & Regards

Sathish Veerapandian 

MVP – Office Servers & Services 

How certificate revocation works

For any web application which is hosted externally will be SSL encrypted.To establish a secure connection they require a certificate.Basically these certificates have a Public key certificate which has a digital signature  for them so that it  can be trusted  for the name, address , organization it has in the certificate by the client.

In a typical public-key infrastructure (PKI) scheme, the signer is a certificate authority (CA), usually a company which charges customers to issue certificates for them.Browsers ensure user safety by requesting certificate information from the vendor instead of from the web application server.

The job of a CA who issues the certificate is not to just issue the new  certificate requests . It needs to provide the certificate revocation information for all the requests it is receiving from the clients.

In this article we will have a look at how certificate revocation works.

Below are the types of  certificate revocation check that can be configured

1) CRL Distribution. –  Certificate Revocation List.

2) OCSP – Online Certificate Status Protocol.

3) OCSP Staple .

Both the configuration (CRL & OCSP)  needs to be done  on the certificate authority properties extension tab as shown below

CRLL

CRL distribution is the core component of the certificate revocation check.so the latter two options are indirectly and totally dependent on the CRL.

The CRL configuration has below  components:

Base CRL – This will contain the whole complete list of revoked certificates (non-expired). so what ever the revoked certificates we have will be present here.

An example below of how it will show in the CRL  and will show all the revoked certificates

C
Delta CRL – This will contain only the list of revoked certificates which got from the last CRL distribution points. So this will not have all the revoked certificates.

An example of delta CRL

C1
CDP(CRL distribution points) – This CRL distribution point is the place where the Certificate Authority publishes all the certificate information. So the base CRL and the delta CRL gets information from this place only.

A real time example of CRL distribution point wehn seen from the client side.

RT.png

There are 2 types of CRL distribution points which can be configured:

LDAP – Not firewall friendly and complicated. We also need to allow LDAP port for this verification which is normally not feasible. Personally i don’t feel to allow my LDAP port accessed externally for this revocation process.

HTTP – This is easily accessible by all clients.Its very good if configured properly without exposing the internal name space. So basically we need to create a DNS records for the http url to publish ,create a virtual directory for the CRL distribution points and configure a file server.

The disadvantage of CRL’s is that the client has to search through the complete revocation list. More over they are updated periodically and chances are there the client might get wrong information until the next update happens on the CDP. Usually the browsers take more time to load all these certificates and then check the revocation for its required certificate.

OCSP : Online Certificate Status Protocol

With the OCSP the job has become very simple and easier. This removes the major disadvantage of CRL by allowing the client to check the certificate status of its only one which it owns by providing a serial number to the responder.

OCSP Client – This is the client responsible for querying the certificate check . This OCSP client is available from Windows vista and later versions of operating systems. Operating systems prior to these versions will be using the normal CRL check to validate the certificates. This client is responsible for  providing a serial number to the responder.

OCSP responder (web proxy) – This component is available from Windows 2008 server CA. Servers holding CA prior to this versions will be using the CRL to respond the
requestors. This will check the certificate status of the serial number provided by the client. Then it holds a cache entry of the requests that came so that it would be easier to provide them in future .
The OCSP client request process in shown below:
1) Client access the website via browser.
2) Client sends OCSP Request to a OCSP Responder (over HTTP) with the certificates serial number for which it requires verification.
3) OCSP Responder replies with a certificate status of either Good, Revoked or Unknown .

Certificate


2 important things for OCSP configuration

1) The Online Responder service runs under the Network Service account. So we need to make sure it Network service has read permission.
2)  we need to enable the value id-pkix-ocsp-nocheck extension for the OCSP by running the below command.

certutil -v -setreg policy\editflags +EDITF_ENABLEOCSPREVNOCHECK

This extension is to avoid the circular revocation checking so that it will not verify the signing certificate from the OCSP requestor.

OCSP stapling:

With OCSP stapling, the web server downloads a copy of the vendor’s response which it can deliver directly to the browser. So the browser do not need to contact the CA seperately rather it will contact the application directly and get the certificate.

With OCSP stapling, the application periodically queries CA and caches a response which is then provided to the browser. By default this setting is configured when we configure OCSP .

The registry key HKEY_LOCAL_MACHINE\SYSTEM\CurrentControlSet\Control\Lsa\Kerberos\Parameters\ controls this behavior.

If we want to disable stapling then all we need to do is create a DWORD called RequestOCSP in the same location and set it to value 0.

A real time example of OCSP distribution point when seen from the client side

RT

Hope this article gave some idea on how certificate revocation works .

Thanks & Regards

Sathish Veerapandian

MVP – Office Servers and Services 

Exchange 2016 install error – Tried to create new default OAB but the object already exists

We might get this below error on installing the first Exchange 2016 on a coexistence setup with Exchange 2013 or Exchange 2010.

When looking through the setup logs we can find the below reason to stop the installation.
{
                Write-ExchangeSetupLog -Warning (“Tried to create new default OAB but the object already exists; it may have been created by another instance of setup.”)
              }

Resolution :
Open ADSI Edit, go to CN=Configuration,DC=domainname,DC=local\CN=Services\CN=Microsoft Exchange\CN=Container\CN=Address Lists Container\CN=Offline Address Lists
Right click on the Exchange 2010/2013 OAB (according to the legacy exchange version you have )and click Properties.

Look for the value ‘msExchOABDefault‘ and Make this value to Not Set or False and then click apply ok.


OAB


What is this  msExchOABDefault ?
This is a Boolean attribute in the offline address book  properties.

The already existing Exchange setup might be having this value set to True.
This value can be either True ,false or Not Set .

If its set to true then this will be the offline address book for any mailbox store, databases in the organization.
Why it fails with this value True is because the Exchange 2016 setup successfully creates the new OAB container in the ADSI EDIT during the installation.When it attempts to set this value to True it fails because the old one has already value set to True.
There can be only one Offline Address Book in a Organization which value can be set to True which is the default OAB.

Now rerun the setup and it should be completed without any issues

After successful installation we can see the default value set to True on the higher version of Exchange as below

OAB1

IMP Note:

Be careful while performing the steps on the ADSI EDIT container since deleting any objects accidentally will lead to a big issue. Better to take a backup before performing any actions on the ADSI Edit.

Thanks 
Sathish Veerapandian

MVP – Office Servers & Services

Content Index and search in Exchange 2016

In this article we will have a look at content index in Exchange 2016 and its improvements

A Small background functionality of how Indexing works in the background:

Index will contain all the search data for database and its copies. This will create a search data for all the mailboxes in that database.This data will be stored in a GUID on corresponding databases on the same location in a folder  and has sub-folders in it.This will help all end users search query from their mailbox.

So basically this will be like an index for a book where we usually look for the subject page location and navigate to the right page. This index functionality is also similar where it looks for the specific email based on the executed search query from the users and returns the appropriate results.

Exchange 2016 uses the same Fast Search index which was introduced from Exchange 2013.

We can see that corresponding file FastSearchIndex as well in the below location on indexing folder in Exchange 2016 as well..
CIII2

So how does the indexing functionality work with Fast Search Index ?

This fast search index has two core components :

CTS – Content Transformation Service:

This service is responsible for performing the actual background work . When the search query reaches here it actually filters the request and performs the search content analysis with  dictionary matches, keyword matches and parsing data with regular expressions. These all  of them are preloaded registered filters on Exchange 2016 Mailbox Server. From Exchange 2016 this parsing retry logic and search result cap have increased from 30 to 250 search refiners which will give a better  search results.

As soon as the search process with this CTS reaches the corresponding database store where the mailbox resides that’s when the below event ID gets created.

CCC

IMS – Interaction Management Service:

This component receives the prepared search results from CMS service processes and then sends the search results back to the user.

The corresponding service which is responsible for these components is Microsoft Exchange Search.

actual

Rest of the content index operators statistics remains the same as Exchange 2013

C1

What happens when you rebuild an index ?

Usually we don’t require to rebuild the index until the database and copies goes in inconsistent state which is very very rare case in a well planned deployment. But when index is rebuilt Exchange will create a clone copy of the existing database and will use this copy to rebuild the index from the scratch.This will take lot of time to rebuild the index and will consume cpu ,memory and disk .

Search Enhancements and improvements from Exchange 2016:

In earlier versions of Exchange these passive database  copies index will be updated from the active copies.This will  consume more resources CPU time , memory and also disk space 10 to 20 percent.

From Exchange 2016 the indexing of passive copies is done on the passive itself rather than getting it from active copies. This will definitely reduce the utilization of the system resources and network which is very good.

Calendar search which is available only from Outlook Web App at the moment.

actual2


Enhanced server power search and hand off to the end user is available for all Outlook 2016 clients.

Which means from Exchange 2016 with Outlook 2016 client end users will not get this below screen with option “find more on the server”  anymore

actual2

By having this as a default search index from  Outlook 2016 client this will seamlessly search on the local cache(ost) ,Exchange 2016 computer and provide better results in the first search itself. Important point to note is that the client computer needs  an internet connection to have the server side search .

The good thing is that after configuring  outlook profile  for a user having huge mailbox size  on a new laptop the help desk team no longer needs to wait for the local OST file to be cached and indexed since the server side search is attempted on the first try itself.

When  offline, still the search will be performed against the Windows Search Index on the computer.

Based on my experience with the enhanced search from Exchange 2016 is really faster and returns appropriate results with outlook 2016 client.

Thanks  & Regards 

Sathish Veerapandian 

MVP – Office Servers & Services 

Skype for Business leave messages offline

From build 16.0.3331.1000 Skype for Business client 2016 there is an option to send IM to people who are offline. When the users sign in to the Desktop  client all the missed IM conversations will be notified.

We need to follow the below steps to enable this feature for all users.

Basically we require 2 parameters that needs to be enabled on the client policy in order for this feature to work.

EnableIMAutoArchiving

DisableSavingIM

By default this value will be set to null with no values as below.

SFB.png

The default option is set to null which means it will save the conversation history locally on the PC and mobile devices and not on the server side unless the option EnableServerConversationHistory value is set to True.

We have 3 options to set:

1) DisableSavingIM value to Null 

When set end users will have the option either to select or uncheck the option save IM conversations in my email conversation history folder.

2) DisableSavingIM  value to True 

When set end users will not have the option either to select or uncheck the option save IM conversations in my email conversation history folder. The option will be greyed out.

SFB

3) DisableSavingIM value to False 

Setting this value will not

In-order for this feature to work we need to set this value to True  since with the null option and false  it will not work.

post enabling this end users will get this notifications icon on the Skype for business 2016 client.

SFB2.png


If the exchange server integration is enabled for archiving then all these archiving data will be stored on the associated user Exchange Mailbox.

The versions of exchange it supports to integrate the oauth setup is from Exchange 2013 and Exchange 2016 or Exchange Online.
If the version of exchange is 2010 then we do not have this option to store this archiving data on the Exchange.
In this scenario the data will be stored in the Archiving SQL server database.

Below sample Dashboard report shows about IM information contained in the archiving database for IM stored on Archiving SQL database.

11

If we have the server side enabled on the Archiving SQL DB its very important we need to look for two values

Test

CachePurging Interval

The system will look for the participants who doesn’t have archive enabled and for them the transcript will be deleted from the database.

Keep Archiving data

By setting this value the system will have only the logs of specified value and purge other records which are older than the specified value.

If in case the data is stored on the Exchange mailbox then we need to make sure a retention policy with the retention tag corresponding to this folder is created which will not increase the Mailbox Quota for end users.

Below are the limitations of this sending Offline IM  feature at this moment:

  1. This feature available only for peer to peer Instant messages at this moment.
  2. This feature is not available for users sending IM to offline persons through mobile devices.
  3. The IM (senders) should be sent from a desktop/laptop thick client. Microsoft might extend this feature to all the clients in future.

Thanks & Regards

Sathish Veerapandian

MVP – Office Servers & Services

Error occured while establishing a connection to the SQL server

Recently in one of our application while trying to configure  reporting services configuration we were getting the below error while trying to connect to a SQL database.

IMG2

Checked the remote server connections for the database and it was enabled

SQL4


Went into the component services and checked the local DTC connection


Test3331

Network DTC access was disabled and hence the issue.

IMG-1.jpg

Enabled them and after MS DTC service restart checked UDL connection for the affected database on that instance.

Final

In addition to the above we can also check the execution account permission on the SQL database server.

This can also happen if the SQL service state is not running.

Make sure SQL Server service status is Running.
Also make sure the TCP/IP communication is enabled on the SQL server configuration manager on the instance where the problematic DB exists

final2

By default SQL Server runs on port 1433, if the default port is changed then these new ports should be added in the firewall exceptions.

You can also check the connectivity to the SQL Server by the below commands

netstat -ano| findstr 1433

You should get a successful  TCP listening establishment on the SQL server IP address and on port 1433 .

Hope this helps

Thanks & Regards 

Sathish Veerapandian 

MVP – Office Servers & Services