
What is Efax?
EFax® is a service that allows us to send and receive faxes using the Internet rather than a phone line. EFax® is easy to use, but it is different than a typical phone-based fax machine.
Bright fax is one of the EFax type.Bright fax is one of the best EFax type currently in the industry and they are providing excellent service to their customers. In this article we will be looking at Bright Fax Functionality and its features .
Bright Fax is a service provided by CRC.CRC has been providing fax-to-email and email-to-fax services for years. This service allows users not only to send and receive faxes through their email account, but adds ability to send and receive from anywhere, and to search, print, sort and view faxes from any web browser and it allows users to send fax from any applications (ex:Word,Outlook). Bright FAX acts as a print driver for all of the applications installed in PC.
The whole solution is hosted with CRC. There is no software or hardware to use Bright Fax. So there is no software, no hardware and no maintenance required from our Environment.
By using this we can create a user profile in bright fax for users who wish to send and receive faxes through their email accounts. This basically streamlines and automates the incoming and outgoing faxes in an organization. This can be used for sending out multiple copies of reports as fax to the partners in an organization.
Also we have a self-service administrative portal which lets admins to track all the incoming and outgoing faxes in an organization. And we can filter out our search option by group, users and recipients as well. We can also take print out of any one of the copy that was sent earlier.
In order to setup bright fax account for a user mailbox the below things are mandatory.
1) The company needs to have subscription with bright fax since the whole setup is hosted with bright fax.
2) We need to have a fax number associated with the user email address so that users can send and receive fax to those email ID’s.
Note:
Initially we will be getting a list of Toll Free Numbers created for respective regions by the ETAC Team (by Bright Fax Team Admins) for each department. We can assign any one of these numbers one by one for the account that we are creating in Bright Fax.
Even the Fax numbers can be specifically chosen by user by not selecting the Toll free numbers that we are getting from Bright Fax. But the configuration will be little bit complicated since it needs to be integrated with associated service provider which is done by ETAC Team (Bright Fax Team Admins).
Basically we have 3 types of administrators to handle bright fax accounts.
Department Administrators:
- They can Create/Edit users and request bright fax numbers for new users.
Company Administrators:
- Create/Edit department administrators and assign departments.
- View active and inactive users and administrators.
- Import an excel spreadsheet of new users to be added.
- Move users from one department to another.
- View SLA, Live Statistics, Inbound and Outbound History reports.
ETAC Administrators:
- Have all the privileges of Department and Company Administrators and they are Admins from Bright Fax Team.
- Create/Edit new customers (or companies).
- Create Company administrators for a customer (or company).
- Assign bright-fax numbers to a customer (or company).
We will be assigned into department admins or company admins (mostly it should be company admins) with which we can perform ETAC account creation.
Now we will look in how to create a Bright Fax account for a user
1) Logon to the Site http://portal.mfax.net/Mailfax/Login.aspx with the Administrator user name and password (this will be the url for everyone since the whole setup is hosted with bright fax).
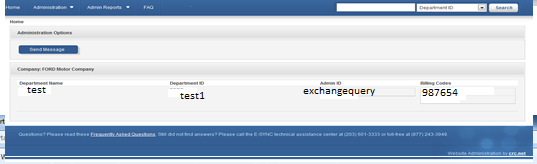
Once we have logged in we get a below screen. We have an option to choose department ID and option to send message to users. It shows the Department name,
Department ID, Admin ID and billing codes.We have admin reports option as well.
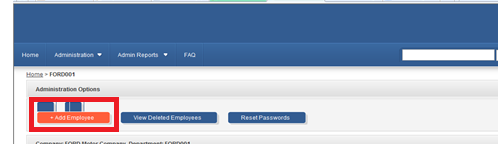
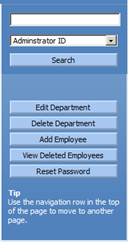
Now click on the department name. It will take you to the below screen which has Add employee. We have an option to view the deleted employees as well as to reset the passwords as well.
Leave the Billing Code field blank and enter the rest of the information as per the details in Global Address book.
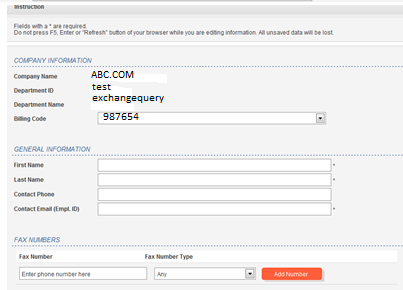
Ensure that you give the correct email address and Phone number of the associate.
Under the Fax Server Information, for the Profile field: Select the BasicPDFConfirm option from the drop-down list you have other options to select as well.
Click Add Toll Free Number. Once the toll free number is generated copy it for further communication to the user.
Communicate all relevant information including the toll free number to the end user

We have additional options to search for specific fax that was sent ,edit, delete department ,add ,view deleted employees and reset password as well as shown below.
We are done in creating the bright fax account for the user.
Now let’s see how to send a fax from Outlook 2010 to a user who has fax number and machine configured for his ID.
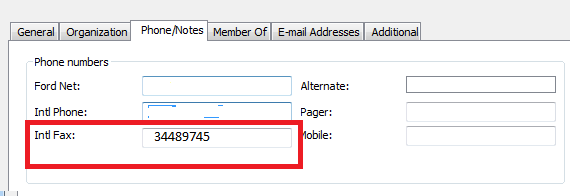
First we need to look for the user‘s fax number that he has been assigned. We can simply look this in the phone/notes tab in outlook address book by finding his contact as below.

Open a new e-mail message in Outlook and address it.
The fax is addressed using the To.line of the email message.
Simply type [fax: 8 followed by the fax number].
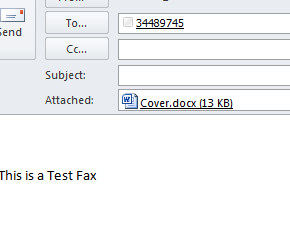
Attach the document that you wish you send as a fax and click send.
You will receive a notification as well whether the fax is delivered or not.
Cheers 🙂
Sathish Veerapandian
Technology Evangelist


What’s Taking place i’m new to this, I stumbled upon this I’ve found
It positively helpful and it has aided me out loads.
I’m hoping to contribute & help other users like its helped me.
Great job.
LikeLike
Thanks Kathleen
LikeLike