
Product Review – LepideMigrator for Exchange
I was evaluating the Lepide Software’s Exchange migration solution as it boasted numerous unique features and made some bold claims. For these features alone I felt that it was a solution worth trying. Here’s what I found:
Product Information
LepideMigrator for Exchange is an Exchange/Office 365 migration solution that allows us to migrates mailboxes and public folders between the following (irrespective of their versions and the complexity of the migration scenario): Between on-premises Exchange Servers, between Office 365 accounts, and between Exchange and Office 365. It is designed to simplify migration management and minimize resource usage to make any migration more comfortable.
Some Notable Features
LepideMigrator for Exchange comes with some features that are rarely seen in other migration solutions. Some of them are:
- Pre-migration analysis
- Load sharing with migration agents
- Migration rollback
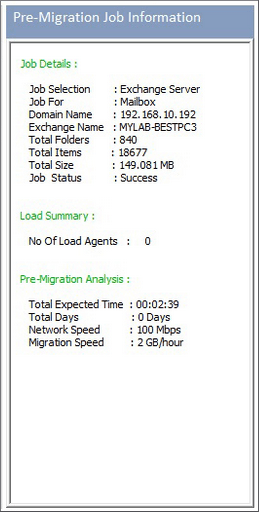
Pre-migration analysis
The pre-migration analysis feature calculates the approximate migration time from a combination of the network speed, the number of migration agents used and the size of data (public folders and mailboxes) to be migrated. Though the process is simple it is very important as it helps when scheduling the migration and allocating resources. A sample of LepideMigrator’s pre-migration analysis is shown below:
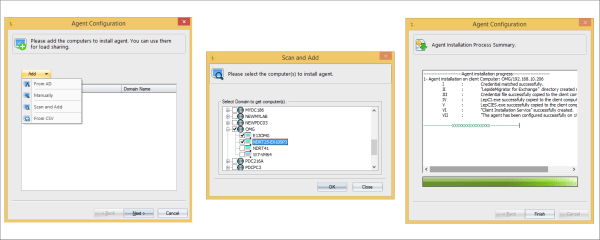
Migration agents
It can sometimes be difficult to keep to an initial migration schedule, especially when the migration load is heavy or the server resources are low. Lepide cleverly allows you to share the migration load across the network computers. Here’s an example of how to deploy migration agents:
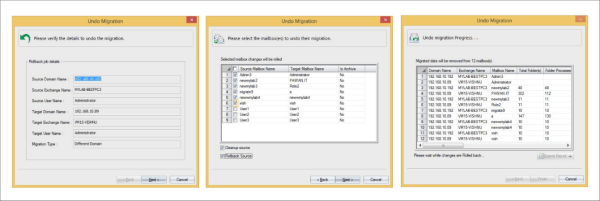
Migration rollback
Migration rollback comes in handy if something has gone wrong during an attempted migration. It simply allows you to undo the migration and related jobs and start again from scratch. It also includes a ‘Footprint Cleaner’ feature to help erase any signs of migration from the target environment. An example is shown below:
Before starting the migration…
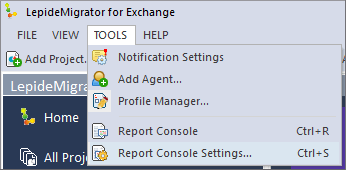
Before starting the migration you’ll need to configure Notifications Settings and Report Console Settings (both from the Tools menu). These are pretty self-explanatory so I won’t bother going through them here.
Migration using Lepide Exchange Migrator
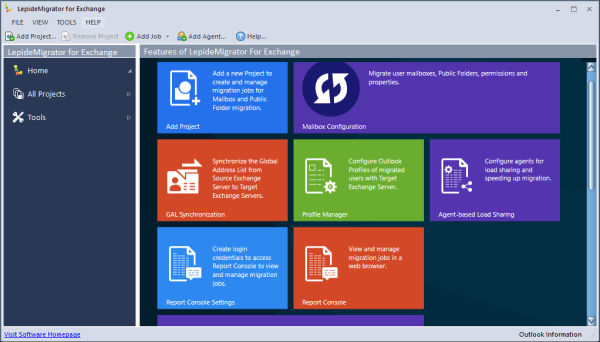
So now onto the actual migration itself. I attempted to migrate a few mailboxes from Exchange Server 2007 to a different domain in Exchange Server 2013. After successfully installing Lepide Exchange Migrator (available as a trial version), you will be shown the below homepage:
What I liked straight away about this solution was that it didn’t require me to prepare the source or destination domains as you would have to with the native methods. I was free to start the migration directly from the solution itself (although, of course, you need administrative rights over the source and destination domains).
The procedure
Migrating using LepideMigrator for Exchange involves four steps:
- Create a migration project
- Add a mailbox migration job to the project
- Add a public folder migration job to the project
- Manage migration jobs from the Reports Console
Note: After the migrating mailboxes and public folders, you can migrate their limits and permissions too. To avoid any end user impact, you can migrate Outlook rules & folder permissions, update Outlook profiles and synchronize Global Address Lists simultaneously.
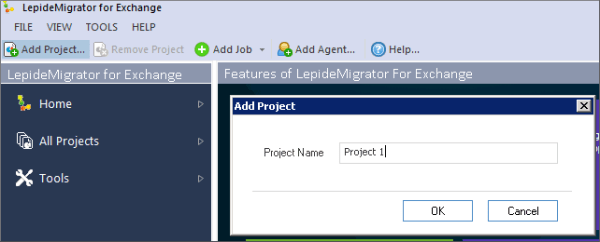
Creating a migration project
A migration project is where all the jobs related to a particular migration reside e.g. mailbox migration and public folder migration. To add a project, just click the Add Project button, enter a name for the project, and click OK. The new project then gets listed under All Projects.
Creating a mailbox migration job
A ‘mailbox migration job’ migrates mailboxes from source to target (even between Exchange 2003 to Exchange 2016). The series of steps given below will show you how to perform a cross-forest migration between two different versions of Exchange.
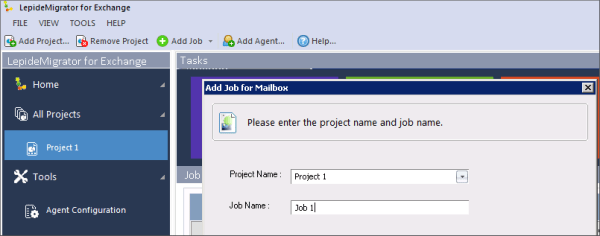
Step 1: On the Homepage expand the Add Job button and select Job for Mailboxes.

Step 2: In Add Job for Mailbox, select a project name and enter a job name; click Next.
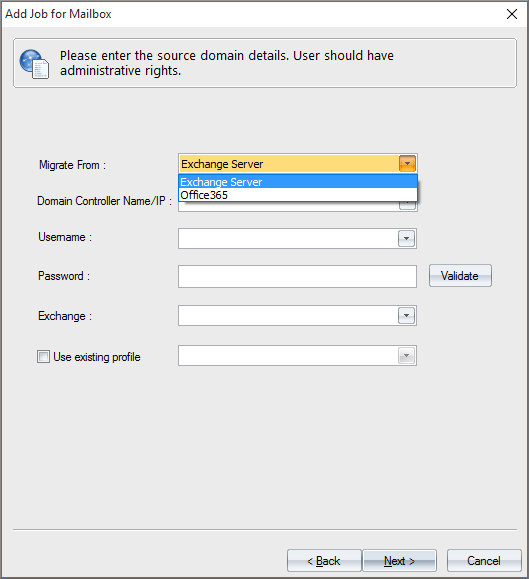
Step 3: Choose ‘Exchange Server’ in the Migrate From box and then provide Domain Controller name/IP and username; click Validate. After validation, select the relevant Exchange Server and select ‘Use an existing profile’ if there is an online profile for the user already in the system. Otherwise, the application will create a temporary profile (which will be deleted when the migration is over). Click Next.
Comments:
- As seen in the Migrate From box, Lepide Migrator for Exchange supports migration from Exchange and Office 365.
- The option to use an existing profile, saves the time that would be wasted creating a new temporary profile.
Step 4: Select the mailboxes that you wish to migrate from the list of mailboxes in the source domain (for the selected Exchange). Click Next.
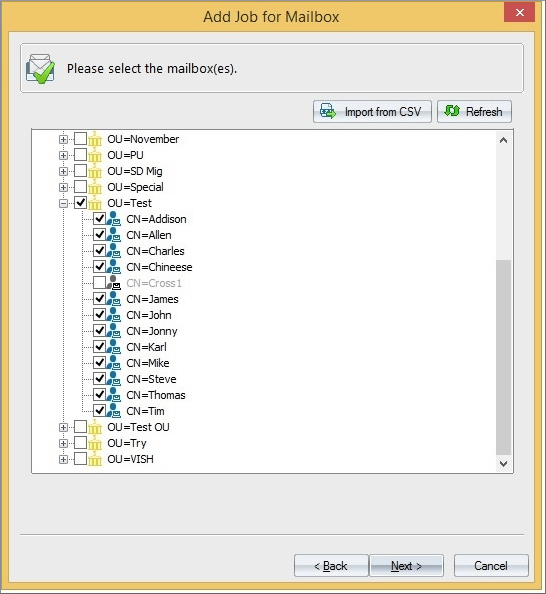
- Comments: The selection of mailboxes is easy as all the mailboxes get listed as shown. Alternately, you can import the list of mailboxes as a CSV file. This option is useful when there are a large number of mailboxes.
Step 5: Select ‘Different Domain’ in the Migrate To field (as we are doing a cross-forest migration). Provide destination domain credentials and click Validate. After validation, choose an existing Outlook profile. Click Next. When the mailboxes of the destination server are displayed, select the required ones or create new ones. Click Next.
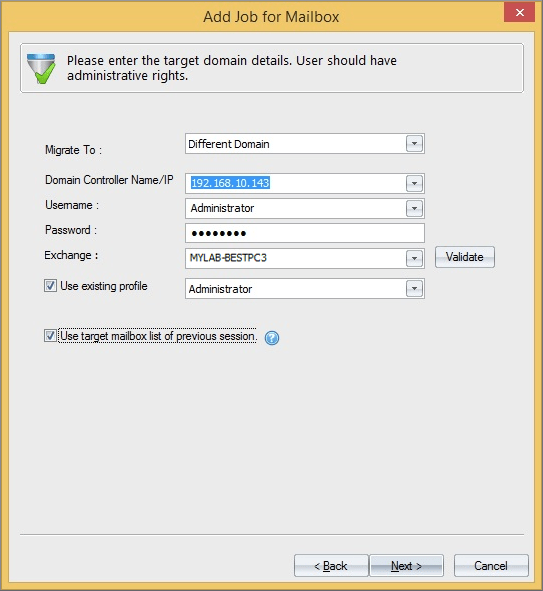
- Comments: Expand the Migrate To box to see the options available in LepideMigrator.
| To migrate: | Select (in the Migrate To box): |
| to the same Exchange Server | Same Domain (Single Exchange) |
| to new mailboxes or existing ones in a different Exchange Server | Same Domain (Multiple Exchange) |
| to new or existing mailboxes of different domain’s Exchange Server | Different Domain |
| to Office 365 mailboxes | Office 365 |
Step 6: Filter for the required messages (by message classes, date range, and folders). Click Next.
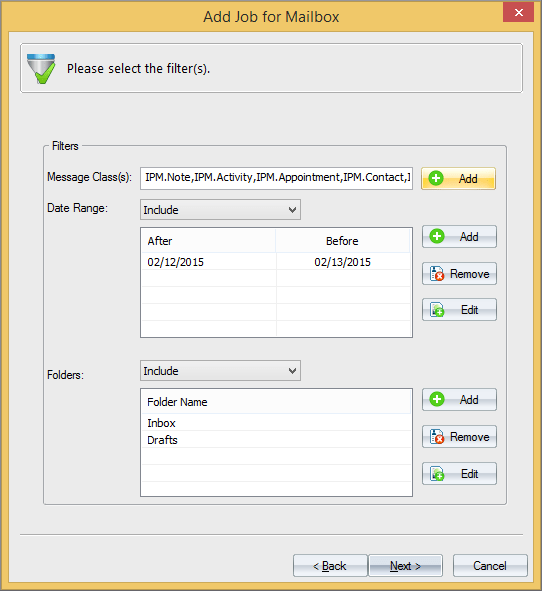
- Comments: LepideMigrator for Exchange effectively controls the selection of data to be migrated. It allowed you to select the required mailboxes from the source Exchange earlier (Step 4). Now, it allows you to filter the mailboxes according to criteria like message classes, date range, and folders. The filtered data can be included or excluded from the migration.
Step 7: Map the mailboxes from the source Exchange to existing or to new mailboxes on the target Exchange. Click Next.
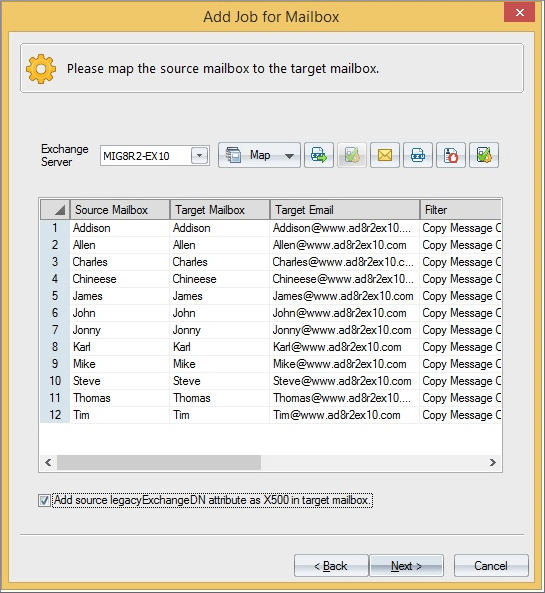
- Comments: Mapping has been simplified enormously by LepideMigrator through its Map Automatically, Map using CSV and Map Selected Mailboxes options (these options can be seen by expanding the Map button).
Step 8: Select the synchronization options. Click Next.
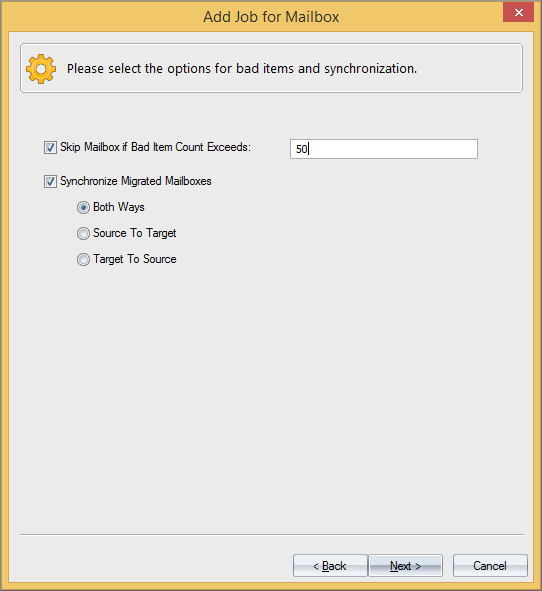
- Comments: Synchronization of mailboxes minimizes accessibility issues in the post-migration phase. Lepide Migrator can synchronize the mailboxes in source to target, target to source or both. Also, there is an option to exclude mailboxes having large number of bad items.
Step 9: Provide the details for email notifications. Click Next.

- Comments: With LepideMigratior there is no need to continuously supervise the migration. Its notifications will reach the inbox at every stage of the migration, making it an ideal tool for busy Exchange administrators.
Step 10: Specify blackout hours when you want the migration to be temporarily paused. Click Next.
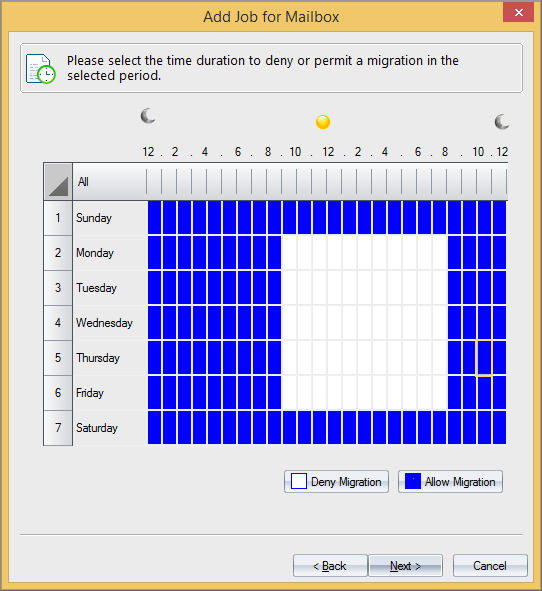
- Comments: This feature is helpful when the migration has to be stopped during office working hours.
Step 11: The migration can be run immediately or at any specified time. Provide the user details (new users can be created) to delegate the rights to access the Report Console. Click Next.
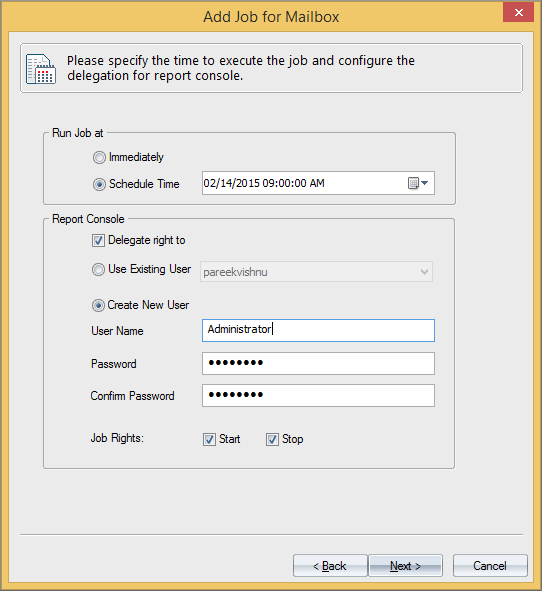
Comments: Lepide Migrator runs the migration job at specified time without any manual intervention.
- Step 12: Finally, review the job summary and click Finish.
Creating a public folder migration job
Creating a public folder migration job is a similar process to creating a mailbox migration job.
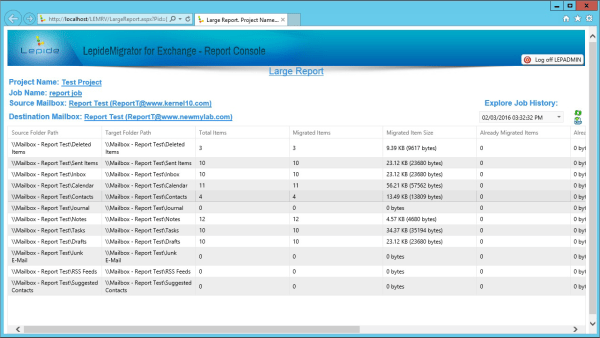
Managing migration jobs from the Report Console
Report console is a web interface that displays migration details and manage options. It lists project details and job details. Migration or related jobs can be started and stopped from here (image courtesy: Lepide).
How LepideMigrator helps condition the post-migration environment
Adapting to the post-migration Exchange environment can be a challenge for many organizations, especially when end users are not technology savvy. Unlike many other migration tools I have tried, Lepide Exchange Migrator takes care of some of the post-migration requirements for you, including:
- Migration of limits and permissions
- GAL Synchronization
- Migration of Outlook rules & folders permissions
- Updating Outlook profiles
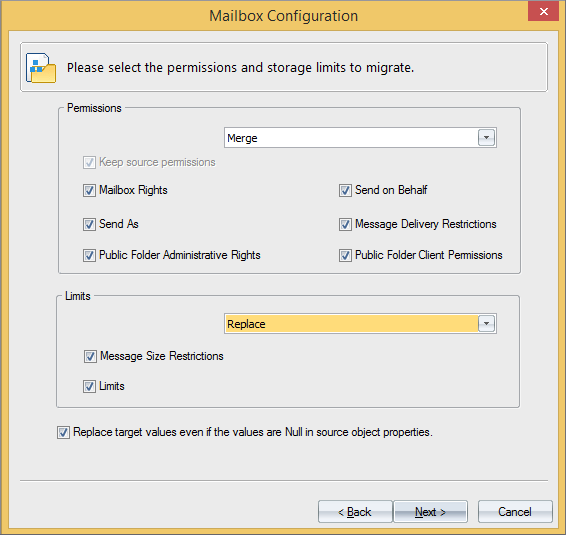
Migration of limits and permissions (of mailboxes and public folders)
As a natural continuation of mailbox and public folder migrations, LepideMigrator migrates permissions and storage limits to the new Exchange. The steps to do this are similar to those in mailbox and public folder migration with the difference being that this job migrates limits and permissions instead of data.
GAL Synchronization
Lepide Migrator allows to synchronize the Global Address Lists of the source and the target to make all the addresses or selected addresses available on the other end.

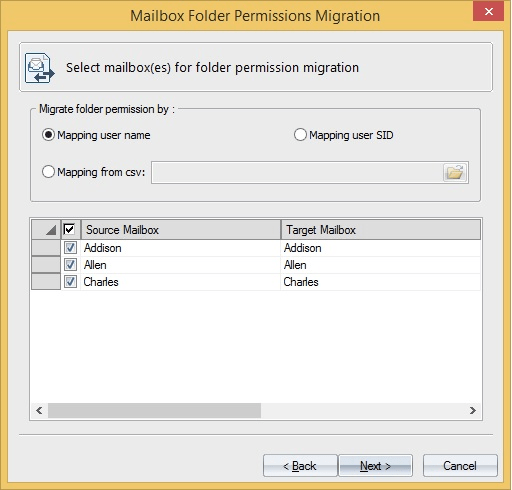
Migration of Outlook rules & folders permissions
I feel this option is very good especially during cross forest migration
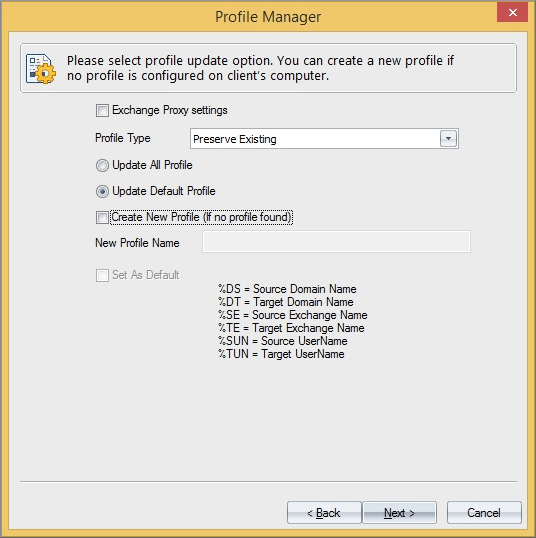
Updating Outlook profiles
The Outlook profile manager updates Outlook profiles in the target environment without any manual intervention. Though there are many pre-conditions to be met for updating the profiles, this facility is undoubtedly useful.
Final Verdict
LepideMigrator for Exchange didn’t disappoint. It did everything I wanted it to do and lived up to the promises it made. The most surprising this is how easy it was to use. I could complete the entire migration without any support. It was also very easy to manage the migration and get the all the required details.
Another important thing for me is that it supports all versions of Exchange—from 2003 to Exchange 2016— and Office 365. I didn’t have any issues with the speed of the migration either, although this will depend on your infrastructure. With a network speeds, server resources and agents in place this solution will perform very well.
Overall, I would say that LepideMigrator for Exchange deserves a solid 7/10 and worth for the money.
Product page – http://www.lepide.com/exchangemigrator/
Product download – http://www.lepide.com/exchangemigrator/download.html


Leave a comment