Author Archives: Sathish Veerapandian

Upgrade to Exchange 2013 CU5 in Graphical User Interface

Just tried installing Exchange 2013 CU5  and is pretty much easier  and went clean without any errors/warnings in my lab setup.

For the changes and fix that have been done in CU5 can be referred in my previous article

http://exchangequery.com/2014/05/28/microsoft-exchange-2013-cu5-released/

The setup can be downloaded from this location

http://www.microsoft.com/en-us/download/details.aspx?id=43103

As we are aware that the upgrade order from Exchange 2013  if we are using separate server for mailbox and cas then Microsoft recommends to upgrade the mailbox server first and then the cas server.

After the download is complete just open the setup file and it opens the below screen.Choose the required option its always recommended to check for updates and then click on next.


Image


The setup starts copying files .

Image


And then initializes the setup as below.


Image


Finally it brings the upgrade option and just click on upgrade

Image


Click on accept in the license agreement and proceed with the installation.

Image


Now the setup goes through the prerequisites analysis

Image


The setup starts once the prerequisites is completed.It goes through 18 steps as below for organization preparation.

Image


And then the installation continues  in 9 steps and completes the installation as below.Image


Just reboot the servers after the installation is complete.

We can now notice the new service Microsoft Exchange Shared cache service is installed on the server.


Image


For unattended installation/upgrade you can refer the below technet article.

http://technet.microsoft.com/en-us/library/aa997281(v=exchg.150).aspx

Cheers

Sathish Veerapandian

Technology Evangelist


Script for Conference Room Conversion

We often receive a request in daily job in messaging environment with regards to conference room. We might receive a request to convert an existing conference room from auto accept to delegate and vice versa.

It could be easier if there is a script to change the room type for these kind of bulk requests . Below script can be used for converting the conference room types. The Script configures conference rooms for Auto Accept or delegate configuration according to the input given.

You can use the below script for conference room conversion

***********************************************************************

<#

.SYNOPSIS

SetConferenceRoom.ps1 configures conference rooms for AutoAccept or delegate configuration.


.DESCRIPTION

Rooms are configured as AutoAccept room or delegate room using the parameters defined below. Both types are converted to the RoomMailbox recipient type if they are not already. This is a one-way operation.


If configured as an AutoAccept room, no resource delegates are set and the AllBookIn and AllRequestIn policies are left at true with AutoAccept processing turned on.


If configured as a delegate room, the AllBookIn policy is set to false. At least one delegate must be supplied in the syntax described below, and will be configured on the room. Delegates can be added to rooms as part of this script, and delegates cannot be removed. It will only take the existing delegate list and add to it.


.PARAMETER Room

The CDSID, DN or LegacyDN of the room to configure. Quote if necessary.


.PARAMETER AutoAccept

Boolean parameter to define whether AutoAccept is on or off. If set to $true, then -Delegates must not be used.


.PARAMETER Delegates

An array of delegates to add to the room. Specify multiple delegates using a comma, and quote individual delegates.


.INPUTS

None – no pipeline input.


.OUTPUTS

System.String.


.EXAMPLE

C:\PS>.\SetConferenceRoom.ps1 -Room NARoom100 -AutoAccept:$true

Room is configured as a RoomMailbox if not already, and all AutoAccept settings are configured. Delegates are not configured.


.EXAMPLE

C:\PS>.\SetConferenceRoom.ps1 -Room NARoom100 -AutoAccept:$false -Delegates userid1

Room is configured as a RoomMailbox if not alreayd, and all delegate settings are configured. Delegate userid1 is added to the existing list, empty or not.


.EXAMPLE

C:\PS>.\SetConferenceRoom.ps1 -Room NARoom100 -AutoAccept:$false -Delegates “userid1″,”userid2”

Room is configured as a RoomMailbox if not alreayd, and all delegate settings are configured. Delegates userid1 and userid2 are added to the existing list, empty or not.


.LINK

Insert script documentation link here.

#>

Param([string]$Room,[bool]$AutoAccept = $false,[Array]$Delegates = $null)


if (($AutoAccept -eq $false) -and ($Delegates -eq $null))

{

write-host “Cannot configure room as a delegate room without a delegate list. Please see ‘help .\SetConferenceRoom.ps1 -detailed’ for more information.”

exit

}

if (($AutoAccept -eq $true) -and ($Delegates -ne $null))

{

write-host “Cannot configure room as an AutoAccept room WITH delegates. Please see ‘help .\SetConferenceRoom.ps1 -detailed’ for more information.”

exit

}

try

{

write-host (“`r`nValidating mailbox `”$room`”…”) -ForegroundColor white

$d = Get-mailbox $Room -erroraction Stop

}

Catch

{

write-host (“`r`nCannot find mailbox `”$room`”. Reason: ” + $Error[0]) -ForegroundColor white

write-host `r`n”Exiting…”

exit

}

$RecType = (get-mailbox $room).RecipientTypeDetails.ToString()

write-host “`r`nConverting $room to recipient type RoomMailbox…” -ForegroundColor white

if ($RecType -ne “RoomMailbox”)

{

$answer = read-host -Prompt “`r`nRoom About to convert $room to object type Room from $RecType. This is required in order to configure the conference room. Do you wish to continue? (y/n)”

if ($answer.ToString().Tolower() -eq “y”)

{

set-mailbox $room -type Room

write-host “`r`nConfigured $room as recipient type RoomMailbox.”

}

else

{

write-host “`r`nOperation aborted. No longer processing room conversion.”

}

}

else

{

write-host “$room is already of type RoomMailbox. Skipping conversion…”

}

if ($AutoAccept -eq $true)

{

write-host “`r`nChecking room for existing delegates…” -ForegroundColor white

$currentdelegates = @()

$currentdelegates += (get-calendarprocessing $room).resourcedelegates

if ($currentdelegates.Count -gt 0)

{

write-host “`r`n$Room has the following delegates:”

$currentdelegates |select name

write-host “`r`nThese delegates should be cleared if the room is to be configured as AutoAccept.”

$answer = Read-Host “Do you wish to clear these delegates from the room? (y/n)”

if ($answer.tostring().tolower() -eq “y”)

{

set-calendarprocessing $Room -ResourceDelegates $null

write-host “Cleared delegates on $room.”

}

else

{

write-host “Not clearing delegates on $room.”

}

}

else

{

write-host “`r`n$Room has no existing delegates. Skipping warnings…”

}

write-host “`r`nConfiguring calendar processing on $room…” -ForegroundColor white

set-calendarprocessing $room -TentativePendingApproval:$true -OrganizerInfo:$false -additionalresponse “This meeting had the Subject, Comments and Attachments removed. This meeting is not public and should be treated as private.” -AddNewRequestsTentatively:$false -AutomateProcessing AutoAccept -BookingWindowInDays 365 -ForwardRequestsToDelegates:$false -AddOrganizerToSubject:$false -AddAdditionalResponse:$true -AllRequestInPolicy:$true -AllBookInPolicy:$true

write-host “`r`nConfigured calendar processing on $room for standard AutoAccept configuration.”

}

else

{

write-host “`r`nSetting delegate configuration on $room…” -ForegroundColor white

$currentdelegates = @()

$currentdelegates += (get-calendarprocessing $room).resourcedelegates

if ($currentdelegates.count -gt 0)

{

write-host “`r`n$room currently has these delegates:”

$currentdelegates |select Name

write-host “`r`nThe following delegates will replace the existing list:”

$delegates

$answer = read-host -prompt “`r`nIf you do not wish to proceed, delegates will not be added but proocessing options will still be confgured as a delegate room. Delegates can be added later. `r`nAlso, if there are any users in the list of additions that are already delegates, do not proceed and remove the duplicates from the list. `r`nDo you wish to proceed? (y/n)”

if ($answer.ToString().ToLower() -eq “y”)

{

Set-CalendarProcessing $room -ResourceDelegates $null

set-calendarprocessing $room -resourcedelegates $delegates

write-host “Delegates configured. These may not appear in the properties of $room for a few minutes.”

}

else

{

write-host “Skipping delegate configuration.”

}

}

else

{

write-host “`r`n$Room currently has no delegates. Adding these:”

$delegates

set-calendarprocessing $room -resourcedelegates $delegates

write-host “Delegates configured.”

}

write-host “`r`nConfiguring calendar processing on $room..” -ForegroundColor white

set-calendarprocessing $room -TentativePendingApproval:$true -OrganizerInfo:$false -additionalresponse “This meeting had the Subject, Comments and Attachments removed. This meeting is not public and should be treated as private.” -AddNewRequestsTentatively:$false -AllBookInPolicy:$false -AllRequestInPolicy:$true -AutomateProcessing AutoAccept -BookingWindowInDays 365 -ForwardRequestsToDelegates:$true  -AddOrganizerToSubject:$false -AddAdditionalResponse:$true

write-host “`r`nConfigured calendar processing on $room for standard delegate configuration.”

}

write-host “`r`n$room configuration complete.`r`n” -ForegroundColor white

***********************************************************************

Just download the script and navigate to the location through EMS

Run the below command to make it to delegate  type

.\conf.ps1 –Room   “roommbx” –AutoAccept:$false –Delegates “specify delegates”

Image

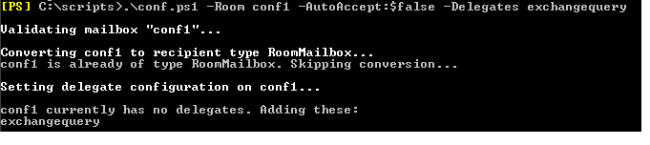
This script can be used to change the delegate of the conference room as well
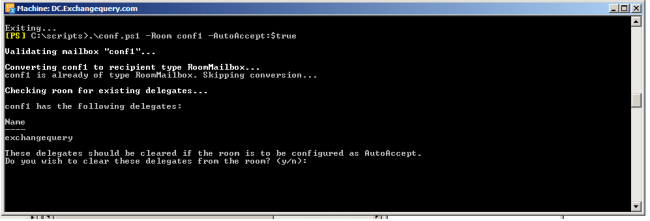
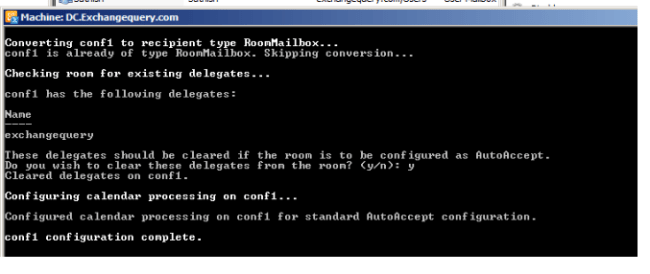
Image

For auto accept

The below output is for autoaccept

Image


Cheers

Sathish Veerapandian

Technology Evangelist

Microsoft Exchange 2013 CU5 Released

Microsoft has finally released Exchange 2013 CU5

The main Enhancements in CU5 are

1) Introduction of New service – Microsoft Exchange shared Cache Service.

The Microsoft Exchange Shared Cache Service is a new service that is added to Exchange Server 2013 Cumulative Update 5 to meet future needs of the product.

It improves System Performance through Caching few system Information.Currently this service is not been used as of now. It the readiness for enabling this functionality it the future Cumulative updates.

Note : We might be experiencing some probe config in Managed Availability frequently restarting this service Microsoft Exchange Shared Cache Service after CU5 upgrade because this service is yet to be fully functional.

Inorder to fix this Microsoft has published a Windows PowerShell script that you can use to disable the probes to prevent the Exchange Shared Cache service from restarting.More information is available in KB2971467.

2) Improvements in Managing OAB for Multi site Environments which was already mentioned by Ross Smith IV on the Exchange Team blog.
3) New options in the Hybrid Configuration Wizard
It has an option My Office 365 Organization is hosted by 21viaNet.

For more information about HCW read Micheal’s Blog – http://vanhybrid.com/2014/05/27/new-hybrid-configuration-wizard-features-in-exchange-2013-cu5/
Read more information about Cu5 in Exchange Team Blog – http://blogs.technet.com/b/exchange/archive/2014/05/27/released-exchange-server-2013-cumulative-update-5.aspx
You can look more detailed information about CU5in Tony Redmond’s blog as well – http://windowsitpro.com/blog/exchange-2013-cu5-a-good-update

Cheers

🙂

Sathish Veerapandian


Overview about Efax and Brightfax functionality

What is Efax?

EFax® is a service that allows us to send and receive faxes using the Internet rather than a phone line. EFax® is easy to use, but it is different than a typical phone-based fax machine.

Bright fax is one of the EFax type.Bright fax is one of  the best EFax type currently in the industry and they are providing excellent service to their customers. In this article we will be looking at Bright Fax Functionality and its features .

What is Bright FAX?

Bright Fax is a service provided by CRC.CRC has been providing fax-to-email and email-to-fax services for years. This service allows users not only to send and receive faxes through their email account, but adds ability to send and receive from anywhere, and to search, print, sort and view faxes from any web browser and it allows users to send fax from any  applications (ex:Word,Outlook). Bright FAX acts as a print driver for all of the applications installed in PC.

The whole solution is hosted with CRC. There is no software or hardware to use Bright Fax. So there is no software, no hardware and no maintenance required from our Environment.

By using this we can create a user profile in bright fax for users who wish to send and receive faxes through their email accounts. This basically streamlines and automates the incoming and outgoing faxes in an organization. This can be used for sending out multiple copies of reports as fax to the partners in an organization.

Also we have a self-service administrative portal which lets admins to track all the incoming and outgoing faxes in an organization. And we can filter out our search option by group, users and recipients as well. We can also take print out of any one of the copy that was sent earlier.

In order to setup bright fax account for a user mailbox the below things are mandatory.

1)      The company needs to have subscription with bright fax since the whole setup is hosted with bright fax.

2)      We need to have a fax  number associated with the user email address so that users can send and receive fax to those email ID’s.

Note:

Initially we will be getting a list of Toll Free Numbers created for respective regions by the ETAC Team (by Bright Fax Team Admins) for each department. We can assign any one of these numbers one by one for the account that we are creating in Bright Fax.

Even the Fax numbers can be specifically chosen by user by not selecting the Toll free numbers that we are getting from Bright Fax. But the configuration will be little bit complicated since it needs to be integrated with associated service provider which is done by ETAC Team (Bright Fax Team Admins).

Basically we have 3 types of administrators to handle bright fax accounts.

Department Administrators:

  • They can Create/Edit users and request bright fax numbers for new users.

Company Administrators:

  • Create/Edit department administrators and assign departments.
  • View active and inactive users and administrators.
  • Import an excel spreadsheet of new users to be added.
  • Move users from one department to another.
  • View SLA, Live Statistics, Inbound and Outbound History reports.

ETAC Administrators:

  • Have all the privileges of Department and Company Administrators and they are Admins from Bright Fax Team.
  • Create/Edit new customers (or companies).
  • Create Company administrators for a customer (or company).
  • Assign bright-fax numbers to a customer (or company).

We will be assigned into department admins or company admins (mostly it should be company admins) with which we can perform ETAC account creation.

Now we will look in how to create a Bright Fax account for a user

1)  Logon to the Site http://portal.mfax.net/Mailfax/Login.aspx   with the Administrator user name and password (this will be the url for everyone  since the whole setup is hosted with bright fax).


Image


Once we have logged in we get a below screen. We have an option to choose department ID and option to send message to users. It shows the Department name,

Department ID, Admin ID and billing codes.We have admin reports option as well.


Image


Now click on the department name. It will take you to the below screen which has Add employee. We have an option to view the deleted employees as well as to reset the passwords as well.


Image


Leave the Billing Code field blank and enter the rest of the information as per the details in Global Address book.


Image


Ensure that you give the correct email address and Phone number of the associate.

Under the Fax Server Information, for the Profile field:  Select the BasicPDFConfirm option from the drop-down list you have other options to select as well.

Click Add Toll Free Number. Once the toll free number is generated copy it for further communication to the user.
Communicate all relevant information including the toll free number to the end user


Image


We have additional options to search for specific fax that was sent ,edit, delete department ,add ,view deleted employees and reset password as well as shown below.


Image


We are done in creating the bright fax account for the user.

Now let’s see how to send a fax from Outlook 2010 to a user who has fax number and machine configured for his ID.

First we need to look for the user‘s fax number that he has been assigned. We can simply look this in the phone/notes tab in outlook address book by finding his contact as below.


Image


Open a new e-mail message in Outlook and address it.

The fax is addressed using the To.line of the email message.

Simply type [fax: 8 followed by the fax number].


Image


Attach the document that you wish you send as a fax and click send.

You will receive a notification as well whether the fax is delivered or not.

Cheers 🙂

Sathish Veerapandian

Technology Evangelist

Exchange 2013 Domain Security

In this article we will be looking at how to configure Domain Security in Exchange 2013.

This Domain Security provides session based authentication by using Mutual TLS. This new feature was introduced from Exchange 2010.The Functionality in Exchange 2013 remains the same as we had in Exchange 2010 except we need to configure this on Exchange 2013 CAS server if we don’t have edge server configured .

The main points about Domain Security

1) Domain Security is server to server level configuration for securing SMTP traffics.

2) We do not need any user level encryption i.e., without configuring any options for encryption on Outlook on sender as well as recipient end.

3) We can enable this type of connection for trusted partners to secure SMTP traffic in an organization level.

Below are the steps to configure Domain Security

I’m just going to explain this with configuring Domain Security between two organizations exchangequery.com  and toybox.com  in my lab as an example .

The first and the foremost thing is that we would need valid certificate for Domain Security for these 2 domains exchangequery.com  and toybox.com  .

The main reason for certificate is

To establish a trust between two organizations for a secure transmission.

Each server would verify the connections with other server by means of a valid certificate .This will ensure that the encrypted connection is coming from valid domain which is already in the Domain Security List.

Configuring Certificate can be achieved in the following ways (we have multiple ways to achieve this is regular practice)

1) We can use public trusted certificates for both the domains.

2) We Can Cross-import Root CA certificates on both the domains as well.

3) Assign certificates for SMTP for both Exchange organizations from a single trusted RootCA.

4) Note: The Exchange self-signed certificate TLS is only for opportunistic TLS and not for Mutual TLS and so the Exchange self-signed certificate for TLS will not work for Mutual TLS.

5) We must have appropriate names in certificate. Precisely Certificate that you assign to SMTP service must have the exact same name that your SMTP connector has (created for Domain Security) is using.

Now we will look into how to configure the Connector Settings.

In our example we are going to configure Domain Security from Exchangequery.com for Toybox.com

First we need to run Get-Transportconfig in Exchangequery.com domain to modify few setting globally for sending receiving emails from trusted partners.

Image


All we need to do is to look at below parameters

TLSReceiveDomainSecureList

TLSSendDomainSecureList

In our case we can see both the values are empty since we haven’t configured it yet.

Note: We can have multiple values i.e., multiple domains added in the TLSReceiveDomainSecureList and  TLSSendDomainSecureList since this commandlet accepts multivalued parameters.

In our case the following commands needs to be executed.

Set-TransportConfig -TLSSendDomainSecureList exchangequery.com –  for sending secure emails from Exchange query to toybox

Set-TransportConfig –TLSReceiveDomainSecureList toybox.com –  for receiving secure emails from toybox.com

Image


Now we need to run Get-TransportConfig once again and ensure that the domains are added.In our case we have toybox.com and exchangequery.com added respectively.

Image


After making the transport config changes globally now we need to configure CAS server to accept encrypted connections from the trusted partners.

Now we need to create a dedicated receive connectors for the same.

Open EAC – Click Receive Connectors – Select the appropriate CAS server.

Type desired name. Select the connector type as partner .

Image


Click next and In the IP address tab just leave all available.

Image


In the remote network settings remove the default value and specify only the public IP of the partner from which we are going to receive the encrypted email.

This is very important because if we leave the remote network as such then all the external emails might hit this connector and all unencrypted emails will not be delivered to the users.

Image


Ensure that TLS and enable domain security is enabled which is enabled by default.

Also ensure that partners is selected.


Image


Now we need to configure the send connector to send emails from exchangequery.com to toybox.com.A dedicated send connector for toybox.com from our end.

Click on new send connector and give desired name and select partner.

Image


Click on next and leave default option as MX record associated with recipient domain and don’t user smart host.

The reason why we are not using smart host is because if we are routing it to any spam filters these encrypted emails might be blocked thinking them to be suspicious.

Image


Click on next and then specify only the address space of the TLS domain. In our case we need to specify toybox.com as toybox.com is our trusted partner.

Select the source server in Exchange 2013 we have an option to select only CAS server since front end transport proxies all the requests.

Image


Click on finish.

Now we need to ensure that DomainSecureEnabled is set to True.

Run the following command to check it

Get-SendConnector –identity toybox | FL

We could see is enabled.

If it’s not enabled you can enable it by running below command

Set-SendConnector –identityConnectorName –DomainSecureEnabled: $true

Image


That’s all and we are done setting up Domain Security between Exchangequery.com and Toybox.com.

Now we are ready to send and receive secure emails between Exchangequery.com and toybox.com.

Cheers 🙂

Sathish Veerapandian

Exchange Evangelist.

Changes in OAB from Exchange 2013 CU5

We are eagerly waiting for the release date of Exchange 2013 CU5 which could fix transport agents not loaded  after Sp1 upgrade as mentioned in KB2938053, Shared mailboxes sent items  are not saved in the Sent Items folder of the shared mailbox and it gets stored in drafts folder of primary mailbox.

I just happened to read the latest Tech-net blog posted by Ross Smith which mentioned about Changes in OAB from Exchange 2013 CU5.

The main highlights are

1) Single OAB Generation Mailbox per site. Which stops multiple OAB download instances from multiple OAB generation mailboxes located in same site?

2) Having one OAB instance per site which stops multiple downloads of OAB files.

3)We can Specify  OAB generating Mailbox.

Read more from Source Tech-net Blog:

http://blogs.technet.com/b/exchange/archive/2014/05/13/oab-improvements-in-exchange-2013-cumulative-update-5.aspx

Hope this information will be helpful in planning for CU5 upgrade .

Cheers !!!

Secret about alphanumeric in Exchange Administrative Group and Exchange Routing Group

I was just wondering why there was always some alphanumeric (FYDIBOHF23SPDLT) written in brackets in the Exchange administrative Group folder whenever we navigate through ADSIEDIT console.

Also you can notice some similar kind of alphanumeric in Exchange Routing Group Folder as well (DWBGZMFD01QNBJR).

We could see this alphanumeric from Exchange 2007.

Image

No matter how many number of Exchange Servers we are deploying the alphanumeric remains the same.

What do these letters actually mean?

If we use the Caesar Cipher Code (old encryption technique) by shifting the letters we will be able to find the actual meaning of these letters.

The secret information is EXCHANGE12ROCKS. They both actually decode to the same message J

FYDIBOHF23SPDLT (EXCHANGE12ROCKS)

F = E

Y = X

D = C

I = H

B = A

O = N

H = G

F = E

2 = 1

3 = 2

S= R

P= O

D = C

L = K

T = S


DWBGZMFD01QNBJR (EXCHANGE12ROCKS)

D = E

W =X

B  = C

G  =H

Z  = A

M = N

F  = G

D = E

0  = 1

1 = 2

Q = R

N = O

B = C

J = K

R = S

The Exchange Coders while developing the product being passionate about Microsoft products especially Exchange versions they have made a secret note for all of the Exchange Administrator’s  J .

Microsoft Pelnet Tool

Microsoft has released an excellent tool called Pelnet created by MSFT Michael Hall. This tool can be used for validating the transport changes like changing config of send connectors and everything.

This tool can also be used for troubleshooting mail flow issues i.e., connectivity issues with transport servers as well.

Basically it’s a Power-Shell script which does this transport validation as well.

Few Advantages of using Pelnet

1) IT can be used in organization where the Telnet Functionality on member servers is disabled due to security reason.

2) Manual testing of Telnet and NSLOOKUP on each and every transport servers can be eliminated which consumes more time. 

Just download the script from the Tech-net Gallery

http://gallery.technet.microsoft.com/office/PelNetps1-1cb7b6d7

Open exchange management shell and navigate to the location where we have this script downloaded

You can run update-help for the list of parameters that can be included

Refer below Microsoft Team blog for few more examples.

http://blogs.technet.com/b/exchange/archive/2014/04/30/released-introducing-pelnet.aspx

Image

Below is the output of get-help with example

Image

Now as a part of testing in Exchange 2010 & 2013 mixed environment I just performed the following task

Disabled the transport services on Exchange 2013.

Created a test Send connector in Exchange 2010 .

Included only address space Toybox.com on the test send connector.

Now ran the script and below is the output

Image

It was able to identify the test send connector with the address space toybox.com.

Image

Also it throws an error connecting to Exchange2013 since we have stopped the transport services on the Exchange 2013 servers.

Additionally it creates associated txt files in the script location as well.

Image

This script can be used for daily monitoring the mail-flow for few parameters to check the source transport server’s functionality. It can be executed on a specified time by using the Windows Task Scheduler.

Things to consider before configuring Autodiscover in Exchange 2010/2013 coexistence scenarios

Based on my experience I have collected few guidelines before configuring autodiscover in Exchange 2010/2013 coexistence.

First and the foremost step that i would recommend is

Follow the steps from Exchange server deployment guide which is pretty simple and straightforward.

http://technet.microsoft.com/en-us/exdeploy2013/Checklist?state=2284-W-DQBEAgAAQAAICQEAAQAAAA~~

We need to consider below things before we proceed with the full fledged operation of autodiscover in Exchange 2010/2013 coexistence.

First we need to decide on using which internal and external url’s in Exchange 2013.

The following Steps needs to be configured in this order:
Configure Exchange 2013 external URLs.
Configure Exchange 2013 internal URLs.
Enable and configure Outlook Anywhere in Legacy i.e, (Exchange 2010 & 2013).
Configure service connection point,Change SCP of Exchange 2010 CAS VIP to Exchange 2013 CAS VIP.
Configure DNS records.
DNS entries should be pointed to Exchange 2013 CAS from Exchange 2010 CAS.

Note: To allow your Exchange 2013 Client Access server to redirect connections to your Exchange 2010 

servers, you must enable and configure Outlook anywhere on all of the Exchange 2010 servers.
You can probably run Get-Outlookanywhere on both Exchange 2010 and 2013 and see all the
internal and external url’s assigned and configured accordingly.

Note: We need to have legacy url for legacy users if they want to access outlook anywhere externally.

For Outlook Anywhere
Change authentication on Exchange 2010 CAS server client auth method to NTLM

Run the following commands on Exchange 2013 server to set outlook anywhere settings

Set-outlookanywhere -InternalHostname “hostname” -identity
“serverRpc (Default Web Site)”-InternalClientAuthenticationMethod ntlm -internalclientsrequiressl $True
Set-outlookanywhere –externalHostname “hostname “ –identity
“serverRpc (Default Web Site)” -ExternalClientAuthenticationMethod ntlm -externalclientsrequiressl $true
Set-outlookanywhere -iisauthenticationmethods basic,ntlm,negotiate -identity “Rpc (Default Web Site)”

Imp Note : Exchange 2013 supports Negotiate for Outlook Anywhere HTTP authentication,
this option should only be used when all the servers in the environment are running Exchange 2013.

To configure certificate based authentication we need to ensure following things

1. Please check if Certificate Mapping Authentication is installed on the server
2. Go to IIS manager and check if Active Directory Client Certificate Authentication is enabled.
3. Check if required Client certificate is enabled on ActiveSync VD. If not, enable it.
4. Check if basic authentication is disabled on ActiveSync VD. If not, disable it.
5. Check if the ClientCertificateMappingAuth is set true.

Apply a new certificate with all the required site names included in Exchange 2013 CAS.

For OWA –
Enable FBA authentication + windows Integrated authentication on OWA VD on exchange 2010 CAS server.
Users with mailboxes still on 2010 will be connecting to CAS 2013 and then proxy to CAS 2010.

Feel free to post your comments if any other things that needs to be taken into consideration .
Cheers

Installing and Configuring PST Capture 2.0 in Exchange 2013 Environment

In this article we will be discussing about installing and configuring PST capture agent in Exchange 2013 environment.

Since everyone will be familiar with the enhanced features which are available from the version 2.0 I’m not going to list down the improvements. For those who would need to know the enhancements you can refer this TechNet blog http://blogs.technet.com/b/exchange/archive/2013/02/22/time-to-go-pst-hunting-with-the-new-pst-capture-2-0.aspx

Installation in Exchange 2013 is the same procedure as we do it  for Exchange 2010. But only PST Capture version 2.0 supports Exchange 2013 and not the earlier version.

Now let’s go ahead with the prerequisites of installing this tool.

  1. Microsoft .NET Framework 3.5 or 3.5 Service Pack 1 (SP1).
  2. A Central Service account for managing the PST captures central service.
  3. Outlook 2010 to be installed on a PC where we have PST capture console and we are performing the export and import.


Download the setup from the below location.

http://www.microsoft.com/en-us/download/details.aspx?id=36789

We could see there will be 2 files which will be available in the setup.

PSTCapture.msi – This is the main installation file which should be installed on a PC where we require the PST capture console. All the PST capture in the organization and import happens through central service running in this PC.

PSTCaptureAgent.msi – It should be installed on the machines (client pc’s) where we need to scan for the PST files. This particular service running after the installation on the client pc’s will be sending the requested PST files to the PST capture console when requested for an import.


Note: If we do not install this agent on the client machines then we won’t be able to detect the PST files on those particular machines.

Image

Installation is pretty simple and just navigate through the setup one by one.

Image


Now specify the host name of the Central service computer you wish to select and click next. Also you can see the default port assigned for this function which can also be altered within the specified values.

Image


Once the installation is completed on the PC you can see the PST capture icon as below in that PC.


Image

When you open the wizard it has the following options.

Image

The PST search happens in 4 steps.


1st step

Select the computers that we need to perform the PST search.

Note: If we do not install the PST capture agent on the client machines then we won’t be able to detect the PST files on those particular machines.

Image


2nd Step

We have locations to search and locations to ignore as well as shown below.

Image

3rd step

We have an option to run the schedule manually as well as to run on a scheduled date.

Image


4th step

Finally we get the summary. Just click on finish.

Image

Finally we get the below screen while PST search is running.

Image

Once the search is completed it displays the below results with the list of PST files scanned.

Image

Now we need to select the scanned PST files and then create a new Import list.

Cloud Import list – For Importing PST files to an online account.

OnPrem Import List – For Importing PST files to an on premise Exchange account.

Now select the destination mailbox to which it needs to be imported.

Image

Image

You can see the import status in percent and once the import is complete you would be able to see the emails in the imported mailbox.

Image

Note: Outlook 2010 64 bit version is required on the host computer where we are performing this action through PST capture console. If Outlook is not installed then Import will be failure.

This tool is really useful in effectively managing the end users PST files during migration as well as in transition to BPOS/O365 from an on premise  setup.