Author Archives: Sathish Veerapandian

Exchange Mailbox Folder Permission Script

One of the important task of the Exchange admin to assign the folder permission to the delegates, When new delegates added to the generic mailbox and Resource mailboxes. If the mailboxes has multiple folders and sub folders its time consuming process. The script simplifies the task and eliminates the manual errors

Browse to the folder and run the ps1 file, the initial screen looks below and select the option based on your action


***************************************************************************

<#
.SYNOPSIS

Add mailbox folder permission to the delegates for user and resource mailboxes

.DESCRIPTION

Important task of the Exchange admin to assign the folder permission to the delegates
when new delegates added to the generic mailbox and Resource mailboxes.
the script simplify the task and eliminate the manual errors

#>

Write-host ”

Assign Mailbox folder Permission
——————————–

1.Assign Folder permission to Single folder

2.Assign Folder Permission to All folders(includes user created,default,recoverable mailbox folders)

3.Assign Folder permission only to the default folders(inbox,calendar,….)

4.Assign Folder permission only to the user created folders

5.Exit ” -ForeGround “Cyan”

$option = Read-host “Choose the Option”

switch ($option)
{

1 {

$Mailbox = Read-Host “Enter Mailbox ID ”

$Folder = Read-Host “Enter the FOLDER NAME ( Examplles : Inbox,calendar…)”

$delegate = Read-Host “Enter Delegate ID ”

$Permission = Read-Host “Enter Type of Permission(Author, Editor, Owner, Reviewer, none)”

$foldername = $Mailbox + “:\” + $folder

If ($folder -ne “”)

{
Add-MailboxFolderPermission $foldername -User $delegate -AccessRights $Permission -confirm:$true

}

Else

{ Write-Host ” Please Enter Folder name ” -ForeGround “red”}

;break

}

2
{

$Mailbox = Read-Host “Enter Mailbox ID”

$delegate = Read-Host “Enter Delegate ID ”

$Permission = Read-Host “Enter Type of Permission(Author, Editor, Owner, Reviewer, none)”

$AllFolders = Get-MailboxFolderStatistics $Mailbox | Where { $_.FolderPath.ToLower().StartsWith(“/“) -eq $True }

ForEach($folder in $AllFolders)

{

$foldername = $Mailbox + “:” + $folder.FolderPath.Replace(“/”,”\”)
Add-MailboxFolderPermission $foldername -User $delegate -AccessRights $Permission -confirm:$true

}
;Break}
3 {

$Mailbox = Read-Host “Enter Mailbox ID”

$delegate = Read-Host “Enter Delegate ID ”

$Permission = Read-Host “Enter Type of Permission(Author, Editor, Owner, Reviewer, none)”

$Default = Get-MailboxFolderStatistics $mailbox | ?{$_.foldertype -ne “user created” -and $_.foldertype -ne “Recoverableitemsroot” -and $_.foldertype -ne “RecoverableItemsDeletions” -and $_.foldertype -ne “RecoverableItemspurges” -and $_.foldertype -ne “RecoverableItemsversions” -and $_.foldertype -ne “syncissues” -and $_.foldertype -ne “conflicts” -and $_.foldertype -ne “localfailures” -and $_.foldertype -ne “serverfailures” -and $_.foldertype -ne “RssSubscription” -and $_.foldertype -ne “JunkEmail” -and $_.foldertype -ne “CommunicatorHistory” -and $_.foldertype -ne “conversationactions”}

ForEach($folder in $default)

{

$foldername = $Mailbox + “:” + $folder.FolderPath.Replace(“/”,”\”)
Add-MailboxFolderPermission $foldername -User $delegate -AccessRights $Permission -confirm:$true
}

;break}

4 {

$Mailbox = Read-Host “Enter Mailbox ID”

$delegate = Read-Host “Enter Delegate ID ”

$Permission = Read-Host “Enter Type of Permission(Author, Editor, Owner, Reviewer, none)”

$Default = Get-MailboxFolderStatistics $mailbox | ?{$_.foldertype -eq “user created”}

ForEach($folder in $default)

{

$foldername = $Mailbox + “:” + $folder.FolderPath.Replace(“/”,”\”)
Add-MailboxFolderPermission $foldername -User $delegate -AccessRights $Permission -confirm:$true

}

;break}

5 {

}
}

************************************************************************

copy above code and save it as ps1 as extension(addmailboxfolderperm.ps1)


Custom Transport rules in Exchange 2013

By using transport rules in Exchange 2013  we can filter, inspect or block any confidential emails that match any specific conditions with the email that matches the transport rule. By using this we would be able to prevent the leakage of the sensitive data in any organization.

Transport rules along with DLP and policy tips can be used to give end users warning informational tips when they try to send any emails which does not abide the company policy.

In-order to achieve this we need to create a transport rule first, and then create a associated DLP policy and then configure policy tips for the same. we will look into how to perform this with a small example.

Below example is a simple rule that helps us to block any emails with attachments that has a character set invoice

Open EAC – Go to Mail Flow – Select Rules

Click on the + sign to create a new rule – Give it a name

pic1


We have scope to choose as well. In my example im selecting the option if the recipient is located outside the organization this applies for external users.


pic2


We can apply a condition to this rule. Specify a character set. In my case im specifying name invoice so that all emails which contains character invoice will be sent for review and approval.


pic3


We can take the following action on the message that matches the criteria for invoice. In my case im forwarding the email for approval by administrator.


pic4


We can add an exception too by excluding few recipients who are entitled to send those messages or even according to subject or few other parameters as shown below.


pic5


We can still enhance this rule and notify end users before they try to send any emails which do not meet the company policy. This task can be accomplished with the help of policy tips.

Policy tips are informative messages displayed to the end users in owa, outlook and owa for devices before they tend to send any offending content in any organization.

They function similar to MailTips where an informational message is given to the user while he/she tries to add any attachment like pdf file which an organization restricts to send through email to external users. By using this users will come to know that this kind of email is not allowed to send and they can abide the rules.


Policy Tips works along with DLP. An associated DLP policy also should be created for the same.

To create Custom DLP Policy

Open EAC – Click Compliance management – Select Data Loss Protection – Select New Custom DLP Policy


DLP1


Now give it a name and specify the description.

Select the state to be enabled and choose option Test DLP policy with Policy Tips and click save.


DLP2


Now Click on the DLP policy created and click edit

Select Rules – You can create a new rule.

im selecting option notify sender when sensitive information is sent outside organization rule in my case.You can create a new rule or an existing one which matches your criteria and click save.


DLP3


To edit Policy Tips

In-order to do that  click edit on the custom created DLP policy and select Manage policy tips


DLP4

Click on the option notify the sender option .


pic6


Select the locale language

And specify the text message  that needs to be displayed to the end user when he/she tries to send an email which matches our Transport rule, DLP and policy tips.


pic7


Below is the example of the policy tip notification.


DLP5

Note : If you are using policy tip for SSN, Passport Numbers , Credit Card numbers with already existing DLP templates then policy tips will be triggered only  for valid passport numbers,credit card numbers and SSN numbers.

Sathish Veerapandian

Steps to configure IRMS in Exchange 2013

Information Rights Management Service IRMS is an inbuilt Messaging policy feature which is available from Exchange 2013. This inbuilt Messaging policy works along with transport rule to secure all the sensitive email transits that is happening in our organization.

By Using IRMS we will be able to inspect any sensitive email content with help of transport rules, encrypt them and then provide secure access only  to the required users.

IRM agents are built in transport agents. But however when we run Get-TransportAgent we will not be able to see the IRM agents visible. Because most of the inbuilt transport agents that come along with the installation are not visible in Get-TransportAgent and they are unmanageable from PowerShell.

IRMS works with the help of ADRMS and informational protected technology which is introduced from Windows Server 2008. ADRMS uses extensible rights markup language (XrML) type certificates to certify users and computers. We need to have AD RMS installed to use this IRM functionality.


By Using IRM following actions can be taken

  1. We can restrict confidential email to be sent only to the right recipients and other recipients can be blocked.
  2. Prevent forwarding a confidential message to other recipients.
  3. Prevent Copying and pasting a confidential message
  4. Prevent printing a confidential Message


This IRM requires Licensing to work along with ADRMS.When we enable IRM pre-Licensing is enabled by default.

There is a prelicensing agent which acts on the categorizer on the mailbox server in the transport service which attaches a prelicensing in OnRoutedMessage to IRM- protected messages.

So by this prelicensing which is issued by default by the ADRMS to the IRM protected messages end users will be able to access these emails through Outlook in online/offline mode and as well as through OWA, Active sync devices as well.By doing this the client does not need to send a request to the ADRMS for license to access these emails each and every time.


IRM works in the following clients

Manually by Outlook users – By using IRM functionality in Outlook. (This is a client side IRM from outlook and no IRM transport rule from server is triggered in this scenario)

Manually by Outlook Web App users – By using Web-Ready Document Viewing.( This is a client side IRM from outlook and no IRM transport rule from server  is triggered in this scenario)

Manually by Windows Mobile and Exchange ActiveSync device – This requires users to connect their supported Windows Mobile devices to a computer and activate them for IRM (This is a client side IRM from outlook and no IRM transport rule from server is triggered in this scenario)

Automatically on Mailbox servers – Works with the help of Transport Protection Rules from server.


Note:

A message which is already IRM protected by any of the client type like Outlook, OWA or Activesync will not be again IRM protected by Transport protection rules since its already protected. IRM purely works with the help of ADRMS encryption so all the client side IRM protection will already be processed if a user tries to use IRM functionality from Outlook or OWA.


IRMS works in the categorizer Mailbox Transport service in the following ways:


RMS Decryption agent – Decrypts the messages to provide access to transport agents for inspection.

Transport Rules agent – An associated IRM transport rule inspects the email and marks the email as IRM protected email and notifies RMS encryption agent

RMS Encryption agent – Identifies the IRM marked messages by transport rule and then encrypts them for protection.

Prelicensing agent – Attaches a prelicensing to this message in OnRoutedMessage to IRM- protected messages by AD RMS cluster.

Journal Report Decryption agent– Decrypts only irm messages with journal reports.


Now let’s see how to enable IRM in Exchange 2013.

Prerequisites to use IRM in Exchange 2013

1) We need to have ADRMS installed in our Environment

 Note: We need to have IRMS installed separately on a server. It should not be installed on a server  where we have Exchange installed.

Follow the below steps for ADRMS installation.

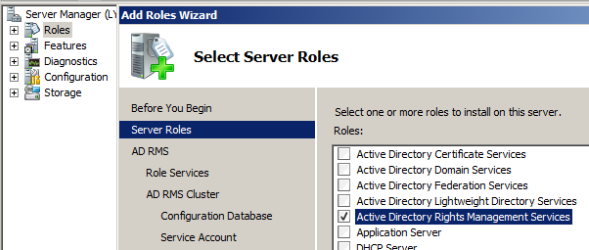
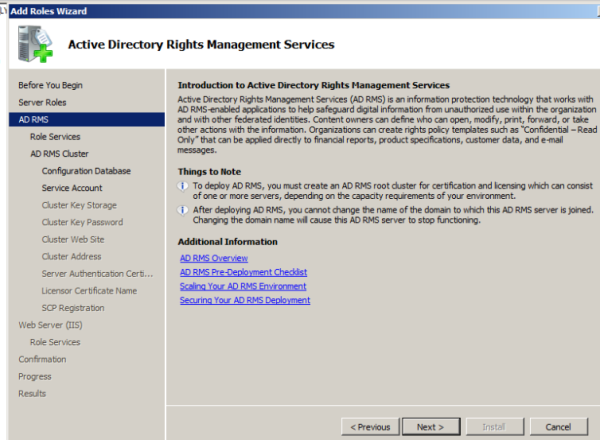
Open server manager. Go to roles and select ADRMS.


1


Click next

2


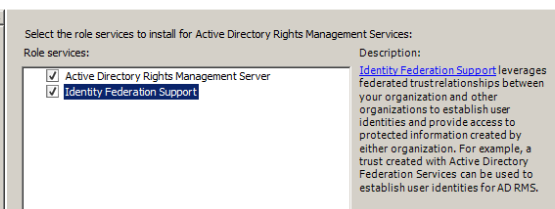
Select federation support as well if you wish to extend ADRMS to federated partners.

3


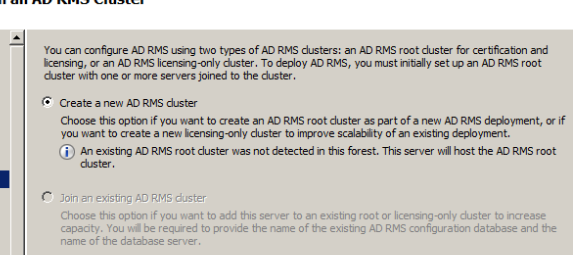
Click create new AD RMS cluster

4


Choose a location to store configuration database

5


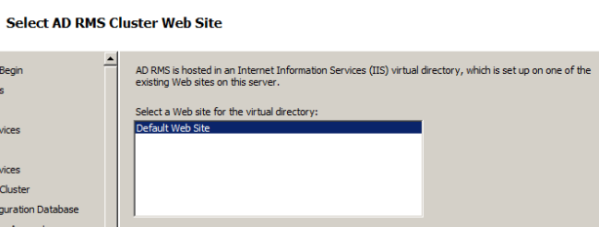
Default website is selected automatically

6


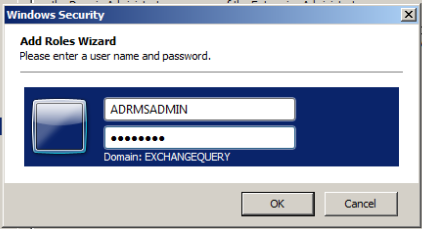
We need to create a separate service account to manage ADRMS

7


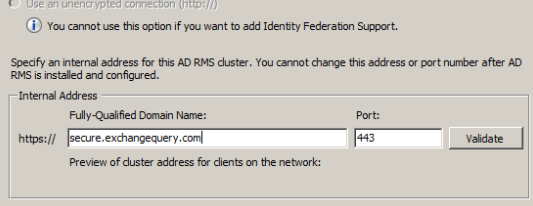
Specify the internal address to be used for ADRMS.


8


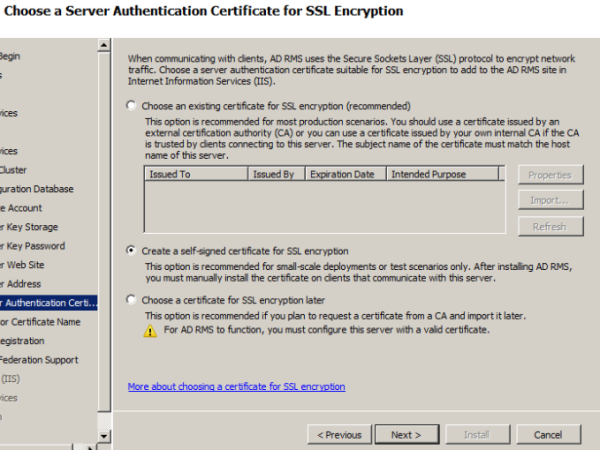
Choose server authentication certificate

9


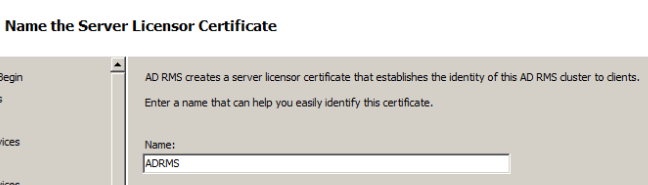
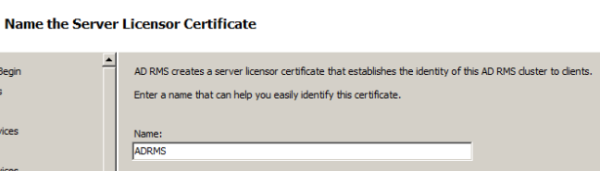
Provide a server licensor certificate which helps to identify the clients

10


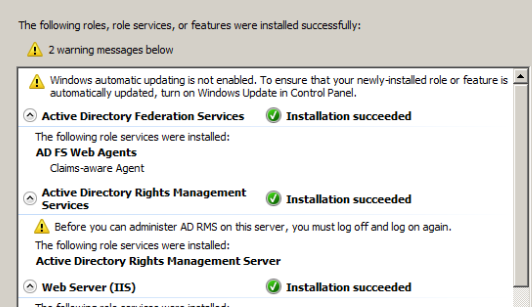
Just navigate through the wizard it’s pretty much easy and complete the installation of ADRMS role.

11


Note: By default Exchange 2013 IRM features support Microsoft Office file formats. We can extend IRM protection to other file formats by deploying custom protector.

If you need to support additional files then you will need to import custom protector in ADRMS.

For custom protectors refer http://msdn.microsoft.com/en-us/library/office/bb802693(v=office.14).aspx


2) Grant access to Exchange servers to use ADRMS for IRM. Perform the following task.

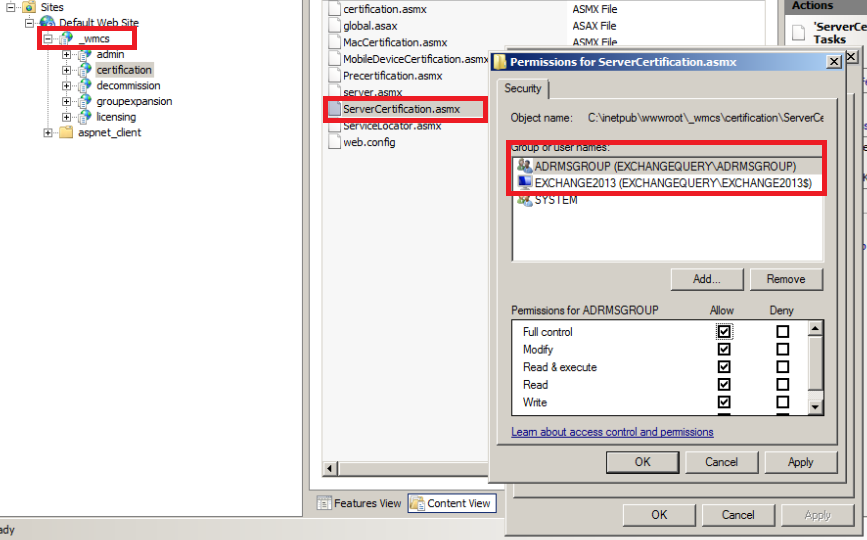
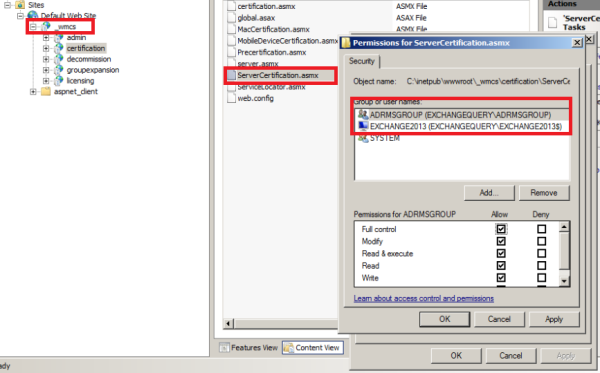
Open IIS – open default Website – Click _wmcs – Select Certification

Switch to content view – right click on servercertification.asmx and click edit permissions ensure that Exchange servers are listed as shown below.

Note:  This setting on IIS should be checked on the server where we have installed ADRMS. _wmcs directory will be visible only after we install ADRMS.

12


3) We need to create a dedicated security group for encryption and decryption of these messages by super admins

Perform the following task

Create a dedicated super user group to be used in AD users and Computers.

Open ADRMS – in security policies select super users and ensure super user functionality is enabled. If not add this user to the group.

4) Run the below commandlets to enable IRM.


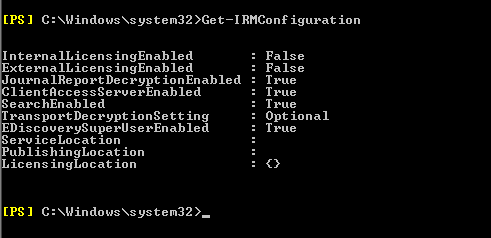
First check the IRM settings by running the below command.

Get-IRM configuration.

13


To enable on CAS –   Set-IRMConfiguration -ClientAccessServerEnabled $true

To Enable for OWA –   Set-OWAMailboxPolicy –Identity Default -IRMEnabled $true

For Multimailbox IRM search –   Set-IRMConfiguration -SearchEnabled $true

For Licensing Internally –   Set-IRMConfiguration –InternalLicensingEnabled $true

For Licensing External users –   Set-IRMConfiguration –ExternalLicensingEnabled $true


5) Create an associated transport rule for IRM for mailbox side IRM.

Note: Before creating transport security rules we need to have RMS templates loaded from the ADRMS to use in this rule. To identify the set of RMS template from ADRMS run the below command.

Get-RMSTemplate | format-list

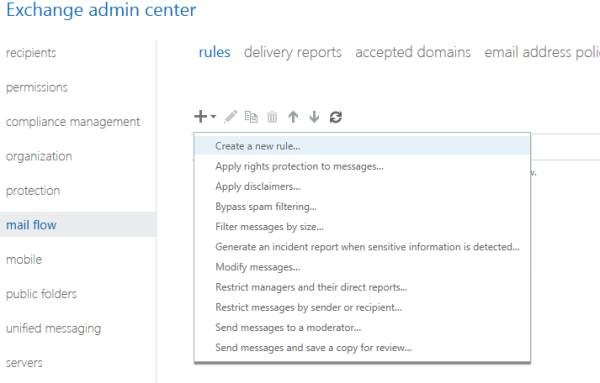
Open EAC – Select Mail flow and select – Rules

Select Apply Rights protection to Messages


14


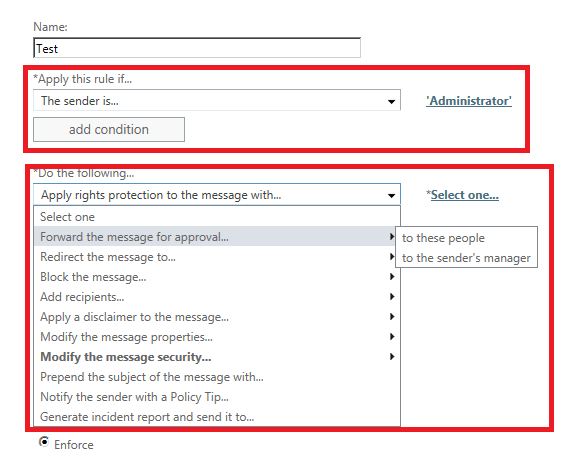
Use the Select RMS template dialog box to select a template.

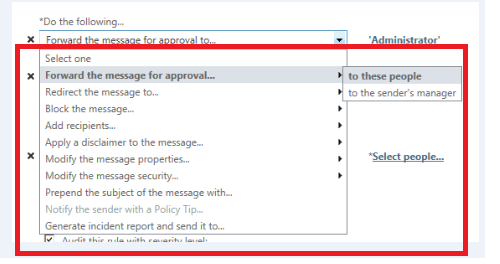
Add any exception if we need to use any exception for few senders.

Below is an example of adding an exception for Administrator. IF  any IRM message which matches the  Template chosen in IRM for Admin then we can set exception to forward the message to his manager for approval.

15


Clicks save and we are done.


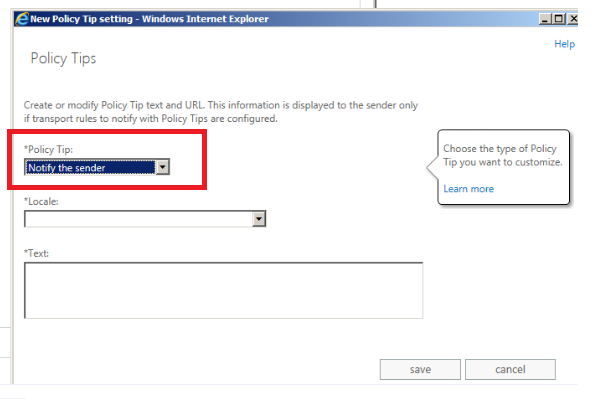
Below is an example by using Do not forward template in ADRMS. The Outlook and owa users while composing this message by organizer will receive this type of information as shown below.

s0

Also  we can use Test-IRMConfiguration commandlets to check the IRM functionality for a user

Below is an example for testing IRM config for user Adam sent emails.

Test-IRMConfiguration -Sender adams@contoso.com

References: http://technet.microsoft.com/en-us/library/dd638140(v=exchg.150).aspx

http://technet.microsoft.com/enus/library/dd298166(v=exchg.150).aspx

http://technet.microsoft.com/enus/library/bb125012(v=exchg.150).aspx

http://technet.microsoft.com/en-us/library/dd979798(v=exchg.150).aspx

Sathish Veerapandian

Customized system messages to users in different languages in Exchange 2013

In this article let’s have a look at customizing system messages (Warning mailbox limit, ProhibitSendMailbox, DSN) to users in different languages.

Let’s take an example if we have users who are using mailboxes across different regions in multiple geographical locations. In this scenario users will be having different languages as default according to their region. For example user might have his default language as French and some might have default language as English.

In these scenarios we can customize this system message according to different region so that the users will be getting the system generated emails according to their regional language.

Let’s take a scenario of customizing system messages for French users as well as English users who are residing in different locations.

So we need to deliver DSN,Quota Messages in English for SetA users and in French for SetB users. By this way SetA users gets the DSN in English and SetB users gets DSN in French.

In-order to accomplish this task we need to create a new customized quota message. We need to run the below commands.


First we need to set the language property of the user mailbox according to his region. In order to accomplish this we need to run the below commands

For French users – Set-Mailbox – identity “user” -languages “FR-CA”

For English users – Set-Mailbox – identity “user” -languages “EN-US”

1) Warning Messages

For French users

New-SystemMessage –QuotaMessageType WarningMailbox -Language FR –Text “type French text here”

S1

For English users

New-SystemMessage –QuotaMessageType WarningMailbox -Language EN–Text “Watch out! Your mailbox has reached its maximum capacity


2) Prohibit Send mailbox:

New-SystemMessage –QuotaMessageType ProhibitSendMailbox –Language EN –Text ““type english text here”

New-SystemMessage –QuotaMessageType ProhibitSendMailbox –Language FR –Text “type French text here”


3) Prohibit Send receive mailbox:

New-SystemMessage –QuotaMessageType ProhibitSendReceiveMailbox –Language FR –Text ““type French text here”

New-SystemMessage –QuotaMessageType ProhibitSendReceiveMailbox –Language EN –Text “Watch out! Your mailbox has reached its maximum capacity”

S2


4) For DSN’s we can use the below command

New-SystemMessage -DsnCode 5.3.2 -Language En -Internal $true -Text “Any English TEXTMessage”

New-SystemMessage -DsnCode 5.3.2 -Language FR -Internal $true -Text “Any French TEXTMessage”

Once after we have made the above changes users will be able to receive system messages according to their MailboxRegionalConfiguration settings.


To view the system messages we can use the below commandlets:

To view the language for user – Get-MailboxRegionalConfiguration –Identity username

For Warning – Get-SystemMessage -Identity EN\WarningMailbox

For prohibit Send – Get-SystemMessage -Identity EN\ProhibitSendMailbox

For prohibit SendReceive – Get-SystemMessage -Identity EN\ProhibitSendReceiveMailbox

S3

To modify system messages:

Set-SystemMessage -Identity EN\WarningMailbox -Text “Your mailbox is becoming too large.”

Set-SystemMessage -Identity EN\ProhibitSendMailbox -Text “Your mailbox can not send nor receive any more …”

Set-SystemMessage -Identity EN\ProhibitSendReceiveMailbox -Text “Your mailbox can not send nor receive any more …

To remove any customized system message you can use the below command

Remove-SystemMessage -Identity EN\WarningMailbox.

Refer more:

http://technet.microsoft.com/en-us/library/bb310757(EXCHG.80).aspx

http://technet.microsoft.com/en-us/library/aa998878(v=exchg.150).aspx

Sathish Veerapandian

Modifying System Generated Mailbox in Exchange 2013

In this article we will have a look at the system generated mailbox and steps to modify system generated mailbox in Exchange 2013.

By default the system generated mailbox comes from sender “Microsoft Outlook”. Sometimes we might need to change the display name of the system generated mailbox because some of the users might use Non-Microsoft clients like MAC, Linux etc., and cannot understand if system generated emails are why sent from “Microsoft Outlook”  sender and this could create confusion for end users if they have configured outlook on multiple PC’s thinking  that could cause trouble in sending email to few users.

In these kinds of scenarios we can specify identical display for Microsoft Exchange Recipient, so that it would be easily understandable by all client users in domain that the message is sent from the server and not from outlook. Also there could be scenarios where users would reply for an ndr message received  if he/she is not aware of these system generated emails. It could be better if we have a mailbox setup which is monitored by admins so that users can reply for these ndr’s and can be addressed.


Now let’s have a look into few of these parameters involved first.

Basically there are 2 types for system generated Mailbox in a  organization that exchange server can send. It can send NDR’s for internal users for mailbox limit quota warning, non-deliverable reports for internal senders. MicrosoftExchangeRecipientPrimarySmtpAddress attribute is involved in sending ndr’s to the internal users. Also it can send external NDR for external recipients as well who is not part of accepted domain in our organization. Externalpostmasteraddress attribute is involved in sending ndr notification to users who are not part of our domain. Both these attributes are in organizational level and can’t be altered from server level.

We can use the below command to check the value of the MicrosoftExchangeRecipientPrimarySmtpAddress

Get-OrganizationConfig | FL MicrosoftExchangeRecipientPrimarySmtpAddress

When we run this command it shows a default value with alphanumeric@domain.com as shown below


T2

We can use the below command to check value of Externalpostmasteraddress

Get-TransportService | FL Identity, ExternalPostMasterAddress

By default the Externalpostmaster address value is not set to any value. Which means by running this command usually the result will be null as shown below.

T1


In my case it is just showing the list of hub transport server , transport service(exchange 2013) and edge server without any values  since  I have not set any specific mailbox.

So what happens if there is no value set for ExternalPostMasterAddress.

The NDR for external users will be sent in postmaster@domain.com format from our domain if we have only mailbox and cas servers. It will use edge server to send out these external ndr’s if we have edge configured and the value will be postmaster@edgeserverfqdn.


So if you need to change this value run the below command

Set-TransportConfig -ExternalPostMasterAddress postmaster@contoso.com

To change the value of MicrosoftExchangeRecipientPrimarySmtpAddress  is little bit tricky. We can change this value to a different mailbox however if we make any organizational changes by running set-organization command then it reverts back this value to default value Microsoft Outlook.


First we need to change the value by running the below command

MicrosoftExchangeRecipientEmailAddressPolicyEnabled $False

And then we need to set an appropriate email address from which it can send out NDR’s to the internal users.

Set-TransportConfig MicrosoftExchangeRecipientPrimarySmtpAddress localit@exchangequery.com

T5


Note:

MicrosoftExchangeRecipientEmailAddressPolicyEnabled –   If this parameter is set to $false, you must manually add new e-mail addresses to the Microsoft Exchange recipient when e-mail address policies are added or modified.

There is an alternative way by which we can achieve this setting. We can change the display name alone through ADSI edit

To make this change in the adsiedit follow the below instruction

  • Open ADSIEdit.msc
  • Configuration – Services – Microsoft Exchange
  • Open the properties of “CN=MicrosoftExchange329e71ec88ae4615bbc36ab6ce41109e” in right hand side pan.
  • Locate the display name attribute and Make sure that it is displaying “Microsoft Exchange” if not then change it to Desired Display name that users want to see when they receive an NDR.
  • Close ADSIEdit.

If you need the internal ndr’s to be copied to a mailbox and if a user reply back to an ndr and if that email needs to be delivered to a mailbox and monitored then we need to set value for the attribute MicrosoftExchangeRecipientReplyRecipient.Run the below command

Set-OrganizationConfig -MicrosoftExchangeRecipientReplyRecipient localit

After you run the above command you can see the value as below when you run

Get-OrganizationalConfig |FL

T6

If we want the external ndr’s to be sent to the above email address  we can run the below command

Set-TransportConfig -GenerateCopyOfDSNFor 5.1.0, 5.1.1

dsn

Above is an example for getting a copy of DSN only for 2 ndr codes. We can add multiple ndr codes as well.

Troubleshooting Outlook Connectivity issues for all users in Exchange 2013

In this article i will list down few common steps that can be checked during troubleshooting outlook connectivity issues  in Exchange 2013 SP1 and later.

First step is that we need to identify whether it is happening for few users, or all users or its just one user and troubleshoot accordingly. In this blog we will discuss about troubleshooting Outlook connectivity issues for all users in Exchange 2013 environment .

1) Ensure that all Microsoft Exchange Services which  is  set to automatic are up and running.Especially the Microsoft Exchange RPC Client Access service must be started which is more involved in Outlook Connectivity issues.

2) Check in the application log for any throttling events in both CAS server as well as mailbox server.

3) If it  is a new Exchange 2013 setup ensure Host A record for Mail ,Webmail and Auto discover on internal DNS is created correctly.

4) Ensure that the new Exchange Certificate is created and assigned to the IIS service. If you have SSL make sure that the SSL certificate is assigned to the virtual directory.

5) Ensure that autodiscover internal url,ews internal url,oab internal url are set correctly.

6) Check the authentication methods in the IIS for the RPC .If you have enabled mapihttpenabled protocol  then check the mapi virtual directory. It can be Basic, NTLM, Negotiate on both the virtual directories and negotiate authentication is enabled by default in Exchange 2013.

You can use the below command to check the authentication method for mapi virtual directory if you have enabled mapihttpenabled  protocol.

Get-MapivirtualDirectory | fl

Below is the output and check the iis authentication method and internal authentication column.

ol4


Also you can check if you have enabled mapihttpenabled by running the below command

Get-organizationalconfig | fl Mapi*

ol6

Analyzing this part is very important.If your organization is using mapihttpenabled protocol then we need to enable this option. There are also few other settings that needs to be configured for using this protocol.For enabling mapihttpenabled protocol refer microsoft blog

http://technet.microsoft.com/en-us/library/dn635177(v=exchg.150).aspx

This value should be set to false if you have  not configured mapihttpenabled in your organization else end users will face trouble in connecting through Outlook . Run the below command to disable mapihttpenabled feature.

Set-OrganizationConfig -MapiHttpEnabled $False

7) Also it could be problem if the outlook providers were not set correctly.

Below is an example of setting up outlook providers .

First we need to run the below command  to check the value of outlook provider

Get-OutlookProvider


ol1

In our case since  the outlook provider is not set we get the values to be null.

Run the below commands to set the outlook provider name

Set-OutlookProvider -Server exchange2013CAS EXCH -CertPrincipalName msstd:exchangequery.com
Set-OutlookProvider -Server exchange2013CAS EXPR -CertPrincipalName msstd:exchangequery.com


ol2

Note:

Make sure that the certprincipal name that you are entering matches the name of the autodiscover that you have given in the SAN certificate and internal DNS.

Below will be the output if the outlook providers are set.

ol3


Though Outlook providers is not required as it is changes the autodiscover settings to global level from server level .But problems might arise if the outlook providers were not set correctly and autodiscover settings are not configured correctly.So its always better to check the values of outlook provider during troubleshooting these kind of scenarios and there is no harm in setting these values.

Get and easy and secured access to your online private work space and catch up with latest emails and essential documents with office 365 on your preferred device(PC/Mac/android/iOS) on your remotely accessible virtual desktop from CloudDesktopOnline.com with 24*7 top-notch support services from Apps4Rent.com.

Sathish Veerapandian

MVP – Office Servers & Services

Troubleshooting rapid Log Files and Database growth in Exchange 2010

In this article let me discuss about troubleshooting unusual growth in log files and database in Exchange 2007 and Exchange 2010.

It’s always better to check and validate first before we jump into any troubleshooting. It’s better to check first from what time  the log files and the database starts growing rapidly.

We can probably filter out events for any related information about logs and database in the application logs in the affected mailbox server.

Also we need to collectively gather all information about the list of third party software’s installed and running on the affected mailbox server.This could be the problem as well if the handshake between Exchange and third party agent is broken.

I have classified  few troubleshooting steps which would help us in narrowing down and rectifying these kind of issues.Below are the list of troubleshooting that can be possibly done .


EXMON

The first step that would easily help us in identifying the problem is using EXMON tool to see if there are any user’s unusual activity which causes the log files to grow rapidly.

You can download the exmon tool from the below location

http://www.microsoft.com/en-us/download/details.aspx?id=11461

Run exmon tool and sort the the value by % cpu and look for high CPU consuming users. Also you can check the log bytes column to monitor the log growth.

If you identify any potential users then you can see the following things

  • See if there are any email with a large attachment which is stuck on the outbox.
  • Also you can monitor if there are any spam mails circulating on the affected user’s mailbox.


Exclude FILE LEVEL AV SCANNING

If the AV scanning running on mailbox servers is not aware of exchange databases and log files then this will definitely cause the transaction logs to grow rapidly.

Following things can be checked

  • Check if there are any recent updates that happened on the AV scanner on the mailbox servers which might remove  exchange databases and log files exclusions.
  • Ensure that AV exclusions are set for Exchange databases and Log files on the AV scanner in the mailbox servers.
  • Disable AV scanning on the affected mailbox server where transaction logs and DB are growing rapidly. Monitor for few hours and see the log files and database growth and compare the results.


OPEN RELAY

Check if the server is an open relay to the internet, there will be tons of transaction logs. You will also usually see a bunch of items in the junk mail folder. So ensure that the environment is not open for relay as huge amount of spam mail circulated also will cause the server performance and server to send out more number of spam messages internally as well as externally.

It’s better to have a look at all the queues in all hub servers to ensure that no spam messages are been sent out from our organization in such kind of scenarios.


PUBLIC FOLDER REPLICATION

  • Check if there are any PF replicas initiated recently on the affected mailbox server recently as it could cause the problem.
  • Check in the message queue if there is more number of public folder replication messages.


CHECK BACKUP CONFIGURATION

If you have any backup running in the environment ensure that the backup is scheduled properly. Ensure that you are running only full and incremental backups as only these two types of backups will truncate the logs and the rest wouldn’t have the capability to truncate them.

Imp Note:

If a server hosting the data being backed up is a member of a database availability group (DAG) and hosts both active and passive database copies, you must disable the Microsoft Exchange Replication service VSS writer. If the Microsoft Exchange Replication service VSS writer is enabled, the backup operation will fail.


To disable the Microsoft Exchange Replication service VSS writer, perform the following steps:

  • Log on to the server by using an account that has local administrator access, and then start Registry Editor (regedit).
  • Navigate to HKEY_LOCAL_MACHINE\Software\Microsoft\ExchangeServer\v14\Replay\Parameters.
  • Add a new DWORD value named EnableVSSWriter, and set its value to 0.

Exit Registry Editor and then restart the Microsoft Exchange Replication service.


Bulk Mailbox Move

If there are any recent bulk mailbox move that is happening that could generate lot of log files if few of the mailboxes are larger in size and if it has more corrupted items. Probably for this as a temporary fix until the mailbox move completes you can enable circular logging on the source and the destination mailbox database. Ensure that you need to disable circular logging once the move is completed as enabling circular logging always is not a good choice.

Hope this helps in scenarios where we come across scenarios  in troubleshooting unusual  rapid growth in database and log files.

Cheers

Sathish Veerapandian

Overview and Troubleshooting MailTips in Exchange 2010/ 2013

MailTips are useful information displayed to the end users while composing and trying to send messages to any users in their organization.

When end users select any recipient for which we have Mailtips enabled that particular information will be displayed as a tip after the GAL resolves that user in the recipient tab.

In order to troubleshoot MailTips its better we can understand the functionality of MailTips first so that it will be easier to identify and provide a fix. Let’s   see the overview and functionality of MailTips first and then we will look into troubleshooting scenarios.

How MailTips work:

  1. Sender creates a new message and addresses the message to a recipient.
  2. During message composition the client submits a GetMailTips request to the Exchange web services on the CAS server. The request is submitted as a SOAP message over HTTPS.
  3. CAS/Exchange Web Service receives the GetMailTips SOAP request and uses the information to authenticate the SOAP request and then queries:
  • Active Directory – for the requested objects (recipient, organizational).  The active directory request is executed as an LDAP query.
  • Mailbox Servers -to retrieve “out-of-office” messages, “mailbox-full” status, or any customized MailTip configured for the recipients.
  • The Active Directory and mailbox servers return the results to exchange web services.
  • The Exchange web services returns the result to the client.
  • The client will be able to see the MailTip information for that configured user account.


EWS is the main component for MailTips.

Mail Tips are available from client versions   Outlook 2010 and Outlook Web App as well.

Note: MailTips will not work when outlook is in offline mode.

Mail tips are triggered in the following scenarios

  • When a user resolves a recipient in the GAL.
  • When a user uses reply to all option in a message.
  • When a user adds or removes any attachment in a message.


Now we will look at how to configure MailTips in Exchange 2013.

MailTips is an organizational feature but still it can be enabled for each and every recipient individually as well. In order to enable MailTip for each individual we need to have MailTip enabled in the organizational level first.

We can run Get-Organizational config | fl mailtip* to see the MailTips configuration for a whole organization.

mailtip1


Basically we have 5 different types of MailTips in organizational level. Apart from these we have Active Directory Based MailTips which can be enabled as well. Now we will look in to the different types of MailTips and their functionality.

MailTipsALLTipsEnabled

This enables or disables the MailTip’s option totally in organizational level. If this option is disabled then MailTip functionality will not work for any users.

MailTipsExternalRecipientsEnabled

This option gives any tips to the sender if there are mail tips enabled for any user outside the organization.

Eg: Most of the organizations are much concerned about any internal confidential information should not be leaked outside for any reason. If we have this option enabled and if the user accidentally adds any external vendor, partner in a confidential trail email   he will be getting a mail tip of that information which displays that particular recipient will be shown with that custom message. This makes the sender very helpful in these kind of scenarios.

Steps to enable MailTip for external recipient

Set-OrganizationConfig –MailTipsExternalRecipientsTipsEnabled $True

When you run the above command MailTip with custom message for all external recipients will be displayed,


MailTipsLargeAudienceThreshold –

Gives the sender information if he adds more number of recipients in a mail than the configured threshold.

The default value is 25. We can change the value by running the below command.

Set-OrganizationConfig –MailTipsLargeAudienceThreshold <Desired Integer Value>


MailTipsGroupMetricsEnabled –

Displays the MailTips for the Distribution Lists and Dynamic Distribution Lists.

For example enabling this will give sender an info that the DL you are sending contains more than 100 members.

It is enabled by default. If you want to disable this feature you can run the below command.

Set-OrganizationConfig –MailTipsGroupMetricsEnabled $false


MailTipsMailboxSourcedTipsEnabled

This option gives the mailbox full and out of office message to the sender while he addresses message to a user whose mailbox is full or if he is out of office. This option is enabled by default.


Other Active Directory Based MailTips

Custom MailTips – Custom MailTip can be set for individual users with custom message by administrator.

Moderated Recipient -.  Is used to alert the sender that the recipient is moderated and that mail delivery may be delayed.

Restricted Recipient – advises that the message cannot be delivered to the recipient (when you are not in the list of users allowed to send e-mail to the recipient)

Message Size Limit – displays if the message the sender is composing is larger than configured message size limits in your organization.

Maximum Number of Recipients – displays if the sender adds more recipients than allowed. This value can be changed for each mailbox according to the configuration.

Below is an example of Custom MailTips.

In order to enable custom MailTips perform the following action.

Open EAC – Click recipients – select the mailbox for which we need to configure custom MailTips – and type the custom message and click save.


mailtip2


Below information is displayed for senders while addressing the message to the custom MailTip enabled user.


mailtip3


Now let’s have a small discussion in troubleshooting MailTips


First we need to ensure that owa is able to access the ews virtual directory without any issues. Also ensure that outlook is able to fetch the Autodiscover information.

  • First identify the MailTip issue is happening for just one user or multiple users. Also if it is will all users pick one user and start troubleshooting.
  • Check if the mail tip is not functioning in owa and outlook or any one of them.
  • Ensure that outlook is able to get the correct Autodiscover information.


Tools for troubleshooting MailTips

Exchange and Outlook provide tools for troubleshooting mail tip issues. Below is a listing of the tools that we can use to identify and resolve mail tip issues;

1.         Outlook 2010/2013 Diagnostic Logging (MailTips.log)

2.         Internet Information Server Logs

3.         Diagnostic Logging (Event Viewer)

4.         Performance Monitor Counters


 Steps to enable Outlook logging

File – Options – Advanced – Enable troubleshooting logging

Restart outlook, try to retrieve MailTips and you will get a below kind of log

You need to ensure that there is no error after GetServiceConfiguration for mailtips which is a successful transaction of MailTip.

Below is an example of successful result of a query of mailtips from outlook which shows in the outlook log.

<ex15m:ConfigurationName>MailTips</ex15:ConfigurationName>

</ex15m:RequestedConfiguration>

</ex15m:GetServiceConfiguration>

</q:Body>


<GetMailTipsResponse ResponseClass=”Success” xmlns=”http://schemas.microsoft.com/exchange/services/2006/messages“>

<ResponseCode>NoError</ResponseCode>

<ResponseMessages>

<MailTipsResponseMessageType ResponseClass=”Success“>

<ResponseCode>NoError</ResponseCode>


Similarly we can enable IIS server logging in the CAS server and look of there are any errors after get-service configuration for MailTips so that we will be able to identify the issue.

Also we can increase the following Perfmon counters for MailTips and see the results if we get any relevant information.

mm

Looking into the application logs in the event viewer will also help us in identifying the root cause.

The above troubleshooting can help us in identifying the MailTips issue.

Sathish Veerapandian

Overview and Readiness for configuring SIP trunk in Lync 2010/2013

What is SIP trunk?

SIP trunk is  a virtual  connection between Lync server(mediation server) in any organization  and the ITSP.SIP trunk is used to make a direct connection from your organization to ITSP(Internet Telephony Service Provider).

It helps us to extend any organization VOIP (voice over internet protocol) functionality beyond the firewall without the need of ip-PSTN or even a PBX.

In a simple term SIP trunk can be utilized to carry VOIP calls in following scenarios

1)  PC to phone Communications.

2)  Phone to PC Communications.

3)  PC to PC    Communications.

In addition to VOIP calls  SIP trunk can carry instant messages, multimedia conferences, user presence information, Enhanced 9-1-1 (E9-1-1) emergency calls, and other SIP-based, real-time communications services.

In some scenarios we can choose the SIP trunk to connect to the branch site through ITSP.


Advantages of SIP trunk

By using SIP trunk we can typically reduce the cost in making a long distance calls.

We do not need to have a PSTN or even a PBX.

We can consolidate our organization connections and PSTN in a single central site.

An enterprise user can make local calls i.e., within the organization and a long distance call to a  E.164-compliant number.


What is  E.164-compliant number ?

International public telecommunications numbering plan. The E.164 plan was originally developed by the International Telecommunication Union (ITU).

E.164 is an international numbering plan for public telephone systems in which each assigned number contains a country code (CC), a national destination code (NDC), and a subscriber number (SN). There can be up to 15 digits in an E.164 number. With E.164, each address is unique worldwide and it has its own number. With this 15 digits combination for each user there can be 100 trillion numbers generated all around the world. So there is no possibility in future that  we might run out of option in assigning E.164-compliant number for any user.

SIP trunk can be established in 2 ways

Centralised SIP trunk

Is a method in which all the branch site  connections come to a central site and then the connections are routed to the ITSP. This type of connection is Cost effective.

Distributed SIP trunk

Is a method where all the sip trunk are established of its own in each and every site to their own ITSP.

Reason for having Distributed SIP Trunk

Company sites can be in different countries

In order to provide Site resilience


How  do we implement SIP trunk ?

1) Order a SIP trunk subscription connection from any one of SIP trunk service providers.

2) Configure the external firewall to allow communication between SIP Trunk provider and your Lync Server with the Mediation Server role.

3) Make the necessary changes and publish the Lync Topology.

4) Create a dial plan and configure users for using enterprise voice.


SIP trunk service providers can give 2 types of connections

1) TCP connection

For this type of connection we need to have port 5060 open in the firewall for SIP trunk provider. For this connection there is no certificate required. This type of connection uses NTLM type of authentication since no certificate is required.

2) TLS  Connection

For this type of connection we need to have port 5067 open in the firewall for SIP trunk provider and then we need to get a certificate from the SIP trunk provider. This type of connection uses TLS-DSK since it uses a certificate for the connection.

We need to exchange few information between the SIP trunk service provider and our organization to configure the endpoints on both side for this type of connection.This configuration basically depends on what type of connection we are using for this SIP trunk and varies according to  different scenarios.

For MPLS and dedicated type of connection ,give the router public IP address to  ITSP . Ensure that ITSP’s SBC or gateway is able to resolve this address.

Also give the FQDN of the Mediation server.

For VPN connection, give the VPN server IP address to the ITSP

Note :

We need to get the ITSP gateway.i.e, their IP address and the FQDN .We need to specify these values in the mediation pool of the mediation server.


We need to have a Mediation server with 2 interfaces Basically 2 NIC’s.

Internal interface connects to the front end server for internal connection.

External interface – connects to ITSP edge component.(the external edge component of ITSP can be a router,SBC or an gateway)

The mediation server can either be collocated along with the front end server or it can be a standalone server according to the requirement. It’s always better to use the Lync server  planning tool to evaluate the front end server pool that whether it can handle the load. Else we can deploy the mediation server separately.

Exception:

If you are connecting to a SBC(session Border Controller) of a ITSP a dedicated Mediation server is required.

We need a connection to establish a SIP trunk from mediation server external interface to the ITSP external edge for any organization. Below are the supported connection types

1) Least fibre  Optic connection or T1 line

This one has the highest call carrying capacity, most secure and reliable one. Most expensive. Suitable for organization who prefer good quality of call and security. No VPN is required.

2) MPLS connection

Multi Protocol Label Switch is a dedicated line shared with other IP traffic and the bandwidth network is shared with other subscribers. No VPN is required. Drawback is that it can have excess of IP traffic,can interfere with VOIP unless VOIP is given as highest

3) Internet connection

Least expensive. VPN connection is required but less secure and low  quality.


Bandwidth requirements

Bandwidth planning is very important before making SIP trunk connection. We need to calculate according to the number of calls. That can be calculated with the below formulae

SIP Trunk Peak Bandwidth = Max Simultaneous Calls x (64 kbps + header size)


Codec Support

Lync Server 2013 supports only the following codec’s:

G.711 a-law (used primarily outside North America)

G.711 µ-law (used in North America)


Internet Telephony Service Provider

For ITSP you need to use only Microsoft certified ITSP.

How you implement the service provider side of a SIP trunk connection varies from one ITSP to another. For deployment information, contact your service provider. For a list of certified SIP trunk service providers, see Microsoft Unified Communications Open Interoperability Program website. For details about Microsoft certified SIP trunk providers, contact your Microsoft representative.

References :-

http://technet.microsoft.com/en-us/library/gg398755.aspx

http://blogs.technet.com/b/nexthop/archive/2013/04/10/configuring-lync-2010-server-to-work-with-level-3-sip-trunking-services.aspx

http://blogs.technet.com/b/drrez/archive/2011/04/21/configuring-an-intelepeer-sip-trunk-solution-in-lync-server-2010.aspx

Cheers 🙂

Sathish Veerapandian

Technology Evangelist

SysTools OST Recovery Software

OST files are just an image of the content from the server.When Outlook is used with Exchange Server in ‘Cached Exchange Mode’ we get the OST file downloaded , then OST files allows to access entire components.

There is no built-in option in Outlook to open or import OST files without configuring Outlook profile for that associated mailbox account.

At times we might run into a few complex scenarios for an VIP user where we need to recover emails in scenarios where  we are running out of backup options,no exchange database and if we have the last option to recover only from an old OST file.

There could be multiple reasons for converting the OST file. There are multiple ways in recovering and repairing orphaned and lost .OST files. There are 3rd party applications that allows to convert OST to PST,repair and corrupted ost file ,filtering and gathering required data from the ost file.

If only the client PC has crashed, We can always recover the data from the exchange server itself (ost is just a online copy of the mails and one copy resides on the server all the time).

In some circumstances there may be a need to open/import an OST file.

1) User has left the organization and mailboxes have been deleted crossing the retention period. But the local IT team has only the OST  file from the PC of the mailbox from which an important data needs to be extracted.

2)If the old OST file has corrupted, user needs the data of the old ost file which he took it from his laptop to be merged into his new outlook profile in new PC.

3)For example if a user goes for long leave and if his mailbox was in a disabled state and then gets deleted, his outlook profile is deleted but somehow the OST file remains in the PC and needs the old emails from the OST  file.

4)The Exchange servers have been migrated and user’s mailbox has moved to the new version. User needs his old emails from OST  file after a long leave to be recovered.

5)If we need to access the emails from an old OST  file without configuring current Outlook profile for that account.

I just happened to have a look at this SysTools OST recovery Software and found it to be pretty much easier and user-friendly.

In this article we will be looking at how to recover data from an corrupted OST through SysTools OST recovery software.

This software allows us to recover and Convert Inaccessible OST File to Outlook (PST) / EML / MSG Format.

We have 2 versions freeware and a full version.
Freeware version can export only 25 items per folder While the full version has no limitations on the number of counts per folder.

Download the free version from the below link

http://www.systoolsgroup.com/ost-recovery.html

Just open the setup and run through the installation wizard.

11


Accept the license agreement.

22


Choose the installation directory.


33


Once the setup completes just open the OST recovery software.

44


Browse and select the damaged OST file.


55


Once the OST file is selected it starts scanning the file as shown below.

66


Once the scanning is completed it opens all the emails in outlook mode which are readable.Since its  a demo version it displays the below information.

We have an option to export emails one by one.

77


We have an option to export the emails in MSG format or into PST file.


88


Just Click on export and select the required format in  MSG or PST. After that we are done with the PST extract from the corrupted OST file.

Overall this tool can be useful for admins in few critical scenarios of recovering the OST files for  important mailboxes and its user friendly.

Cheers

Sathish Veerapandian

Technology  Evangelist