Category Archives: Iron Port

Enable DLP for outgoing emails in Cisco Iron Port

Data Loss Prevention prevents the sensitive organization’s proprietary information by detecting before transit through ex-filtration transmissions and continuously monitors them to protect all types of data loss. The organizational data leak mostly happens when the end users unintentionally emailing sensitive data from our network which leads to Data leak Incidents.
There are many ways to achieve this and in this article we will look into how to prevent the data loss with the options present in Cisco Iron Port Email Gateway Solution.

Basically in any DLP there will be two actions involved :

Data Match: Where the DLP application scans the email body, header and attachments for the sensitive content created based on the DLP policy rules.

Action: Once any emails are identified to be sensitive, based on the DLP policy where it was blocked action types can be drop,quarantine or deliver with disclaimer and notify an admin or manager or recipient based on the policy and document classification.

Below are the steps to enable DLP on Cisco Iron Port-

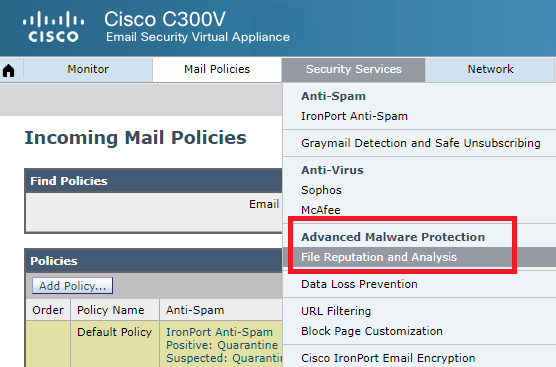
Login to Cisco Iron Port – Select security Services – Click on Data Loss Prevention

DLP

By Default this option will be enabled – but now we need to creation DLP policies and action types based on our requirement.

Better to enable Content logging which will appear in message tracking and better in troubleshooting.

DLP1

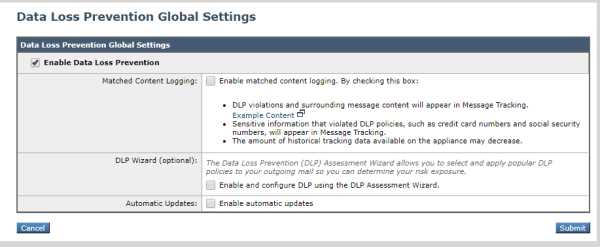
In this example we will run through the DLP wizard which will have few popular policies which are common. Adding custom policies are very much possible via cisco ironport and there are more options to add custom.

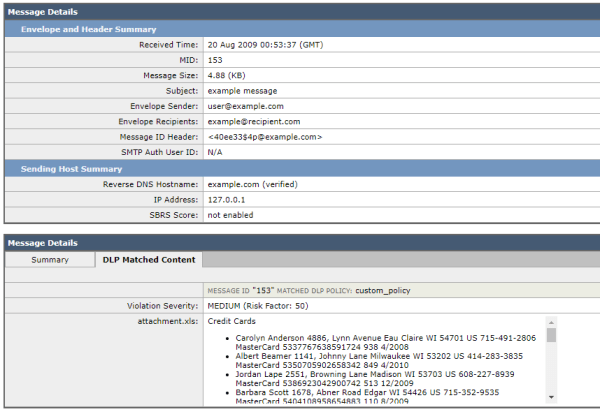
An Example of enable matched content logging when DLP is enabled. This will help Admins to debug and find the reason why the email was blocked.

DLP2

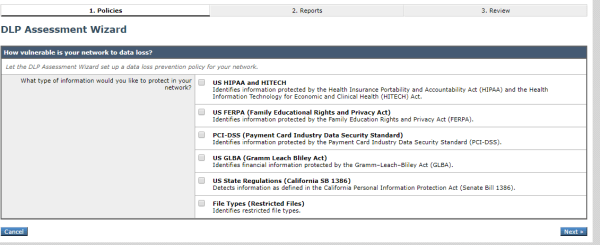
There are more common used cases and in our example we can choose PCI-DSS which is most sensitive and must be enabled  especially for the Finance teams.

DLP3

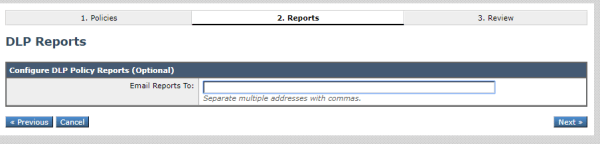
Here we have an option to enable the DLP reports

DLP4

Once done in the outgoing mail policies will be configured for PCI-DSS we created.

DLP6

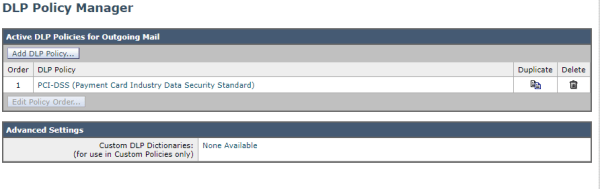
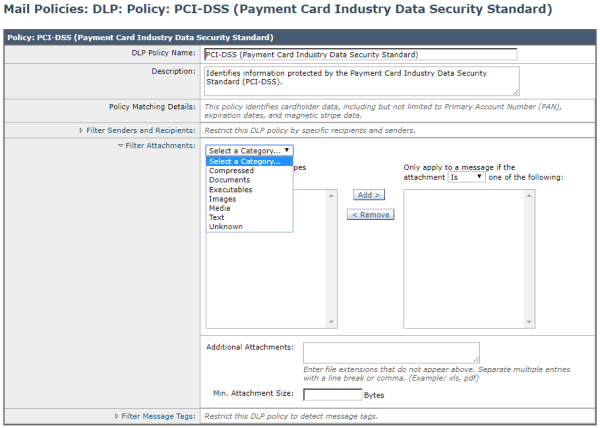
And in this policy we can edit and choose the inbuilt DLP  dictionaries based on our requirement.

DLP7

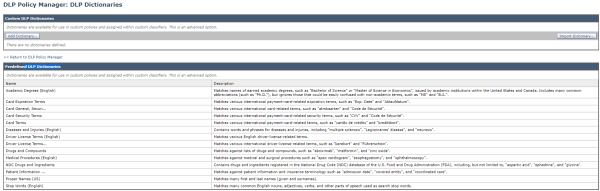
There is an option to add custom also.

DLP8

In Mail Policies there is an option to apply only for few users sent or in the recipient list.

DLP9

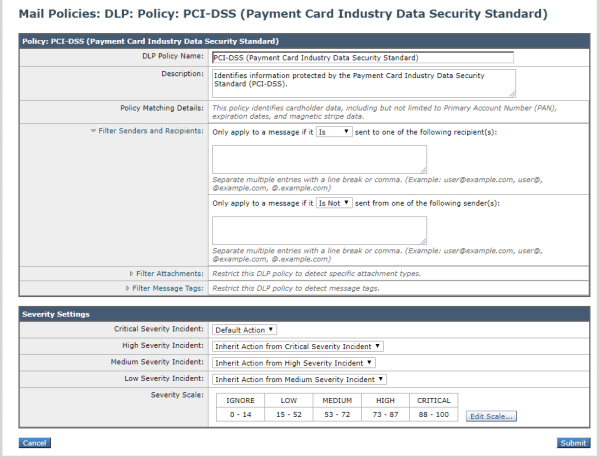
Options to add attachments is present

DLP10

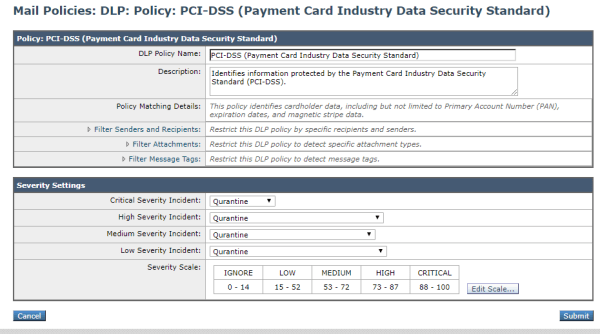
The Severity settings can be altered below

DLP12

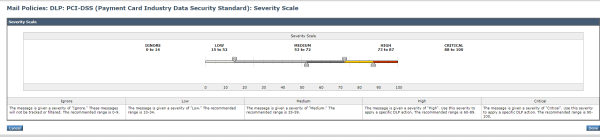
The severity scale can be altered based on the policy and our requirement

DLP13

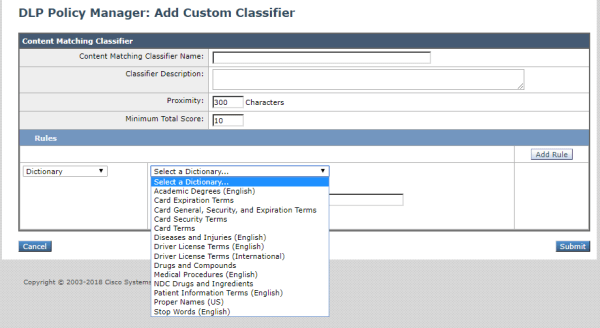
Custom classifier can be added

DLP14

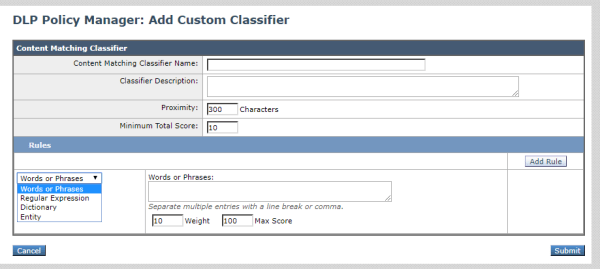
In the classifier we have an option to choose templates from dictionary and entity

DLP15

DLP16

Once Done based on the policy and action DLP will be working for outgoing emails.

Imp Notes:

    1. Before implementing DLP in any environment it requires lot of study in multi phase , closely working with security team and implementing purely based on the document classification.
    2. Need to understand how the sensitive data is currently handled by all the teams, identify the current risks. Post analysis the required action plan of creating policy and action must be done.
    3. End user awareness session is very important to deal with DLP. Advising to use more secure channels in Enterprise File Share DRMS solutions only for dealinig with sensitive documents for finance teams can be advised.
    4. Any DLP policies we create must have Audit and notify manager which will create awareness on employees and easier for tracking.

Thanks & Regards
Sathish Veerapandian

Email Security – Enable Sand Boxing ATP on Cisco Iron Port

Cisco Advanced malware protection uses Cisco Threat Intelligence Extensive latest threats and security trends Knowledge base Analytics and behavioral indicators which will help us to defend in latest spear phishing  and malware attacks.

This will basically fall under  advanced threat capability  category which is capable of providing additional layer of security.These ATP have retrospective detection alerts which is capable of tracking malware alerts which was successful through initial defenses.

AMP is the recent name given to this advanced threat detection by most of the security systems  where it has following:

  1. A separate private isolated environment where it has Implementations for multiple attack vectors/entry points (firewall, network, endpoint, email.
  2. Ransomware/Malware Threat prevention.
  3. Retrospective alerting and remediation techniques.

Usually AMP works in the following fashion for any email security system :

Preventive Measure – Strengthens the defense mechanism by having upto date latest malware attacks and defense mechanism from respective real time threat intelligence service.
Ironport uses Talos Engine – https://www.talosintelligence.com/
Using this technique the malicious content will be blocked.

Threat Analysis in Transit of Emails – During this process the file is analyzed as an end user PC(windows/MAC) in a isolated network to detect malware, experience file behavior and mark threat level if at all detected. If the sand boxing is not enabled in local on premise them it captures the fingerprint of each file which hits the gateway and will send them to their AMP cloud based intelligence network. Here we have an option to select which types of files that needs to be analysed via this AMP in most of the gateways.

Tracking after Delivery- In this step it uses continuous analysis which will help to identify if there are any malicious file which are capable of performing any malware attacks after certain period of time. By using this AMP will be able to find the infected source and then alert the admin and visibility till the infected file.

In this article we will have how to enable AMP in cisco ironport.

Login to the  appliance –  Navigate to security services – Advanced Malware protection – Select File reputation and analysis.

ip1

If its enabled we will be getting the below screen. To further fine tune the settings click on edit global settings

ip2

Click on – Enable file reputation.

ip3

This is used to protect against zero-day and targeted file-based threats.

Following actions are performed After a file’s reputation is evaluated:
• If the file is known to the file reputation service and is determined to be clean, the file is released to the end user.
• If the file reputation service returns a verdict of malicious, then the appliance applies the action that we have specified for such files.

We have Enable File Analysis-

This needs to be enabled. We have almost for all the attachment types.

ip4

ip5

ip6

File Analysis works in coordination with File reputation filtering. When this option is enabled attachments in emails will be sent to file analysis. Here we have the option to choose the file types which we need to perform the analysis. Be very choosy in this section keep in mind that since there is analysis enabled on this file it will take little few minutes to deliver the mail to end user when compared to a user who does not have AMP enabled for their account.

If the file is sent for analysis TO SANDBOXING (cloud or onprem based on setup):
• If the Selected file type is sent to the cloud for analysis: Files are sent over HTTPS.
Also the appliance generates an identifier for each file using a Secure
Hash Algorithm (SHA-256)
•Usually Analysis normally takes minutes, but may take longer based on the size and file type.
• Results for files analyzed using an on premises Cisco AMP Threat Grid appliance are cached locally

Advanced settings for file reputation –  Here we need to select our Sand boxing environment based on our configuration. If we are using cloud AMP then we have 4 regions to select based on our requirement.

ip7

There is an option  to register appliance with AMP for endpoints.Make sure you have a user account in AMP for Endpoints console with admin access rights. For more details on how to create an AMP for Endpoints console user account, contact Cisco TAC.

ip71

If we have local on premise AMP setup then we need to select option private reputation cloud and add the required details.

ip8

We have the same option cloud or on prem for file analysis

If specifying the cisco cloud server, choose the server that is physically nearest to your
appliance. Newly available servers will be added to this list periodically using standard
update processes

ip9

If we choose our own private cloud then we need to  use the self signed cert or  upload one certificate.This is required for encrypted communications between this appliance and yourprivate cloud appliance. This must be the same certificate used by the private cloudserver. I prefer to have one SHA256,2048 bit certificate generated from internal CA and apply them on the private cloud as well as the appliance for this connection alone.

Untitled

This settings is optional which we can leave as it is or if you want to configure the cache expiry period for File Reputation disposition values.

ip10

Once enabled the files enabled in AMP will be passed to them after antivirus engine.

We can see the files blocked in the AMP in the incoming mail dashboard.

Untitled1

Imp Notes:

  1. An AMP subscription is required to enable this functionality.
  2. Advanced Malware Protection services require network communication to the cloud servers on port 443 (for File Reputation) and 443 (for File Analysis). If there is no communication  the file types enabled for AMP will be sent to quarantine folder even if they are clean. Below error message will be received if no communication is present to cloud server in incoming  email header.

Untitled

Thanks & Regards
Sathish Veerapandian

%d bloggers like this: