New Boomerang feature to prevent Backscatter (Reverse NDR Attack)

Reverse NDR attack is one of the most common method of spamming a mail server by the hackers. Even though if they are unable to compromise any user accounts by this method in an organization they can increase the load on the messaging system and our network bandwidth  by bouncing the NDR’s back and forth. This makes the end users more annoying to think why they got NDR’s for the message which they never sent.


What is Reverse NDR Attack?

1) Spammer creates and email address with the spam victim’s address in the sender field since sender can always be anonymous and in the recipient he addresses them with random common names at your domain.

Ex: from:Sathish@contoso.com , To:Jack@exchangequery.com,Jim@exchangequery.com

2) He attaches an spam email and sends to the random addressed recipients of the victims domain.
3) Your mail server cannot deliver the message and sends an NDR email back to what appears to be the sender of the original message, the spam victim.
4)The return email carries the non-delivery report and possibly the original spam message. Thinking it is email they sent, the spam victim reads the NDR and the included spam.


Microsoft has brought some basic filtering setup for this Backscatter detection in EOP(Exchange Online Protection) which is more beneficiary. It uses a method called BATV( Bounce Address Tag Validation)


What is BATV ?

BATV( Bounce Address Tag Validation) is a standard internet draft of validating a reverse NDR email to see whether it is legitimate with a tag value or not.

How does this works ?

It uses a cryptographic hash. This cryptographic hash contains a valid return path of an email address, time stamp in the encoded format.So any NDR that is returned to a system without this cryptographic has tag value will be halted/rejected and hence no bounce backs.

BATV replaces an envelope sender like sathish@hotmail.com with prvs=tag-value=sathish@hotmail.com, where prvs, called “Simple Private Signature” . This PRVS is one of the possible method of tagging the values though there are few more in the standards followed.

This cryptographic token cannot be forged at any cost until they come to know the PRVS tag value.

For on-premise setup If you have this reverse NDR filtering setup in your anti-spam filtering agent you need not worry about this setup since your spam filtering will take care of this part.

If you are an on-premise customer and if you have your email filtering with EOP then Microsoft recommends to turn on this feature .

If your Mailboxes are hosted with Office 365 you no need to worry about turning on this feature. However Microsoft recommends to turn this feature ON if your outbound email goes through Office365(Not sure why)


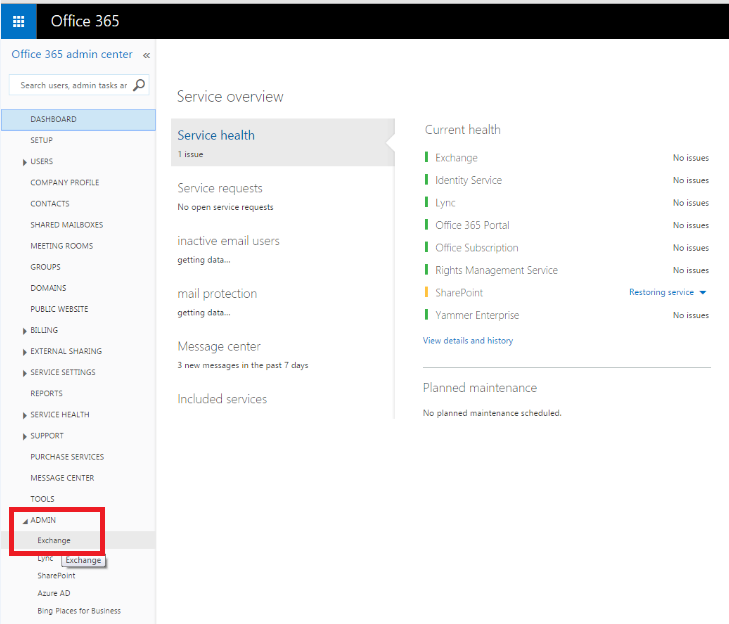
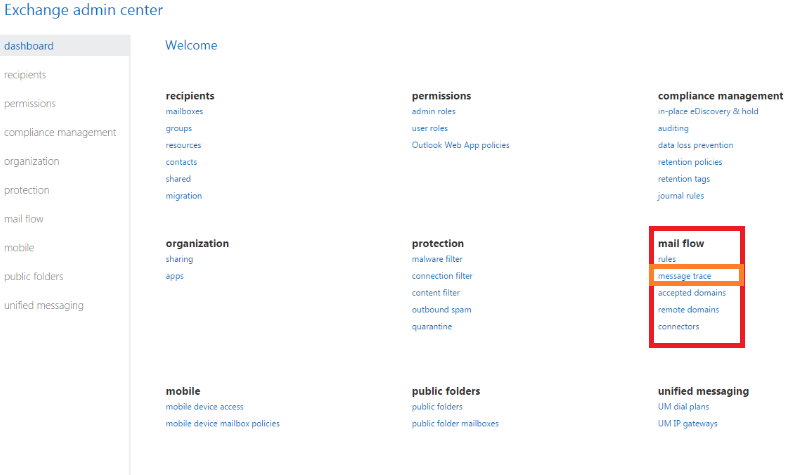
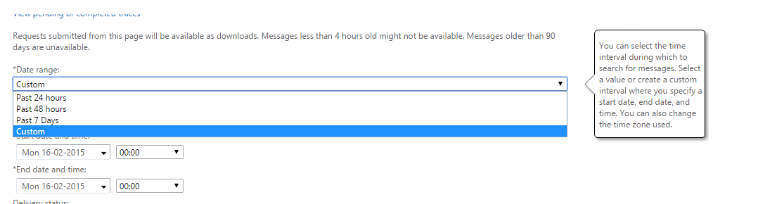
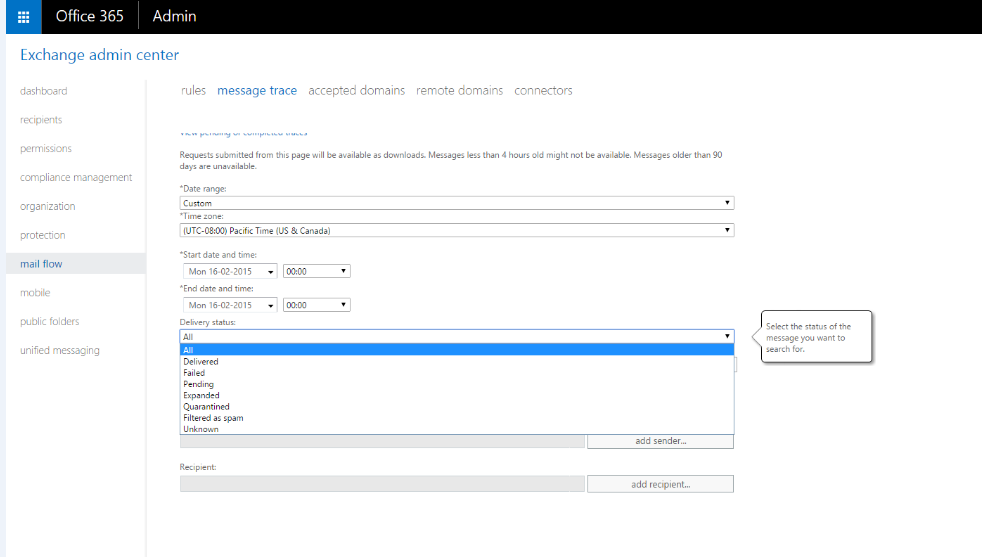
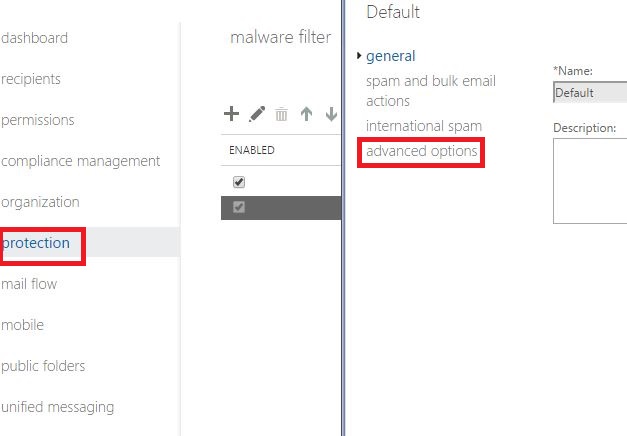
Below are the steps to turn on this feature in through EAC

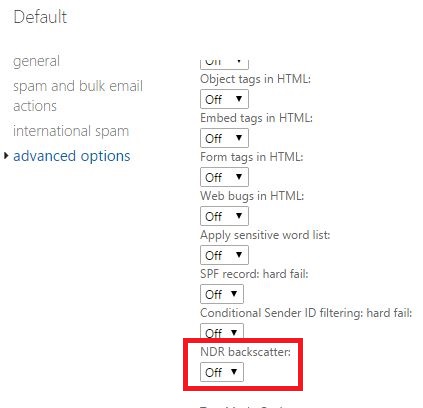
Open EAC – Click on protection – Navigate to your Policy – Click Advanced

Capture


Turn on the NDR back scatter option

Capture1

Enabling this option will definitely add additionally layer of security especially for reverse NDR attacks. Hope this helps.

Thanks 
Sathish Veerapandian

MVP – Exchange Server

Touch Down features and overview

Basically it is difficult for an admin to track and secure the EAS connected android ,IOS and windows devices  if there is no MDM solution in place.

Its always better to have a tight security when the email services are extended and used outside our organization firewall.

In this article we will have an overview of touch down features and functionality.

Touch Down was developed by a company called Nitro Desk initially and later Symantec acquired nitro desk.

Touch Down had been a personal favorite Exchange client for most of the people because it offers more features at affordable cost.

Key Features 


1) NitroDesk’s Touchdown application  separates corporate data from personal data on a mobile device using a secure container. By having this option we have a secured way of preserving the corporate date in mobile devices and an option to wipe only the corporate information rather than performing a factory reset.

2) Touch Down uses advanced AES-256 and SSL encryption by which it supports IRMS as well as DLP and the data in transit will be always secure.

To download and configure touchdown follow the below steps

Lets take an example of configuring them in IOS device

To download TouchDown from the App Store, 

  1. On your device, go to the App Store.
  2. Tap Search, tap the search field and enter NitroDesk, then tap Search.
  3. Navigate to TouchDown.

This will open the product information screen.

  1. Tap the price, then tap Buy Now.

If you already purchased the app, you won’t be charged if you download it again.

Configuring TouchDown

You must have the following information before you can configure TouchDown.

USERNAME Desired username

DOMAIN : Specify your domain

EMAIL: Specify your email ID

PASSWORD This is the password you use to connect your mailbox to your Microsoft® Exchange server. Note that if your password changes or expires, it will not be updated automatically in TouchDown. You must manually update it in TouchDown.

SERVER : Specify the activesync url

SERVER CERTIFICATES : use this option if you have a certificate based authentication for secure ssl.

When you launch TouchDown for the first time, the following screen will appear.

T1

Enter the Email Address and Password.

T2

NOTE: If you turn Enable Logging to On, it logs recent activities in TouchDown and is a helpful troubleshooting tool. You can email the log to iossupport@nitrodesk.com for help in troubleshooting the problem you may be having with the application.

If you choose manual configuration the following information needs to be filled

T3


NOTE: If your password changes or expires, it will not be updated automatically in TouchDown. You must manually update it in TouchDown.

T4

The following menu is available when you select a message.

DELETE will delete the email from TouchDown.

MOVE will open up a list of folders to select where to move the email.

MARK will allow you to do the following with the email:

  • Mark Read/Unread
  • Flag
  • Flag Complete
  • Clear Flag
  • Tags

JUNK moves the email to the Junk folder.

CLEAR removes the checkbox from the email so it’s no longer selected.

The following menu options are  available with an email open through touchdown.

SECURITY lets you view the security for that email.

ATTACHMENTS shows if there is an attachment.

RECIPIENTS lists the recipients for the email.

CATEGORIZE allows you to add a category or create a new category for the message.

REPLY will reply to sender. See “Compose Email” on page 9 for information on using the formatting toolbar and how to edit your signature.

MOVE will open up a list of folders to select where to move the email.

DELETE will delete the email from TouchDown.

FLAG flags the email for follow up.

NEW will bring up the compose email screen to create a new email.

Touch Down supports Remote Wipe of exchange data when connecting to an exchange  2007,2010 and 2013 server via ActiveSync mode, and when PUSH is enabled Remote wipe is instantaneous as long as push is active. If push is not active, and you are polling, the wipe will happen only at the next poll interval

Below is the procedure to perform remote wipe from owa

Click Options on the top right corner of owa and select see all options
Select Mobile devices or phones on the left side
Select the device you want to wipe and click the Remote Wipe Data

Now after performing this action what are all the data that are wiped ?

Touch Down wipes the  database stored on the device.
All data under the /NitroDesk/ folder under the SD card (this is where attachments are downloaded, and databases and backups are stored)
Note : Touch Down does NOT reset the phone to factory defaults (no app can do that on Android)

There is another feature called User-Initiated Wipe

This is a feature in Touch Down where a user can cause a remote wipe by sending an email to themselves using a specially crafted subject line.

To set this up

  1. Go to Touchdown Settings, to the Advanced tab
  2. Press Remote Kill button
  3. Type in a secret code, e.g.: SECRETCODE
  4. Press OK, and provide your exchange password to confirm
  5. Press Save in the settings screen


At this point Touch Down is ready for a remote kill. From this point, if Touch Down receives an email with the subject line containing TDKILL: SECRETCODE anywhere in it, all the corporate data will be deleted. Since this can be quite an inconvenience if you did not intend it, make sure no one else knows about the kill code you have set.

Overall I  find this app to be user friendly, more secure communication to exchange server ,affordable cost  and no complications of setup required since we don’t require a server setup and we can integrate this app easily with an MDM solution.

Thanks

Sathish Veerapandian

MVP – Exchange Server

Configuring federation , external access and limitations in Lync 2013

Configuring external access in lync 2013 is one of the challenging part for the administrators.

In this article we will see the options to configure external access and few limitations that we have on them.

In order to perform that open Lync Server Control Panel  and click on federation and external access as shown below.


Fe1


Choose the type of external access policy that you would like to have configured


Note : By default there will be global policy and its not enabled until we enable them.This policy is created while you deploy edge servers.

In the access edge configuration we have the below settings as shown


Fe2


Public IM – for Outlook,Hotmail and public messenger that are supported refer more on technet for this part.

Enable Anonymous – For users joining the meeting by providing the link

The below option SIP Federated Providers that are hosted providers running Microsoft Office 365, Microsoft Lync Online and Microsoft Lync Online 2010


Fe3


We have an option to specify allowed domain as well as blocked domain.

Fe4


Below option is for SIP federated providers.

fe5


Below is the option for the SIP federated providers

fe6


Below is the option for specifying XMPP federated partners

fe7


Can we control this federation access services to few users and give full access to rest of the users ?

Lets take an example where a company wants to federate with us but we don’t want them to have A/V access to all of their users but need to enable full federation services IM,Presence,A/V only for few users.

Can we achieve this with the policy ?

The answer is no . Because the policies are not defined that granular.We can block outside AV access altogether through firewall or stopping the A/V edge service but making this change will stop a real user from our organization from using A/V when connected remotely.

So the final conclusion is that the current policies cannot be configured as of now to control federation in few services A/V for few users and to allow for rest of the users but still this can be achieved with some third party products.


Thanks 
Sathish Veerapandian

MVP – Exchange Server

Modifying the log file size for safety net on Exchange 2013

In this article lets see how to change the values of safety net in Exchange 2013.

Transport Dumpster  is replaced with Safety Net in Exchange 2013 unlike the earlier versions.It prevents data loss by maintaining a queue of successfully delivered messages. Unlike the earlier version of transport dumpster it also holds emails of mailbox that is not a member of DAG and also public folder mailboxes.

From exchange 2013 safety net does not mandatory requires DAG.Now the safety net is no more single point of failure since it has 2 queues primary safety net and shadow safety net.

Because of this we will notice huge difference in the log file size compared  to 2010 in 2013.

This is because of the safety net holding primary safety net and shadow safety net information in the queue.

So where does this Safety Net Queue Location resides ?

There is no dedicated Safety Net location in Exchange 2013 and it stores the messages in the same transport queue that is located in the mailbox server.

All the different queues are stored in a single ESE database. By default, this queue database is located on the transport server at %ExchangeInstallPath%TransportRoles\data\Queue.

Below is the location of the safety net queue in exchange 2013

Transport Queue

At times there might be a situation where the safety net queue will grow abnormally. Below are the steps that can be followed when we run into these kind of scenarios.

First we can create a new transport queue.

In-order to do that follow the below steps.

On each server with a large mail.queue file:
a. Stop the MSExchangeTransport service.
b. Delete the mail.que file.
c. Start the MSExchangeTransport service.

Also we can troubleshoot safety net by changing the safety net hold time.

By Default the hold period for the safety net will be 2 days. If you wish to change these values follow the below procedure.

To check the safety net hold time run the below command
Get-TransportConfig | ft name,Safety*

Transport2

In-order to change the value run the below command

Set-TransportConfig –SafetyNetHoldTime 1.00:00:00

Transport3

You will get the above warning once you run the above command. So you need to ensure that the SafetyNetHoldTime’ needs to Exceed ‘ReplayLagTime. Keep this in mind that  you need to plan this according to your lag copies. You need not worry about this if you do not have any lag copies.

Now there is something a value called message expiration time out. This is actually the message in the shadow safety that can remain the queue before it expires.

To see this value run the below command.

Get-TransportService |ft name,messageexpiration*

Transport4

To change this value run the below command

Transport5

These values can be changed from the EAC as well

Inroder to change the value through EAC perform the following steps

Open EAC- Click on mail flow tab – Click on receive connectors

Click on more and click on organizational transport settings

TransportEAC

Below you have the option to change the value of the safety net hold time as shown

TransportEAC2

Hope this article will help to change the safety net value in Exchange 2013.

Cheers

Sathish Veerapandian

Technology Evangelist

Enable Office 365 External Sharing

In this article we will have a look at enabling the office 365 external sharing option

Following services can be shared externally from your office 365 tenant.

1) SharePoint Sites.

2) Calendar free/busy sharing.

3) Lync – You can add people outiside your organizations , skype and  can communicate provided the following conditions are met.

Login to the office 365 portal with admin privilige

Click on Admin and click on external sharing

E1

Now we have external sharing options for 3 of the services

When we click on SharePoint we get the below option as shown below

E2

Also we have an option to share individual site by selecting them and then it gives us the same option.

When we click on the Calendar we have the below option

C3

C4

Once sharing is enabled, users can use Outlook Web App to share their calendars with anyone inside or outside the organization. People inside the organization can view the shared calendar side-by-side with their own. People outside the organization will be sent a URL that they can use to view the calendar. Users decide when to share, how much to share, and when to keep their calendars private

Note: If you want to share calendars with an organization that uses Exchange Server 2013 (an on-premises solution), the Exchange administrator will need to set up an authentication relationship with the cloud.

Below is the option that we have for enabling external sharing for lync

Online2

The organization you’re communicating with must also allow communication with your domain. If the other organization has Lync Server on premises, refer them to the TechNet article Configuring Federation Support for a Lync Online Customer.

When you’re communicating with someone in a federated domain, you can only use Lync features (for example, video conversations or desktop sharing) that are turned on in both organizations.

If the external access setting is changed from “On only for allowed domain” to “On except for blocked domain”, the domains that are listed won’t be kept.

Thanks 

Sathish Veerapandian

All about enterprise vault services and its tasks

I Just went through Enterprise Vault services, Tasks and its functionality. I have collected few points about its functionality and would like to share the same.

In this article we will have a look at the enterprise vault version 11 services and its tasks.

Basically EV version 11 has 4 services . The previous version 10 had 6 services and they have reduced it to 4 from 6 in EV11.

Below are the functionality of the 4 services.

Enterprise vault storage service

The Enterprise Vault Storage Service reads the objects from the Storage Archive queue and stores the associated mailbox items to the Storage Device.

What is storage archive queue?

This is the actual  queue which EV server queues the messages from the end users mailbox for archival.

It actually holds the emails that EV needs to archive in its storage.

It integrates and works with the windows message queuing service (MSMQ) and that’s the reason it needs to be installed on the OS during EV installation.

Once the items are copied to this storage queue the below process takes place


  • The copied file from the user will be marked for archive pending.
  • The copied item will be added as .EVSQ file in the Storage queue location. Usually the storage queue location should be redundant path (SAN Storage)
  • Once when all the items are archived this .evsq file is emptied and keeps only the empty .evsq file(not sure why it leaves this file trace).

Below are the different types of queues


Enterprise Vault Exchange Mailbox task for server queue A1

This queue holds the Enterprise Vault Exchange Mailbox Pending items to update in the corresponding users archive. It also has the  failed operations.


Enterprise Vault Exchange Mailbox task for server queue A2

This queue holds the Individual items that needs to process. Used for end user manual archive requests and whenever Enterprise Vault cannot directly communicate with the Storage Archive queue of the Storage service.


Enterprise Vault Exchange Mailbox task for server queue A3

This queue is  Used if you start archiving using the Run Now option in the Administration Console. If the administrator forces the task to run then it comes in this queue.


Enterprise Vault Exchange Mailbox task for server queue A4

This queue is used during the retry of the failed archive.


Enterprise Vault Exchange Mailbox task for server queue A5

This queue is used during scheduled archive runs. This queue is not processed outside the scheduled archiving times, so you cannot use Run Now to clear a backlog on this queue.


Basically this enterprise vault storage service  has 3 tabs as shown below

ee

General Tab

Just tells us about the site and the computer name and doesn’t hold much information


Storage Queue Tab

Tells the queue status open or closed, queue location free space and available space, queue total length and pending length.


Advanced Tab

This queue contains archive processes and restore processes.

ee1


Archive processes

It’s about the number of archiving task that this service can handle at time (can be exchange archive, SharePoint archive, etc..,)


Restore processes

It’s the same as archive and it is the number of the restoring task that this service can handle at a time


Restore thread per process

It’s the number of threads that the restore process must handle while restoring the items. We need to ensure that this value is increased when you increase the value of the number of processes else the restore will take long time.

Note:

We need to make sure that we are aligning the values for archive process and threads correctly else there will be some issues and will take time in the restore


EV Shopping service

This service manages the selected items to be restored when the end user manually chooses to archive few items through browser search and archive explorer. As the name indicates that this service is used only when the user tries to manually archive any items to EV from his end.


ee2

This service will log events in the event log whenever it starts and then stops. So it’s better to monitor this service events once in a while on every day.

Apart from this I do not find any much more information on this service


Enterprise Vault Task Controller Service

The Enterprise Vault Task Controller Service controls all provisioning, archiving, and retrieval tasks for Enterprise Vault. At the completion of every task it records an event about the status (whether it’s completed or its failure) of the task that was completed.

The Enterprise Vault Indexing Service:

This service is responsible to handle the indexing part for the archived data.

The Indexing Service will index items once they are being archived. Each archive will have its own index

It keeps the index all up to date.

Also it fetches the search results for the end users that they are searching for any emails from their EV archive

It’s better to have this functionality enabled as the end users will search for their archived emails for sure.


Tasks

Now we will start looking into the tasks functionality.

So these tasks will be working depending upon all the above services.

Below are the list of tasks that can be created from EV server for the applications as shown below.

ee4


And after we create a task these tasks have options to schedule and run on a timely basis which I find it to be very useful.

There are few more options to explore apart from the schedule

ee5

Note: We would be able to  set only one task for one server.

Example for one mailbox server we can set only one archive task schedule  and that task can be configured.

There are more topics to know on Enterprise Vault since it’s a pretty much complicated big product with more features and functionalities. We will discuss about the rest of the features in the upcoming blogs.

Thanks 

Sathish Veerapandian

Steps to export/import enterprise vault archive mailbox as PST

In this article we will have a look at the steps to export/import the enterprise vault archive as a PST.

Log in to the Enterprise Vault server and open Enterprise vault admin console

Select the node and select the archives

EV1


Now right click on the archives icon and you have an option to export and import as a PST/NSF files.

Now we will see the steps to export as PST.

EV2


Now we have 3 options as shown below for the export of PST file

EV3


Now choose the archive mailbox for the export

Ev4


Select the source archive file

ev5


We have an option to export items in a specific date range which i find to be very useful

ev6


Choose the folder path and we have an option to split the PST files

ev7


Confirm the PST export settings


ev9


Once we click on next we have the status of the export and


there is a report file of the export as well

ev10


These steps  can be useful to export/import the PST to enterprise vault archive for the end users.

Hope this helps.

Thanks

Sathish Veerapandian

Steps to create/identify the list of public Ip’s used by exchange services

In this article we will look at the steps to create and identify the list of public Ip’s used by exchange

In this article we will have a look at the steps to set all Outgoing SMTP from 1 IP address and to see all the ip address from the Exchange server.

First you have to run Get-SendConnector SourceIPAddress x.x.x.x from the EMS in order to see the source IP address of the exchange server

Note:

By default this value will be set only to 0.0.0.0 and exchange hub will take its default assigned ip to send emails to the smart host (firewall/spam filter/Spam cloud). However you can check this if there is any value set to be on the safer side.

Now how the mail flow will go from your Exchange server

From your Exchange – to your firewall – then its gets NAT’ed from local ip to public ip and to internet

We need to NAT our local IP to one public IP.

Inorder to do that Follow the below steps:

Now you need to accomplish this with a router/firewall with a feature called Policy Based Routing.

1)      Create a firewall/NAT rule to NAT outbound traffic from exchange ip address to your preferred public ip address.

2)      With this you could make a rule like: When traffic is coming from my mail server AND the destination port is 25, send the traffic through your ISP from one of your public IP.

To be more precise you will have to do many to one NAT in your firewall as below:

For Example below is your server

Server name      Private IP (Server)     (Public IP on firewall)               Port

Server1:               192.168.0.1          –> 65.55.33.118                           Port 25

Server2:               192.168.0.2          –> 65.55.33.118                           Port 25

If your servers configured as above your source public will be 65.55.33.118 from both the servers.

Also you should have PTR created for your external IP. If not please inform your ISP to create PTR for your external IP’s.

How to identify which Public IP your exchange services are using

There are multiple ways to identify the public ip address used by exchange server

The easiest way to identify them is through MX lookup

You can query all the Exchange url’s through nslookup to see the results

Things you need to query through nslookup:

1)      Query external autodiscover url

2)      Query webmail external url

3)      Query outlook anywhere external  url

Below is an example of mxlookup for Microsoft  records

This steps can be useful during the migration scenarios of exchange servers as well as firewall.

Thanks
Sathish Veerapandian

Steps to perform a extended message trace in Office 365

In this article we will look at the steps to perform a extended message trace in Office 365.

What is Message Trace ?

Message trace is same like  same message tracking in Exchange 2010 . By using this we would be able to track/trace an email which was already sent  through a mailbox which resides in the office 365 cloud.

In-order to perform a message trace perform the following action.

Login to office 365 Admin portal and click on Admin Icon

Track1


Scroll down all the way down to  Admin and click on Exchange

Track2


Navigate to mail flow and select message center as shown below


Track3


Now it will take you to message tracking center.Now Specify the start date and end date

Track4

Select the date range.

Note: The tracking results through EAC will be displayed only for the last 7 days.

If you want to see the message tracking results for more than 7 days then we can export them in csv file and see the results.

Track5


Also we have an option to trace the emails based upon the message delivery  status which i find this to be very useful.

Track6


The final result will be displayed as below

Track7


Track8


Also we have an option to see the pending and already completed traces that can be viewed.

Track9


Note:

By default the message tracking logs will be available only for the past 90 days. If at all your organization will like to extend this period then its better to open a case with Microsoft and extend the tracking period for the same.


Thanks 

Sathish Veerapandian

MVP – Exchange Server

Tech Tip of the Day – What is a federated exchange solution ?

In short, federation is when two Company trust each other and when federation is enabled between them they can share their user’s presence, calendar and global address list.

In a short description  below things needs to be done in order to enable a federation between to organizations

Setup two AD-FS Servers (for company A and company B)

Setup AD FS federated trust between company A and company B

Choose a Server for Authentication Certificate for SSL Encryption (only 1)

Configure the resource server (web server, Application server to which resources clients access) for company A and company B


It’s always recommended that all Exchange organizations use the business instance of the Microsoft Federation Gateway for federation trusts. Before configuring federated delegation between the two organizations, you need to verify which Microsoft Federation Gateway instance each Exchange organization is using for any existing federation trusts.


Inorder to identify the instance  run the following command


Get-FederationInformation -DomainName <the hosted Exchange domain namespace>


For exchange to “Configure Federated Delegation” you need to remember the below


Domain Namespace Requirements:


Step 1: Create a federation trust with the Microsoft Federation Gateway.


https://technet.microsoft.com/en-us/library/dd335198(v=exchg.141).aspx#Shell


Step 2: Create TXT records for federated delegation

https://technet.microsoft.com/en-us/library/ee423548(v=exchg.141).aspx


Step 3: Configure the domains for federated delegation

Add-FederatedDomain -DomainName contoso.com


Step 4: Create an Autodiscover DNS record


https://technet.microsoft.com/en-us/library/cc772053(WS.11).aspx


Step 5: Create an organization relationship

New-OrganizationRelationship -Name “Contoso” -DomainNames “contoso.com”,”northamerica.contoso.com”,”europe.contoso.com” -FreeBusyAccessEnabled $true -FreeBusyAccessLevel LimitedDetails


Thanks & Regards

Sathish Veerapandian

MVP- Exchange Server