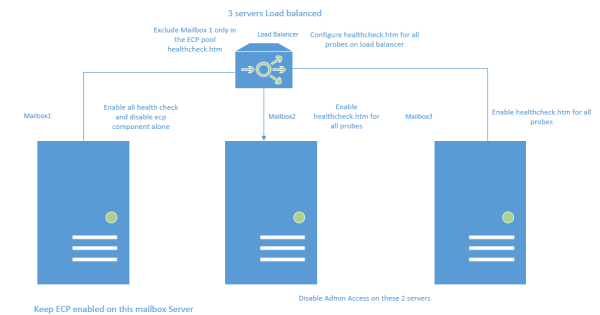
This article outlines the client troubleshooting end points that can be used for Exchange and Skype for Business services.
For Exchange
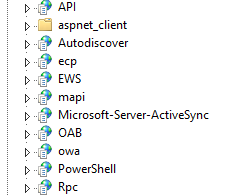
To verify Exchange autodiscover Service endpoints:
https://yourdomain.com/autodiscover/autodiscover.xml
Usage:Main purpose of autodiscover is to establish,discover and make initial connections to their mailboxes.
Also it keeps updated on the outlook on frequent changes of mailboxes and updates the offline address book.
To verify Exchange Exchange Web Service endpoints:
https://yourdomain.com/ews/exchange.asmx
Usage: EWS applications to communicate with the Exchange server mainly for developers to connect their clients and get the email connectivity for their applications via SOAP.
To verify Offinle Address Book Service endpoints:
https://yourdomain.com/oab/oab.xml
Usage: An offline address book provides local copy of address list to Microsoft Outlook which can be accessed when the outlook is in disconnected state.
To verify ActiveSync Service endpoints:
https://yourdomain.com/Microsoft-Server-ActiveSync
Usage:By using Activesync protocol users can configure and sync their emails on their mobile devices.
To verify Webmail Service endpoints:
https://yourdomain.com/owa/owa.xml
Usage:Outlook Web App is a browser based email client used for accessing emails via browser.
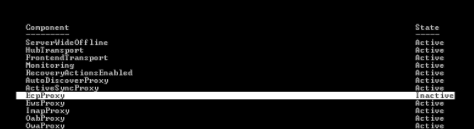
To verify exchange control panel Service endpoints:
https://yourdomain.comecp/ecp.xml
Usage:The Exchange Control Panel is a Web application that runs on a Client Access service providing services for the Exchange organization
To verify MAPI service end points:
https://yourdomain.com/mapi/mapi.xml
Usage:New protocol outlook connections introduced from Exchange 2013 SP1 which enhances faster connections only through TCP and eliminating the legacy RPC
To verify the RPC service end points:
https://yourdomain.com/rpc/rpc.xml
Usage:Not used on new versions of exchange and almost retiring type for client connections.
All the above URL’s will be listening on Exchange 2016 Mailbox Server Virtual Directories.
For Skype for Business:
Mostly for the chat services provided through Skype for business the main URL end points are Chat,Meet,Conference,Audio/Video and lyncdiscover.
We usually check these URL’s during any troubleshooting scenarios.
Below are the additional end points which can be seen and kept for additional references.
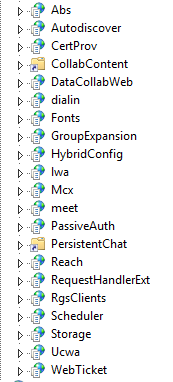
To test conferencing URL:
https://meet.domain.com/meet/
Usage: Meet is the base URL for all conferences in the organization.
To Verify Dial in URL :
https://dialin.domain.com/dialin/
Usage:Dial-in enables access to the Dial-in Conferencing Settings webpage
To Verify Lync control panel:
https://sip.internaldomain.com/cscp
Usage:Must be only added and accessed from intranet site and no need to publish on the internet.
To verify the autodiscover web site and retrieve the redirection information for Client:
https://poolexternaluri/autodiscover/autodiscover.svc/root
https://poolexternaluri/reach/sip.svc
Usage: They are the service entry points for the Autodiscover service and they are required.They are the Lync Server Web Service Autodiscover Response which was sent from the clients.They are the URL for the Authentication Broker (Reach) web service
To Verify Mobile Client Connectivity:
https://poolexternaluri/webticket/webticketservice.svc
Usage:Specifies the default authentication method used for mobile client connectivity.
This is a SOAP web service that authenticates a user via NTLM or Kerberos (if configured) and returns a SAML Assertion (Ticket) as part of the SOAP Message response.
To check that the mobility service is working use the following url.
https://poolexternaluri/mcx/mcxservice.svc
This is the URL required for the Skype Mobility Services
https://poolexternaluri/supportconferenceconsole
Usage:Listening port for the Support Conferencing Console. The default value is 6007
Port used by the Office 365 Support Conference Console. This console is used by support personnel to troubleshoot problems with conferences and online meetings.
To verify the persistent chat:
https://PCpoolexternaluri/persistentchat/rm/
Usage:There are actually a Virtual directory for Persistent Chat, both on External and Internal web site So for external testing access the url from the published persistent chat FQDN
Verify hybridconfig service:
https://poolexternaluri/shybridconfig/hybridconfigservice.svc
Usage:Not sure this might be used for hybrid connectivity beween Skype for Business Server and Skype for Business Online
To check the address book issues:
https://poolexternaluri/abs/handler
Usage:GAL files are downloded from the FE server IIS
Check the below URL for distribution group expansion:
https://poolexternaluri/groupexpansion/service.svc
Usage:They are configured for via windows authentication by default.
https://poolexternaluri/certprov/certprovisioningservice.svc
Usage:This parameter can be used instead of the WebServer parameter in order to specify the full URL of the Certificate Provisioning Web service. This can be useful when the calculation used in WebServer will not yield the correct URL.This parameter is optional, and is used only when SipServer is provided.
This is needed when the Lync Server web server is not collocated with either the main Director or within the Front End pool in a site.
This might be due to a load balancer configuration where web traffic is load balanced differently to SIP traffic resulting in different FQDNs for the SIP and web servers.
All the above SFB URL’s will be listening on front end server
On accessing these URL’s if we are not prompted with username and password then troubleshooting steps needs to be performed accordingly to the message we received to identify the issue. In most cases the URL’s might not be published correctly to be accessed from the remote end points or there might be the issue with the authentication or the virtual directory/server/services itself.
Thanks & Regards
Sathish Veerapandian
MVP – Office Servers & Services