For any web application which is hosted externally will be SSL encrypted.To establish a secure connection they require a certificate.Basically these certificates have a Public key certificate which has a digital signature for them so that it can be trusted for the name, address , organization it has in the certificate by the client.
In a typical public-key infrastructure (PKI) scheme, the signer is a certificate authority (CA), usually a company which charges customers to issue certificates for them.Browsers ensure user safety by requesting certificate information from the vendor instead of from the web application server.
The job of a CA who issues the certificate is not to just issue the new certificate requests . It needs to provide the certificate revocation information for all the requests it is receiving from the clients.
In this article we will have a look at how certificate revocation works.
Below are the types of certificate revocation check that can be configured
1) CRL Distribution. – Certificate Revocation List.
2) OCSP – Online Certificate Status Protocol.
3) OCSP Staple .
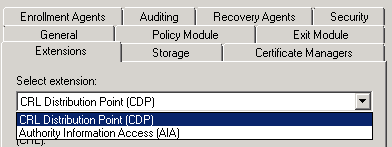
Both the configuration (CRL & OCSP) needs to be done on the certificate authority properties extension tab as shown below
CRL distribution is the core component of the certificate revocation check.so the latter two options are indirectly and totally dependent on the CRL.
The CRL configuration has below components:
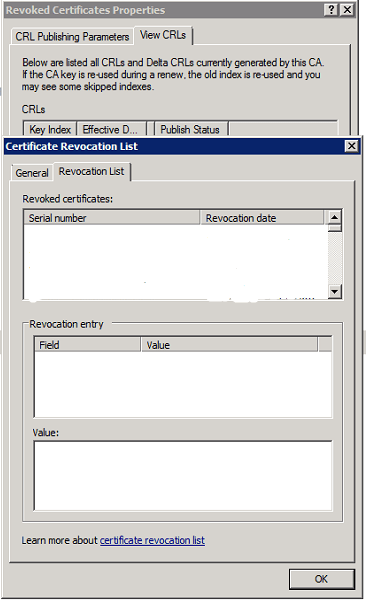
Base CRL – This will contain the whole complete list of revoked certificates (non-expired). so what ever the revoked certificates we have will be present here.
An example below of how it will show in the CRL and will show all the revoked certificates
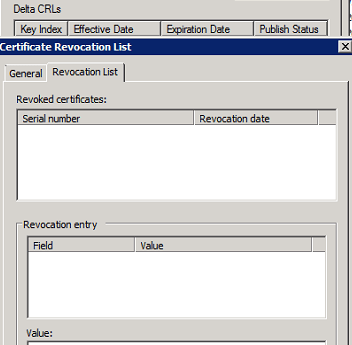
Delta CRL – This will contain only the list of revoked certificates which got from the last CRL distribution points. So this will not have all the revoked certificates.
An example of delta CRL
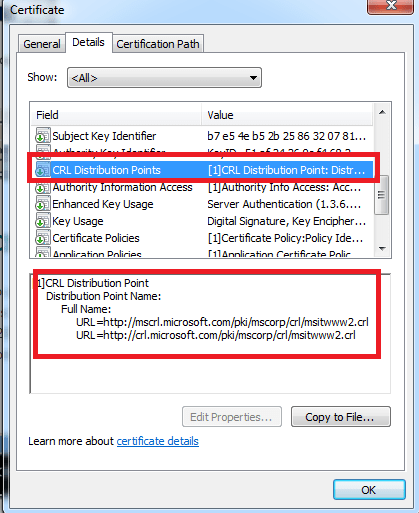
CDP(CRL distribution points) – This CRL distribution point is the place where the Certificate Authority publishes all the certificate information. So the base CRL and the delta CRL gets information from this place only.
A real time example of CRL distribution point wehn seen from the client side.
There are 2 types of CRL distribution points which can be configured:
LDAP – Not firewall friendly and complicated. We also need to allow LDAP port for this verification which is normally not feasible. Personally i don’t feel to allow my LDAP port accessed externally for this revocation process.
HTTP – This is easily accessible by all clients.Its very good if configured properly without exposing the internal name space. So basically we need to create a DNS records for the http url to publish ,create a virtual directory for the CRL distribution points and configure a file server.
The disadvantage of CRL’s is that the client has to search through the complete revocation list. More over they are updated periodically and chances are there the client might get wrong information until the next update happens on the CDP. Usually the browsers take more time to load all these certificates and then check the revocation for its required certificate.
OCSP : Online Certificate Status Protocol
With the OCSP the job has become very simple and easier. This removes the major disadvantage of CRL by allowing the client to check the certificate status of its only one which it owns by providing a serial number to the responder.
OCSP Client – This is the client responsible for querying the certificate check . This OCSP client is available from Windows vista and later versions of operating systems. Operating systems prior to these versions will be using the normal CRL check to validate the certificates. This client is responsible for providing a serial number to the responder.
OCSP responder (web proxy) – This component is available from Windows 2008 server CA. Servers holding CA prior to this versions will be using the CRL to respond the
requestors. This will check the certificate status of the serial number provided by the client. Then it holds a cache entry of the requests that came so that it would be easier to provide them in future .
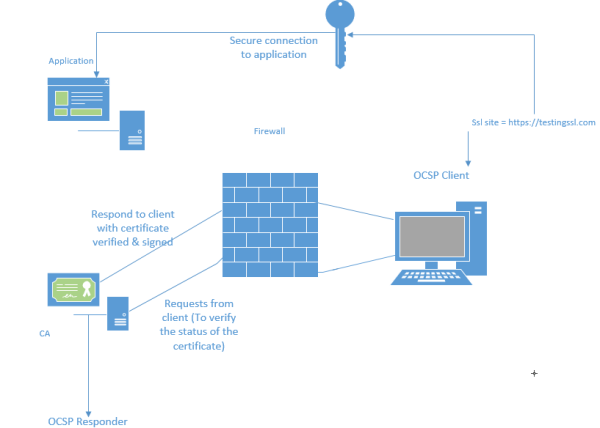
The OCSP client request process in shown below:
1) Client access the website via browser.
2) Client sends OCSP Request to a OCSP Responder (over HTTP) with the certificates serial number for which it requires verification.
3) OCSP Responder replies with a certificate status of either Good, Revoked or Unknown .
2 important things for OCSP configuration
1) The Online Responder service runs under the Network Service account. So we need to make sure it Network service has read permission.
2) we need to enable the value id-pkix-ocsp-nocheck extension for the OCSP by running the below command.
certutil -v -setreg policy\editflags +EDITF_ENABLEOCSPREVNOCHECK
This extension is to avoid the circular revocation checking so that it will not verify the signing certificate from the OCSP requestor.
OCSP stapling:
With OCSP stapling, the web server downloads a copy of the vendor’s response which it can deliver directly to the browser. So the browser do not need to contact the CA seperately rather it will contact the application directly and get the certificate.
With OCSP stapling, the application periodically queries CA and caches a response which is then provided to the browser. By default this setting is configured when we configure OCSP .
The registry key HKEY_LOCAL_MACHINE\SYSTEM\CurrentControlSet\Control\Lsa\Kerberos\Parameters\ controls this behavior.
If we want to disable stapling then all we need to do is create a DWORD called RequestOCSP in the same location and set it to value 0.
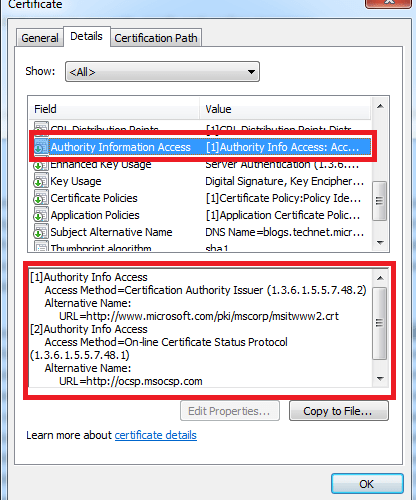
A real time example of OCSP distribution point when seen from the client side
Hope this article gave some idea on how certificate revocation works .
Thanks & Regards
Sathish Veerapandian
MVP – Office Servers and Services