Author Archives: Sathish Veerapandian

MailXaminer Forensic email investigation tool

Mailxaminer is a forensic mail recovery tool designed for finding and reviewing the email evidence

It helps legal firms in reducing the time and cost factor by searching data by particular keywords.

By this we would be able to recover deleted emails preview emails in HTML,RTF,MIME,and hex Format

It has exporting and sharing capabilities as well.

With its user-friendly interface, the application enables us to open as many e-mails as we want and export them to EML, MSG, PDF or HTML format so that e-mails can be easily analyzed. We can open all our email investigation on a case to case basis and store these cases as well.

By doing this we would be able to have a record of our email investigation as well as pull these details in future whenever required.

This tool has the live Exchange server mailbox analysis. The tool forensically scans the entire exchange database and let you find everything which is related to your search parameter.

In what scenarios and which organizations can use SysTools MailXaminer?

Digital Investigators: When they are involved in a Cyber-Crime Case where they need to gather evidences and find the truth in fixing and completing the case.

Law Enforcement Agencies: These agencies are faced with an increasing number of cases in which emails form the bulk of evidence.

Corporate Companies: With employees communicating inside and outside their enterprise through emails, the management needs clever tools to monitor messages for operational intelligence and evidence of malpractices. This could include forewarning of employees’ eminent departure from this job, to harassment, threats and victimization, to data theft and information leakages.

Below are the lists of identified Main features in MailXaminer:

1) Support for multiple e-mail formats

2) Recover corrupted e-mails

3) Mail view options

4) Import cases

5) Remove duplicate e-mails

In this article lets install and explore the product functionality.

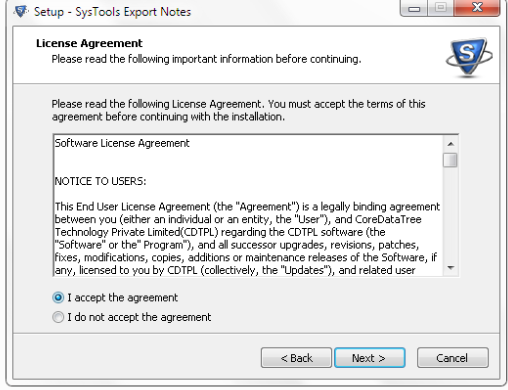
The installation of the product is pretty much straight forward with no prerequisite required and its the normal  hassle free next next – finish standard installation.

The trail version can be downloaded from the below link

http://www.mailxaminer.com/download.html

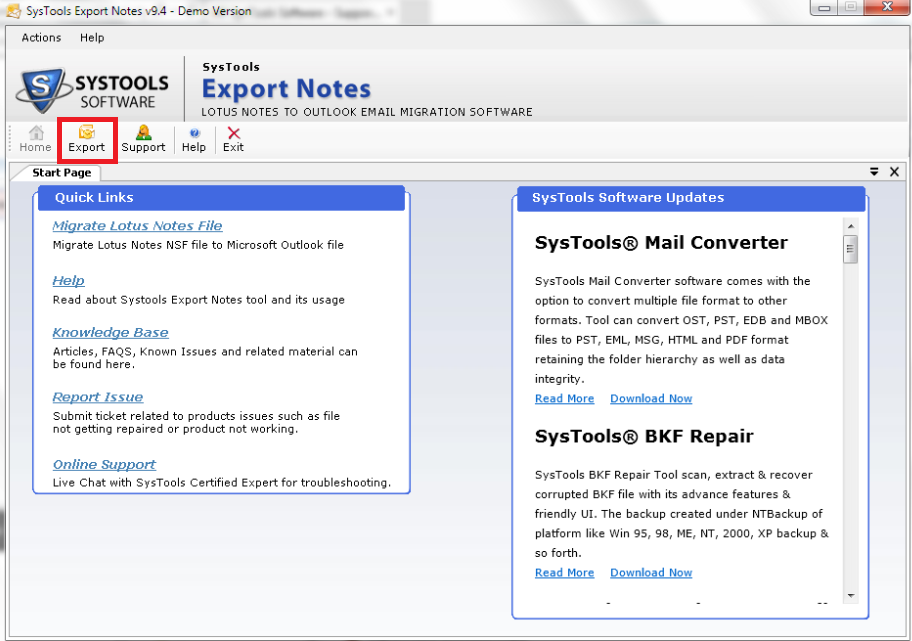
Just open the application

We have the below options

1) Create Case

2) Scan File

3) Search

4) Export

mail1

We have an option to choose create a new case as well as open recent cases as shown beloow

mail2

Click on file and select open to choose the source file from which we need to investigate

Below are the supported email files from which we would be able to open  the files

systools-mailxaminer_149383(2)

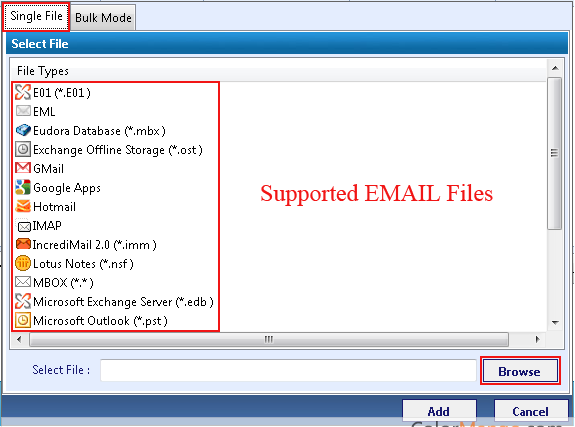
Since we have multiple source files to choose in my case im jsut selecting pst file option to explore the functionality

Once we choose the file it calculates the size of the file, count of the items and displays the result as shown below

Mail3

Once synchronization of pst is done we can see the emails and have an option to see the emails in different formats as well as shown below.

mail4

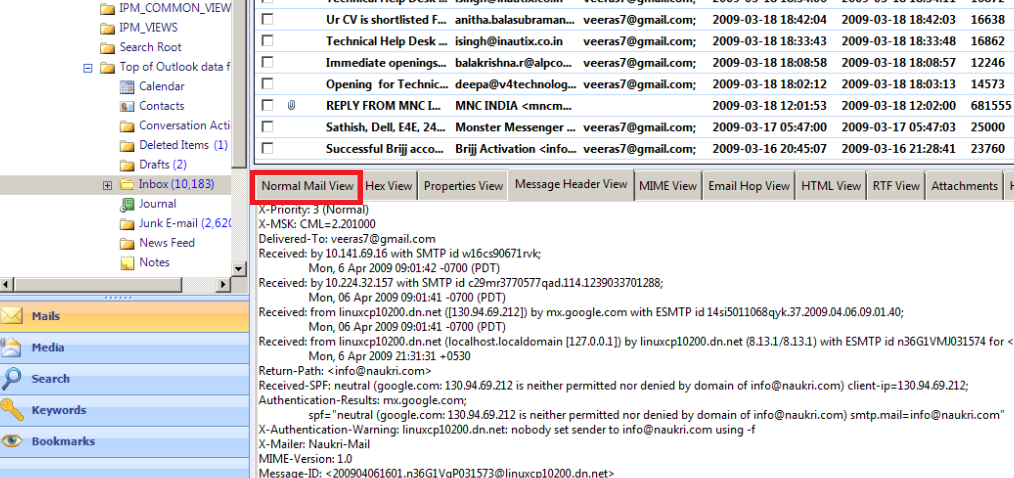
Example of email hop view

Mail5

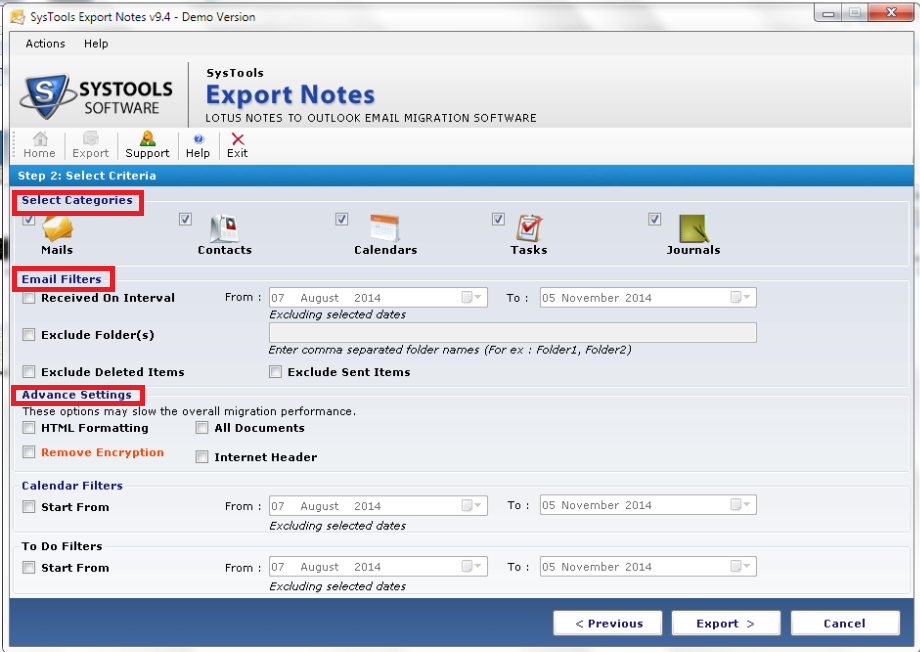
We have an option to export these emails as well

Mail6

Supported email systems :

This product can be connected to live mailboxes running on versions   Exchange 2007, Exchange 2010 and Exchange 2013. But the file types supported are the same as shown in the supported email files.

I find this tool more user-friendly ,easy to operate, able to navigate through different email source files and minimal cost of ownership of this tool .Overall Systools will help us  to examine e-mails and analyze accurate results in any email investigation tasks without the need of external agencies.

For more product feature you can refer : http://www.mailxaminer.com/product/

Thanks 

Sathish Veerapandian

MVP – Exchange Server 

Steps to run Experfwiz remotely on all Exchange Servers

I have created a simple script to run experfwiz remotely on all the exchange servers. Below steps can be done to accomplish this task.

First get all the servers  and store them in a text file. Ensure that are no spaces between them.

Note: We need to download the experfwiz and have them  on the remote machine from where we are executing this script.

Lets say if we are running this script on all the exchange servers remotely  from one machine we  will be prompted to answer yes or no after it enables the counters on each servers. So each and every time it would ask us an input before it starts collecting the data for all the counters.

In-order to avoid this input each and every-time for all the servers probably we can bypass this confirm switch  parameter to yes so that no manual confirmation of (YES or NO)  is not  required from the admin side. We need to do small modification in the experfwiz script to avoid this input.

Follow the below steps to avoid this manual confirmation.

First download the experfwiz from the below technet link

https://experfwiz.codeplex.com/releases/view/135743

Open the ps1 file in notepad

Look for the value $answer = confirmAnswer

experfwiz

Change the above value from

$answer = confirmAnswer

to

$answer = “yes” as shown below

experfwiz2

save the PS1 file in the computer where we are going to run experfwiz

Now copy the below script in notepad  , save them in a ps1 file on the computer where we are going to run the experfwiz

*********************************************************************************

$server = Get-Content c:\servers.txt

foreach ($s in $server)

{.\experfwiz.ps1 -Server $s -duration 08:00:00 -interval 5 -filepath \\$s\c$\Logs}

**********************************************************************************

In my example i’m storing it as experfwiz.ps1

Then navigate to the drive and run this command and it will start to run experfwiz  on all exchange servers

experf222

The above script will query all the servers we have in text file and will run experfwiz . After that it will store these perfmon logs in  respective servers in the path c$ in a folder called logs.

To directly download the file as PS1 go to  – https://gallery.technet.microsoft.com/Steps-to-run-Experfwiz-73f3d662

Thanks 

Sathish Veerapandian

MVP – Exchange Server

Office 365 app launcher navigation experience

App launcher is the new feature introduced in office 365 by Microsoft.

This feature gives option to the end users to easily navigate and gives a quick launch option which has the most recent used applications by users which needs to be used for day to day operations can be easily accessible.

What is is APP Launcher ?

App launcher is a single one point click where we can see all the default office 365 applications (Outlook,Excel,PowerPoint,One Note,Word,One Drive etc.,) all together in the same location. In addition to this  we can add few other applications which end users would like to see on this app launcher one point click.

This gives a new navigation experience to the end user where all the applications are available on the top navigation bar.

Below is the icon which would be available once this App Launcher feature is available on office 365 tenants.

Test


Once we click on that we get the below option as shown

Test2

We can see there are default office applications and we have an option My apps at the bottom which will navigate to a window where we can modify these applications as shown below.


Test3


We have an option to unpin any applications that we do not need in the list.

There are additional apps which can be added from the below office store URL

https://store.office.com/

In addition to above feature there is a new customization feature that provides the option for users to pin up to three mostly used  applications to the right side of the top navigation bar.By doing this end users will get more direct access to the daily most frequently used applications.
Only customers with Exchange on-premise will have this ability to pin and un-pin this option at this time.

This feature will give end users a easy navigation and accessibility to their most frequent used applications on their daily operations.

Thanks 

Sathish Veerapandian

MVP – Exchange Server 

Quick Bites – How to track Lync end users Audio/Video usage

How to track Lync end users Audio/Video usage daily,weekly or monthly ?

We can use the Lync Monitoring reports collected on Monitoring server to track the usage on Lync. We have different reporting options available in Lync monitoring reports which are Call Detail report(CDR) , Media quality diagnostics report and system usage report.

Below are the information about these reports

Call Detail report(CDR)

The Call Detail Report provides a detailed summary of an individual call which has quality of the call and the below information.

Call Information
Caller Device and Signal Metrics
Callee Device and Signal metrics
Caller Client Event
Callee Client Event
Audio Stream (Caller to Callee)
Video Stream (Caller to Callee)
Audio Stream (Callee to Caller)
Video Stream (Callee to Caller)

 
Media Quality Diagnostic Report

Used to diagnose and troubleshoot information for failed calls and has the below information.

UC Peer to Peer Calls (such as a Microsoft Lync 2013 to Microsoft Lync 2013 call)
UC Conference Sessions
PSTN Conference Sessions
PSTN Calls: Media Bypass
PSTN Calls (Non-Bypass): UC Leg
PSTN Calls (Non-Bypass): Gateway Leg
Other Call Types

 
System usage reports

System Usage Reports provide system usage information an overview of user logon activity, most notably information about the number of users who logged on to Microsoft Lync Server 2013 during a specified time period (hourly, daily, weekly, monthly).

In addition to system usage reports we can use the user activity report which has the detailed report of users connected in peer to peer, conferencing sessions on a given time frame that we choose.Also if you would like to drill down and see that users who have participated in a conference call we can expand the conference information which has the users joined in the conference and the role they had in the conference.

To capture, analyze, and diagnose poor quality audio, do the following:

  1. Enable Lync client logging.
  2. After the call is complete, open the client log using Lync Server 2010 Resource Kit Tool: Snooper.
  3. Copy the call quality data into a XML file.
  4. Parse that XML data with a free tool called XML Notepad.
  5. Trend on that data in Excel if needed.

Here are the tools you’ll need to do the job:

Below are the list of logs that can be collected for troubleshooting purposes of any audio/video calls and Call park issues 

SipStack , Inbound routing , Outbound routing logs on the FE server
S4 , Mediation logs on the Mediation server
Client logs from both the clients involved during establishing a Audio/Video Call.

Below articles references gives the information of how to use monitoring reports : –

http://technet.microsoft.com/en-us/library/gg398199.aspx  – Deploying monitoring in Lync Server 2013
http://technet.microsoft.com/en-us/library/jj204989.aspx  – Installing Lync monitoring reports
http://technet.microsoft.com/en-us/library/gg558662.aspx  – Different type of monitoring reports

http://technet.microsoft.com/en-us/library/gg558638.aspx  – User Activity Report

http://blogs.technet.com/b/nexthop/archive/2012/12/10/troubleshooting-call-quality-locally-with-snooper.aspx – Troubleshoot call Quality with Snooper

http://social.technet.microsoft.com/wiki/contents/articles/28611.how-to-track-lync-end-users-audiovideo-usage.aspx

Thanks 
Sathish Veerapandian

MVP – Exchange Server

All about new Clutter Feature in Office 365

Clutter is a new feature introduced  in Office 365.
This feature automatically analyzes once mailbox , checks the most read/unread emails and moves the unwanted unread emails that are in the users mailbox to a new folder called Clutter.
It creates a new folder called clutter under each user’s mailbox for whom this feature is enabled.

When will the clutter feature available in my office 365 tenant?

Admins who have opted for First Release in their Office 365 Admin Center would be able to see the Clutter feature enabled.

Also check if you have enabled for first release.

In-order to check
Navigate to Office 365 Admin portal

Select Office 365 – click on service settings – choose updates and scroll the option towards right to opt for first release.


first release1


If you have opted for standard release then users will need to wait for 3 weeks from November 13th for this feature to be enabled.

By default this clutter feature is not enabled for all users once this feature is available for office 365 tenant.

This feature can be enabled for users through owa
Follow these steps to enable it:

1. Open OWA.
2. Click the Settings (“gear”) icon in the navigation  bar.
3. Click options
4. Select the option clutter and there you will have 2 options to enable or disable the clutter feature as shown below.


onclutter

We could see the clutter feature is disabled by default for all the users. When we select the first option then it separates those clutter identified emails and then it moves it to the clutter folder.


Once  the user enables this feature in his mailbox he gets a confirmation email in his inbox of clutter enabled and a small summary of this feature as below.

confirmation


Once this feature is enabled user will  have an option to right click on any emails in inbox and have an option as mark as clutter as shown below.

markclutter


Also if we right click on any emails that is in clutter folder we have an option to mark as not clutter. This option can be used by end users if in case they identify any important emails moved to the clutter folder.


Mark2


How does this clutter work ?

Once end user enables  this clutter functionality  it actually needs some time to analyze the way of work the person is doing in his mailbox. It will try to prioritize the users most frequently visited emails and the unread emails. Once it identifies the unused emails it would move all those emails to the clutter folder which would be created under inbox for the user who has clutter feature enabled.

Also if you need this feature to understand more about the way to organize your mailbox you can simply move the unused emails to this clutter folder created in your mailbox. By this way this feature will be able to understand and make this functionality work very fast in your mailbox.

Clutter works only on the emails that have been already processed by Anti-spam filters, Agents and it does not works on any spam emails.Basically it does not create any folders under clutter folder and move emails like rules.

Also if an end user creates a rule and moves few emails to a specific folder under his inbox then clutter feature does not disturb those emails as rules take precedence over clutter feature.Clutter works only on the emails which are not mostly viewed under inbox.

The main functionality of Clutter is to keep the inbox organized and clean only with priority emails and move the unread,untouched emails to the clutter folder.

Lets say if we are receiving daily company updates/changes which are not in top priority of daily job which would always be in unread then those emails would be moved to the clutter folder if its not been seen for some days (not sure about exact time period). So this reduces the end user job to create  rule for this unread daily updates. If the user feels like reading these updates on his free time then he can always come to his clutter folder and have a look at these emails.

This clutter feature works on Outlook Client, OWA and also Active Sync Enabled Devices.
Clutter is a good feature which would be definitely useful for end users to keep their inbox organized way in their daily  busy schedule.

Thanks 

Sathish Veerapandian

MVP – Exchange Server

Microsoft Office Delve for Office 365

What is Delve ?

Delve is a new option introduced in Office 365 which can be enabled for users and is a new way to search and discover content across office 365.Its a kind of a sticky notes which will help end users to glance through in their busy day and prioritize their work.
Based on every individual work Delve will analyze and will give the information to each users in the Delve Views. So basically the Delve information what you see in yours will be entirely different from other person Delve View.
What Kind of Files does Delve Shows to users ?

Delve shows users videos, PDF, PowerPoint, Excel, or Word documents that they have access to. Delve prioritizes content that’s been modified or viewed in the last three months and shows them accordingly in the Delve view for each and every user.

Below is an example Screen Shot of how Delve would look like for the end user

Delve

Core Functionality involved in Delve

The core functionality part for the Delve is the contents that are stored in the share point Online and in One-drive for Business.
Its kind of a cached information visible to users as a sticky notes for the documents you and your colleagues viewed,edited and shared in share-point and one-drive.

Functionality of Delve in Exchange Online

For Exchange Online it fetches the right people(most communicated people through exchange online) , Most searched email content and creates a cached information for that user and makes them visible in the Delve view for each and every user.

Functionality of Delve in Lync Online

For Lync  Online it fetches the right people(most communicated people through Lync online)
Users would be able to see them in their delve and would be able to communicate with those users directly from  Lync Online.

Delve updates and changes the people information, documents every 24 hours according to their work. It keeps the information of last 3 months.
How to Activate Delve ?

Delve is on by default. If you turn Delve off, the Office Graph Index will still get built but will not be used in search. It will also remove the ‘Delve’ link in the O365 navigation bar if we turn of Delve.

What Office 365 subscription do i need to activate Delve ?

If Your organization uses any one of Office 365 Enterprise (E1, E3, and E4), Office 365 Education (A2, A3 and A4) or Office 365 Government (G1, G3 and G4) Delve can be enabled. Delve is supported in all versions of Office 365 subscriptions.

Ensure that you are in First Release Group only

To verify, go to Admin in Office 365 Portal > Service settings > Updates and make sure that First Release toggle is set to ON.

Few things that can be checked to enable Delve Functionality

Make sure that the user has licenses assigned.
Make sure that users can access the Office graph
Make sure that you allow your organization to access the Office graph. To verify, go to Office 365 admin center > SharePoint Online admin center > Settings > Office graph and make sure that you’ve selected Allow access to the Office graph.

How to Turn off Delve

1. Sign in to the Office 365 Admin Center.
2. Choose Admin > SharePoint. You’re now in the SharePoint admin center.
3. Click Settings > Under ‘Office Graph’ select ‘Allow’ or ‘Don’t Allow’

Delve22

 Also Refer –  http://social.technet.microsoft.com/wiki/contents/articles/28508.microsoft-office-delve-for-office-365.aspx

Thanks & Regards

Sathish Veerapandian

MVP – Exchange Server

Determining the users connected in Outlook Online/Cached mode

At times we might run into checking the users how they are connected through online mode or cached mode during troubleshooting performance issues. If we have more number of users connected in online mode then we might need to look into the number of users connected through online mode as this could cause performance issues if we have more online users.

First we need to analyze and identify always users who can be used to connect online mode and the rest of the users can be connected through cached mode . Since cached mode stores the local copy of the user’s email and the OAB in the form of OST file.User no longer needs to  depend upon the network connectivity and the users latest information is available offline.

Probably for most of the users it is better to have the outlook in cached mode since end user will have better experience of reading the latest emails offline and would be able to update them periodically whenever they get connected. Users would be able to read important email even when the laptop is not connected in the LAN or WIFI.

Online mode can be used only in few exemptions where if we have a generic mailbox which has a secure sensitive data which should not be stored locally on any  common PC’s and should be available only for few users. Or if size of the mailbox is very large let’s say greater than 20 GB then it takes more time to update the information.  In those scenarios we can use online mode.

I have just collected few troubleshooting steps which we might think of doing if we are in a situation to determine the users connected in online and cached mode

To see users connected in Cached mode or online mode –

The first easiest way to identify this is through RPC Client Access Logs.

To achieve this goal, we can use Excel to open the RPC Client Access logs. RPC logs can be located in Client Access Server in the below Location.

(<Install Path>:\Program Files\Microsoft\Exchange Server\V14\Logging\RPC Client Access)

These logs would be in Text File. Copy them and open these logs in excel file do some formatting and filter. After filtering them the logs would look like the below screenshot.

RPC logs

We have 2 options classic and cached.Classic is for Online Mode and Cached is for cache mode.

Another way to achieve this is to use EXMON tool to identify the list of online/cached mode users


Download the exmon tool from the Microsoft site  http://www.microsoft.com/download/en/details.aspx?displaylang=en&id=11461

Just proceed with the installation
Once the installation is done we need to go the installed directory and look for the file ExMon.reg,Double click on this file to add the required registry entries.

We might get warnings as below and just proceed with the adding the registry entries

exmon1


We should get the below screen upon successful registration of the Reg keys

exmon2

We have an option to check the users connected in cached mode as shown below in by clientmon Tab

cached mode


Also we have an option to see the client version and the client ip address in by user tab.


exmon4


Apart from the above we can use the below script which will give only the Outlook Client Version and the computer name and not the ip address and the type of connection users are connected. It can be used only to find the type of Outlook version users are connected and the computer name from which they are connected.

Get-LogonStatistics -server ServerName| where {$_.ClientMode -ne “Cached”} | select-object FullMailboxDirectoryName,UserName,Windows2000Account,ClientMode,ClientName,ClientVersion,Identity | sort-object UserName -Unique| Export-Csv -Path C:\scripts\UserCount.csv -NoTypeInformation


Above steps can be used to troubleshoot the Exchange Performance issues and to identify the users connected in online mode in an Exchange Environment.

Also Refer –

http://social.technet.microsoft.com/wiki/contents/articles/28446.determining-the-list-of-users-connected-in-outlook-onlinecached-mode.aspx

http://go.microsoft.com/fwlink/?LinkId=142433.

Thanks 

Sathish Veerapandian

MVP – Exchange Server

Quick Bites – Best practices for installing Exchange Servers across different subnets/sites

In this article i have collected few information that we need to look into while we are  planning for Exchange Servers across different subnets.

Exchange servers will work perfectly fine on different subnets. As long as there is no firewall interruption between Exchange servers in the subnet you should be fine.Even if you have firewall it will work fine but ensure that you have DC and GC connectivity if you have firewall to these servers since exchange needs them to contact frequently.

But keep in mind the exchange servers need to talk to each other almost constantly and that would just make things extremely difficult and make troubleshooting harder if you run into any issues with Exchange and GC/DC connectivity.
Ensure that there is no Windows Firewall or A/V interfering perhaps between 2 subnets. Let’s have a look at few things that we need to consider during our planning.


For DAG –
If I’ve got servers on multiple subnets do I need to have a DAG IP in the range of each subnet ?

There needs to be a new Subnet added to the DAG before the node in a different subnet can join the DAG.The reason for this is so the DAG name can be switched and hosted in either of subnets.

MAPI network and Replication Network should not be on the same subnets. Having them on a different subnets will not be single point of failure. When a replication network fails, replication should automatically fail-over to the DAG’s MAPI network .Always, DAG member which communicates with other site requires each site with different Replication Network Subnet.

Probably you can perform the below tasks as a part of checking to ensure that the DAG configuration is correct

Run the below command to check the network settings of DAG :-

Get-DatabaseAvailabilityGroup -Identity DAGNAME | ft DatabaseAvailabilityGroupIpAddresses

To provide network connectivity between each of the replication subnet, a persistent static route must be entered into the Exchange member’s routing table.

To create a persistent static route run the below command :-

netsh interface ip add route (Example IP)10.3.0.0/ 24 “replication 1” 10.4.0.2
netsh interface ip add route (Example IP)10.4.0.0/ 24 “replication 2” 10.3.0.2
Validate through Failover Cluster Manager and ensure that DAG IP is Online.

 
For CAS Array –

CAS Array is site Specific

It is possible to add 2 CAS Servers belonging to different subnet in a CAS Array but they should be in same AD sites. Since they should be querying the same DC’s so we can have Exchange servers spanned across 2 datacenters in a single site if you are planning for adding cas servers in a array in 2 different subnets.

If it is going to be 2 different subnets and different sites then we need to create 2 different CAS array one in each site and probably need to do a DNS round robin which will not give a full HA even by setting the TTL values.

 
For HUB –

We need to have hub servers in each site and they are site specific.Hub servers can support HA for different subnets and help in mail routing only when they are spanned across  the same site in different datacenters.
If we are planning for HA for hub servers in different subnet and different site then we need to install hub servers on each site for HA.

The above points will be useful while we plan for Exchange server deployment in 2 sites and subnets.

Reference –

http://blogs.technet.com/b/timmcmic/archive/2014/05/06/exchange-2010-2013-what-constitutes-a-failure-of-the-replication-network.aspx

http://social.technet.microsoft.com/wiki/contents/articles/28362.best-practices-for-installing-exchange-servers-across-different-subnetssites.aspx

Thanks 

Sathish Veerapandian

MVP – Exchange Server 

Steps to configure cross-forest availability between two exchange forests in Exchange 2013

In this article lets have a look at steps to configure cross-forest availability between two exchange forests

By using the Add-AvailabilityAddressSpace commandlet which has been introduced from Exchange 2013 we would be able to share the exchange free busy data between 2 forests.

We need to have a trust relationship between the source forest and target forest to execute this command. Only then the below command will be successful.

If a trust relationship exists between the two forests, run the following commands.

In our example lets think of sharing the freebusy information between domain Exchangequery.com and toybox.com.

In Order to share the free busy info between these 2 forests we need to perform the below steps

In the source forest perform the following tasks : (ExchangeQuery.com)

Add-AvailabilityAddressSpace -ForestName toybox.com -AccessMethod PerUserFB -UseServiceAccount $true

The above command adds the target domain’s address space  in source domain to share the free busy information in a secured way.

Below types of access methods can be used.

PerUserFB – used to access the FB data in All Exchange Servers group.
OrgWideFB – used to access the FB data in specific group in the target forest.
InternalProxy – used to proxy the request in the latest version of exchange in the site.

The type of access method  can be selected according to our requirement.

Now we need to run the below command in the target domain ( Toybox.com)

Get-Exchangeserver | Add-AdPermission -AccessRights ExtendedRight -ExtendedRights “ms-exch-epi-token-serialization” -User “ExchangeQuery.com\Exchange Servers”

The above command will add required permission for source domain on the target domain Exchange Servers to  access the free busy information.

In a trust relationship scenario, run this command in the target forest toybox to export the SCP from the target forest to the source forest :

 
Export-AutodiscoverConfig –DomainController “LocalForestDomainController” -TargetForestDomainController “(toybox.com)” -TargetForestCredential (Get-Credential) -MultipleExchangeDeployments $true

Type (Toybox\Administrator) password  when prompted.

Now we need to perform the same tasks in the target forest  toybox.com  to share the exchangequery.com address space for sharing the freebusy data.

In the target forest perform the following tasks : (Toybox.com)

Add-AvailabilityAddressSpace -ForestName exchangequery.com – AccessMethod PerUserFB -UseServiceAccount $true

Run the below command in the Source domain ( ExchangeQuery.com)

Get-ClientAccessServer | Add-AdPermission -AccessRights ExtendedRight -ExtendedRights “ms-exch-epi-token-serialization” -User “Toybox.com\Exchange Servers”


Now  run this command in the forest Exchangequery.com to export the SCP from the target forest to the source forest:

 
Export-AutodiscoverConfig –DomainController “LocalForestDomainController” -TargetForestDomainController “exchangequery.com” -TargetForestCredential (Get-Credential) -MultipleExchangeDeployments $true

Type Exchangequery.com\Administrator password when prompted.

Imp Note : This command Add-AvailabilityAddressSpace is available and applicable only for Exchange 2013 servers and Office 365.

The required trust relationship, contacts and address space  between the 2 different organizations must be already created and replicated between them.Only then free busy information will be working.

Reference – http://technet.microsoft.com/en-us/library/bb124122(v=exchg.150).aspx

http://social.technet.microsoft.com/wiki/contents/articles/28332.steps-to-configure-cross-forest-availability-between-two-exchange-forests-in-exchange-2013.aspx

Thanks 

Sathish Veerapandian

MVP – Exchange Server

SysTools Export Notes ( Lotus Notes NSF file to PST Converter )

Recently there are more number of organizations that are moving from lotus notes to Exchange on-premise 2010/2013 or office 365.

After a successful migration we might run into few requirements for export to PST of Notes mail data ( NSF) local archives to PST files in-order to open them with Outlook.

Basically “Archive databases” in Lotus Notes are like “Personal Folders” PST’s in Outlook (local files).
Because they aren’t located in the Domino Server but in the Lotus Notes client folder in each PC. So these files won’t be migrated to Exchange server mailboxes during the period of migration.

We might come across a scenario where we need to move or view files that are already stored in lotus notes archives and find a way to view them or convert them to pst files. There are few numbers of tools which will help us to get this job done.

I just came across this tool SysTools Export Notes for nsf to pst converter and would like to share the product experience.

I found this tool useful and NSF file to PST converter can be used in following scenarios : –

1) If we are doing migration project for a small business with less number of users , with a tight budget for IT tools then we can choose this option SysTools Export Notes.

2) If we are looking out for a solution to migrate the nsf archive databases alone to pst files then this tool might be a good option .

3) If the migration from the notes to exchange has been already completed and if we have few nsf archive databases in users PC which needs to be converted into PST files for accessing them through outlook.

Now let’s have a look into the functionality of this product

The product can be downloaded from the below link

http://www.systoolsgroup.com/export-notes.html


Prerequisites – 

This product can be downloaded and installed on the client PC which has the archive databases .

The supported operating systems are Windows 7 & Windows 8.

We need to have Notes Client and Outlook Client installed on the PC to convert this nsf to pst operation.

Lotus Notes Client should not be connected to the Lotus Domino Server.

Apart from the above i’m not able to find any prerequisites for this software.


The installation is pretty much straight forward and just navigate next , next and finish.

101

Accept the license agreement


102


Next screen prompts for installation folder, quick launch  and finally finish.

103

It opens up a window as below. Now Enter the Lotus Notes Path

104


After that it opens up the wizard as below. Now click on export as shown below


105


Now choose the nsf archive file that needs to be converted as PST file.Also we have an option to choose Migrate notes contacts as well into PST file.

106


Now it brings up the next screen as below.

There is an option to choose categories which has mails,contacts,calendars,tasks and journals.

We can see the Email Filters option by which we can choose only emails to be filtered and exported on a particular interval.

There is Advance Settings option as well which has few options as HTML formatting and removing encryption.

Also there is an option for calendar filters to export entries on a particular date

107


Once you click on export it asks for the location of the PST file to be saved.Once entered the location it shows the below screen with Current Status and Final report .


108

The export time from nsf to pst depends upon the items and the size of the nsf file and it may vay accordingly

Cost Factor : –

Systools nsf to pst converter have licensing structure  cost as one time payment 250 USD. There is also a free version of this product which has all the options similar to the full-version except for the factor it is limited to 16 items per folder.

Conclusion : –

Overall Systools nsf to pst converter product is much user friendly and latest version  has much effective cool new features which can be used for nsf to pst migration and suits well for migrating nsf to pst after migration from notes to Exchange on-premise or office 365.

Thanks 

Sathish Veerapandian

MVP – Exchange Server