Steps to completely uninstall/remove an already existing lync 2010/2013 deployment

At times we might run into a situation where we would need to remove all the server roles , remove the features and front end roles in our lync environment  like a disaster recovery scenario, a lync server upgrade.

In this article we will have a look at the steps to decommission the lync servers in a existing deployment.

Based on my experience, i have gathered few steps which would be useful to troubleshoot in these kinds of scenarios.

1) Disable all users that are enabled for Lync Server and conferencing directories.

Probably you can run the below commands

Get-CSuser | Disable-CSuser

Get-CsConferenceDirectory | Remove-CsConferenceDirectory

2)  Remove Exchange Unified Messaging (UM) Contact Objects

Get-CsExUmContact -Filter {RegistrarPool -eq “LyncServerPoolFqdn”} | Remove-CsExUmContact

3) Remove Response Group Service Workflow Contact Objects

Get-CsRgsWorkflow -Identity:Service:ApplicationServer:LyncServerPoolFqdn | Remove-CsRgsWorkflow

4) Remove Dial-in Conferencing Access Number Contact Objects

Get-CsDialInConferencingAccessNumber | where {$_.Pool -eq “LyncServerPoolFqdn”} | Remove- CsDialInConferencingAccessNumber

5) Reassign the PSTN Gateway

Set-CsPstnGateway -Identity “PstnGateway:Xds Identity of PSTN Gateway” -MediationServer:”MediationServer: Name of Mediation Server Identity”

6) Confirm that a Front End Pool or Front End Server is Vacant

Get-CsVoiceRoute | select Identity,PstnGatewayList

7) Delete all the server roles in the topology, and then publish the final, empty topology.

Log on to the computer where Topology Builder is installed.
Start Topology Builder: Click Start, click All Programs, click Microsoft Lync Server 2010, and then click Lync Server Topology Builder.
In the Actions pane, click Remove Deployment.
Read the information regarding Remove Deployment
Click Next, and then click Finish.

Once the above is done you can open topology builder and publish the empty topology by choosing the option Download Topology from existing deployment.

8) Uninstall all Lync related SQL database.

Uninstall-CsDatabase -DatabaseType User -SqlServerFqdn sqlbe.contoso.net[-SqlInstanceName <instance name>]

9) Run “Remove-CsConfigurationStoreLocation” to remove the Central Management store service control point (SCP) for the existing Central Management store in Active Directory Domain Services (AD DS).

Remove the Central Management Store Service Control Point in Active Directory Domain Services (Optional)

10) Unprep the domain.

Example:

Disable-CsAdDomain -Domain domain1.contoso.net -GlobalSettingsDomainController dc01.domain1.contoso.net -Force

11) Unprep the forest.

Example:

Disable-CsAdForest -Force -GroupDomain contoso.net

After doing the above, you should be able to start a new deployment.

Thanks

Sathish Veerapandian

MVP – Exchange Server 

Lync 2010/2013 Trusted Application Pool, communication paths and firewalls ?

Integrating the Lync 2010/2013 server with a trusted application is one of the major task that an admin needs to do for integrating with 3rd party device.

In this article lets have a look at few things that we need to consider  to accomplish this task.

In-order to establish a signaling gateway between the Lync servers and these 3rd party medias we need to create a trusted application pool for them which will be acting as a gateway for to and fro communications.

This Trusted application pool must be created and defined in the Lync topology to represent the 3rd party application
New-CsTrustedApplication -ApplicationID VideoRouting -TrustedApplicationPoolFqdn video.domain.com -Port 5061

Next step is we need to define the end points for this Trusted application pool by creating Static Routes

Static route can be created for a SIP URI and then point that route to trusted application pool as next hop.
This static route can have a seperate SIP name space which points to the SIP URI used by the organization.

$route = New-CsStaticRoute -TLSRoute -Destination “appservername.domain.com” -Port 5061 -MatchUri “video.domain.com” -UseDefaultCertificate $True
Set-CsStaticRoutingConfiguration -Identity global -Route @{Add=$route}

Lync operates Exactly similar to Exchange’s Internal Relay method for an accepted domain with respect to a shared SIP domain. It first attempts to resolve a URI internally, and only if no match is found does it route the call to the third-party system.

Note :

The DMA certificate only needs to be installed on the DMA, there is no need to have it saved on the Lync servers

Codec Support :

The signaling between the Lync and third party device happens always via SIP but still the final end point hosts must have a IP connectivity and a type of codec to send the media stream between each others.

This integration is very basic and the type of integration between both the video end points should be only H.263 considering the facts that third party end points did not support Microsoft’s RTVideo codec at any point of time.
Namespace Considerations:

Though from Lync 2013 it is possible to have the same SIP name space but still its is better to have 2 separate name spaces to differentiate only for IM enabled users and Video end points

Gateways ( DMA – Distributed Media Applications)

Any signaling gateway product used to achieve this type of integration with Lync server is called the Distributed Media Application (DMA). This DMA’s can be a 3rd party Audio/Video communications server that integrates with lync servers.

An organization can have multiple DMA’s for redundancy even in different geographical locations with different static routes.

Port Requirements:

Recommendation is to use a unique port which is free within a pool ,  so that application can use it. If you have mutiple trusted application pool , you may need to add different port numbers. As it is not a standard application built inside Lync , there is no specific port reserved for it.

For reference : http://technet.microsoft.com/en-us/library/gg398259.aspx

http://social.technet.microsoft.com/wiki/contents/articles/29013.lync-20102013-trusted-application-pool-communication-paths-and-firewalls.aspx

Thanks

Sathish Veerapandian

MVP – Exchange Server 

AutodiscoverServiceInternalURI in Exchange 2013

In Exchange 2013 when we run the below can see AutoDiscoverServiceInternalUri

Get-ClientAccessServer | fl AutoDiscoverServiceInternalUri

Normally this should be something like below:

AutoDiscoverServiceInternalUrihttps://autodiscover.domain.com/Autodiscover/Autodiscover.xmlJump

Don’t touch the Autodiscover virtual directory for changing external and internal URI leave it as such.

Their values will be empty and can be checked by running the below command
Get-AutoDiscoverVirtualDirectory -Server servername | fl *url*

Actually there is no ExternalUri we need to specify.
Internally (so when the clients are on the domain and can see the domain) they will query the domain for that value and resolve to it.

Externally the clients go through a pre-set number of URLs:

https://example.com/Autodiscover/Autodiscover.xml Jump

https://Autodiscover.example.com/Autodiscover/Autodiscover.xml Jump

Then DNS SRV records and finally a redirect.

Therefore for Autodiscover to work correctly externally you need to have one of those URLs resolve and be on the SSL certificate – the most common method is to use Autodiscover.example.com as an additional URL on the UC certificate

Systools Outlook PST recovery software

We should have been facing issues whenever we try to restore big PST file requests. At times these kind of requests might come for VIP users which cannot be avoided and it can come for multiple Executive/VIP users as well.

By default, the overall size of .pst and .ost files has a preconfigured limit of 50 GB in Outlook 2010 and Outlook 2013. And the default .pst file size limit in Outlook 2007 and in Outlook 2003 is 20 GB.
Additionally, we can change the limit: http://support.microsoft.com/kb/832925

It is always recommended to size the PST file for end users so that the recovery of the PST files during any corruption and managing them would be easier.

There are few third party tools that can be used if we run out of options in these scenarios.

I just happened to explore Systools Outlook Recovery Software and found it to be useful.

Systools Outlook Recovery is a professional application designed to help you easily recover or restore emails from corrupt or damaged MS Outlook PST  files.

Let’s explore the functionality of this product and review its features.

The software can be downloaded from this location

http://www.systoolsgroup.com/outlook-recovery.html

In my case i’m downloading the demo version of this product which restricts to 25 items per folder

re1

Once we continue with the demo it makes the prerequisite check  which  is nothing we  just need to have Outlook installed on the PC where we are going to recover the PST files.

Recommended version of outlook –  Outlook 2007/2010 and 2013

re2

Once installed we have an option to select the file to recover Add file at the top

Also there is an Advanced scan option which can be used if the file is highly corrupted.

re3

Once we select the  corrupted PST file we have an option to view those files as shown below Normal View and Attachments

re5

When we select export option we have an option to export the emails in 3 different formats as shown below, also we have option to filter emails on specific time period and Splitting the large PST’s  into our desired values which i find this option to be very useful especially for the help desk team members to handle corrupted and large pst file issues.

re4

We have an option for the naming convention available as well when we select  only MSG and EML type.

re7

Finally it can be exported and saved to our desired destination.

dest

List of  features identified in this product :

  • Outlook file recovery is performed on the deleted emails of Outlook too.
  • The PST database which is broken can also be retrieved with the SysTools Outlook Recovery software application.
  • The tool is capable of recovering PST files that have acquired error messages like 0x80040119 or 0x80040600.
  • The entire Outlook mailbox recovery of the database of PST folder is performed along with the email folders, contacts, tasks, calendars etc.
  • We have an option to split a large PST files into multiple smaller ones.
  • Exporting and saving the PST files in different email formats.
  • All types of datas including calendar, Contacts, emails and tasks can be recovered
  • It can recover data from an encrypted PST file
  • Easy user friendly Graphical User Interface which can be understood by help desk team.

Pricing and Cost Factor:

Systools Outlook recovery software is available in 2 versions the demo and the full version.

Demo version is limited to 25 items per folder and the full version has no limitations on the number of items per folder , size of the PST/OST files and number of users.The cost of the full version is 49$ . I feel the full version will be definitely useful for help desk team which will be more beneficial and appropriate solution especially for large  PST corrupted cases in daily operations.

Thanks 

Sathish Veerapandian

MVP – Exchange Server 

Steps to perform SSl Certificate renewal in Exchange 2010/2013

In this article let’s have a look at things to consider during SSL certificate renewal in Exchange 2010 and 2013 environment.

First we need to confirm what type certificate we are using, i.e., the third-party certificate or self-signed certificate. And then we need to check the existing 3rd party certificate is associated with what all exchange services, number of SAN entries we have  and note down them.

Let’s see the procedure of renewing the certificates for third party and self-signed.

For Third party Certificate Renewal

For renewing the third-party certificate, we need to apply a new certificate request from the third-party CA, then import the certificate to the Exchange servers and enable the related service (IIS, IMAP, POP, and SMTP) on the Exchange servers.

Follow the below steps:

Step 1: Obtain an SSL certificate. Purchase an SSL certificate from a well-known certification authority (CA).

Step 2: Generate and submit the certificate request: create a new certificate request for Secure Sockets Layer (SSL) services.

  1. Open Exchange Management Shell
  2. Run the following command, replace domain name and friendly name with your domain name and display name, and then run below command:

New-ExchangeCertificate -GenerateRequest -SubjectName “C=US, S = Contoso, L = Toybox, O = Test, OU = IT, CN = mail.contoso.com” -domainname mail.contoso.com, Mail.ad.contoso.com, Webmail.contoso.com  -FriendlyName mail.contoso.com -privatekeyexportable:$true -path c:\cert.txt

IMP Note:

“DomainName” is used to populate one or more domain names (FQDNs) or server names in the resulting certificate request. We can replace ‘domainname’ according to our own environment.

“FriendlyName” is used to specify a display name for the resulting certificate. The display name must be lesser  than 64 characters.

In SubjectName property, we can use the proper subject name by our own environment: c for country/region name, o for organization name and cn for common name.

  1. Submit the request to the certification authority and have the CA generate the certificate

Step 3: Enable the certificate on the Default Web site after your certificate has been generated, you must import it and then enable the certificate on the Default Web site.

  1. From the computer where step 2 was run, import the certificate. To import the certificate, open EMS and run the below cmdlet:

Import-ExchangeCertificate -path c:\cert.cer

Note: “c:\cert.cer” is the location and name of our certificate in my example.

  1. Copy the thumbprint of the certificate, which is the digest of the certificate data.
  2. Enable the certificate on the Default Web site, run the cmdlet in EMS and paste the copied thumbprint to the following cmdlet:

Enable-ExchangeCertificate -thumbprint <copied thumbprint value> -services “IIS,IMAP,POP,SMTP”

Note: Using the “enable-ExchangeCertificate” cmdlet will update the certificate mapping and replace the existing certificate that is configured in IIS, IMAP4, POP3, SMTP.

Step 4: Require the Client Access server virtual directories to use SSL

Step 5: Perform an IIS reset. Try browsing OWA and see if you get any errors

For Self Signed Certificate Renewal

For renewing the self-signed certificate, we need to get the old Thumbprint property of the expiring self-signed certificate, and then use New-ExchangeCertificate to renew the certificate and then enable the related service to the new certificate.

To get the existing thumbprint value

Run

Get-Exchangecertificate | fl

5

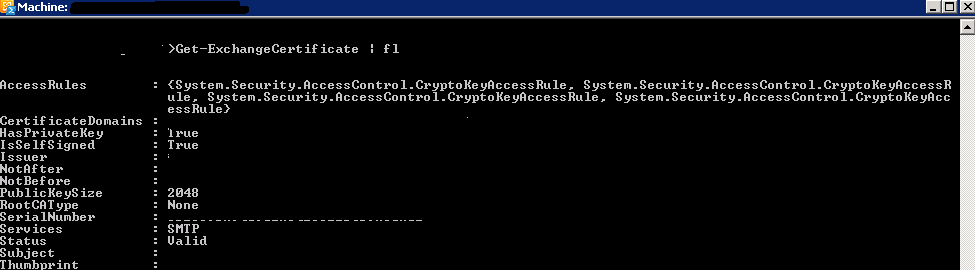
Important thing to note down the self-signed certificate should have a value True in the column IsSelfSigned

Then use the command remove-Exchangecertificate to remove the old expired certificate

Example

Remove-ExchangeCertificate -Thumbprint 5113ae0233a72fccb75b1d0198628675333d010e

You can use the command New-ExchangeCertificate to create a new certificate

Run the below command to perform the action

New-ExchangeCertificate -FriendlyName “SelfSigned Certificate” -KeySize 2048 -SubjectName “c=IN, s=, l=, o=CONTOSO, ou=IT, cn=CONTOSO.COM” -DomainName MAIL.CONTOSO.COM, AUTODISCOVER.CONTOSO.COM -PrivateKeyExportable $True


Below are the important things to keep in mind:

  • You can assign only one certificate to the Default Web site at a time. I would recommend deleting the old certificate as it is useless and will create confusions because it will not be used by any services once we assign the new certificate.
  • Ideally it should break or bring own any services while installing the new certificate. However, we may need to do an IISreset (not always but we may need it). So for few seconds till your IIS comes back we will experience a disconnection for few seconds
  • Certificates cannot be changed after they are signed, otherwise they would provide no security. Once issued, a certificate holds all SANs. This means that a certificate would have to be revoked and a new one has to be issued to add a new SAN.
  • You should first find out which names you want to register, because revoking and reissuing will most likely cost extra money. And also adding SAN entries will cost you extra money. If you have edge servers then the new certificate created must be imported on them and new edge subscription must be created.
  • When you order a Unified Communications Certificate from a third party you can secure all the SAN names you need with one easily manageable certificate. After your Multiple Domain (UCC) SSL certificate is issued, you can add or remove Subject Alternative Names (SANs) at any time. SANs are the additional, non-primary domain names secured by your UCC SSL certificate. However, keep in mind: Changing your SANs generates a new certificate, which you must install on your server. Your old certificate only remains valid only for 72 hours and has to be replaced with new entries.
  • Public trusted CA’s shall not issue a certificate with an Expiry Date later than 1 November 2015 with a SAN or Subject Common Name field containing a Reserved IP Address or Internal Server Name. As from 1 October 2016, CAs shall revoke all unexpired Certificates.
  • If you are a server admin using internal names, you need to either reconfigure those servers to use a public name, or switch to a certificate issued by an internal CA before the 2015 cutoff date. All internal connections that require a publicly-trusted certificate must be done through names that are public and verifiable (it does not matter if those services are publicly accessible).
    What things comes under internal name ?

    Any server name with a non-public domain name suffix. For example, http://www.contoso.local or server1.contoso.internal.
    NetBIOS names or short hostnames, anything without a public domain. For example, Web1, ExchCAS1, or Frodo.
    Any IPv4 address in the RFC 1918 range.
    Any IPv6 address in the RFC 4193 range.

Also Refer – http://social.technet.microsoft.com/wiki/contents/articles/28809.steps-to-perform-ssl-certificate-renewal-in-exchange-20102013.aspx

Thanks

Sathish Veerapandian

MVP – Exchange Server

Microsoft Exchange UPDATES Released

Microsoft Exchange UPDATES Released :

Microsoft has released Exchange 2013 CU7, Exchange 2010 SP3 RU8 and Exchange 2007 SP3 RU15.

Exchange 2013 Cumulative Update 7 can be downloaded –https://www.microsoft.com/en-us/download/details.aspx?id=45221
Issues that Exchange 2013 CU8 resolves –http://support.microsoft.com/kb/2986485

Exchange 2010 Update rollup 8 up can be downloaded =http://www.microsoft.com/en-us/download/details.aspx?id=45225
Issues that Exchange 2010 update rollup 8 resolves –http://support2.microsoft.com/default.aspx?kbid=2986475

Exchange 2007 Update rollup 15 up can be downloadedhttp://www.microsoft.com/en-us/download/details.aspx?id=45269
Issues that update rollup 15 resolves –http://support2.microsoft.com/default.aspx?kbid=2996150

Thanks

Sathish Veerapandian

MVP – Exchange Server

MailXaminer Forensic email investigation tool

Mailxaminer is a forensic mail recovery tool designed for finding and reviewing the email evidence

It helps legal firms in reducing the time and cost factor by searching data by particular keywords.

By this we would be able to recover deleted emails preview emails in HTML,RTF,MIME,and hex Format

It has exporting and sharing capabilities as well.

With its user-friendly interface, the application enables us to open as many e-mails as we want and export them to EML, MSG, PDF or HTML format so that e-mails can be easily analyzed. We can open all our email investigation on a case to case basis and store these cases as well.

By doing this we would be able to have a record of our email investigation as well as pull these details in future whenever required.

This tool has the live Exchange server mailbox analysis. The tool forensically scans the entire exchange database and let you find everything which is related to your search parameter.

In what scenarios and which organizations can use SysTools MailXaminer?

Digital Investigators: When they are involved in a Cyber-Crime Case where they need to gather evidences and find the truth in fixing and completing the case.

Law Enforcement Agencies: These agencies are faced with an increasing number of cases in which emails form the bulk of evidence.

Corporate Companies: With employees communicating inside and outside their enterprise through emails, the management needs clever tools to monitor messages for operational intelligence and evidence of malpractices. This could include forewarning of employees’ eminent departure from this job, to harassment, threats and victimization, to data theft and information leakages.

Below are the lists of identified Main features in MailXaminer:

1) Support for multiple e-mail formats

2) Recover corrupted e-mails

3) Mail view options

4) Import cases

5) Remove duplicate e-mails

In this article lets install and explore the product functionality.

The installation of the product is pretty much straight forward with no prerequisite required and its the normal  hassle free next next – finish standard installation.

The trail version can be downloaded from the below link

http://www.mailxaminer.com/download.html

Just open the application

We have the below options

1) Create Case

2) Scan File

3) Search

4) Export

mail1

We have an option to choose create a new case as well as open recent cases as shown beloow

mail2

Click on file and select open to choose the source file from which we need to investigate

Below are the supported email files from which we would be able to open  the files

systools-mailxaminer_149383(2)

Since we have multiple source files to choose in my case im jsut selecting pst file option to explore the functionality

Once we choose the file it calculates the size of the file, count of the items and displays the result as shown below

Mail3

Once synchronization of pst is done we can see the emails and have an option to see the emails in different formats as well as shown below.

mail4

Example of email hop view

Mail5

We have an option to export these emails as well

Mail6

Supported email systems :

This product can be connected to live mailboxes running on versions   Exchange 2007, Exchange 2010 and Exchange 2013. But the file types supported are the same as shown in the supported email files.

I find this tool more user-friendly ,easy to operate, able to navigate through different email source files and minimal cost of ownership of this tool .Overall Systools will help us  to examine e-mails and analyze accurate results in any email investigation tasks without the need of external agencies.

For more product feature you can refer : http://www.mailxaminer.com/product/

Thanks 

Sathish Veerapandian

MVP – Exchange Server 

Steps to run Experfwiz remotely on all Exchange Servers

I have created a simple script to run experfwiz remotely on all the exchange servers. Below steps can be done to accomplish this task.

First get all the servers  and store them in a text file. Ensure that are no spaces between them.

Note: We need to download the experfwiz and have them  on the remote machine from where we are executing this script.

Lets say if we are running this script on all the exchange servers remotely  from one machine we  will be prompted to answer yes or no after it enables the counters on each servers. So each and every time it would ask us an input before it starts collecting the data for all the counters.

In-order to avoid this input each and every-time for all the servers probably we can bypass this confirm switch  parameter to yes so that no manual confirmation of (YES or NO)  is not  required from the admin side. We need to do small modification in the experfwiz script to avoid this input.

Follow the below steps to avoid this manual confirmation.

First download the experfwiz from the below technet link

https://experfwiz.codeplex.com/releases/view/135743

Open the ps1 file in notepad

Look for the value $answer = confirmAnswer

experfwiz

Change the above value from

$answer = confirmAnswer

to

$answer = “yes” as shown below

experfwiz2

save the PS1 file in the computer where we are going to run experfwiz

Now copy the below script in notepad  , save them in a ps1 file on the computer where we are going to run the experfwiz

*********************************************************************************

$server = Get-Content c:\servers.txt

foreach ($s in $server)

{.\experfwiz.ps1 -Server $s -duration 08:00:00 -interval 5 -filepath \\$s\c$\Logs}

**********************************************************************************

In my example i’m storing it as experfwiz.ps1

Then navigate to the drive and run this command and it will start to run experfwiz  on all exchange servers

experf222

The above script will query all the servers we have in text file and will run experfwiz . After that it will store these perfmon logs in  respective servers in the path c$ in a folder called logs.

To directly download the file as PS1 go to  – https://gallery.technet.microsoft.com/Steps-to-run-Experfwiz-73f3d662

Thanks 

Sathish Veerapandian

MVP – Exchange Server

Office 365 app launcher navigation experience

App launcher is the new feature introduced in office 365 by Microsoft.

This feature gives option to the end users to easily navigate and gives a quick launch option which has the most recent used applications by users which needs to be used for day to day operations can be easily accessible.

What is is APP Launcher ?

App launcher is a single one point click where we can see all the default office 365 applications (Outlook,Excel,PowerPoint,One Note,Word,One Drive etc.,) all together in the same location. In addition to this  we can add few other applications which end users would like to see on this app launcher one point click.

This gives a new navigation experience to the end user where all the applications are available on the top navigation bar.

Below is the icon which would be available once this App Launcher feature is available on office 365 tenants.

Test


Once we click on that we get the below option as shown

Test2

We can see there are default office applications and we have an option My apps at the bottom which will navigate to a window where we can modify these applications as shown below.


Test3


We have an option to unpin any applications that we do not need in the list.

There are additional apps which can be added from the below office store URL

https://store.office.com/

In addition to above feature there is a new customization feature that provides the option for users to pin up to three mostly used  applications to the right side of the top navigation bar.By doing this end users will get more direct access to the daily most frequently used applications.
Only customers with Exchange on-premise will have this ability to pin and un-pin this option at this time.

This feature will give end users a easy navigation and accessibility to their most frequent used applications on their daily operations.

Thanks 

Sathish Veerapandian

MVP – Exchange Server 

Quick Bites – How to track Lync end users Audio/Video usage

How to track Lync end users Audio/Video usage daily,weekly or monthly ?

We can use the Lync Monitoring reports collected on Monitoring server to track the usage on Lync. We have different reporting options available in Lync monitoring reports which are Call Detail report(CDR) , Media quality diagnostics report and system usage report.

Below are the information about these reports

Call Detail report(CDR)

The Call Detail Report provides a detailed summary of an individual call which has quality of the call and the below information.

Call Information
Caller Device and Signal Metrics
Callee Device and Signal metrics
Caller Client Event
Callee Client Event
Audio Stream (Caller to Callee)
Video Stream (Caller to Callee)
Audio Stream (Callee to Caller)
Video Stream (Callee to Caller)

 
Media Quality Diagnostic Report

Used to diagnose and troubleshoot information for failed calls and has the below information.

UC Peer to Peer Calls (such as a Microsoft Lync 2013 to Microsoft Lync 2013 call)
UC Conference Sessions
PSTN Conference Sessions
PSTN Calls: Media Bypass
PSTN Calls (Non-Bypass): UC Leg
PSTN Calls (Non-Bypass): Gateway Leg
Other Call Types

 
System usage reports

System Usage Reports provide system usage information an overview of user logon activity, most notably information about the number of users who logged on to Microsoft Lync Server 2013 during a specified time period (hourly, daily, weekly, monthly).

In addition to system usage reports we can use the user activity report which has the detailed report of users connected in peer to peer, conferencing sessions on a given time frame that we choose.Also if you would like to drill down and see that users who have participated in a conference call we can expand the conference information which has the users joined in the conference and the role they had in the conference.

To capture, analyze, and diagnose poor quality audio, do the following:

  1. Enable Lync client logging.
  2. After the call is complete, open the client log using Lync Server 2010 Resource Kit Tool: Snooper.
  3. Copy the call quality data into a XML file.
  4. Parse that XML data with a free tool called XML Notepad.
  5. Trend on that data in Excel if needed.

Here are the tools you’ll need to do the job:

Below are the list of logs that can be collected for troubleshooting purposes of any audio/video calls and Call park issues 

SipStack , Inbound routing , Outbound routing logs on the FE server
S4 , Mediation logs on the Mediation server
Client logs from both the clients involved during establishing a Audio/Video Call.

Below articles references gives the information of how to use monitoring reports : –

http://technet.microsoft.com/en-us/library/gg398199.aspx  – Deploying monitoring in Lync Server 2013
http://technet.microsoft.com/en-us/library/jj204989.aspx  – Installing Lync monitoring reports
http://technet.microsoft.com/en-us/library/gg558662.aspx  – Different type of monitoring reports

http://technet.microsoft.com/en-us/library/gg558638.aspx  – User Activity Report

http://blogs.technet.com/b/nexthop/archive/2012/12/10/troubleshooting-call-quality-locally-with-snooper.aspx – Troubleshoot call Quality with Snooper

http://social.technet.microsoft.com/wiki/contents/articles/28611.how-to-track-lync-end-users-audiovideo-usage.aspx

Thanks 
Sathish Veerapandian

MVP – Exchange Server