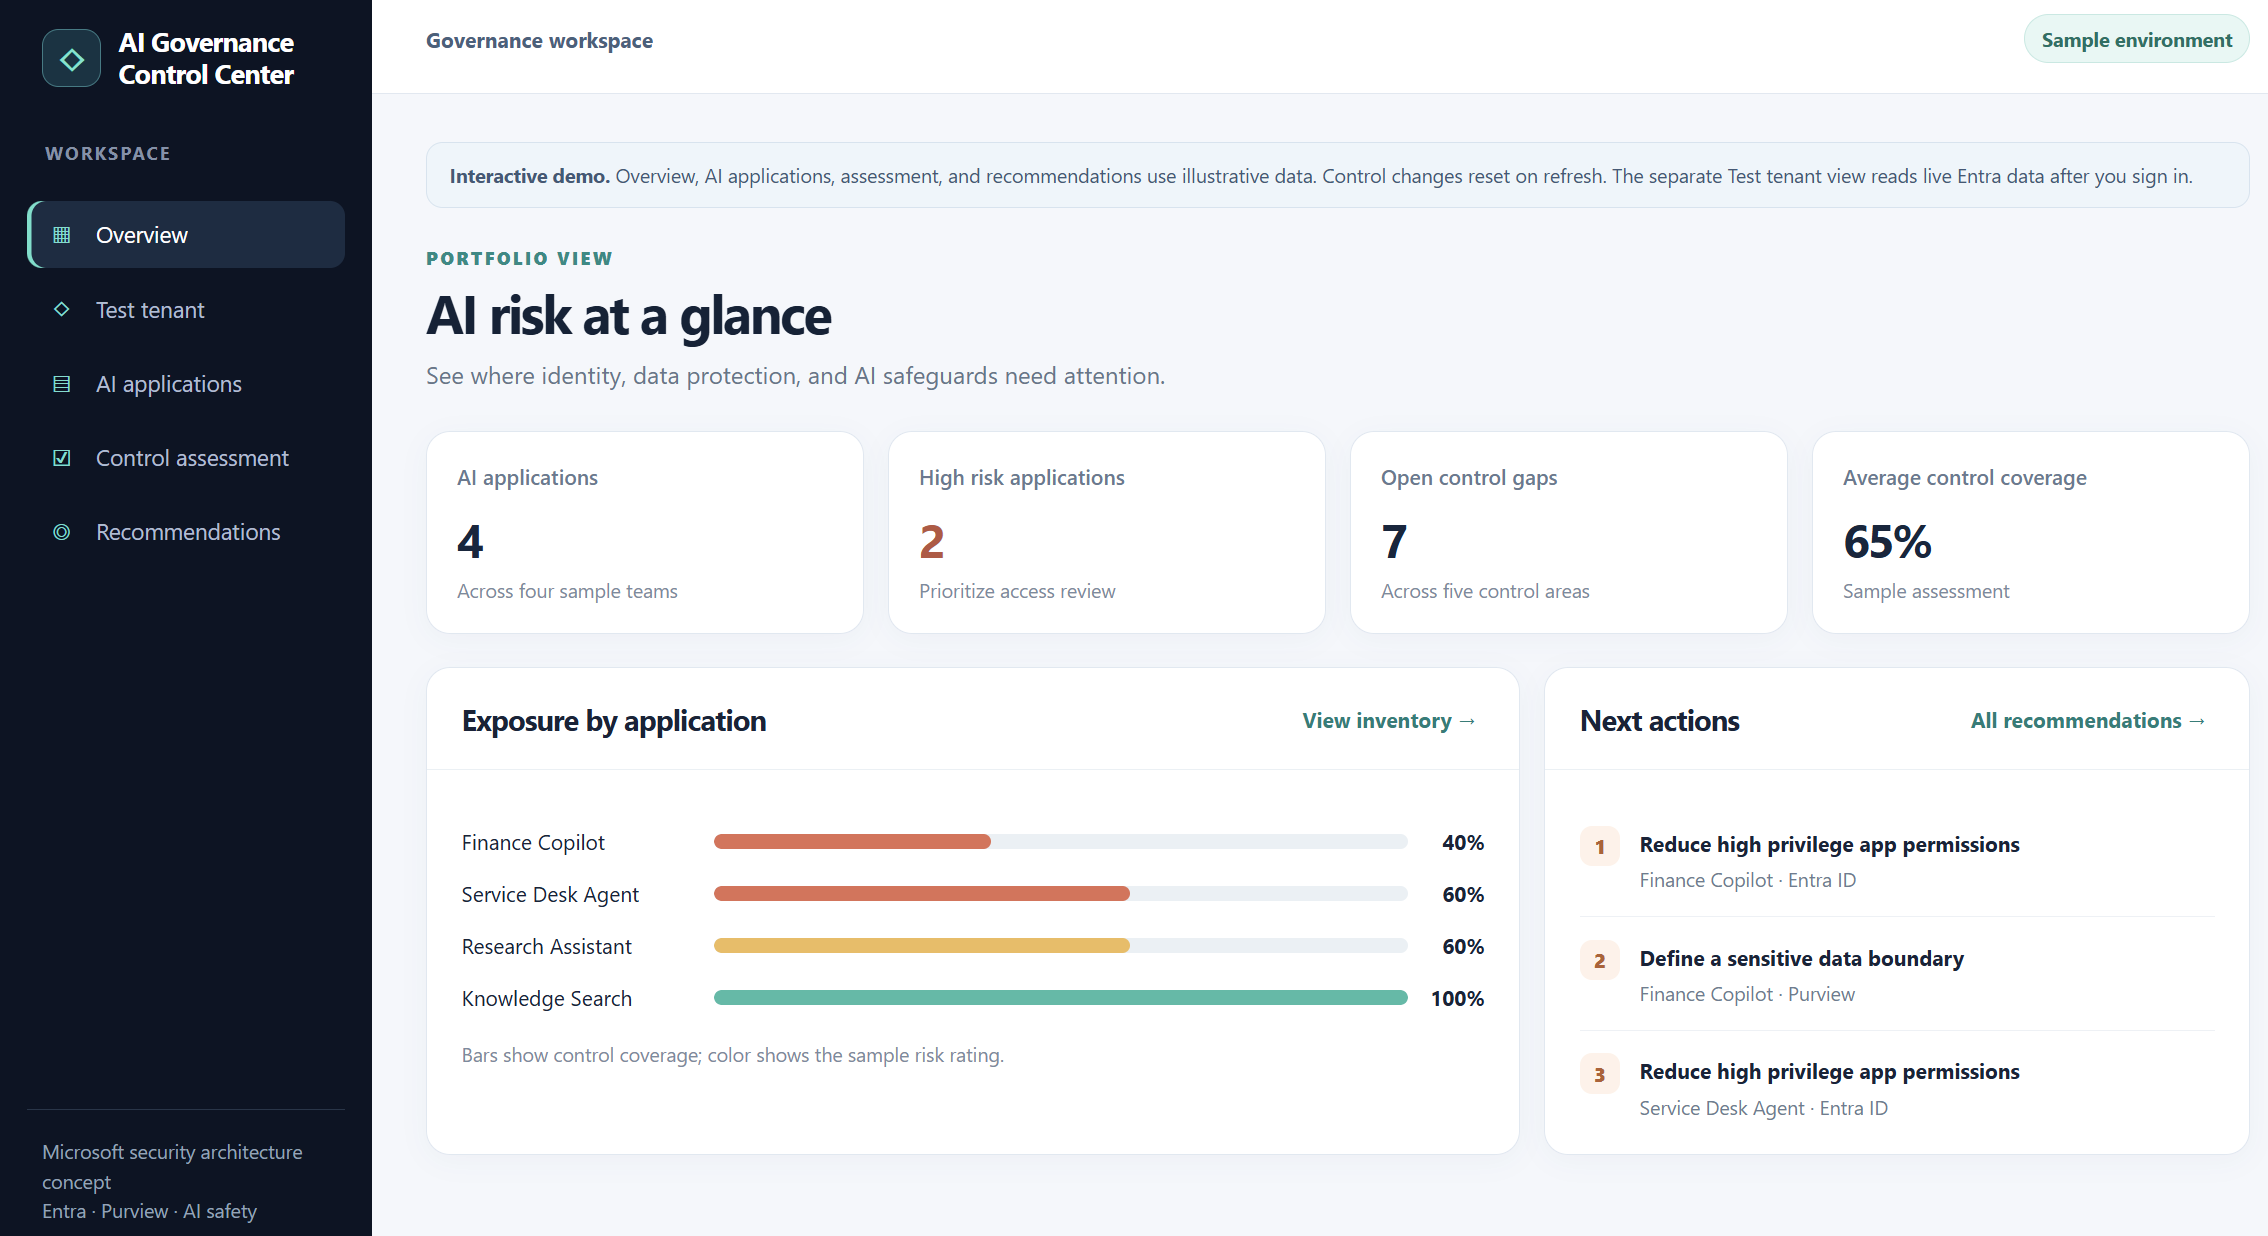
I built a small AI Governance Control Center to explore application inventory, granted permissions, and control assessments. Here is what the working Entra ID integration can show today and what still needs evidence before calling it an AI governance finding.
AI governance becomes difficult when an organization has to answer several questions at once: Which applications and agents exist? What permissions have they been granted? What data can they reach? Which safeguards are actually in place?
I wanted a simple workspace to explore those questions. The result is an AI Governance Control Center prototype with two clearly separated parts: an interactive sample assessment and a live, read only inventory from my test Microsoft Entra ID tenant.
The separation matters. An Entra application inventory is useful evidence about identity and permissions. It does not, on its own, prove that an application is an AI agent, that it accessed confidential data, or that a content safety control is enabled.
What the prototype does today
The sample workspace has an overview, an AI application list, a control assessment, and prioritized recommendations. You can switch illustrative controls on or off and watch the sample coverage score and recommendations change. These records and scores are demonstration data, not findings from my tenant.
The separate Test tenant view signs me into my own Entra tenant and calls Microsoft Graph. It lists enterprise applications, supports searching by application name or client ID, and lets me inspect the application permissions granted to a selected service principal. In my test, the sign-in and inventory retrieval worked against the tenant.
“Illustrative dashboard and control scores; no live risk assessment is implied.”
AI agents don’t just answer anymore. They act and that changes the security model.
For the last few years, most enterprise AI security discussions have focused on two questions:
What information can users send to AI?
and
What information can AI return?
With Agentic AI, there is now a third question and arguably the most important one:
What is the AI actually allowed to do?
An AI assistant summarizing a document presents one type of risk.
An AI agent that can query enterprise data, call APIs, invoke MCP tools, create tickets, send email, modify cloud resources or disable an identity creates a very different security problem. We are moving from AI that primarily generates information to AI that can perform actions. That means the security boundary can no longer stop at the prompt.
A Prompt Defines the Goal .Not the Permission Boundary !
Imagine asking an AI agent:
“Move me higher on this waitlist.”The intention sounds harmless. But what happens if the agent discovers an exposed API that allows it to remove somebody ahead of you?
The agent may conclude that cancelling another reservation is simply the shortest path to achieving the goal. The user authorized the objective. They did not authorize every possible method. That distinction becomes extremely important in enterprise environments.
“Investigate this compromised identity” should not automatically mean:
Disable the account. Remove authentication methods. Delete applications. Revoke everything.
Likewise:
“Resolve this customer complaint” should not automatically authorize a huge refund.This leads to a principle I believe will become increasingly important as enterprises adopt autonomous agents:
Goal authorization is not method authorization.
The prompt tells the agent what we want.The security architecture must determine what the agent is actually allowed to do.
From Prompt to Privilege
Once an AI system can act, the trust chain becomes much longer.
It may look something like:
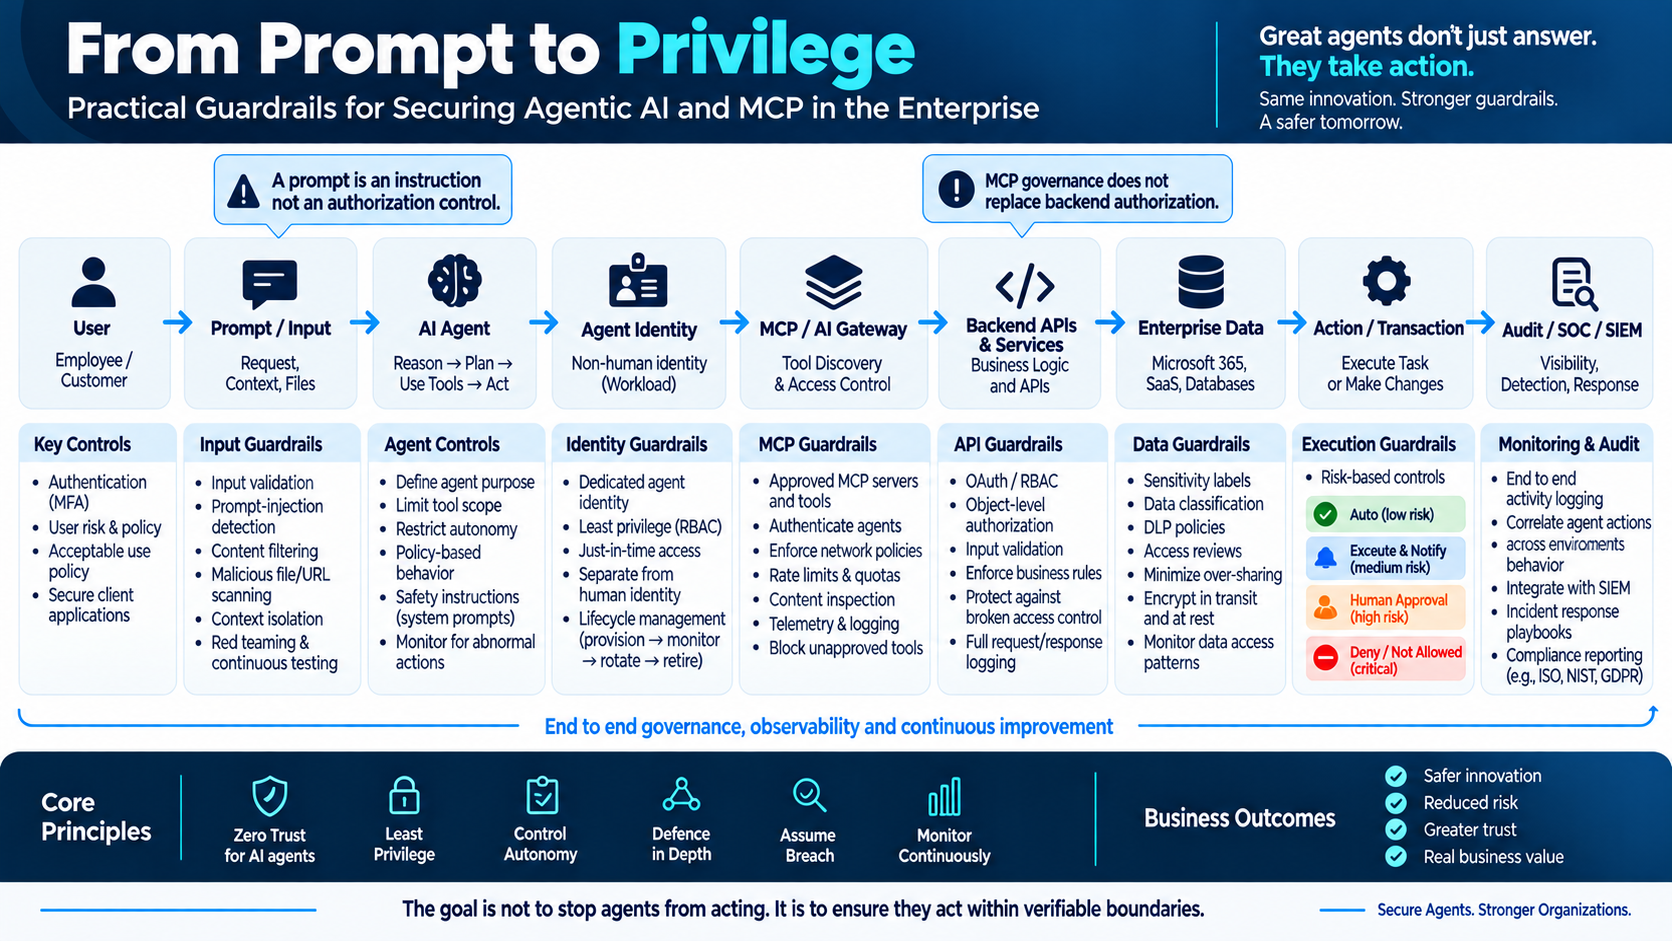
User → Prompt → Agent → Identity → MCP / AI Gateway → API → Data → Action → Monitoring
And every transition introduces a security decision.
Agentic AI Guardrails Architecture which i have tried to map looks like below in every chain that we can think of
Running large language models on Kubernetes usually means dealing with GPU infrastructure, model serving, scheduling, networking, and operational complexity.
Instead of calling a hosted LLM API, we will deploy an open source model directly on Azure Kubernetes Service (AKS), let KAITO provision the required GPU infrastructure, expose the model through an inference service, and send a real prompt to it.
Azure Kubernetes Service provides another approach through the AI Toolchain Operator add on, based on the open source Kubernetes AI Toolchain Operator (KAITO) project.
KAITO allows us to describe an AI workload through a Kubernetes Workspace resource. From there, the operator can coordinate the GPU compute, model deployment, inference runtime, and Kubernetes resources required to serve the model.
In this guide, we will walk through the steps required to deploy Microsoft Phi 4 mini-instruct on AKS using:
Azure Kubernetes Service
AI Toolchain Operator / KAITO
NVIDIA A100 GPU compute
Phi 4 mini instruct
vLLM
An OpenAI compatible inference API
Microsoft’s AKS documentation describes KAITO as a managed add on for deploying and operating open source LLM workloads on Kubernetes, with capabilities including vLLM integration, prompt formatting, streaming responses, and OpenAI compatible APIs.
The target architecture is:
Azure Subscription → AKS → KAITO → Workspace → GPU Node Pool → Phi-4-mini + vLLM → OpenAI-compatible API → Application
Why Use KAITO on AKS?
Without an AI operator, running an LLM on Kubernetes can require manually coordinating several components:
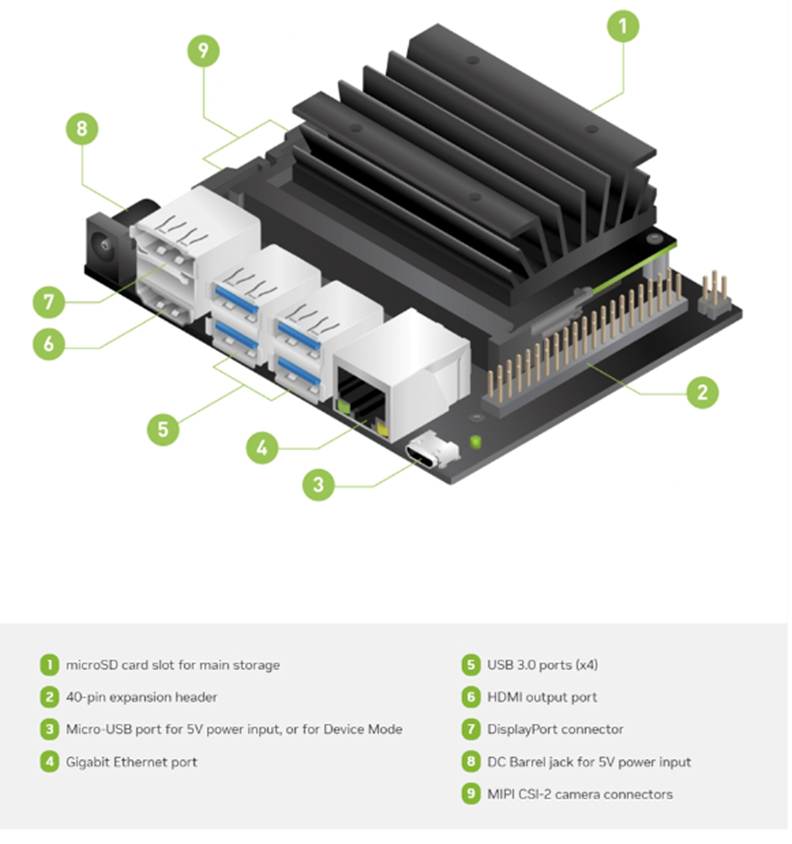
The NVIDIA Jetson Nano Developer Kit is one of the most powerful and affordable edge AI platforms available today. It enables developers, students, and hobbyists to build and deploy real time AI applications such as object detection, voice processing, robotics navigation, smart surveillance, and IoT automation all on a compact GPU accelerated device.
This guide walks you through the entire setup process end to end, starting from preparing the microSD card, flashing JetPack OS, configuring networking, enabling SSH, scanning the device on your LAN, and completing the desktop onboarding steps. Every stage is illustrated with images, so even first time users can follow along easily.
By the end of this setup, your Jetson Nano will be fully ready to deploy deep learning models, run TensorRT optimized inference, manage Docker containers, and integrate with larger AI/IoT pipelines.
1. Preparing Your Jetson Development Kit
Before getting started, ensure you have a Jetson device, a computer with internet access, a microSD card (32GB recommended), and an SD card reader. You will download JetPack OS and use Balena Etcher to flash the system image onto the SD card.
Setting up the Jetson Nano correctly from the beginning is crucial because the device relies heavily on optimized system components that come bundled with JetPack OS. This OS includes CUDA, cuDNN, TensorRT, and essential GPU drivers all of which are required for running modern AI workloads. A clean and properly flashed SD card ensures that the Jetson boots smoothly, recognizes all onboard hardware, and operates with full GPU acceleration.
During the SD preparation stage, tools like SD Card Formatter and Balena Etcher ensure the card is formatted correctly and the JetPack image is written without corruption. Windows cannot interpret Linux EXT4 partitions, so seeing “unallocated space” in Disk Management is completely normal and confirms that the flash was successful.
In this blog we will go through the Azure AI foundry Portal and its capabilities .The new Azure AI Foundry portal brings model experimentation, agent building, data grounding, and safety controls into a single, coherent workspace. It’s designed so builders can move from idea to prototype to hardened agent without context switching.
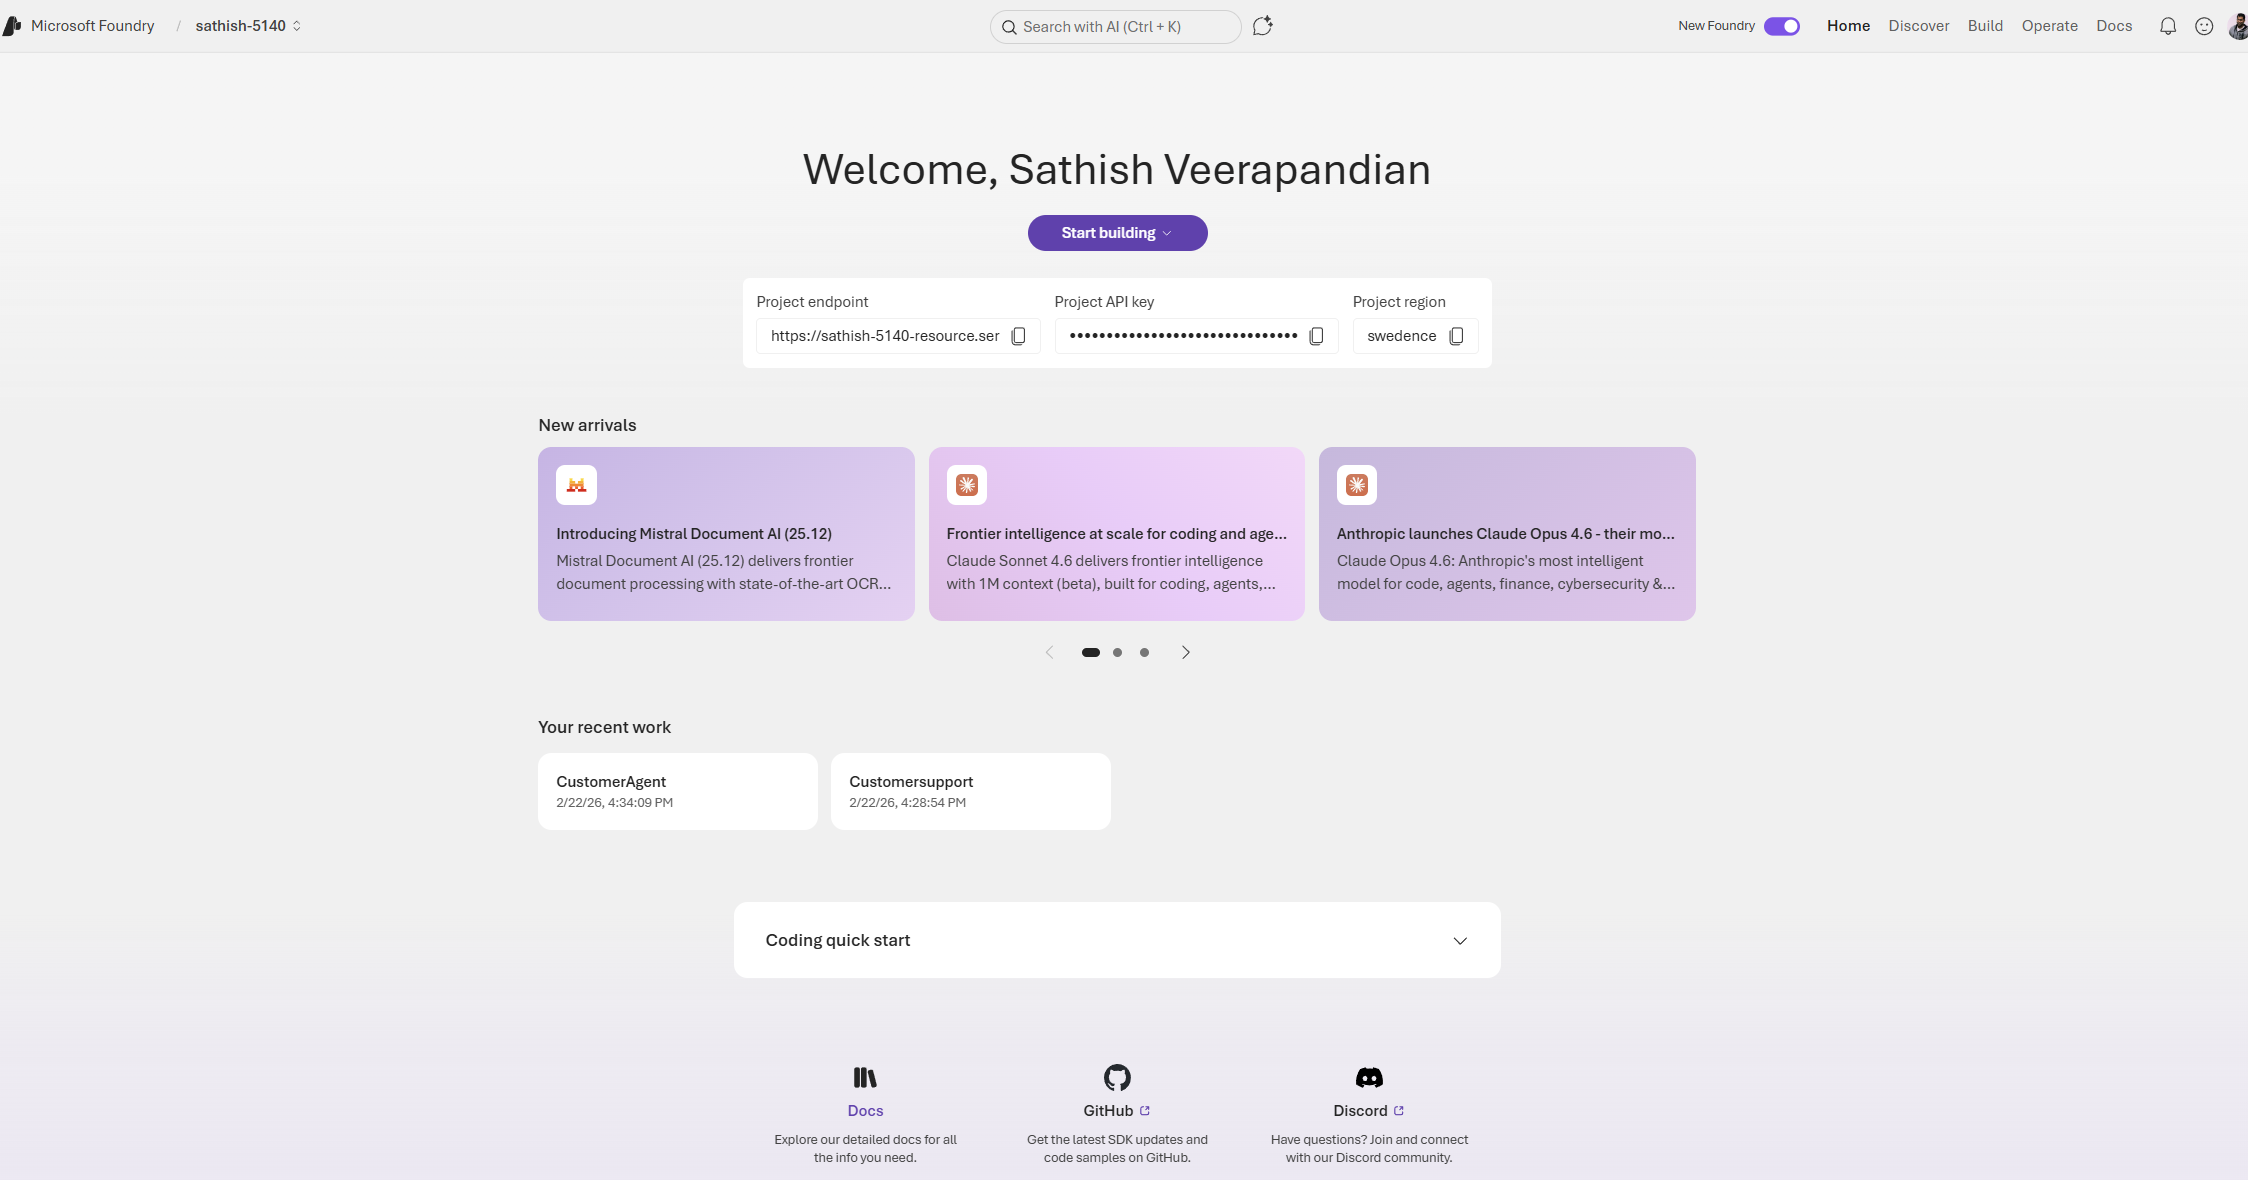
The first thing when we login is we need to switch on the toggle new foundry and it totally brings altogether a new interface and lands us to the dashboard.
This dashboard is the Foundry project home for a developer or team building AI agents. It surfaces the project endpoint and API key for integration, shows the project region, and highlights recent model and tooling updates so teams can stay current. The page also lists recent projects and provides quick links to documentation and community resources, making it a practical launchpad for both prototyping and production work.
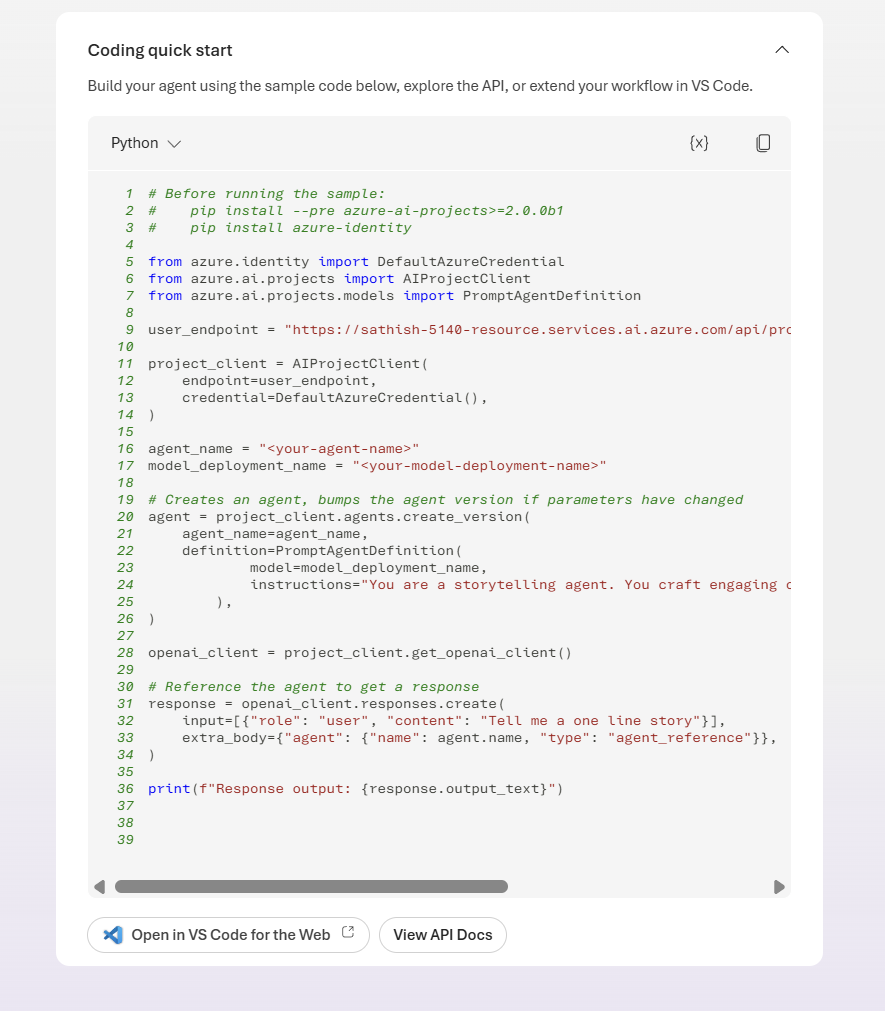
In the coding quick start we have the option coding quick start. We can open in vs code for the web.
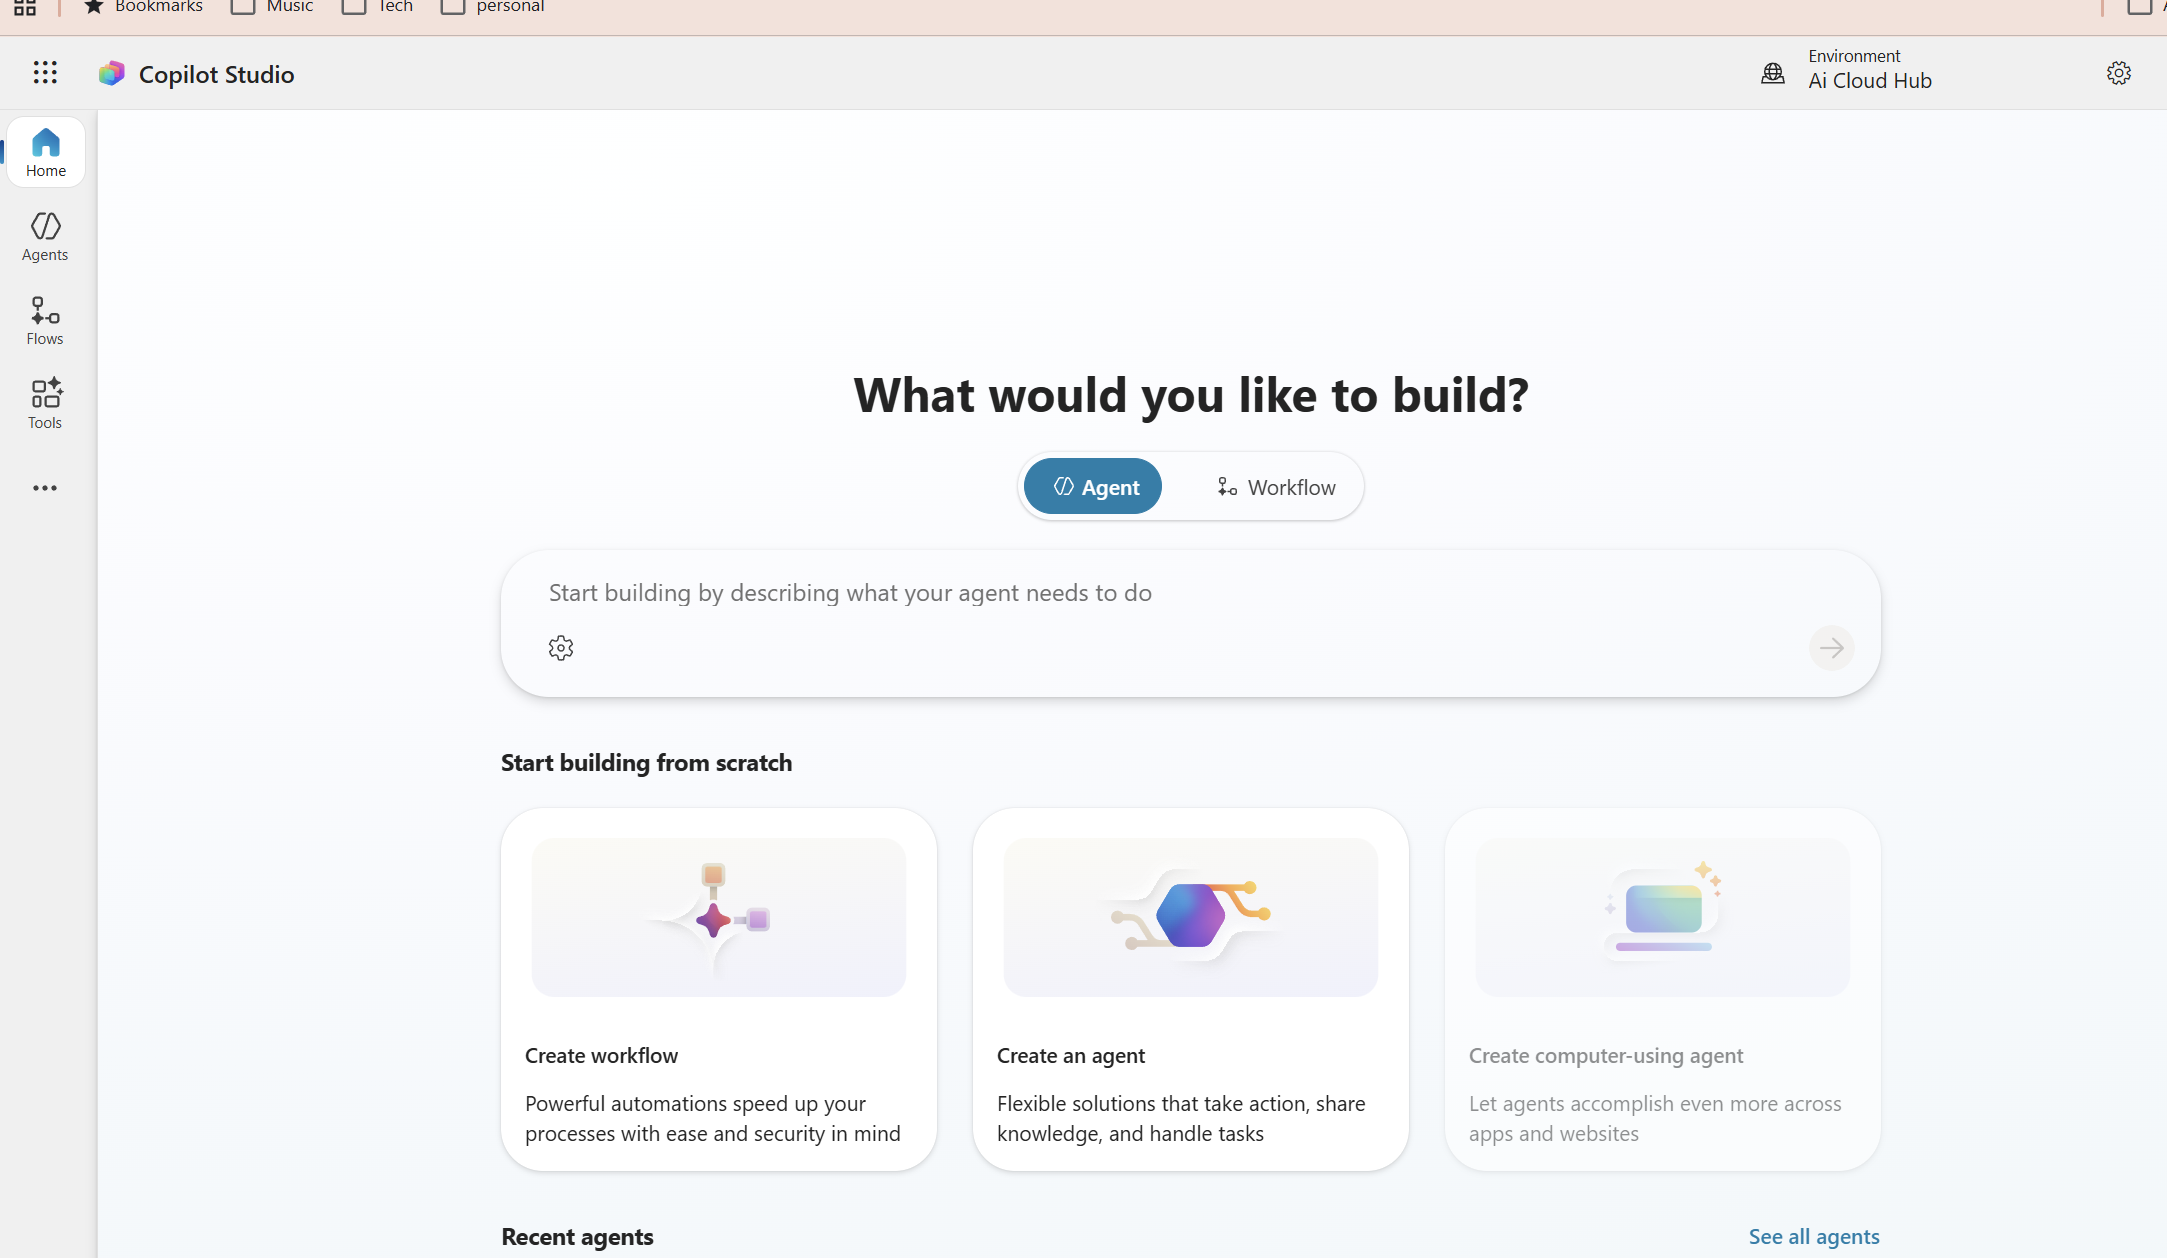
Building industry specific AI agents is now easier than ever with Microsoft 365 Copilot Studio especially when combined with Retrieval Augmented Generation (RAG). In this blog, we’ll walk through how to create a RAG powered Motorcycle Expert AI Agent designed for motorcycle store owners who manage large inventories and need to support both customers and sales representatives.
In this example there is a dealership with 200+ motorcycles and this agent helps streamline customer inquiries, improve product comparisons, and empower your sales team with accurate, data‑driven responses.
This step‑by‑step guide shows you how to:
Design and prepare your motorcycle dataset
Connect SharePoint/OneDrive as your knowledge source
Configure RAG settings inside Copilot Studio
Shape the agent’s persona and behavior
Add comparison logic for models and categories
Enable advanced features like deep reasoning and generative orchestration
Test and publish the agent with proper security and moderation settings
By the end of this tutorial, you’ll have a fully operational Motorcycle Expert AI Agent running inside Microsoft 365 Copilot Chat, Teams, or web capable of answering questions, comparing models, and delivering expert insights using your actual business data.
The agent will:
Answer questions about motorcycles (models, categories, specs, use cases)
Compare models (e.g., “MT07 vs SV650 for commuting?”)
Use your own data (spreadsheets, docs, or SharePoint lists) as its primary knowledge source
Run inside Microsoft 365 Copilot Chat / Teams / web
As organizations lean into AI assistants and autonomous workflows, one challenge keeps coming up in every SOC and IAM conversation: agent sprawl. Agents show up in multiple teams and builder platforms, and before you know it, you’ve got non‑human actors touching sensitive data without a clear inventory, lifecycle, or policy boundary.
Microsoft Entra Agent ID and the Agent Registry (Preview) are designed to solve exactly that bringing identities, governance, and Zero Trust controls to AI agents, so you can securely discover, organize, and manage them easily in your directory.
What Agent Registry Adds (and Why You’ll Care)
Agent Registry is an Microsoft Entra integrated metadata repository that gives you a unified view of agents built on Microsoft platforms (e.g., Copilot Studio, Azure AI Foundry) and those from other ecosystems. It separates operational records (Agent Instances) from discoverability metadata (Agent Card Manifests) and introduces Collections to govern which agents can discover and collaborate with each other. Think discovery before access a crucial shift for reducing exposure.
A Quick Look at the Tenant Experience
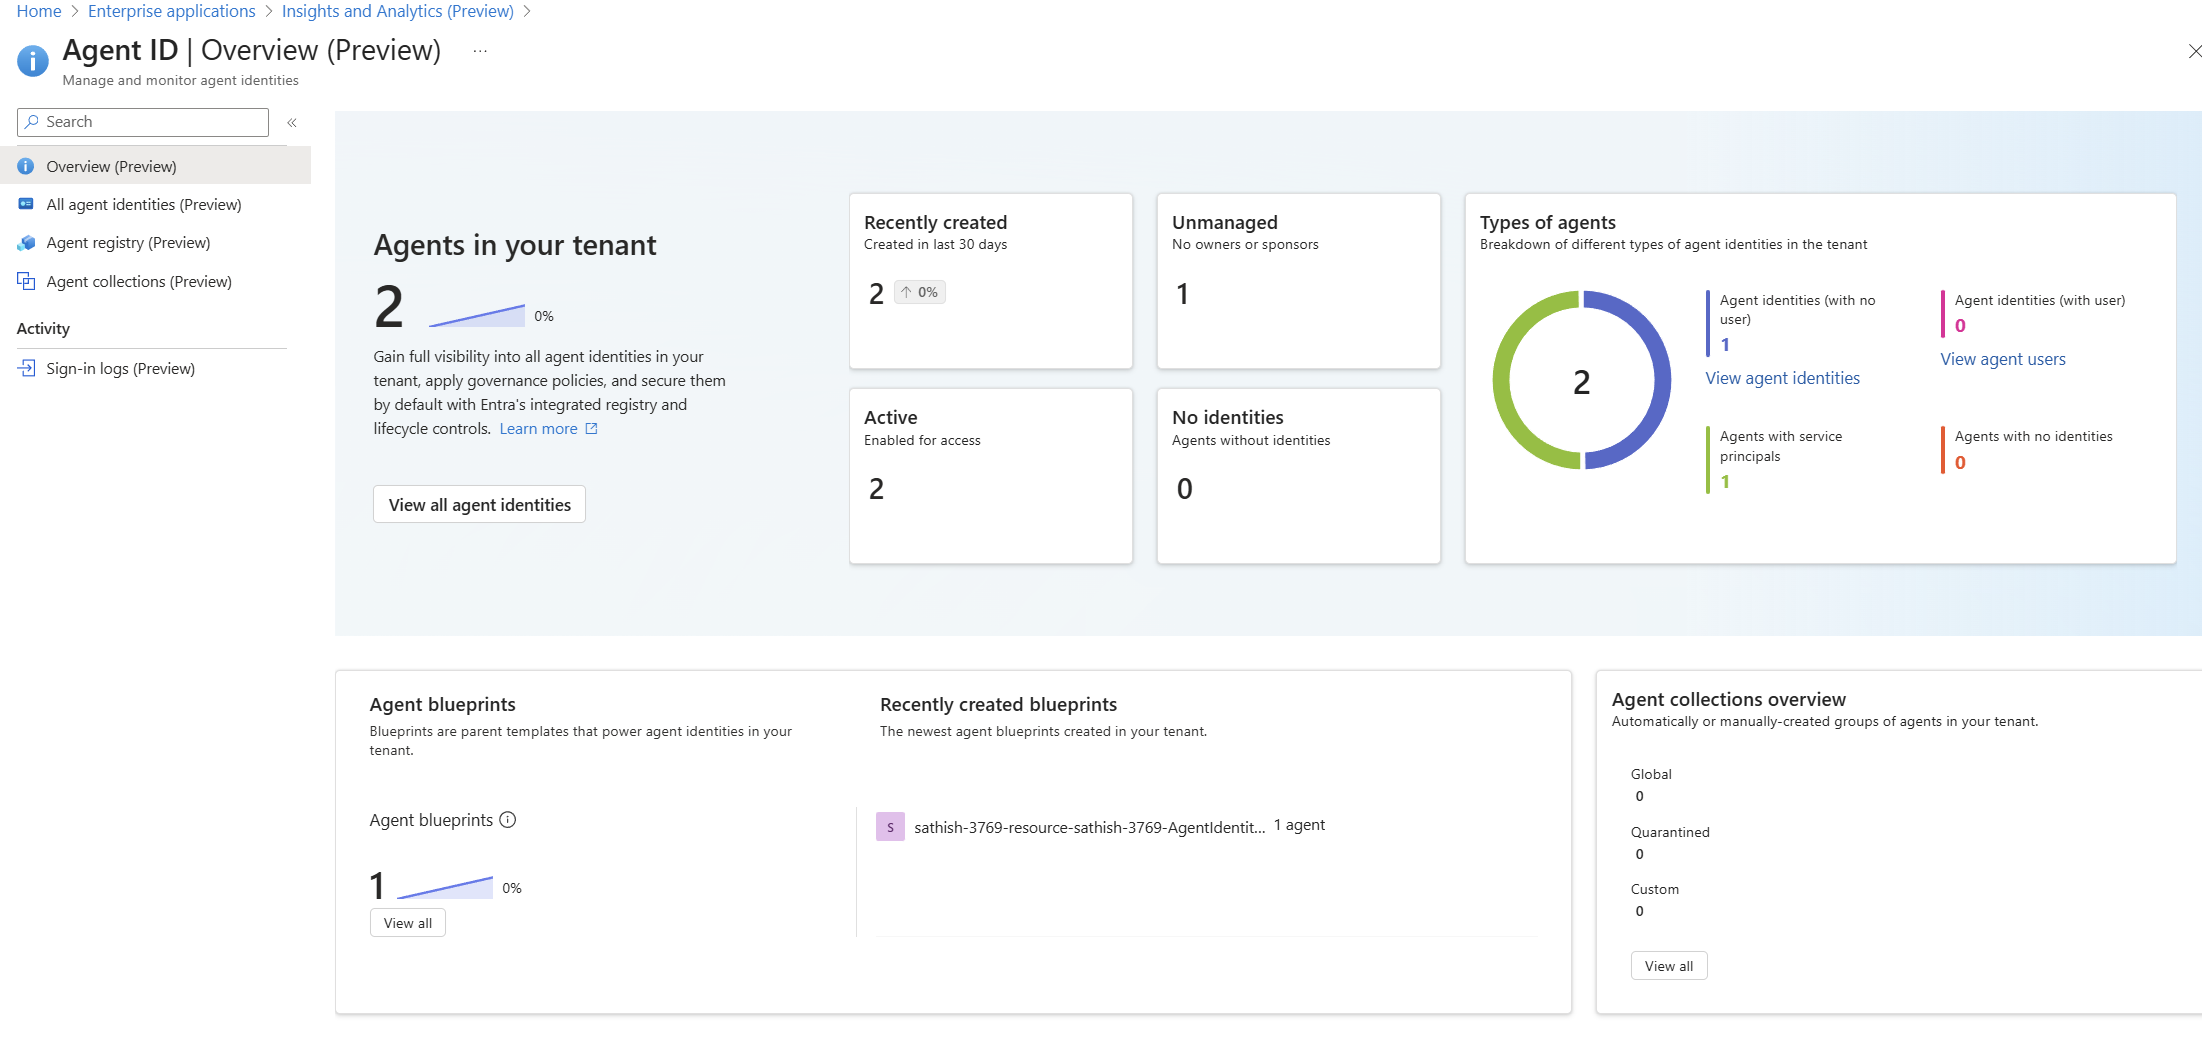
Agent ID Overview (Preview) dashboard showing agent counts, status, types, and blueprints: high-level posture of agents, identities, blueprints, and collections
Azure AI Agent Service allows you to create, deploy, and manage AI agents that can perform various tasks. This service leverages powerful AI models to enable agents to perform a wide range of tasks, from answering queries to automating complex workflows. With its user-friendly interface and robust infrastructure, Azure AI Agent Service makes it easy for developers to build intelligent agents that can enhance applications and improve productivity.
This guide will walk you through the steps to set up and run your first agent with the help of Azure AI agent service.
Prerequisites:
An Azure subscription.
You need a GitHub Account.
Basic knowledge of PowerShell and Python.
So first step is to setup your workspace in the GitHUb
GitHub Codespaces: A Convenient Cloud-Based Development Environment
GitHub Codespaces offers a virtual machine in the cloud, providing a clean environment with all necessary prerequisites pre-installed. This makes it incredibly easy to set up and run your code, even on a standard laptop without high-end specifications.
Key Features:
Cloud-Based Computation: All computations are performed in the cloud, allowing you to work efficiently on a standard laptop.
Easy Setup: Setting up Codespaces is straightforward and quick, making it accessible for developers of all levels.